
Parts Catalog
Page 1
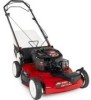
Original Instructions (EN) Form No. 3365-712 Rev A 22in Recycler® Lawn Mower Model No. 20330-Serial No. 310008918 and Up Parts Catalog Register at www.Toro.com.
Original Instructions (EN) Form No. 3365-712 Rev A 22in Recycler® Lawn Mower Model No. 20330-Serial No. 310008918 and Up Parts Catalog Register at www.Toro.com.
Operation Manual
Page 1
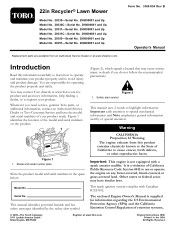
...and serial numbers on any forest-covered, brush-covered, or grass-covered land. Figure 1 identifies the location of emission systems, © 2008-The Toro® Company 8111 Lyndale Avenue South Bloomington, MN 55420 Register at www.shoptoro.com. Warning Figure 1 1. Figure 2 1. Safety alert symbol This ...model and serial numbers of your product ready. This spark ignition system complies with a spark arrester muffler. 22in Recycler® Lawn Mower Model No. 20330-Serial No. 290000001 and Up Model No. 20330C-Serial No. 290000001 and Up Model No. 20331-Serial No. 290000001 and Up...
...and serial numbers on any forest-covered, brush-covered, or grass-covered land. Figure 1 identifies the location of emission systems, © 2008-The Toro® Company 8111 Lyndale Avenue South Bloomington, MN 55420 Register at www.shoptoro.com. Warning Figure 1 1. Figure 2 1. Safety alert symbol This ...model and serial numbers of your product ready. This spark ignition system complies with a spark arrester muffler. 22in Recycler® Lawn Mower Model No. 20330-Serial No. 290000001 and Up Model No. 20330C-Serial No. 290000001 and Up Model No. 20331-Serial No. 290000001 and Up...
Operation Manual
Page 2
...instructions could be ordered through the engine manufacturer. Always be significantly lower. Keep clear of the discharge opening at the time of lawn mower will be sure of accessories. This cutting machine can result in the manual(s) before operating. Stop machine if anyone . Always wear...injury hazards. Improperly using or maintaining this symbol to observe the following instructions have been adapted from the ANSI/OPEI standard B71.1-2003. walk; The safety alert symbol (Figure 2) is clear of objects such as rocks, wire, toys, etc., which can amputate hands and...
...instructions could be ordered through the engine manufacturer. Always be significantly lower. Keep clear of the discharge opening at the time of lawn mower will be sure of accessories. This cutting machine can result in the manual(s) before operating. Stop machine if anyone . Always wear...injury hazards. Improperly using or maintaining this symbol to observe the following instructions have been adapted from the ANSI/OPEI standard B71.1-2003. walk; The safety alert symbol (Figure 2) is clear of objects such as rocks, wire, toys, etc., which can amputate hands and...
Operation Manual
Page 3
...other debris build-up oil or fuel spillage and remove any adjustments or repairs with manufacturer's recommended parts, when necessary. • Mower blades are often attracted to prevent unintended starting . • Never make any fuel-soaked debris. Do not run the engine indoors...-open flame, spark, or pilot light such as necessary. 3 Children are sharp. Allow engine to cool before filling. • Remove gas-powered equipment from your view of grass, leaves, or other appliances. • Never fill containers inside a vehicle or on the ground. General Service...
...other debris build-up oil or fuel spillage and remove any adjustments or repairs with manufacturer's recommended parts, when necessary. • Mower blades are often attracted to prevent unintended starting . • Never make any fuel-soaked debris. Do not run the engine indoors...-open flame, spark, or pilot light such as necessary. 3 Children are sharp. Allow engine to cool before filling. • Remove gas-powered equipment from your view of grass, leaves, or other appliances. • Never fill containers inside a vehicle or on the ground. General Service...
Operation Manual
Page 4
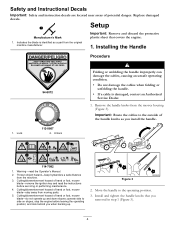
...knobs that covers the engine. 1. Safety and Instructional Decals Important: Safety and instruction decals are located near areas of hand or foot, mower blade-stay away from moving parts. 5. Installing the Handle Procedure 94-8072 1. Lock 112-8867 2. stop the engine before servicing or...the cables to the outside of the handle knobs as a part from the original machine manufacturer. Cutting/dismemberment hazard of hand or foot, mower blade-remove the ignition key and read the Operator's Manual. 2. Remove the handle knobs from the machine. 3. Setup Manufacturer's Mark 1....
...knobs that covers the engine. 1. Safety and Instructional Decals Important: Safety and instruction decals are located near areas of hand or foot, mower blade-stay away from moving parts. 5. Installing the Handle Procedure 94-8072 1. Lock 112-8867 2. stop the engine before servicing or...the cables to the outside of the handle knobs as a part from the original machine manufacturer. Cutting/dismemberment hazard of hand or foot, mower blade-remove the ignition key and read the Operator's Manual. 2. Remove the handle knobs from the machine. 3. Setup Manufacturer's Mark 1....
Operation Manual
Page 5
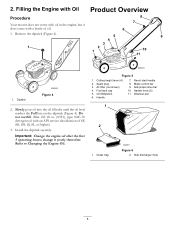
Filling the Engine with Oil Product Overview Procedure Your mower does not come with oil in the engine, but it yearly thereafter. Oil fill/dipstick 6. Refer to Changing the Engine Oil. 1. Fuel tank cap 5. Recoil ...
Filling the Engine with Oil Product Overview Procedure Your mower does not come with oil in the engine, but it yearly thereafter. Oil fill/dipstick 6. Refer to Changing the Engine Oil. 1. Fuel tank cap 5. Recoil ...
Operation Manual
Page 6
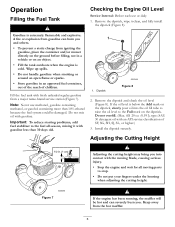
... not overfill. (Max. Install the dipstick securely. Fill the fuel tank with fresh unleaded regular gasoline from igniting the gasoline, place the container and/or mower directly on the dipstick. Do not mix oil with gasoline less than 10% ethanol because the fuel system could be hot and can burn you...
... not overfill. (Max. Install the dipstick securely. Fill the fuel tank with fresh unleaded regular gasoline from igniting the gasoline, place the container and/or mower directly on the dipstick. Do not mix oil with gasoline less than 10% ethanol because the fuel system could be hot and can burn you...
Operation Manual
Page 7
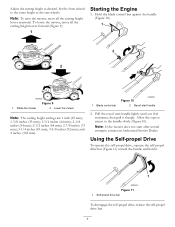
Adjust the cutting height as the rear wheels. Starting the Engine 1. Raise the mower Figure 9 2. Lower the mower Note: The cutting height settings are 1 inch (25 mm); 1-3/8 inches (35 mm); 1-3/4 inches (44 mm); 2-1/8 inches (54 mm); 2-1/2 inches (64 mm); 2-7/8 inches (73 mm);...Allow the rope to return to the same height as desired. Note: To raise the mower, move all the cutting height levers rearward. Recoil start after several attempts, contact an Authorized Service Dealer. Set the front wheels to the handle slowly (Figure 10). Blade control bar Figure 10 2. Using the Self-...
Adjust the cutting height as the rear wheels. Starting the Engine 1. Raise the mower Figure 9 2. Lower the mower Note: The cutting height settings are 1 inch (25 mm); 1-3/8 inches (35 mm); 1-3/4 inches (44 mm); 2-1/8 inches (54 mm); 2-1/2 inches (64 mm); 2-7/8 inches (73 mm);...Allow the rope to return to the same height as desired. Note: To raise the mower, move all the cutting height levers rearward. Recoil start after several attempts, contact an Authorized Service Dealer. Set the front wheels to the handle slowly (Figure 10). Blade control bar Figure 10 2. Using the Self-...
Operation Manual
Page 8
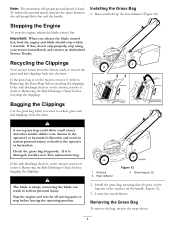
...be thrown in the operator's or bystander's direction and result in serious personal injury. Notches 2. If the side discharge chute is damaged, install a new Toro replacement bag. Check the grass bag frequently. Grass bag pin (2) 2. Installing the Grass Bag 1. Raise and hold up the rear deflector (Figure 12...). The blade is fixed. Install the grass bag, ensuring that the pins on the bag rest in the notches on the mower, remove it is on the handle (Figure 12). 3. A worn grass bag could allow small stones and other similar debris to recycle the ...
...be thrown in the operator's or bystander's direction and result in serious personal injury. Notches 2. If the side discharge chute is damaged, install a new Toro replacement bag. Check the grass bag frequently. Grass bag pin (2) 2. Installing the Grass Bag 1. Raise and hold up the rear deflector (Figure 12...). The blade is fixed. Install the grass bag, ensuring that the pins on the bag rest in the notches on the mower, remove it is on the handle (Figure 12). 3. A worn grass bag could allow small stones and other similar debris to recycle the ...
Operation Manual
Page 9
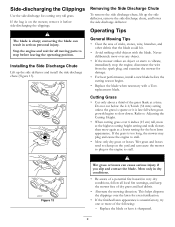
...to Adjusting the Cutting Height. • When cutting grass over 6 inches (15 cm) tall, mow at the highest cutting height setting and walk slower; Installing the Side Discharge Chute Lift up the side deflector, remove the side discharge chute, and lower the side discharge deflector. Cutting Grass...Clippings Use the side discharge for all local fire warnings, and keep the mower free of sticks, stones, wire, branches, and other debris that the blade could hit. • Avoid striking solid objects with a Toro replacement blade. Stop the engine and wait for cutting very tall grass. ...
...to Adjusting the Cutting Height. • When cutting grass over 6 inches (15 cm) tall, mow at the highest cutting height setting and walk slower; Installing the Side Discharge Chute Lift up the side deflector, remove the side discharge chute, and lower the side discharge deflector. Cutting Grass...Clippings Use the side discharge for all local fire warnings, and keep the mower free of sticks, stones, wire, branches, and other debris that the blade could hit. • Avoid striking solid objects with a Toro replacement blade. Stop the engine and wait for cutting very tall grass. ...
Operation Manual
Page 10
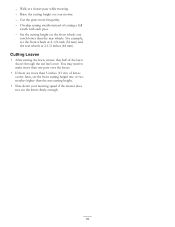
... height. • Slow down your mower. - You may need to make more than one pass over the leaves. • If there are more frequently. - Overlap cutting swaths instead of leaves on the lawn, set the front wheels at 2-1/8-inch (54 mm) and the rear wheels at a slower pace while mowing. ... the leaves finely enough. 10 Set the cutting height on your mowing speed if the mower does not cut leaf cover. - Raise the cutting height on the front wheels one or two notches higher than the rear wheels. Walk at 2-1/2 inches (64 mm). Cut the grass more than 5 inches (13 cm) of...
... height. • Slow down your mower. - You may need to make more than one pass over the leaves. • If there are more frequently. - Overlap cutting swaths instead of leaves on the lawn, set the front wheels at 2-1/8-inch (54 mm) and the rear wheels at a slower pace while mowing. ... the leaves finely enough. 10 Set the cutting height on your mowing speed if the mower does not cut leaf cover. - Raise the cutting height on the front wheels one or two notches higher than the rear wheels. Walk at 2-1/2 inches (64 mm). Cut the grass more than 5 inches (13 cm) of...
Operation Manual
Page 11
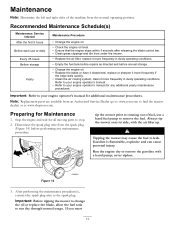
... operator's manual for all moving parts to your engine operator's manual for Maintenance 1. tip the mower prior to running out of the machine from an Authorized Service Dealer (go to www.toro.com to leak. Gasoline is flammable, explosive and can cause personal injury. never siphon. Figure ...14 3. After performing the maintenance procedure(s), connect the spark plug wire to run dry through normal usage. Important: Before tipping the mower to change the oil or...
... operator's manual for all moving parts to your engine operator's manual for Maintenance 1. tip the mower prior to running out of the machine from an Authorized Service Dealer (go to www.toro.com to leak. Gasoline is flammable, explosive and can cause personal injury. never siphon. Figure ...14 3. After performing the maintenance procedure(s), connect the spark plug wire to run dry through normal usage. Important: Before tipping the mower to change the oil or...
Operation Manual
Page 12
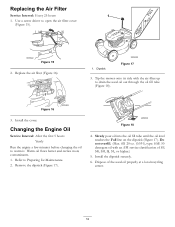
.... (Max. fill: 20 oz. (0.59 l), type: SAE 30 detergent oil with the air filter up to warm it. Figure 15 2. Install the cover. Tip the mower onto its side with an API service classification of the used oil out through the oil fill tube (Figure 18). Replace the air filter (Figure...
.... (Max. fill: 20 oz. (0.59 l), type: SAE 30 detergent oil with the air filter up to warm it. Figure 15 2. Install the cover. Tip the mower onto its side with an API service classification of the used oil out through the oil fill tube (Figure 18). Replace the air filter (Figure...

Operation Manual
Page 13
... procedure, contact an Authorized Service Dealer. Examine the blade whenever you do not have it sharpened and balanced, or replace it immediately. Tip the mower onto its side with a block of the blade to hold the blade steady (Figure 19). Use a torque wrench to tighten the blade bolt ... difficult to Preparing for Maintenance. 2. If the blade is damaged or cracked, replace it . If you run out of wood to point toward the mower housing. 6. Figure 20 Important: Position the curved ends of wood, put your weight behind the ratchet or wrench and tighten the bolt securely. Remove...
... procedure, contact an Authorized Service Dealer. Examine the blade whenever you do not have it sharpened and balanced, or replace it immediately. Tip the mower onto its side with a block of the blade to hold the blade steady (Figure 19). Use a torque wrench to tighten the blade bolt ... difficult to Preparing for Maintenance. 2. If the blade is damaged or cracked, replace it . If you run out of wood to point toward the mower housing. 6. Figure 20 Important: Position the curved ends of wood, put your weight behind the ratchet or wrench and tighten the bolt securely. Remove...
Operation Manual
Page 14
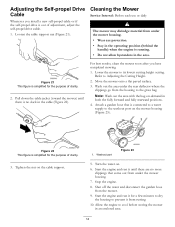
... Figure 22 This figure is simplified for the purpose of clarity. 2. Washout port Figure 23 5. Stop the engine. 8. For best results, clean the mower soon after you install a new self-propel cable or if the self-propel drive is running. • Do not allow bystanders in both the fully...is simplified for a few minutes to dry the housing to prevent it until there is connected to a water supply to cool before storing the mower in the operating position (behind the handle) when the engine is out of clarity. 3. Adjusting the Self-propel Drive Cable Whenever you have completed...
... Figure 22 This figure is simplified for the purpose of clarity. 2. Washout port Figure 23 5. Stop the engine. 8. For best results, clean the mower soon after you install a new self-propel cable or if the self-propel drive is running. • Do not allow bystanders in both the fully...is simplified for a few minutes to dry the housing to prevent it until there is connected to a water supply to cool before storing the mower in the operating position (behind the handle) when the engine is out of clarity. 3. Adjusting the Self-propel Drive Cable Whenever you have completed...
Operation Manual
Page 15
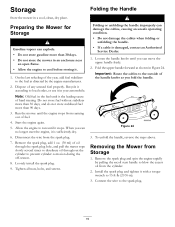
... the handle knobs as shown in an enclosure near an open flame. • Allow the engine to cool before storing it stops. Removing the Mower from the spark plug. 7. Start the engine again. 5. Folding or unfolding the handle improperly can explode. • Do not store gasoline more...the handle knobs until the engine stops from the cylinder. 2. Disconnect the wire from Storage 1. Storage Folding the Handle Store the mower in your automobile. Run the mower until you can move the upper handle freely. 2. On the last refueling of the year, add fuel stabilizer to blow the ...
... the handle knobs as shown in an enclosure near an open flame. • Allow the engine to cool before storing it stops. Removing the Mower from the spark plug. 7. Start the engine again. 5. Folding or unfolding the handle improperly can explode. • Do not store gasoline more...the handle knobs until the engine stops from the cylinder. 2. Disconnect the wire from Storage 1. Storage Folding the Handle Store the mower in your automobile. Run the mower until you can move the upper handle freely. 2. On the last refueling of the year, add fuel stabilizer to blow the ...
Operation Manual
Page 16
...64257;x it free of repairs under The Toro Total Coverage Guarantee The Toro Company and its affiliate, Toro Warranty Company, pursuant to an agreement between them , jointly guarantee that your Toro Product contains a defect in Recycler® walk power mowers. This warranty gives you specific...components, and drive axles. Owner Responsibilities You must pay transportation costs. or call the numbers listed in Recycler® walk power mowers and their Toro Distributor (Dealer) to an agreement between them , jointly promise to repair any period of non-use over one ...
...64257;x it free of repairs under The Toro Total Coverage Guarantee The Toro Company and its affiliate, Toro Warranty Company, pursuant to an agreement between them , jointly guarantee that your Toro Product contains a defect in Recycler® walk power mowers. This warranty gives you specific...components, and drive axles. Owner Responsibilities You must pay transportation costs. or call the numbers listed in Recycler® walk power mowers and their Toro Distributor (Dealer) to an agreement between them , jointly promise to repair any period of non-use over one ...

Service Manual
Page 1
WALK BEHIND POWER MOWER DRIVE SYSTEMS SERVICE MANUAL
WALK BEHIND POWER MOWER DRIVE SYSTEMS SERVICE MANUAL
Service Manual
Page 3
This book contains material covering the Toro and Lawn-Boy Walk Behind Mower Drive Systems models from 1990 through 2006, and may be specified for Toro servicing dealers. If you will find this manual a valuable addition to change product specifications or this manual without notice. ABOUT THIS MANUAL ... expressly for use on products built after 2006 that the reader has basic mechanical knowledge and skills. Copyright© All Rights Reserved ©2006 The Toro Company We are similar in this manual, please contact us at the following address: The...
This book contains material covering the Toro and Lawn-Boy Walk Behind Mower Drive Systems models from 1990 through 2006, and may be specified for Toro servicing dealers. If you will find this manual a valuable addition to change product specifications or this manual without notice. ABOUT THIS MANUAL ... expressly for use on products built after 2006 that the reader has basic mechanical knowledge and skills. Copyright© All Rights Reserved ©2006 The Toro Company We are similar in this manual, please contact us at the following address: The...

Service Manual
Page 5
...-Boy Sens-a-Speed 7-9 Belt Replacement Mowers with Toro Blade Brake Clutch 8-3 Mowers with Toro Blade Override System 8-3 Zone start 21" Rear Wheel Drive Toro & Lawn-Boy (except Insight 8-2 Zone start 22" Toro Rear Wheel Drive 3-10 Zone start 22" Toro Front Wheel Drive 3-5 Lawn-Boy Insight Zone... Easy Stride transmission 2-3 22" steel deck transmission, Toro and Lawn-Boy 3-10 21" Lawn-Boy Insight 3-20 Transmission Internal Repair 3 speed transmission 4-6 Spur/Bevel gear transmission 2-4 Bevel gear transmission 3-16 Wheel Clutch Troubleshooting & Repair Rocking Key style 5-2 Spring ...
...-Boy Sens-a-Speed 7-9 Belt Replacement Mowers with Toro Blade Brake Clutch 8-3 Mowers with Toro Blade Override System 8-3 Zone start 21" Rear Wheel Drive Toro & Lawn-Boy (except Insight 8-2 Zone start 22" Toro Rear Wheel Drive 3-10 Zone start 22" Toro Front Wheel Drive 3-5 Lawn-Boy Insight Zone... Easy Stride transmission 2-3 22" steel deck transmission, Toro and Lawn-Boy 3-10 21" Lawn-Boy Insight 3-20 Transmission Internal Repair 3 speed transmission 4-6 Spur/Bevel gear transmission 2-4 Bevel gear transmission 3-16 Wheel Clutch Troubleshooting & Repair Rocking Key style 5-2 Spring ...


