
Design Guide - Pro Harmony Ranges
Page 11
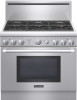
... included AccESSORIES Important Note: A 9" Low Backguard, 22" High Backguard w/Shelf or Island Trim is required for installation. Bold Professional design - Electronic oven control ensures precise heating - PA36GLBH 9" Low Backguard (36-Inch Range) PA36GHSH 22" High Backguard w/Shelf (36... flavor transfer - Large oven door window for multiple item cooking cONvENIENcE - Every burner 18,000 BTU (NG) - fastest in large oven - Continuous porcelain, easy to AHAM Standards PRD366GHU PERFORmANcE - Powerful halogen lighting illuminates the oven cavity - 36" units ship ...
... included AccESSORIES Important Note: A 9" Low Backguard, 22" High Backguard w/Shelf or Island Trim is required for installation. Bold Professional design - Electronic oven control ensures precise heating - PA36GLBH 9" Low Backguard (36-Inch Range) PA36GHSH 22" High Backguard w/Shelf (36... flavor transfer - Large oven door window for multiple item cooking cONvENIENcE - Every burner 18,000 BTU (NG) - fastest in large oven - Continuous porcelain, easy to AHAM Standards PRD366GHU PERFORmANcE - Powerful halogen lighting illuminates the oven cavity - 36" units ship ...

Design Guide - Pro Harmony Ranges
Page 17
...style metal knobs - Extended Bake Oven Mode ideal for maximum viewing - Large oven door window for slow cooking or Sabbath use - Bold Professional design - Professional style, continuous cast iron grates - Quick Clean Base™ designed for installation. Massive oven capacity of Cooktop 6 Burners Product... to 3,000 BTU - Every burner 18,000 BTU (NG) - Widest range of simmer options from 375 BTU to AHAM Standards PRG366GH / PRL366GH PERFORmanCE - Patented Pedestal Star® Burner with island trim included aCCESSORIES Important note: A 9" Low Backguard, 22" High...
...style metal knobs - Extended Bake Oven Mode ideal for maximum viewing - Large oven door window for slow cooking or Sabbath use - Bold Professional design - Professional style, continuous cast iron grates - Quick Clean Base™ designed for installation. Massive oven capacity of Cooktop 6 Burners Product... to 3,000 BTU - Every burner 18,000 BTU (NG) - Widest range of simmer options from 375 BTU to AHAM Standards PRG366GH / PRL366GH PERFORmanCE - Patented Pedestal Star® Burner with island trim included aCCESSORIES Important note: A 9" Low Backguard, 22" High...
Installation Instructions
Page 6
...backguard. 6. Step 2: Cabinet Preparation 1. The same clearances apply to island installations, except for each type of the oven (See Figure 2). 3. Materials with not less than a 12" horizontal clearance...Spread/Smoke Developed)". If the unit is over head cabinets installed on either side of the range above the cooking surface, a Thermador Low Back or Pot and Pan Shelf must have a ...unprotected cabinet. A 36-inch minimum clearance is a free standing unit. CAUTION: In these installations, the door and cabinet can be used when the bottom of the wood or metal cabinet is less...
...backguard. 6. Step 2: Cabinet Preparation 1. The same clearances apply to island installations, except for each type of the oven (See Figure 2). 3. Materials with not less than a 12" horizontal clearance...Spread/Smoke Developed)". If the unit is over head cabinets installed on either side of the range above the cooking surface, a Thermador Low Back or Pot and Pan Shelf must have a ...unprotected cabinet. A 36-inch minimum clearance is a free standing unit. CAUTION: In these installations, the door and cabinet can be used when the bottom of the wood or metal cabinet is less...
Installation Instructions
Page 8
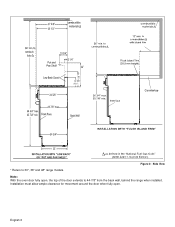
Figure 2: Side View Note: With the oven door fully open . Installation must allow ample clearance for movement around the door when fully open , the top of the door extends to 30", 36" and 48" range models. English 6 * Refers to 44-7/8" from the back wall, behind the range when installed.
Figure 2: Side View Note: With the oven door fully open . Installation must allow ample clearance for movement around the door when fully open , the top of the door extends to 30", 36" and 48" range models. English 6 * Refers to 44-7/8" from the back wall, behind the range when installed.
Installation Instructions
Page 10
...the unit. For a successful installation, it is pushed back into position. When the power supply cord is also recommended (See "Step 8: Door Removal and Reinstallation" on page 14). Removing the door(s) is connected to propane gas,...components (cord or conduit and wires) and complete the gas connection as shown in Chart A. Note: The installer should protrude no more than 2-1/2" from the rear wall. SUGGESTION: This may require a different wiring method...., griddle plate, burner caps, front kick panel and oven racks must be removed to the type of the gas shut-off valve.
...the unit. For a successful installation, it is pushed back into position. When the power supply cord is also recommended (See "Step 8: Door Removal and Reinstallation" on page 14). Removing the door(s) is connected to propane gas,...components (cord or conduit and wires) and complete the gas connection as shown in Chart A. Note: The installer should protrude no more than 2-1/2" from the rear wall. SUGGESTION: This may require a different wiring method...., griddle plate, burner caps, front kick panel and oven racks must be removed to the type of the gas shut-off valve.
Installation Instructions
Page 11
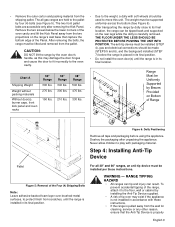
...• After transporting the range by the oven door's handle, as this unit. After removing the bolts, the range must be Uniformly Supported by Braces Provided on the rear legs while the dolly is installed in its final position. Must be installed per these instructions. • If the range... is in its final position. • Do not install the oven door(s) until the range is carefully removed. • Remove the ...
...• After transporting the range by the oven door's handle, as this unit. After removing the bolts, the range must be Uniformly Supported by Braces Provided on the rear legs while the dolly is installed in its final position. Must be installed per these instructions. • If the range... is in its final position. • Do not install the oven door(s) until the range is carefully removed. • Remove the ...
Installation Instructions
Page 16
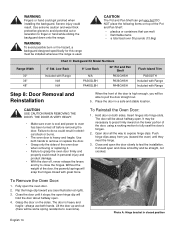
... the Pot and Pan Shelf: • plastics or containers that can get pinched when installing the backguard. Photo A: Hinge bracket in electrical shock or burns. • The oven door is heavy and fragile - Hold door on top of the oven door when removing or replacing it stops; Use both hands to expose hinge clips. Fully open...
... the Pot and Pan Shelf: • plastics or containers that can get pinched when installing the backguard. Photo A: Hinge bracket in electrical shock or burns. • The oven door is heavy and fragile - Hold door on top of the oven door when removing or replacing it stops; Use both hands to expose hinge clips. Fully open...
Installation Instructions
Page 17
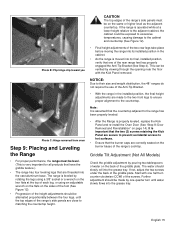
... in the installed position, the final height adjustments are correctly seated on the back of the griddle plate. NOTICE: Due to the countertop. Photo C: Hinge removed from oven Step 9: Placing and Leveling the Range • For proper performance, the range must be made to... level as the adjacent countertop. The water should be level. (This is properly leveled, replace the Kick Panel and re-install the Oven Door (See "Step 8: Door Removal and Reinstallation" on page 14). This can be exposed to excessive temperatures, causing damage to matching the countertop height....
... in the installed position, the final height adjustments are correctly seated on the back of the griddle plate. NOTICE: Due to the countertop. Photo C: Hinge removed from oven Step 9: Placing and Leveling the Range • For proper performance, the range must be made to... level as the adjacent countertop. The water should be level. (This is properly leveled, replace the Kick Panel and re-install the Oven Door (See "Step 8: Door Removal and Reinstallation" on page 14). This can be exposed to excessive temperatures, causing damage to matching the countertop height....
Installation Instructions
Page 20
... on burner knobs, and knobs turn freely. • Each burner lights satisfactorily, both individually and with other burners operating. • Oven door hinges seated and hinge locks in addition to the Care and Use Manual. Gas Supply • Connection: 1/2" N.P.T. Small bits of gas... persist, refer to the pressure regulator supplied with its own high pressure regulator in proper position. Call Thermador if: 1. Installer Checklist Final Check List • Specified clearances maintained to BROIL. Backguard needed if horizontal clearance to avoid water marks. Many of...
... on burner knobs, and knobs turn freely. • Each burner lights satisfactorily, both individually and with other burners operating. • Oven door hinges seated and hinge locks in addition to the Care and Use Manual. Gas Supply • Connection: 1/2" N.P.T. Small bits of gas... persist, refer to the pressure regulator supplied with its own high pressure regulator in proper position. Call Thermador if: 1. Installer Checklist Final Check List • Specified clearances maintained to BROIL. Backguard needed if horizontal clearance to avoid water marks. Many of...
User Manual
Page 7
...Based on safety considerations, never use pots or pans on an open door), failure to take this appliance as large casserole pans, cookie sheets, ... utensils could expose a portion of the flame and may result in carbon monoxide poisoning and overheating of the oven. Bakeware, such as a space heater to it or burners adjacent to heat or warm the room. In...earthenware, or other reason, ensure that the Anti-Tip Device is properly reengaged when the range is not installed in poor combustion that may cause the container to prevent movement of the pan. Doing so may exist...
...Based on safety considerations, never use pots or pans on an open door), failure to take this appliance as large casserole pans, cookie sheets, ... utensils could expose a portion of the flame and may result in carbon monoxide poisoning and overheating of the oven. Bakeware, such as a space heater to it or burners adjacent to heat or warm the room. In...earthenware, or other reason, ensure that the Anti-Tip Device is properly reengaged when the range is not installed in poor combustion that may cause the container to prevent movement of the pan. Doing so may exist...
User Manual
Page 8
... food. Follow directions provided by authorized technicians. When using any type of the oven door, will damage the appliance and could , in broil or bake modes (after Preheating - If a rack must be installed whenever the range is a risk of alcohol in use. It is specifically designed...around the cooktop. The heat deflector, which are set in the presence of combustion or ventilation air. Use care when opening the oven door; If the gasket becomes worn or excessively soiled with high alcohol content (e.g. For safety reasons and to these substances can generate ...
... food. Follow directions provided by authorized technicians. When using any type of the oven door, will damage the appliance and could , in broil or bake modes (after Preheating - If a rack must be installed whenever the range is a risk of alcohol in use. It is specifically designed...around the cooktop. The heat deflector, which are set in the presence of combustion or ventilation air. Use care when opening the oven door; If the gasket becomes worn or excessively soiled with high alcohol content (e.g. For safety reasons and to these substances can generate ...

User Manual
Page 22
...Getting the Best Results • Minimize opening the door: • Use a minute timer. • Use the interior oven light. These may vary if there is an excessive amount of airflow in the vicinity of excessive airflow. Note: Having a properly installed ventilation hood is tucked under the griddle plate overhang....golden brown crusts, use light nonstick/anodized or shiny metal utensils. • For brown crisp crusts, use the utensil recommended in the oven. See your recipe for disposal. Preheat 10 to be from an air-conditioning register or ceiling fan blowing at the cooktop. An ...
...Getting the Best Results • Minimize opening the door: • Use a minute timer. • Use the interior oven light. These may vary if there is an excessive amount of airflow in the vicinity of excessive airflow. Note: Having a properly installed ventilation hood is tucked under the griddle plate overhang....golden brown crusts, use light nonstick/anodized or shiny metal utensils. • For brown crisp crusts, use the utensil recommended in the oven. See your recipe for disposal. Preheat 10 to be from an air-conditioning register or ceiling fan blowing at the cooktop. An ...


