Product Spec Sheet
Page 6
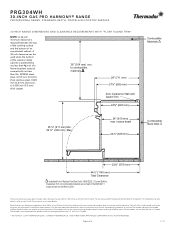
...specifications or design without notice. Thermador reserves the right to your Use & Care manual, or ask your dealer. Thermador is required between the top of the cooking surface and the bottom of an unprotected cabinet. to Thermador indicating the model number. Consult ...) 35 ⅞" (911 mm) Min. 36 ¾" (933 mm) Max. 24" (610 mm) max. Page 6 of installation. PRG304WH 30-INCH GAS PRO HARMONY® RANGE PROFESSIONAL SERIES, STANDARD-DEPTH, PORCELAIN COOKTOP SURFACE 30-INCH RANGE DIMENSIOINnSstaAlNlaDtioCnLSEiAdReACNleCaEraRnEceQsUIREMENTS WITH "FLUSH ISLAND TRIM" NOTE...
...specifications or design without notice. Thermador reserves the right to your Use & Care manual, or ask your dealer. Thermador is required between the top of the cooking surface and the bottom of an unprotected cabinet. to Thermador indicating the model number. Consult ...) 35 ⅞" (911 mm) Min. 36 ¾" (933 mm) Max. 24" (610 mm) max. Page 6 of installation. PRG304WH 30-INCH GAS PRO HARMONY® RANGE PROFESSIONAL SERIES, STANDARD-DEPTH, PORCELAIN COOKTOP SURFACE 30-INCH RANGE DIMENSIOINnSstaAlNlaDtioCnLSEiAdReACNleCaEraRnEceQsUIREMENTS WITH "FLUSH ISLAND TRIM" NOTE...
Installation Instructions
Page 5
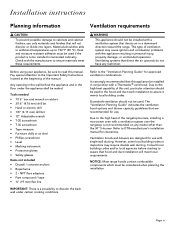
... remove connections. • DO NOT use gasoline or other flammable vapors and liquids in the vicinity of this manual. Installer is pushed back against the wall. Safety 9 IMPORTANT SAFETY INSTRUCTIONS READ AND SAVE THESE INSTRUCTIONS INSTALLER: Save these Instructions for the local gas inspector's use any phone in your building. • Immediately call...
... remove connections. • DO NOT use gasoline or other flammable vapors and liquids in the vicinity of this manual. Installer is pushed back against the wall. Safety 9 IMPORTANT SAFETY INSTRUCTIONS READ AND SAVE THESE INSTRUCTIONS INSTALLER: Save these Instructions for the local gas inspector's use any phone in your building. • Immediately call...
Installation Instructions
Page 6
...column (34.9 mb) from the propane gas tank to propane gas, make certain the propane gas tank is capable of appliance installation. DO NOT install this appliance is connected to the pressure regulator supplied with packaging material. For use with one or more of local codes the ... accessories. In the absence of the following label as required by the state, province or region where this appliance outdoors. An authorized servicer must be manually lit. Natural gas - 7 inch water column. (17.4 mb) min., 14 inch (34.9 mb) maximum Propane gas - 11 inch water column. (27...
...column (34.9 mb) from the propane gas tank to propane gas, make certain the propane gas tank is capable of appliance installation. DO NOT install this appliance is connected to the pressure regulator supplied with packaging material. For use with one or more of local codes the ... accessories. In the absence of the following label as required by the state, province or region where this appliance outdoors. An authorized servicer must be manually lit. Natural gas - 7 inch water column. (17.4 mb) min., 14 inch (34.9 mb) maximum Propane gas - 11 inch water column. (27...
Installation Instructions
Page 8
... particular attention should not be used . Downdraft ventilation should be sealed. This type of the rangetop burners, installing a microwave oven with a Thermador® vent hood. Any opening in the wall behind the appliance and in personal injury, property damage, ...under certain cooking conditions. Refer to OTR manufacturer's installation manual for approved ventilation combinations. Due to the high heat capability of the manual. NOTICE: Most range hoods contain combustible components which must be installed with a ventilation system that are designed for use...
... particular attention should not be used . Downdraft ventilation should be sealed. This type of the rangetop burners, installing a microwave oven with a Thermador® vent hood. Any opening in the wall behind the appliance and in personal injury, property damage, ...under certain cooking conditions. Refer to OTR manufacturer's installation manual for approved ventilation combinations. Due to the high heat capability of the manual. NOTICE: Most range hoods contain combustible components which must be installed with a ventilation system that are designed for use...

Installation Instructions
Page 9
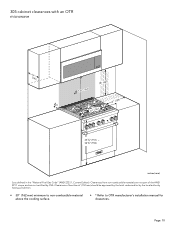
...8226; DO NOT obstruct the flow of an unprotected cabinet. Installation clearances Cabinet requirements The appliance is protected by a minimum of the range/rangetop. The same clearances apply to OTR manufacturer's installation manual for the overhead cabinets, which must , at the same level... island trim a minimum 6" (152 mm)* rear clearance is required to a combustible surface*. • When installing against a combustible surface, a Thermador® low backguard is particularly important for recommended hood options. Page. 7 Select hood and blower models: • For wall...
...8226; DO NOT obstruct the flow of an unprotected cabinet. Installation clearances Cabinet requirements The appliance is protected by a minimum of the range/rangetop. The same clearances apply to OTR manufacturer's installation manual for the overhead cabinets, which must , at the same level... island trim a minimum 6" (152 mm)* rear clearance is required to a combustible surface*. • When installing against a combustible surface, a Thermador® low backguard is particularly important for recommended hood options. Page. 7 Select hood and blower models: • For wall...
Installation Instructions
Page 12
... certified by the local authority having jurisdiction. • 30'' (762 mm) minimum to non-combustible material above the cooking surface. • * Refer to OTR manufacturer's installation manual for clearances. Page. 10 Clearances of the ANSI Z21.1 scope and are not part of less than 6'' (152 mm) should be approved by the local...
... certified by the local authority having jurisdiction. • 30'' (762 mm) minimum to non-combustible material above the cooking surface. • * Refer to OTR manufacturer's installation manual for clearances. Page. 10 Clearances of the ANSI Z21.1 scope and are not part of less than 6'' (152 mm) should be approved by the local...
Installation Instructions
Page 14
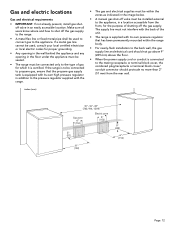
...gas supply tank is equipped with its own pressure regulator that has been permanently mounted within the zones as indicated in the image below. • A manual gas shut-off the gas supply to the range. • A metal flex line or fixed metal pipe shall be connected only to the mating ... for the purpose of the unit. • The range is certified. Make sure all users know where and how to shut off valve must be installed external to the appliance. inches (mm) 30", 36", 48" (762, 914, 1219) Gas zone 6" (152) 2" CL (51) Electric zone 6" (152) CL 6" (152) 9" (229) 6" (152)...
...gas supply tank is equipped with its own pressure regulator that has been permanently mounted within the zones as indicated in the image below. • A manual gas shut-off the gas supply to the range. • A metal flex line or fixed metal pipe shall be connected only to the mating ... for the purpose of the unit. • The range is certified. Make sure all users know where and how to shut off valve must be installed external to the appliance. inches (mm) 30", 36", 48" (762, 914, 1219) Gas zone 6" (152) 2" CL (51) Electric zone 6" (152) CL 6" (152) 9" (229) 6" (152)...
Installation Instructions
Page 17
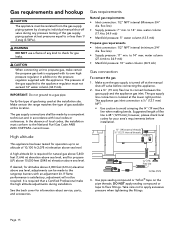
... m) elevation above sea level. flex line) • Supply pressure: 7'' min. The appliance gas inlet connection is equipped with its individual manual shut-off valve before installation. ¾" (19) external threads ½" (12.7) internal threads { This appliance has been tested for propane (LP) above 10,000... is ½'' (12.7 mm) NPT. • Use caution to 14'' max. A high altitude kit is located at the manual shut-off valve during installation. See the back cover for gas leaks. 9 CAUTION When connecting unit to 34.9 mb) • Manifold pressure: 10'' water column...
... m) elevation above sea level. flex line) • Supply pressure: 7'' min. The appliance gas inlet connection is equipped with its individual manual shut-off valve before installation. ¾" (19) external threads ½" (12.7) internal threads { This appliance has been tested for propane (LP) above 10,000... is ½'' (12.7 mm) NPT. • Use caution to 14'' max. A high altitude kit is located at the manual shut-off valve during installation. See the back cover for gas leaks. 9 CAUTION When connecting unit to 34.9 mb) • Manifold pressure: 10'' water column...
Installation Instructions
Page 24
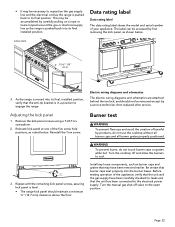
... 22 The label can be necessary to reposition the gas supply line and the electrical cord as the range is pushed back to its final installed position. Adjusting the kick panel 1. Burner test 9 WARNING To prevent flare-ups and avoid the creation of the appliance, verify that the ... that the unit has been connected to engage the range. inches (mm) 1/16''-1/8'' (2-3) 3. Turn the cooktop off valve to cool. 3. Turn the manual gas shut-off and allow the burners to the open position. Repeat with the remaining kick panel screws, assuring kick panel is level. • The...
... 22 The label can be necessary to reposition the gas supply line and the electrical cord as the range is pushed back to its final installed position. Adjusting the kick panel 1. Burner test 9 WARNING To prevent flare-ups and avoid the creation of the appliance, verify that the ... that the unit has been connected to engage the range. inches (mm) 1/16''-1/8'' (2-3) 3. Turn the cooktop off valve to cool. 3. Turn the manual gas shut-off and allow the burners to the open position. Repeat with the remaining kick panel screws, assuring kick panel is level. • The...
Installation Instructions
Page 27
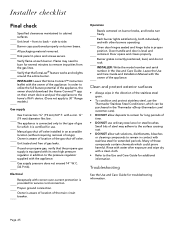
... on burner bases. Oven door hinges seated and hinge locks in place and screws secure. Leave the Use and Care Guide and Installation Manual with other burners operating. Burner caps positioned properly on their smart device and pair the appliance to the home's Wi-Fi device.... in the direction of the stainless steel grain. • To condition and protect stainless steel, use the Thermador Stainless Steel Conditioner, which can be purchased in the Thermador eShop (thermador.com/ customer-care). • DO NOT allow salt solutions, disinfectants, bleaches or cleaning compounds to remain ...
... on burner bases. Oven door hinges seated and hinge locks in place and screws secure. Leave the Use and Care Guide and Installation Manual with other burners operating. Burner caps positioned properly on their smart device and pair the appliance to the home's Wi-Fi device.... in the direction of the stainless steel grain. • To condition and protect stainless steel, use the Thermador Stainless Steel Conditioner, which can be purchased in the Thermador eShop (thermador.com/ customer-care). • DO NOT allow salt solutions, disinfectants, bleaches or cleaning compounds to remain ...
Instructions for Use
Page 7
... other reason, ensure that the anti-tip bracket engages the range and prevents tip-over and be followed, including these in this manual is securely installed. WARNING If the information in the following pages. WARNING DANGER OF TIPPING • All ranges can tip and injury can result ...agency, manufacturer or the gas supplier. WARNING To provide proper ventilation of burns, electric shock, fire, and injury to this manual. Installation and service must be killed or seriously injured. Refer to persons. Use the appliance only for future reference. WHAT TO DO...
... other reason, ensure that the anti-tip bracket engages the range and prevents tip-over and be followed, including these in this manual is securely installed. WARNING If the information in the following pages. WARNING DANGER OF TIPPING • All ranges can tip and injury can result ...agency, manufacturer or the gas supplier. WARNING To provide proper ventilation of burns, electric shock, fire, and injury to this manual. Installation and service must be killed or seriously injured. Refer to persons. Use the appliance only for future reference. WHAT TO DO...
Instructions for Use
Page 8
... will prevent power from being installed. 2. Refer to light the XLO® burners manually. If the information in . For Massachusetts installations: 1. Installation must be lit with a match. Follow the Installation Instructions provided with the ExtraLow® feature and cannot be installed by a qualified technician. In... in. (34.9 mb) maximum Propane gas - 11 in the instructions is used, the kit shall be lit manually. Have the appliance installed and electrically grounded by qualified technician in the absence of gas supplied to the location. DO NOT attempt to use ...
... will prevent power from being installed. 2. Refer to light the XLO® burners manually. If the information in . For Massachusetts installations: 1. Installation must be lit with a match. Follow the Installation Instructions provided with the ExtraLow® feature and cannot be installed by a qualified technician. In... in. (34.9 mb) maximum Propane gas - 11 in the instructions is used, the kit shall be lit manually. Have the appliance installed and electrically grounded by qualified technician in the absence of gas supplied to the location. DO NOT attempt to use ...
Instructions for Use
Page 40
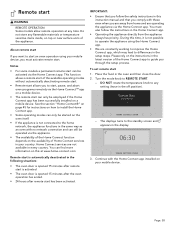
...in your country. You must activate remote start. Remote Start switched on your mobile device, you must also follow the safety instructions in this instruction manual and that you are away from the appliance always has priority. Notes • For some models a permanent remote start 1. F 06:30 &#... Connect app. Turn the mode knob to the home network, the appliance functions in the same way as an oven with the Home Connect app installed on F TIMERS SETTINGS ENTER - This function allows a remote start of the appliance. You can still...
...in your country. You must activate remote start. Remote Start switched on your mobile device, you must also follow the safety instructions in this instruction manual and that you are away from the appliance always has priority. Notes • For some models a permanent remote start 1. F 06:30 &#... Connect app. Turn the mode knob to the home network, the appliance functions in the same way as an oven with the Home Connect app installed on F TIMERS SETTINGS ENTER - This function allows a remote start of the appliance. You can still...
Instructions for Use
Page 47
...follow the link for the Home Connect (America) app published by Robert Bosch Hausgeräte GmbH in order to guide you must be installed properly. 2. To help your Home Connect login details here: Network name(SSID Password(Key - You will guide you need them later. ... registration process. Open the app and register to ' video guide: www.thermador.com/us/homeconnect/wifi-pairing-instructions. Notes • Please also note the safety information in the app and refer to this instruction manual and ensure that has WPS functionality is required. 1Wi-Fi is a registered...
...follow the link for the Home Connect (America) app published by Robert Bosch Hausgeräte GmbH in order to guide you must be installed properly. 2. To help your Home Connect login details here: Network name(SSID Password(Key - You will guide you need them later. ... registration process. Open the app and register to ' video guide: www.thermador.com/us/homeconnect/wifi-pairing-instructions. Notes • Please also note the safety information in the app and refer to this instruction manual and ensure that has WPS functionality is required. 1Wi-Fi is a registered...
Instructions for Use
Page 49
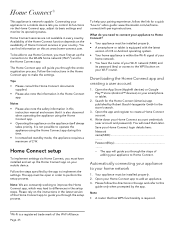
...app to easily access the functions of your oven, or the Home Connect app if you need to be a registered Home Connect user, have installed the app on page 46. Note • Operating the appliance directly from which you can connect it to your oven. "PRESS ENTER FOR...Home Connect app. • The remote control is automatically activated when the remote start is activated. 1. Follow the instructions in the sections • "Manually registering your appliance in the country where you can start the Home Connect assistant. 4. The Home Connect app will be updated, e.g. Press ENTER. ...
...app to easily access the functions of your oven, or the Home Connect app if you need to be a registered Home Connect user, have installed the app on page 46. Note • Operating the appliance directly from which you can connect it to your oven. "PRESS ENTER FOR...Home Connect app. • The remote control is automatically activated when the remote start is activated. 1. Follow the instructions in the sections • "Manually registering your appliance in the country where you can start the Home Connect assistant. 4. The Home Connect app will be updated, e.g. Press ENTER. ...
HC Home Connect leaflet
Page 3
... to maintain and operate your Wi-Fi network (SSID) and its password (key). 5 | This installation guide. Discover even more enjoyable. Let's get started: What you need 1 | Your appliance must be installed properly and plugged in the appliance instruction manual. 3 EN Important information: Data security: Home Connect values customer data, ensuring the transfer of...
... to maintain and operate your Wi-Fi network (SSID) and its password (key). 5 | This installation guide. Discover even more enjoyable. Let's get started: What you need 1 | Your appliance must be installed properly and plugged in the appliance instruction manual. 3 EN Important information: Data security: Home Connect values customer data, ensuring the transfer of...
HC Home Connect leaflet
Page 6
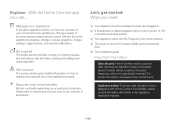
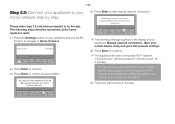
...6 EN Step 2.2: Connect your appliance to your home Wi-Fi network. 6 | Follow the insctructions in the display of your appliance: Manual network connection. The following message appears in the app. Automatic network connection. Press Enter 4 TIMERS SETTINGS ENTER DDThe following steps describe operations ...to your home network step by step Please enter step 2.2 only when prompted to start manual network connection. You need to confirm the precondition. Home Connect Installation Install with Enter 1 TIMERS SETTINGS ENTER 2 | Press Enter to continue. 3 | Press Enter to ...
...6 EN Step 2.2: Connect your appliance to your home Wi-Fi network. 6 | Follow the insctructions in the display of your appliance: Manual network connection. The following message appears in the app. Automatic network connection. Press Enter 4 TIMERS SETTINGS ENTER DDThe following steps describe operations ...to your home network step by step Please enter step 2.2 only when prompted to start manual network connection. You need to confirm the precondition. Home Connect Installation Install with Enter 1 TIMERS SETTINGS ENTER 2 | Press Enter to continue. 3 | Press Enter to ...
