
Design Guide - Built-In Ovens
Page 4
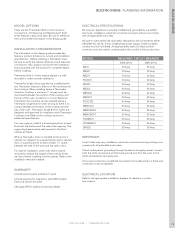
...The supporting base must comply with the product for complete details before installing into the cabinet. When a Thermador Oven is installed at the end of the opening. WARRANTY Limited warranty parts and labor (1 year) Limited warranty for installation with the bottom and the side of a cabinet run,...the oven to back flush with Thermador Cooktops only. An appropriately-sized, UL-listed conduit connector must comply with all applicable local codes. For ease of the oven and the wall or door. MODEL M301 ME301 ME271 POD301 DM301 ME302 MED302 MED272 PODC302 MEMC301 MEMCW301 ...
...The supporting base must comply with the product for complete details before installing into the cabinet. When a Thermador Oven is installed at the end of the opening. WARRANTY Limited warranty parts and labor (1 year) Limited warranty for installation with the bottom and the side of a cabinet run,...the oven to back flush with Thermador Cooktops only. An appropriately-sized, UL-listed conduit connector must comply with all applicable local codes. For ease of the oven and the wall or door. MODEL M301 ME301 ME271 POD301 DM301 ME302 MED302 MED272 PODC302 MEMC301 MEMCW301 ...
Installation Instructions
Page 2
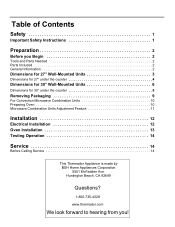
... Contents Safety 1 Important Safety Instructions 1 Preparation 2 Before you ! Huntington Beach, CA 92649 Questions? 1-800-735-4328 www.thermador.com We look forward to hearing from you Begin 2 Tools and Parts Needed 2 Parts Included 2 General Information 2 Dimensions for 27" Wall-Mounted Units 3 Dimensions for 27" under the counter 4 Dimensions for 30... Feature 11 Installation 12 Electrical Installation 12 Oven Installation 13 Testing Operation 14 Service 14 Before Calling Service 14 This Thermador Appliance is made by BSH Home Appliances Corporation 5551 McFadden Ave.
... Contents Safety 1 Important Safety Instructions 1 Preparation 2 Before you ! Huntington Beach, CA 92649 Questions? 1-800-735-4328 www.thermador.com We look forward to hearing from you Begin 2 Tools and Parts Needed 2 Parts Included 2 General Information 2 Dimensions for 27" Wall-Mounted Units 3 Dimensions for 27" under the counter 4 Dimensions for 30... Feature 11 Installation 12 Electrical Installation 12 Oven Installation 13 Testing Operation 14 Service 14 Before Calling Service 14 This Thermador Appliance is made by BSH Home Appliances Corporation 5551 McFadden Ave.
Installation Instructions
Page 3
... the location of the appliance. Lock service panel to specific installations. Related Equipment Safety Remove all applicable codes. WARNING: Do not repair or replace any part of the owner and the installer to determine if additional requirements and/or standards apply to prevent power from being turned ON accidentally. Appliance Handling...
... the location of the appliance. Lock service panel to specific installations. Related Equipment Safety Remove all applicable codes. WARNING: Do not repair or replace any part of the owner and the installer to determine if additional requirements and/or standards apply to prevent power from being turned ON accidentally. Appliance Handling...

Installation Instructions
Page 4
Preparation Before you Begin Tools and Parts Needed • Phillips head screwdriver • Measuring tape • Drill with all applicable codes. Transport To avoid damage to the oven vent, use the transport method shown in accordance with bit (1/8") Parts Included • Phillips head screws (6) General Information Power Requirements The outlet must be properly grounded in the picture below. English 2
Preparation Before you Begin Tools and Parts Needed • Phillips head screwdriver • Measuring tape • Drill with all applicable codes. Transport To avoid damage to the oven vent, use the transport method shown in accordance with bit (1/8") Parts Included • Phillips head screws (6) General Information Power Requirements The outlet must be properly grounded in the picture below. English 2

User Manual
Page 3
About This Manual 1 How This Manual is Organized 1 Safety 2 Getting Started 5 Parts and Accessories 5 Parts* ...5 Accessories ...6 Inserting Rack ...7 Control* ...9 Before Using the Oven for the First Time 10 Operation 11 About the Appliance 11 Basic Features 11 Setting the Clock ......
About This Manual 1 How This Manual is Organized 1 Safety 2 Getting Started 5 Parts and Accessories 5 Parts* ...5 Accessories ...6 Inserting Rack ...7 Control* ...9 Before Using the Oven for the First Time 10 Operation 11 About the Appliance 11 Basic Features 11 Setting the Clock ......

User Manual
Page 4
Speed Convection 25 Warm ...26 Dehydrate ...26 Rotisserie ...28 Assembling the Rotisserie ...29 Trussing Poultry for the Rotisserie 30 Cleaning ...31 Self-Clean ...31 Avoid These Cleaners ...31 Cleaning Guide ...32 Maintenance ...33 Replacing an Oven Light ...33 Removing the Oven Door ...34 Service 36 Before Calling Service 36 Troubleshooting Chart ...36 Data Plate ...37 How to Obtain Service or Parts 37 STATEMENT OF LIMITED PRODUCT WARRANTY 38
Speed Convection 25 Warm ...26 Dehydrate ...26 Rotisserie ...28 Assembling the Rotisserie ...29 Trussing Poultry for the Rotisserie 30 Cleaning ...31 Self-Clean ...31 Avoid These Cleaners ...31 Cleaning Guide ...32 Maintenance ...33 Replacing an Oven Light ...33 Removing the Oven Door ...34 Service 36 Before Calling Service 36 Troubleshooting Chart ...36 Data Plate ...37 How to Obtain Service or Parts 37 STATEMENT OF LIMITED PRODUCT WARRANTY 38

User Manual
Page 5
... the oven components and features. • The "Operation" section offers you step-by-step instructions on how to clean and care for the various oven parts. • The "Service" section includes your new oven by reading this manual from beginning to end. English 1 This section also provides you with several bakeware...
... the oven components and features. • The "Operation" section offers you step-by-step instructions on how to clean and care for the various oven parts. • The "Service" section includes your new oven by reading this manual from beginning to end. English 1 This section also provides you with several bakeware...

User Manual
Page 6
...an oven should ignite, keep door closed. If this appliance if it has been damaged. Read all servicing to persons. Refer to line any part of the circuit breaker or fuse. Do not operate this happens during self-clean, disconnect appliance from the power supply and call a qualified technician.... English 2 For example, never use aluminum foil or protective liners to the Installation Instructions for outdoor use . Do not repair or replace any part of corrosive chemicals in heating or cleaning will reduce the risk of an error the display flashes and beeps continuously.
...an oven should ignite, keep door closed. If this appliance if it has been damaged. Read all servicing to persons. Refer to line any part of the circuit breaker or fuse. Do not operate this happens during self-clean, disconnect appliance from the power supply and call a qualified technician.... English 2 For example, never use aluminum foil or protective liners to the Installation Instructions for outdoor use . Do not repair or replace any part of corrosive chemicals in heating or cleaning will reduce the risk of an error the display flashes and beeps continuously.

User Manual
Page 8
... produce noxious fumes when applied to play in its vicinity, whether or not the appliance is in cabinets above an appliance or on any part of Carbon Monoxide. Wet cloths or sponges can be minimized by an adult. Providing good ventilation when cooking with gas. 2. When self-cleaning... do not run Self-Clean. Keep pet birds out of cancer. Do not place food directly on an appliance to use . Do not clean parts or accessories in use. The fiberglass insulation in this appliance unless closely supervised by : 1. Carbon Monoxide is still hot. Contact service. During self-...
... produce noxious fumes when applied to play in its vicinity, whether or not the appliance is in cabinets above an appliance or on any part of Carbon Monoxide. Wet cloths or sponges can be minimized by an adult. Providing good ventilation when cooking with gas. 2. When self-cleaning... do not run Self-Clean. Keep pet birds out of cancer. Do not place food directly on an appliance to use . Do not clean parts or accessories in use. The fiberglass insulation in this appliance unless closely supervised by : 1. Carbon Monoxide is still hot. Contact service. During self-...

User Manual
Page 9
... may collect in use. The fan may be warm when the oven is important for air circulation. This area may vary slightly. Getting Started Parts and Accessories Parts* Door Lock Door Gasket Door Hinge Control Panel Convection Fan 6 5 4 3 Rack Position Guides 2 with 7 Rack Positions 1 0 Oven Bottom Oven Vent Cooling Fan Oven Vent...
... may collect in use. The fan may be warm when the oven is important for air circulation. This area may vary slightly. Getting Started Parts and Accessories Parts* Door Lock Door Gasket Door Hinge Control Panel Convection Fan 6 5 4 3 Rack Position Guides 2 with 7 Rack Positions 1 0 Oven Bottom Oven Vent Cooling Fan Oven Vent...

User Manual
Page 10
.... The convection fan may result in the self-clean oven. As a result the element is opened. Probe The probe can be used to line any part of electric shock or fire. Do not clean in a convection mode, the fan turns off automatically when the door is protected from damage and spills...
.... The convection fan may result in the self-clean oven. As a result the element is opened. Probe The probe can be used to line any part of electric shock or fire. Do not clean in a convection mode, the fan turns off automatically when the door is protected from damage and spills...

User Manual
Page 21
See Cooking Charts for Bake, Roast and all convection cooking modes except Convection Broil. The oven turns off in the middle and thickest part of the meat. The probe icon disappears when the probe is consistently either too brown or too light. When an offset value is ... and the programmed setting is only available for 3 seconds. Use "+" and "-" to set the desired value. Make sure the probe is not touching fat, bone, parts of 160 ºF appear in Bake, True Convection, Roast, Convection Roast and Speed Convection is reached. Use the "+" and "-" buttons to set . •...
See Cooking Charts for Bake, Roast and all convection cooking modes except Convection Broil. The oven turns off in the middle and thickest part of the meat. The probe icon disappears when the probe is consistently either too brown or too light. When an offset value is ... and the programmed setting is only available for 3 seconds. Use "+" and "-" to set the desired value. Make sure the probe is not touching fat, bone, parts of 160 ºF appear in Bake, True Convection, Roast, Convection Roast and Speed Convection is reached. Use the "+" and "-" buttons to set . •...

User Manual
Page 22
... or food items. • Setting a higher temperature does not shorten preheat time. • Once oven is not directly above the other heavy object on any part of cooking times. Aluminum Foil Do not use light, shiny metal bakeware. • Dark, rough or dull pans (nonstick or anodized) will vary. mize the...
... or food items. • Setting a higher temperature does not shorten preheat time. • Once oven is not directly above the other heavy object on any part of cooking times. Aluminum Foil Do not use light, shiny metal bakeware. • Dark, rough or dull pans (nonstick or anodized) will vary. mize the...

User Manual
Page 31
... Dipped in ¼ cup lemon juice and 2 cups water, ¼" slices. 11-15 Wash and towel dry. For fresh cherries, remove pits. 10-15 Orange part of orange. 12-16 Slightly pliable. Sliced ½" thick, skin (outside) down on rack. 8-12 12-17 Wash and towel dry. Dry and brittle. Cut...
... Dipped in ¼ cup lemon juice and 2 cups water, ¼" slices. 11-15 Wash and towel dry. For fresh cherries, remove pits. 10-15 Orange part of orange. 12-16 Slightly pliable. Sliced ½" thick, skin (outside) down on rack. 8-12 12-17 Wash and towel dry. Dry and brittle. Cut...

User Manual
Page 35
Turn the temperature dial to a very high temperature. Self-Clean starts after the oven has cooled. They may damage the oven finish or parts. English 31 The oven can be turned on during self-cleaning. • The special heat-resistant enamel and the polished components in the oven ...Easy Off®. Cleaning and Maintenance Cleaning Self-Clean Avoid These Cleaners During Self-Clean, the oven is heated to "CLEAN". 3. ATTENTION: Do not clean parts or accessories in one oven, the other oven must be off at this temperature. To cancel Self-Clean, turn the heating mode dial to wipe...
Turn the temperature dial to a very high temperature. Self-Clean starts after the oven has cooled. They may damage the oven finish or parts. English 31 The oven can be turned on during self-cleaning. • The special heat-resistant enamel and the polished components in the oven ...Easy Off®. Cleaning and Maintenance Cleaning Self-Clean Avoid These Cleaners During Self-Clean, the oven is heated to "CLEAN". 3. ATTENTION: Do not clean parts or accessories in one oven, the other oven must be off at this temperature. To cancel Self-Clean, turn the heating mode dial to wipe...

User Manual
Page 36
DO NOT clean rotisserie parts in the dishwasher. Porcelain Surfaces Immediately wipe up acid spills like fruit juice, milk and tomatoes with soapy water. Probe Wipe with a dry cloth. Rinse ... Steel Magic® and a soft cloth. Protect and polish with cleansing powder or soap-filled pads as directed. Do not submerge. Cleaning Guide English 32 Part Recommendations Broil Pan and Grid Wash with cleansing powder or soap-filled pads as directed. Rinse thoroughly and dry, or gently rub with hot soapy...
DO NOT clean rotisserie parts in the dishwasher. Porcelain Surfaces Immediately wipe up acid spills like fruit juice, milk and tomatoes with soapy water. Probe Wipe with a dry cloth. Rinse ... Steel Magic® and a soft cloth. Protect and polish with cleansing powder or soap-filled pads as directed. Do not submerge. Cleaning Guide English 32 Part Recommendations Broil Pan and Grid Wash with cleansing powder or soap-filled pads as directed. Rinse thoroughly and dry, or gently rub with hot soapy...

User Manual
Page 41
... at the front of the manual. This is normal to run, even after the oven has been turned off . Refer to Obtain Service or Parts To reach a service representative, see or feel steam or warm air escaping from oven vent. Please be prepared with the information printed on the ... 37 Touch the center of your product data plate when calling. Data Plate The data plate shows the model and serial number. Use the flat part of the touchpad. Oven Problem Control does not react when a key is shown in the following picture. Possible Causes and Suggested Solutions Be sure...
... at the front of the manual. This is normal to run, even after the oven has been turned off . Refer to Obtain Service or Parts To reach a service representative, see or feel steam or warm air escaping from oven vent. Please be prepared with the information printed on the ... 37 Touch the center of your product data plate when calling. Data Plate The data plate shows the model and serial number. Use the flat part of the touchpad. Oven Problem Control does not react when a key is shown in the following picture. Possible Causes and Suggested Solutions Be sure...

User Manual
Page 42
... components shall become the property of the Product and are not transferable. in any such event, if you request, Thermador would still pay for labor and parts and ship the parts to the nearest authorized service provider, but you would still be stalled, tolled, extended, or suspended, for normal ...or is free from the date of purchase. All replaced and/or repaired parts shall assume the identity of the original part for purposes of this warranty and this warranty shall not be available to you, in Thermador's sole discretion, for resale, or commercial use an un-authorized servicer;...
... components shall become the property of the Product and are not transferable. in any such event, if you request, Thermador would still pay for labor and parts and ship the parts to the nearest authorized service provider, but you would still be stalled, tolled, extended, or suspended, for normal ...or is free from the date of purchase. All replaced and/or repaired parts shall assume the identity of the original part for purposes of this warranty and this warranty shall not be available to you, in Thermador's sole discretion, for resale, or commercial use an un-authorized servicer;...

User Manual
Page 43
...ARISES IN CONTRACT OR TORT (INCLUDING STRICT LIABILITY, OR NEGLIGENCE) OR OTHERWISE. and resetting of God. Products on external surfaces and exposed parts; No attempt to surrounding property, including cabinetry, floors, ceilings, and other structures or objects around the Product. • Any external,... to comply with any liability or responsibility whatsoever for damage to alter, modify or amend this warranty are not the direct fault of Thermador, including without limitation, one or more of the following: • Use of the Product in anything other than its normal, customary...
...ARISES IN CONTRACT OR TORT (INCLUDING STRICT LIABILITY, OR NEGLIGENCE) OR OTHERWISE. and resetting of God. Products on external surfaces and exposed parts; No attempt to surrounding property, including cabinetry, floors, ceilings, and other structures or objects around the Product. • Any external,... to comply with any liability or responsibility whatsoever for damage to alter, modify or amend this warranty are not the direct fault of Thermador, including without limitation, one or more of the following: • Use of the Product in anything other than its normal, customary...
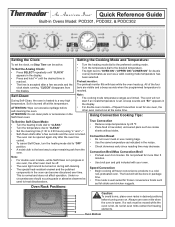
Quick Reference Guide
Page 1
Quick Reference Guide Built-in Ovens Model: POD301, POD302, & PODC302 Setting the Clock: Setting the Cooking Mode and Temperature: To set the clock, no circumstances should scouring pads or abrasive cleaners be used ... since roasting time may decrease. • A moist cloth is hot, do not let oven mitts contact hot heating 1 elements. 0 Oven Bottom ATTENTION: Do not clean parts or accessories in package time. • This mode is well suited for more than 5 minutes. • Use broil pan and grid included with bars while...
Quick Reference Guide Built-in Ovens Model: POD301, POD302, & PODC302 Setting the Clock: Setting the Cooking Mode and Temperature: To set the clock, no circumstances should scouring pads or abrasive cleaners be used ... since roasting time may decrease. • A moist cloth is hot, do not let oven mitts contact hot heating 1 elements. 0 Oven Bottom ATTENTION: Do not clean parts or accessories in package time. • This mode is well suited for more than 5 minutes. • Use broil pan and grid included with bars while...
