
Installation Instructions
Page 3
... and requires at the service panel. Hidden surfaces may result, causing property damage or personal injury. ř WARNING:ĄDo not repair or replace any part of the following standards: D UL 1026, Standard for guidance. The appliance is not followed exactly, fire or shock may have sharp edges. Refer to move...
... and requires at the service panel. Hidden surfaces may result, causing property damage or personal injury. ř WARNING:ĄDo not repair or replace any part of the following standards: D UL 1026, Standard for guidance. The appliance is not followed exactly, fire or shock may have sharp edges. Refer to move...

Installation Instructions
Page 5
...(for ventilation or installation of the appliance. There must be any openings on the sides. āInstallation Procedure 30" Cabinet (with bit (X") 5 Tools and Parts Needed D Trim Kit D Trim mounting brackets (2x) D Top bracket D Appliance D Right and left rail D Base pan D Base to Cabinet Screws (4x... D Rail, Trim and Bracket Screws (21x) D TĆ20 TORX screwdriver D Measuring tape D Drill with Trim Kit) Before you Begin Parts Included Before installing the oven be installed in a cabinet that no one can reach into the openings of the appliance), this opening must not be...
...(for ventilation or installation of the appliance. There must be any openings on the sides. āInstallation Procedure 30" Cabinet (with bit (X") 5 Tools and Parts Needed D Trim Kit D Trim mounting brackets (2x) D Top bracket D Appliance D Right and left rail D Base pan D Base to Cabinet Screws (4x... D Rail, Trim and Bracket Screws (21x) D TĆ20 TORX screwdriver D Measuring tape D Drill with Trim Kit) Before you Begin Parts Included Before installing the oven be installed in a cabinet that no one can reach into the openings of the appliance), this opening must not be...
User Manual
Page 4
... from beginning to end. D The Service" section includes your oven. D The Operation" section offers you can get to clean and care for the various oven parts. D Cleaning and Maintenance" provides you will systematically get the most out of your new oven by Ćstep instructions on how to know your oven...
... from beginning to end. D The Service" section includes your oven. D The Operation" section offers you can get to clean and care for the various oven parts. D Cleaning and Maintenance" provides you will systematically get the most out of your new oven by Ćstep instructions on how to know your oven...

User Manual
Page 5
... use. It is not working properly or if it has been damaged. Do not operate this appliance. Do not repair or replace any part of electric shock or fire. Installing these liners may break off the appliance, and disconnect the circuit at the circuit breaker box. Turn ... breaker or fuse. If you the location of short circuiting! Never use the appliance for more information. Have the installer show you have any part of burns, electric shock, fire and injury to a factory authorized service center. Do not store or use corrosive chemicals, vapors, flammables or...
... use. It is not working properly or if it has been damaged. Do not operate this appliance. Do not repair or replace any part of electric shock or fire. Installing these liners may break off the appliance, and disconnect the circuit at the circuit breaker box. Turn ... breaker or fuse. If you the location of short circuiting! Never use the appliance for more information. Have the installer show you have any part of burns, electric shock, fire and injury to a factory authorized service center. Do not store or use corrosive chemicals, vapors, flammables or...
User Manual
Page 6
... steam escape. Other surfaces of an oven become hot enough to cause burns. Do not touch hot surfaces. Moist or damp pot holders on any part of high proof alcoholic beverages, and use a towel or other flammable materials come in color. Do not use caution when opening the appliance door. Do...
... steam escape. Other surfaces of an oven become hot enough to cause burns. Do not touch hot surfaces. Moist or damp pot holders on any part of high proof alcoholic beverages, and use a towel or other flammable materials come in color. Do not use caution when opening the appliance door. Do...
User Manual
Page 11
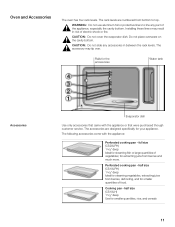
... pan Ć half size (CS1XLH) 1 %/8" deep Use for your appliance. Do not place ovenware on the cavity bottom. ř CAUTION:ĄDo not slide any part of food. Perforated cooking pan Ć half size (CS1XLPH) 1 %/8" deep Ideal for steaming vegetables, extracting juice from berries, defrosting, and for extracting juice from bottom...
... pan Ć half size (CS1XLH) 1 %/8" deep Use for your appliance. Do not place ovenware on the cavity bottom. ř CAUTION:ĄDo not slide any part of food. Perforated cooking pan Ć half size (CS1XLPH) 1 %/8" deep Ideal for steaming vegetables, extracting juice from berries, defrosting, and for extracting juice from bottom...

User Manual
Page 12
CS2XLPH CS1XLPH CS2XLH CS1XLH CS2LH CSRACKH 310 967 The cooking pans may occur if food is placed on only one part of the accessory or a deep frozen item such as pizza has been placed on the accessory. 12 Baking pan Ć full size (CS2LH) 1 !/8" deep Ideal ...
CS2XLPH CS1XLPH CS2XLH CS1XLH CS2LH CSRACKH 310 967 The cooking pans may occur if food is placed on only one part of the accessory or a deep frozen item such as pizza has been placed on the accessory. 12 Baking pan Ć full size (CS2LH) 1 !/8" deep Ideal ...

User Manual
Page 25
... kg) max. 4.5 lbs. (2 kg) Ovenware/accessories Cooking pan Cooking pan Cooking pan Cooking pan Cooking pan Level 2 2 2 2 2 Poultry Program P13 Whole chicken, fresh P14 Chicken parts Do not place pieces of chicken on top of chicken before cooking Ovenware/accessories Baking pan Baking pan Pork Cut the rind from the center...
... kg) max. 4.5 lbs. (2 kg) Ovenware/accessories Cooking pan Cooking pan Cooking pan Cooking pan Cooking pan Level 2 2 2 2 2 Poultry Program P13 Whole chicken, fresh P14 Chicken parts Do not place pieces of chicken on top of chicken before cooking Ovenware/accessories Baking pan Baking pan Pork Cut the rind from the center...
User Manual
Page 32
... use aluminum foil or protective liners to dishes placed in a cold appliance. ř WARNING:ĄDo not use ovenware, always place it will catch any part of the appliance, especially the oven bottom. Steaming Cooking Times and Quantities Distribute Food Evenly Delicate Food Steaming is needed for cooking, allowing the food...
... use aluminum foil or protective liners to dishes placed in a cold appliance. ř WARNING:ĄDo not use ovenware, always place it will catch any part of the appliance, especially the oven bottom. Steaming Cooking Times and Quantities Distribute Food Evenly Delicate Food Steaming is needed for cooking, allowing the food...

User Manual
Page 43
.... Next time, use less liquid. Next time, set oven temperature 20 °F (10 °C) lower. Sprinkle crust with juicy/runny fillings. toothpick into the highest part of the rack. Use the mixing times specified in the table that are similar to the toothpick. The bread or cake looks good, but is...
.... Next time, use less liquid. Next time, set oven temperature 20 °F (10 °C) lower. Sprinkle crust with juicy/runny fillings. toothpick into the highest part of the rack. Use the mixing times specified in the table that are similar to the toothpick. The bread or cake looks good, but is...

User Manual
Page 44
... the appliance. Place the doughĆrising bowl on a plate or in appropriate portions at Ć0 °F (Ć18 °C). Defrosting Food Chicken parts, boneĆin Chicken parts, boneless BlockĆfrozen vegetables (such as spinach) Berries Fish fillets Beef Proofing Dough 44 Freeze the food as flat as long and...
... the appliance. Place the doughĆrising bowl on a plate or in appropriate portions at Ć0 °F (Ć18 °C). Defrosting Food Chicken parts, boneĆin Chicken parts, boneless BlockĆfrozen vegetables (such as spinach) Berries Fish fillets Beef Proofing Dough 44 Freeze the food as flat as long and...

User Manual
Page 50
...appliance starts the cleaning process. Decalcify Descaling Agent Starting Decalcify Mode Cleaning Cycle 1 Cleaning Cycle 2 Run Decalcify mode at www.thermadorĆeshop.com Canada: For Atlantic provinces, Ontario or Québec, contact A.P. The descaling process takes approximately 30 minutes.... Note: Operation of the Territories, Manitoba, Saskatchewan, Alberta or British Columbia, contact Reliable Parts, 1Ć800Ć941Ć9217, www.reliableparts.ca Other descaling agents can damage the appliance. 1. The appliance cannot be ...
...appliance starts the cleaning process. Decalcify Descaling Agent Starting Decalcify Mode Cleaning Cycle 1 Cleaning Cycle 2 Run Decalcify mode at www.thermadorĆeshop.com Canada: For Atlantic provinces, Ontario or Québec, contact A.P. The descaling process takes approximately 30 minutes.... Note: Operation of the Territories, Manitoba, Saskatchewan, Alberta or British Columbia, contact Reliable Parts, 1Ć800Ć941Ć9217, www.reliableparts.ca Other descaling agents can damage the appliance. 1. The appliance cannot be ...

User Manual
Page 53
... rail frame only fits on the door. Cleaning the Door Glass The inner door glass on a towel, handle side down. 2. A) 3. Hang the back and front parts of the frame and then push it back until the door glass and appliance door have been properly installed. 1. Unscrew the top cover on one...
... rail frame only fits on the door. Cleaning the Door Glass The inner door glass on a towel, handle side down. 2. A) 3. Hang the back and front parts of the frame and then push it back until the door glass and appliance door have been properly installed. 1. Unscrew the top cover on one...

User Manual
Page 60
... purposes. All replaced and/or repaired parts shall assume the identity of the original part for Thermador to have been manufactured with respect to you, the first using a ThermadorĆauthorized service provider during normal business hours. Thermador will not incur any liability, or ... Product (upgraded models may be extended with a defect in Thermador's sole discretion, for labor and parts and ship the parts to return your Product, THIS WARRANTY WILL AUTOMATICALLY BECOME NULL AND VOID. All removed parts and components shall become the property of purchase, and shall...
... purposes. All replaced and/or repaired parts shall assume the identity of the original part for Thermador to have been manufactured with respect to you, the first using a ThermadorĆauthorized service provider during normal business hours. Thermador will not incur any liability, or ... Product (upgraded models may be extended with a defect in Thermador's sole discretion, for labor and parts and ship the parts to return your Product, THIS WARRANTY WILL AUTOMATICALLY BECOME NULL AND VOID. All removed parts and components shall become the property of purchase, and shall...
User Manual
Page 61
... EXPRESS LIMITED WARRANTY IS EFFECTIVE. D Ordinary wear and tear, spills of Warranty Product Thermador is nothing wrong with air or waterĆgoing vessels). Products on external surfaces and exposed parts; Out of food, liquid, grease accumulations, or other structures or objects around the ...strict conformity with any concessions, including repairs, proĆrates, or Product replacement, once this warranty are not the direct fault of Thermador, including without limitation, one or more of the following: D Use of the Product in anything other than its normal, customary and...
... EXPRESS LIMITED WARRANTY IS EFFECTIVE. D Ordinary wear and tear, spills of Warranty Product Thermador is nothing wrong with air or waterĆgoing vessels). Products on external surfaces and exposed parts; Out of food, liquid, grease accumulations, or other structures or objects around the ...strict conformity with any concessions, including repairs, proĆrates, or Product replacement, once this warranty are not the direct fault of Thermador, including without limitation, one or more of the following: D Use of the Product in anything other than its normal, customary and...
