Installation Instructions
Page 2
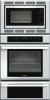
Huntington Beach, CA 92649 Questions? 1-800-735-4328 www.thermador.com We look forward to hearing from you Begin 2 Tools and Parts Needed 2 Parts Included 2 General Information 2 Dimensions for 27" Wall-Mounted Units 3 Dimensions for 27" under the counter 4 Dimensions for 30" Wall-Mounted ... 11 Installation 12 Electrical Installation 12 Oven Installation 13 Testing Operation 14 Service 14 Before Calling Service 14 This Thermador Appliance is made by BSH Home Appliances Corporation 5551 McFadden Ave. Table of Contents Safety 1 Important Safety Instructions 1 Preparation 2 Before...
Huntington Beach, CA 92649 Questions? 1-800-735-4328 www.thermador.com We look forward to hearing from you Begin 2 Tools and Parts Needed 2 Parts Included 2 General Information 2 Dimensions for 27" Wall-Mounted Units 3 Dimensions for 27" under the counter 4 Dimensions for 30" Wall-Mounted ... 11 Installation 12 Electrical Installation 12 Oven Installation 13 Testing Operation 14 Service 14 Before Calling Service 14 This Thermador Appliance is made by BSH Home Appliances Corporation 5551 McFadden Ave. Table of Contents Safety 1 Important Safety Instructions 1 Preparation 2 Before...
Installation Instructions
Page 3
WARNING: Do not repair or replace any part of the appliance unless specifically recommended in this manual is properly installed and grounded by the National Electrical Code (or Canadian Electrical Code), this manual ...
WARNING: Do not repair or replace any part of the appliance unless specifically recommended in this manual is properly installed and grounded by the National Electrical Code (or Canadian Electrical Code), this manual ...

Installation Instructions
Page 4
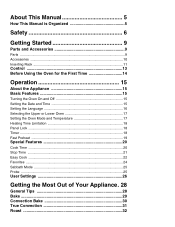
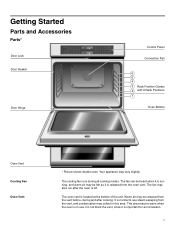
Preparation Before you Begin Tools and Parts Needed • Phillips head screwdriver • Measuring tape • Drill with all applicable codes. English 2 Transport To avoid damage to the oven vent, use the transport method shown in accordance with bit (1/8") Parts Included • Phillips head screws (6) General Information Power Requirements The outlet must be properly grounded in the picture below.
Preparation Before you Begin Tools and Parts Needed • Phillips head screwdriver • Measuring tape • Drill with all applicable codes. English 2 Transport To avoid damage to the oven vent, use the transport method shown in accordance with bit (1/8") Parts Included • Phillips head screws (6) General Information Power Requirements The outlet must be properly grounded in the picture below.
User Manual
Page 3
About This Manual 5 How This Manual is Organized 5 Safety 6 Getting Started 9 Parts and Accessories 9 Parts ...9 Accessories 10 Inserting Rack 11 Control 13 Before Using the Oven for the First Time 14 Operation 15 About the Appliance 15 Basic Features 15 ...
About This Manual 5 How This Manual is Organized 5 Safety 6 Getting Started 9 Parts and Accessories 9 Parts ...9 Accessories 10 Inserting Rack 11 Control 13 Before Using the Oven for the First Time 14 Operation 15 About the Appliance 15 Basic Features 15 ...
User Manual
Page 5
... the oven components and features. • The "Operation" section offers you step-by-step instructions on how to clean and care for the various oven parts. • The "Service" section includes your new oven by reading this manual from beginning to end. This section also provides you with several bakeware and...
... the oven components and features. • The "Operation" section offers you step-by-step instructions on how to clean and care for the various oven parts. • The "Service" section includes your new oven by reading this manual from beginning to end. This section also provides you with several bakeware and...
User Manual
Page 6
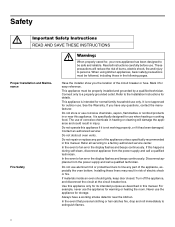
...designed for details. If materials inside an oven should ignite, keep door closed. The use . Do not repair or replace any part of burns, electric shock, fire and injury to be properly installed and grounded by a qualified technician. Safety m Important Safety Instructions ...READ AND SAVE THESE INSTRUCTIONS Proper Installation and Maintenance Fire Safety m Warning: When properly cared for storage. Always have any part of electric shock or fire. Use this appliance only for its intended purpose as described in this happens during self-clean, disconnect...
...designed for details. If materials inside an oven should ignite, keep door closed. The use . Do not repair or replace any part of burns, electric shock, fire and injury to be properly installed and grounded by a qualified technician. Safety m Important Safety Instructions ...READ AND SAVE THESE INSTRUCTIONS Proper Installation and Maintenance Fire Safety m Warning: When properly cared for storage. Always have any part of electric shock or fire. Use this appliance only for its intended purpose as described in this happens during self-clean, disconnect...
User Manual
Page 8
... Act requires the Governor of California to publish a list of soil during self-cleaning can be allowed to such substances. Do not clean parts or accessories in self-clean ovens gives off very small amounts of an appliance, especially a door, warming drawer or storage drawer. Do ...not place food directly on any part of formaldehyde during and immediately after self-cleaning the oven. 3. Operating the unit according to children should not be harmful. Items of cancer....
... Act requires the Governor of California to publish a list of soil during self-cleaning can be allowed to such substances. Do not clean parts or accessories in self-clean ovens gives off very small amounts of an appliance, especially a door, warming drawer or storage drawer. Do ...not place food directly on any part of formaldehyde during and immediately after self-cleaning the oven. 3. Operating the unit according to children should not be harmful. Items of cancer....
User Manual
Page 9
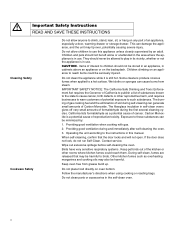
... for air circulation. 9 Do not block the vent, since it is in this area. The fan may vary slightly. It is off. Getting Started Parts and Accessories Parts* Door Lock Door Gasket Door Hinge Control Panel Convection Fan 6 5 4 3 Rack Position Guides 2 with 6 Rack Positions 1 Oven Bottom Oven Vent Cooling Fan Oven Vent...
... for air circulation. 9 Do not block the vent, since it is in this area. The fan may vary slightly. It is off. Getting Started Parts and Accessories Parts* Door Lock Door Gasket Door Hinge Control Panel Convection Fan 6 5 4 3 Rack Position Guides 2 with 6 Rack Positions 1 Oven Bottom Oven Vent Cooling Fan Oven Vent...

User Manual
Page 10
... may also run during all convection modes. Telescopic Rack This rack allows for broiling and roasting. Probe The probe can be used to line any part of electric shock or fire. Do not clean in a convection mode, the fan turns off automatically when the door is protected from damage and spills...
... may also run during all convection modes. Telescopic Rack This rack allows for broiling and roasting. Probe The probe can be used to line any part of electric shock or fire. Do not clean in a convection mode, the fan turns off automatically when the door is protected from damage and spills...
User Manual
Page 25
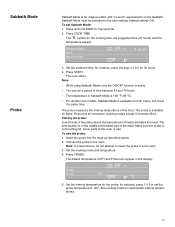
... keys 3 0 0 0 for religious faiths with "no work" requirements on the Sabbath. for instance, press 1 4 5 to the oven. The best location is not touching fat, bone, parts of the meat. Make sure the probe is in the display: Roast Probe QQ: EP am 1 WU: PP QOP° r 3. The default temperature (160º...
... keys 3 0 0 0 for religious faiths with "no work" requirements on the Sabbath. for instance, press 1 4 5 to the oven. The best location is not touching fat, bone, parts of the meat. Make sure the probe is in the display: Roast Probe QQ: EP am 1 WU: PP QOP° r 3. The default temperature (160º...
User Manual
Page 39
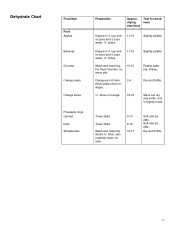
For fresh cherries, remove pits. 10-15 Orange part of orange. 12-16 Slightly pliable. Slightly pliable. Skins are dry and brittle, fruit is slightly moist. Towel dried. 9-13 Towel dried. Sliced ½" thick, ...
For fresh cherries, remove pits. 10-15 Orange part of orange. 12-16 Slightly pliable. Slightly pliable. Skins are dry and brittle, fruit is slightly moist. Towel dried. 9-13 Towel dried. Sliced ½" thick, ...
User Manual
Page 41
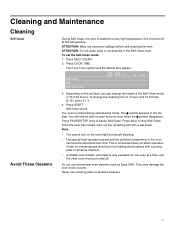
... oven. Press COOK TIME. To change the length of the Self-Clean mode (1:30-2:30 hours). They may damage the oven finish or parts. ATTENTION: Do not clean parts or accessories in the display. Cleaning and Maintenance Cleaning Self-Clean Avoid These Cleaners During Self-Clean, the oven is heated to open...
... oven. Press COOK TIME. To change the length of the Self-Clean mode (1:30-2:30 hours). They may damage the oven finish or parts. ATTENTION: Do not clean parts or accessories in the display. Cleaning and Maintenance Cleaning Self-Clean Avoid These Cleaners During Self-Clean, the oven is heated to open...
User Manual
Page 42
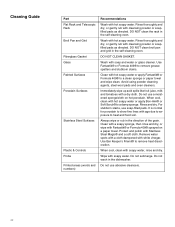
.... Do not submerge. Rinse thoroughly and dry, or gently rub with Stainless Steel Magic® and a soft cloth. Wipe with hot soapy water. Cleaning Guide Part Flat Rack and Telescopic Rack Broil Pan and Grid Fiberglass Gasket Glass Painted Surfaces Porcelain Surfaces Stainless Steel Surfaces Plastic & Controls Probe Printed areas (words...
.... Do not submerge. Rinse thoroughly and dry, or gently rub with Stainless Steel Magic® and a soft cloth. Wipe with hot soapy water. Cleaning Guide Part Flat Rack and Telescopic Rack Broil Pan and Grid Fiberglass Gasket Glass Painted Surfaces Porcelain Surfaces Stainless Steel Surfaces Plastic & Controls Probe Printed areas (words...
User Manual
Page 46
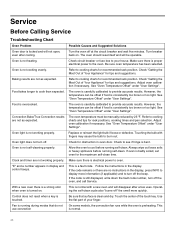
... out. Oven light is carefully calibrated to cool before running self-clean. If the code remains or there are not as expected. Use the flat part of the touch key. The oven should reset itself and will not open, even after a few uses. The oven is not working properly. The oven...
... out. Oven light is carefully calibrated to cool before running self-clean. If the code remains or there are not as expected. Use the flat part of the touch key. The oven should reset itself and will not open, even after a few uses. The oven is not working properly. The oven...
User Manual
Page 47
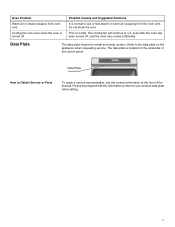
... to the data plate on your product data plate when calling. 47 Cooling fan runs even when the oven is normal to Obtain Service or Parts To reach a service representative, see or feel steam or warm air escaping from oven vent. Possible Causes and Suggested Solutions It is turned off , until...
... to the data plate on your product data plate when calling. 47 Cooling fan runs even when the oven is normal to Obtain Service or Parts To reach a service representative, see or feel steam or warm air escaping from oven vent. Possible Causes and Suggested Solutions It is turned off , until...
User Manual
Page 48
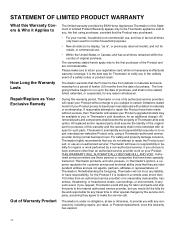
...more than an authorized service provider work performed by a non-authorized servicer. in any such event, if you request, Thermador would still pay for labor and parts and ship the parts to the nearest authorized service provider, but you would still be stalled, tolled, extended, or suspended, for a period ... Product and are those persons or companies that they agree to make sure to return your registration card; All removed parts and components shall become the property of Thermador at all times only been used for normal household purposes. • New at retail (not a display, "as...
...more than an authorized service provider work performed by a non-authorized servicer. in any such event, if you request, Thermador would still pay for labor and parts and ship the parts to the nearest authorized service provider, but you would still be stalled, tolled, extended, or suspended, for a period ... Product and are those persons or companies that they agree to make sure to return your registration card; All removed parts and components shall become the property of Thermador at all times only been used for normal household purposes. • New at retail (not a display, "as...
User Manual
Page 49
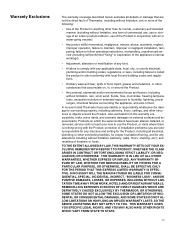
...LIMITATION TIME AWAY FROM WORK, HOTELS AND/OR RESTAURANT MEALS, REMODELLING EXPENSES IN EXCESS OF DIRECT DAMAGES WHICH ARE DEFINITIVELY CAUSED EXCLUSIVELY BY THERMADOR, OR OTHERWISE. ANY WARRANTY IMPLIED BY LAW, WHETHER FOR MERCHANTABILITY OR FITNESS FOR A PARTICULAR PURPOSE, OR OTHERWISE, SHALL BE EFFECTIVE... ONLY FOR THE PERIOD THAT THIS EXPRESS LIMITED WARRANTY IS EFFECTIVE. Products on external surfaces and exposed parts; THIS WARRANTY IS IN LIEU OF ALL OTHER WARRANTIES, WHETHER EXPRESS OR IMPLIED. service visits to teach you are solely responsible ...
...LIMITATION TIME AWAY FROM WORK, HOTELS AND/OR RESTAURANT MEALS, REMODELLING EXPENSES IN EXCESS OF DIRECT DAMAGES WHICH ARE DEFINITIVELY CAUSED EXCLUSIVELY BY THERMADOR, OR OTHERWISE. ANY WARRANTY IMPLIED BY LAW, WHETHER FOR MERCHANTABILITY OR FITNESS FOR A PARTICULAR PURPOSE, OR OTHERWISE, SHALL BE EFFECTIVE... ONLY FOR THE PERIOD THAT THIS EXPRESS LIMITED WARRANTY IS EFFECTIVE. Products on external surfaces and exposed parts; THIS WARRANTY IS IN LIEU OF ALL OTHER WARRANTIES, WHETHER EXPRESS OR IMPLIED. service visits to teach you are solely responsible ...
Design Guide
Page 6
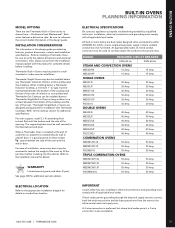
... the correct model information in a wallmounted or under-counter installation. WARRANTY Limited warranty parts and labor (2 year) See page 308 for additional specifications. INSTALLATION CONSIDERATIONS The information... PODM301J 50 Amp 50 Amp TRIPLE COMBINATION OVENS MEDMCW71JS 50 Amp 50 Amp MEDMCW31JS 50 Amp 50 Amp MEDMCW31JP 50 Amp 50 Amp PODMW301J 50 Amp 50 ... with the installation manual packed with all applicable local codes. An electric or non-professional Thermador Gas Cooktop can be used to correctly attach the conduit to back flush with all applicable...
... the correct model information in a wallmounted or under-counter installation. WARRANTY Limited warranty parts and labor (2 year) See page 308 for additional specifications. INSTALLATION CONSIDERATIONS The information... PODM301J 50 Amp 50 Amp TRIPLE COMBINATION OVENS MEDMCW71JS 50 Amp 50 Amp MEDMCW31JS 50 Amp 50 Amp MEDMCW31JP 50 Amp 50 Amp PODMW301J 50 Amp 50 ... with the installation manual packed with all applicable local codes. An electric or non-professional Thermador Gas Cooktop can be used to correctly attach the conduit to back flush with all applicable...
Design Guide
Page 8
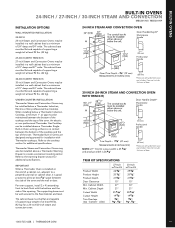
... mm) Trim Depth - 1 5/8" (41 mm) 25/8" (66 mm) *Protrusion of handle from outer part of th3/e8"un- bottom - sides) 3/8"- 5/8" 3/8"- 5/8" (42 kg) for installation with reac3h/8o"f-the power cord. TRIM281/K4" IT SPECIFICATIONS (718 mm) IMPORTANT When a Thermador Oven is installed at least 92 lbs. (42 kg). th max. 38" Pro...
... mm) Trim Depth - 1 5/8" (41 mm) 25/8" (66 mm) *Protrusion of handle from outer part of th3/e8"un- bottom - sides) 3/8"- 5/8" 3/8"- 5/8" (42 kg) for installation with reac3h/8o"f-the power cord. TRIM281/K4" IT SPECIFICATIONS (718 mm) IMPORTANT When a Thermador Oven is installed at least 92 lbs. (42 kg). th max. 38" Pro...
Design Guide
Page 12
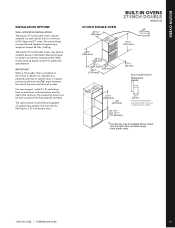
... to the right of the unit within range of the power cable. The cabinet base must be installed above a Thermador Warming Drawer 493/4" (1264 mm) to create a convenient cooking center. BUILT-IN OVENS 27" Double BUILT-IN ...OVENS 27-INCH DOUBLE MED272JS INSTALLATION OPTIONS WALL-MOUNTED INSTALLATION Thermador 27-inch Double Ovens may be installed in a wall cabinet that is good 2413/16" practice to allow at least...(42 mm) Door Handle Depth* Masterpiece Handle 21/8" (55 mm) *Protrusion of handle from outer part of door.
... to the right of the unit within range of the power cable. The cabinet base must be installed above a Thermador Warming Drawer 493/4" (1264 mm) to create a convenient cooking center. BUILT-IN OVENS 27" Double BUILT-IN ...OVENS 27-INCH DOUBLE MED272JS INSTALLATION OPTIONS WALL-MOUNTED INSTALLATION Thermador 27-inch Double Ovens may be installed in a wall cabinet that is good 2413/16" practice to allow at least...(42 mm) Door Handle Depth* Masterpiece Handle 21/8" (55 mm) *Protrusion of handle from outer part of door.
