Installation Instructions
Page 4
..." Wall-Mounted Units 13 Dimensions for 27" Under-Counter Units 15 Dimensions for 30" Wall-Mounted Units 15 Dimensions for 30" Under-Counter Units 17 THERMADOR® Support 18 Service 18 Parts and Accessories 18 4
..." Wall-Mounted Units 13 Dimensions for 27" Under-Counter Units 15 Dimensions for 30" Wall-Mounted Units 15 Dimensions for 30" Under-Counter Units 17 THERMADOR® Support 18 Service 18 Parts and Accessories 18 4
Installation Instructions
Page 5
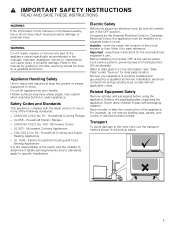
WARNING Do not repair, replace or remove any part of one or more information. Safety Codes and Standards This appliance complies with the latest version of the appliance unless specifically recommended in the picture ...
WARNING Do not repair, replace or remove any part of one or more information. Safety Codes and Standards This appliance complies with the latest version of the appliance unless specifically recommended in the picture ...
Installation Instructions
Page 6
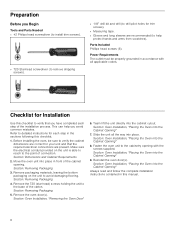
...Opening" 7. Remove the T20 (star head) screws holding the unit to the base of the installation process. Preparation Before you Begin Tools and Parts Needed ▯ #2 Philips head screwdriver (to install trim screws). ▯ T20 Star-head screwdriver (to remove shipping screws). ▯ ...tape. ▯ Gloves and long sleeves are recommended (to help you have completed each step in accordance with the screws supplied. Parts Included Phillips head screws (6). Checklist for Installation Use this checklist to detailed instructions for your unit and that you avoid common mistakes....
...Opening" 7. Remove the T20 (star head) screws holding the unit to the base of the installation process. Preparation Before you Begin Tools and Parts Needed ▯ #2 Philips head screwdriver (to install trim screws). ▯ T20 Star-head screwdriver (to remove shipping screws). ▯ ...tape. ▯ Gloves and long sleeves are recommended (to help you have completed each step in accordance with the screws supplied. Parts Included Phillips head screws (6). Checklist for Installation Use this checklist to detailed instructions for your unit and that you avoid common mistakes....
Installation Instructions
Page 9
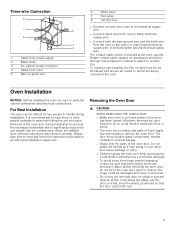
... oven, swivels. Oven Installation NOTICE: Before installing the oven, be routed to permit temporary removal of the oven door during installation. It is heavy and parts of the oven door. Use both the bare ground wire and the white wire from the oven to the white (or gray) neutral electrical supply...
... oven, swivels. Oven Installation NOTICE: Before installing the oven, be routed to permit temporary removal of the oven door during installation. It is heavy and parts of the oven door. Use both the bare ground wire and the white wire from the oven to the white (or gray) neutral electrical supply...
Installation Instructions
Page 18
... to supporting you and your appliance so that your kitchen. USA www.thermador-eshop.com Canada Marcone 800-287-1627 or Reliable Parts 800-663-6060 18 Please don't hesitate to assist you. THERMADOR® Support Service We realize that you have made a considerable investment in...STAR® Customer Support Department if you have any questions or in your THERMADOR® appliance needs service. USA 800-735-4328 www.thermador.com/support Canada 800-735-4328 www.thermador.ca Parts and Accessories Parts, filters, descalers, stainless steel cleaners and more can be purchased in ...
... to supporting you and your appliance so that your kitchen. USA www.thermador-eshop.com Canada Marcone 800-287-1627 or Reliable Parts 800-663-6060 18 Please don't hesitate to assist you. THERMADOR® Support Service We realize that you have made a considerable investment in...STAR® Customer Support Department if you have any questions or in your THERMADOR® appliance needs service. USA 800-735-4328 www.thermador.com/support Canada 800-735-4328 www.thermador.ca Parts and Accessories Parts, filters, descalers, stainless steel cleaners and more can be purchased in ...
User Manual
Page 4
... and Maintenance 6 Fire Safety 6 Burn Prevention 7 Child Safety 7 Cleaning Safety 8 Cookware Safety 8 Getting Started 9 Parts 9 Accessories 10 Control 12 Touchpads 12 Display Icons 12 Operation 13 About the Appliance 13 Before Using the Appliance for ... Guide 25 Maintenance 26 Service 29 Troubleshooting Chart 29 Data Plate 30 How to Obtain Service or Parts 30 Cooking Charts 31 Baked Goods/Entrees 31 Meats 32 STATEMENT OF LIMITED PRODUCT WARRANTY .... 34 ... Out of Warranty Product 35 Warranty Exclusions 35 THERMADOR® Support 36 Service 36 Parts and Accessories 36 4
... and Maintenance 6 Fire Safety 6 Burn Prevention 7 Child Safety 7 Cleaning Safety 8 Cookware Safety 8 Getting Started 9 Parts 9 Accessories 10 Control 12 Touchpads 12 Display Icons 12 Operation 13 About the Appliance 13 Before Using the Appliance for ... Guide 25 Maintenance 26 Service 29 Troubleshooting Chart 29 Data Plate 30 How to Obtain Service or Parts 30 Cooking Charts 31 Baked Goods/Entrees 31 Meats 32 STATEMENT OF LIMITED PRODUCT WARRANTY .... 34 ... Out of Warranty Product 35 Warranty Exclusions 35 THERMADOR® Support 36 Service 36 Parts and Accessories 36 4
User Manual
Page 5
... that death or serious injuries may occur as a result of non-observance of this manual from beginning to clean and care for the various oven parts. ▯ The "Service" section includes do-it-yourself troubleshooting tips. ▯ In "Getting the Most Out of your product warranty. This way you to the...
... that death or serious injuries may occur as a result of non-observance of this manual from beginning to clean and care for the various oven parts. ▯ The "Service" section includes do-it-yourself troubleshooting tips. ▯ In "Getting the Most Out of your product warranty. This way you to the...
User Manual
Page 6
... grounded by a qualified technician. NEVER use this appliance if it has been damaged. Refer to avoid breaking. The use . Do not repair or replace any part of burns, electric shock, fire, and injury to the oven has been turned off before use of corrosive chemicals in heating or cleaning will reduce...
... grounded by a qualified technician. NEVER use this appliance if it has been damaged. Refer to avoid breaking. The use . Do not repair or replace any part of burns, electric shock, fire, and injury to the oven has been turned off before use of corrosive chemicals in heating or cleaning will reduce...

User Manual
Page 7
... small quantities of the opening the appliance. CAUTION To avoid possible injury or damage to burst and cause injury. Moist or damp potholders on any part of oven until they have a Class ABC extinguisher, and you have had sufficient time to cause burns. before beginning. Tie long hair so that it...
... small quantities of the opening the appliance. CAUTION To avoid possible injury or damage to burst and cause injury. Moist or damp potholders on any part of oven until they have a Class ABC extinguisher, and you have had sufficient time to cause burns. before beginning. Tie long hair so that it...

User Manual
Page 8
... before self-cleaning the oven. Keep oven free from grease build up. If the door does not lock, do not run SelfClean. Do not clean parts or accessories in this booklet and provide good ventilation.
... before self-cleaning the oven. Keep oven free from grease build up. If the door does not lock, do not run SelfClean. Do not clean parts or accessories in this booklet and provide good ventilation.

User Manual
Page 9
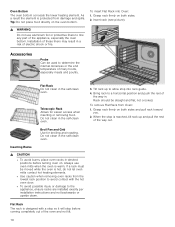
... with 6 Rack Positions 4 Oven Bottom 5 Oven Vent 6 Door Hinge 7 Door Gasket 8 Door Lock Cooling Fan The cooling fan runs during all cooking modes. Getting Started Parts Picture shows double oven. The fan can be heard when it is located at the bottom of the unit.
... with 6 Rack Positions 4 Oven Bottom 5 Oven Vent 6 Door Hinge 7 Door Gasket 8 Door Lock Cooling Fan The cooling fan runs during all cooking modes. Getting Started Parts Picture shows double oven. The fan can be heard when it is located at the bottom of the unit.
User Manual
Page 10
... for easier access when inserting or removing food. To insert Flat Rack into rack guide. 4. Always use aluminum foil or protective liners to line any part of electric shock or fire. Flat Rack Do not clean in the self-clean oven. 3. Grasp rack firmly on both sides and pull rack toward...
... for easier access when inserting or removing food. To insert Flat Rack into rack guide. 4. Always use aluminum foil or protective liners to line any part of electric shock or fire. Flat Rack Do not clean in the self-clean oven. 3. Grasp rack firmly on both sides and pull rack toward...
User Manual
Page 17
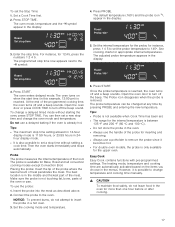
The oven mode, temperature and the y symbol appear in the middle and thickest part of the programmed cooking time, the oven turns off and a beep sounds. The programmed stop time. At the end of the meat. Do not use ... the oven is possible to remove the probe since it is already hot. The Probe icon disappears when the probe is not touching fat, bone, parts of the probe for the upper oven. The default temperature (160º) and the probe icon ) appear in 24hour display mode. ▯ It is reached...
The oven mode, temperature and the y symbol appear in the middle and thickest part of the programmed cooking time, the oven turns off and a beep sounds. The programmed stop time. At the end of the meat. Do not use ... the oven is possible to remove the probe since it is already hot. The Probe icon disappears when the probe is not touching fat, bone, parts of the probe for the upper oven. The default temperature (160º) and the probe icon ) appear in 24hour display mode. ▯ It is reached...
User Manual
Page 20
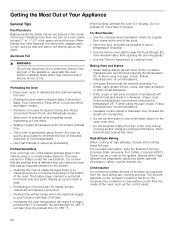
... pan is not directly above the other heavy object on the bottom of moisture to keep the empty broil pan in the oven during any part of the oven. For example, the preheat time for 425° F is not used for certain amount of the oven. For Best Results ▯ Use...
... pan is not directly above the other heavy object on the bottom of moisture to keep the empty broil pan in the oven during any part of the oven. For example, the preheat time for 425° F is not used for certain amount of the oven. For Best Results ▯ Use...

User Manual
Page 24
...;F 4-6 hours Crisp and brittle. Check food at 100 °F (38 °C) (refer to dry and/or preserve foods such as fruits, vegetables and herbs. Orange part of skin thinly peeled from the top. Wash and towel dry. Sliced ^" thick, skin (outside) down on for examples). ▯ Drying times vary depending on...
...;F 4-6 hours Crisp and brittle. Check food at 100 °F (38 °C) (refer to dry and/or preserve foods such as fruits, vegetables and herbs. Orange part of skin thinly peeled from the top. Wash and towel dry. Sliced ^" thick, skin (outside) down on for examples). ▯ Drying times vary depending on...
User Manual
Page 25
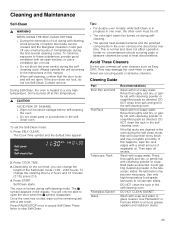
...AVOID RISK OF DAMAGE ▯ Wipe out excessive spillage before self-cleaning the oven. ▯ Do not clean parts or accessories in the display. Cleaning Guide Part Broil Pan and Grid Flat Rack Telescopic Rack Fiberglass Gasket Glass Recommendations Wash with cleansing powder or soapfilled pads as ... stubborn stains. 25 Re-lubrication may become discolored over time. You will loose their shiny finish and may damage the oven finish or parts. Cleaning and Maintenance Self-Clean 9 WARNING WHEN USING THE SELF-CLEAN SETTING ▯ During the elimination of soil during self-cleaning,...
...AVOID RISK OF DAMAGE ▯ Wipe out excessive spillage before self-cleaning the oven. ▯ Do not clean parts or accessories in the display. Cleaning Guide Part Broil Pan and Grid Flat Rack Telescopic Rack Fiberglass Gasket Glass Recommendations Wash with cleansing powder or soapfilled pads as ... stubborn stains. 25 Re-lubrication may become discolored over time. You will loose their shiny finish and may damage the oven finish or parts. Cleaning and Maintenance Self-Clean 9 WARNING WHEN USING THE SELF-CLEAN SETTING ▯ During the elimination of soil during self-cleaning,...

User Manual
Page 26
... main power supply (fuse or breaker box). 2. Remove the oven racks if necessary to provide access to a clean sponge or paper towel and wipe clean. Part Painted Surfaces Porcelain Surfaces Stainless Steel Surfaces Plastic & Controls Probe Printed areas (words & numbers) Recommendations Clean with hot soapy water or apply Fantastik® or...
... main power supply (fuse or breaker box). 2. Remove the oven racks if necessary to provide access to a clean sponge or paper towel and wipe clean. Part Painted Surfaces Porcelain Surfaces Stainless Steel Surfaces Plastic & Controls Probe Printed areas (words & numbers) Recommendations Clean with hot soapy water or apply Fantastik® or...

User Manual
Page 27
... prevent it into the mounting clip and pressing the end nearest you into the housing until the bulb is difficult to pinch behind the rounded part of a narrow flat blade screwdriver between the metal clips to the oven at the main power supply (fuse or breaker box). 27 Remove oven racks...
... prevent it into the mounting clip and pressing the end nearest you into the housing until the bulb is difficult to pinch behind the rounded part of a narrow flat blade screwdriver between the metal clips to the oven at the main power supply (fuse or breaker box). 27 Remove oven racks...

User Manual
Page 28
... glass components. Repeat for reinstallation. 6. It is necessary to position the toggle locks in electrical shock or burns. ▯ The oven door is heavy and parts of a screwdriver to pull out the locking levers. (C) Make sure both hands. Lay the door on a flat, smooth surface, positioned so that both locking levers...
... glass components. Repeat for reinstallation. 6. It is necessary to position the toggle locks in electrical shock or burns. ▯ The oven door is heavy and parts of a screwdriver to pull out the locking levers. (C) Make sure both hands. Lay the door on a flat, smooth surface, positioned so that both locking levers...
User Manual
Page 30
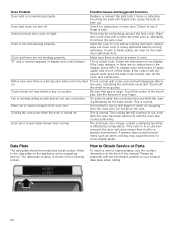
...This is bent. On some models, the convection fan runs while the oven is touched. Do not block the vent. How to Obtain Service or Parts To reach a service representative, see if hinge is normal with fingers may be prepared with a clean dry towel prior to attemping to cool before ... Allow the oven to remove the lens cover. If oven is not working properly. Make sure there is affected by temperature. Use the flat part of your product data plate when calling. 30 The cooling fan will disappear after the oven has been turned off . The soft-close slower than...
...This is bent. On some models, the convection fan runs while the oven is touched. Do not block the vent. How to Obtain Service or Parts To reach a service representative, see if hinge is normal with fingers may be prepared with a clean dry towel prior to attemping to cool before ... Allow the oven to remove the lens cover. If oven is not working properly. Make sure there is affected by temperature. Use the flat part of your product data plate when calling. 30 The cooling fan will disappear after the oven has been turned off . The soft-close slower than...
