Installation Instructions
Page 5
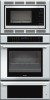
...National Electrical Code (or Canadian Electrical Code), this appliance must comply with the latest version of the appliance unless specifically recommended in the manuals. show the owner the location of the appliance. Mark it for data plate location. 9 IMPORTANT SAFETY INSTRUCTIONS READ AND SAVE THESE ...INSTRUCTIONS N EI S EY HT T E F E A V S A S T N D AN TA R OD PA ME IR WARNING If the information in this manual is heavy and requires at the service panel. Transport To avoid damage to prevent power from being turned ON accidentally. WARNING Do not repair, replace...
...National Electrical Code (or Canadian Electrical Code), this appliance must comply with the latest version of the appliance unless specifically recommended in the manuals. show the owner the location of the appliance. Mark it for data plate location. 9 IMPORTANT SAFETY INSTRUCTIONS READ AND SAVE THESE ...INSTRUCTIONS N EI S EY HT T E F E A V S A S T N D AN TA R OD PA ME IR WARNING If the information in this manual is heavy and requires at the service panel. Transport To avoid damage to prevent power from being turned ON accidentally. WARNING Do not repair, replace...
Installation Instructions
Page 6
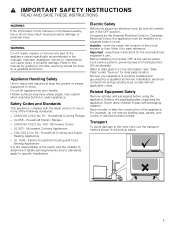
.... Section: Removing Packaging 3. Fasten the oven unit to help you avoid common mistakes. Before installing the oven, be properly grounded in the sections following this manual. 6 Parts Included Phillips head screws (6). Preparation Before you Begin Tools and Parts Needed ▯ #2 Philips head screwdriver (to install trim screws). ▯ T20 Star-head...
.... Section: Removing Packaging 3. Fasten the oven unit to help you avoid common mistakes. Before installing the oven, be properly grounded in the sections following this manual. 6 Parts Included Phillips head screws (6). Preparation Before you Begin Tools and Parts Needed ▯ #2 Philips head screwdriver (to install trim screws). ▯ T20 Star-head...
Installation Instructions
Page 7
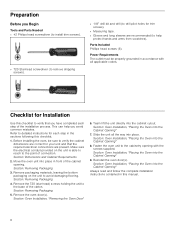
... requirements vary depending on outside of the opening . Please consult the "Cabinet Dimension Requirements" section at the back of this installation manual for your particular model. Actual brackets may look differently. Left Packaging Bracket Removal Right Packaging Bracket Removal 7 Unscrew unit from Left and...(6.4 mm) space between the side of the oven and an adjacent wall or cabinet door when installed at the back of this installation manual. Place oven in front of your floor keep the unit in its packaging base until ready to be installed. 5. This supporting base ...
... requirements vary depending on outside of the opening . Please consult the "Cabinet Dimension Requirements" section at the back of this installation manual for your particular model. Actual brackets may look differently. Left Packaging Bracket Removal Right Packaging Bracket Removal 7 Unscrew unit from Left and...(6.4 mm) space between the side of the oven and an adjacent wall or cabinet door when installed at the back of this installation manual. Place oven in front of your floor keep the unit in its packaging base until ready to be installed. 5. This supporting base ...
Installation Instructions
Page 12
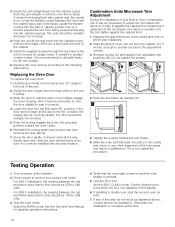
..., repeat the procedure. Slide the oven unit fully back into the cabinet cutout. Tighten the screws holding the trim frame. 6. See the Use and Care Manual for the trim screws. 6. 3.
..., repeat the procedure. Slide the oven unit fully back into the cabinet cutout. Tighten the screws holding the trim frame. 6. See the Use and Care Manual for the trim screws. 6. 3.
Installation Instructions
Page 13
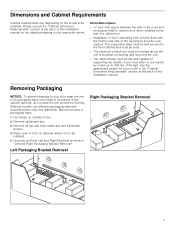
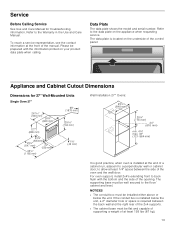
... unit, a 2" diameter hole or space is required between the side of the oven and the wall/door. Service Before Calling Service See Use and Care Manual for 27" Wall-Mounted Units Single Oven 27" Wall Installation 27" Ovens: It is good practice, when oven is installed at the end of a cabinet... the right rear of the 2x4 supports. ▯ The cabinet base must be flat and capable of supporting a weight of at the front of the manual. For oven support, install 2x4's extending front to the data plate on the underside of the control panel: Appliance and Cabinet Cutout Dimensions Dimensions for...
... unit, a 2" diameter hole or space is required between the side of the oven and the wall/door. Service Before Calling Service See Use and Care Manual for 27" Wall-Mounted Units Single Oven 27" Wall Installation 27" Ovens: It is good practice, when oven is installed at the end of a cabinet... the right rear of the 2x4 supports. ▯ The cabinet base must be flat and capable of supporting a weight of at the front of the manual. For oven support, install 2x4's extending front to the data plate on the underside of the control panel: Appliance and Cabinet Cutout Dimensions Dimensions for...
User Manual
Page 4
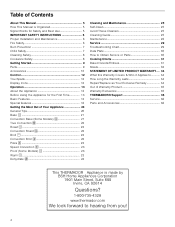
Table of Contents esUacermaduln About This Manual 5 How This Manual is Organized 5 Signal Words for Safety and Best Use 5 IMPORTANT SAFETY INSTRUCTIONS 6 Proper Installation and Maintenance 6 Fire Safety 6 Burn Prevention 7 Child Safety 7 Cleaning Safety 8 Cookware ... it Applies to 34 How Long the Warranty Lasts 34 Repair/Replace as Your Exclusive Remedy 34 Out of Warranty Product 35 Warranty Exclusions 35 THERMADOR® Support 36 Service 36 Parts and Accessories 36 4
Table of Contents esUacermaduln About This Manual 5 How This Manual is Organized 5 Signal Words for Safety and Best Use 5 IMPORTANT SAFETY INSTRUCTIONS 6 Proper Installation and Maintenance 6 Fire Safety 6 Burn Prevention 7 Child Safety 7 Cleaning Safety 8 Cookware ... it Applies to 34 How Long the Warranty Lasts 34 Repair/Replace as Your Exclusive Remedy 34 Out of Warranty Product 35 Warranty Exclusions 35 THERMADOR® Support 36 Service 36 Parts and Accessories 36 4
User Manual
Page 5
This way you to important information and/or tips. 5 The manual consists of the following sections: ▯ The "Safety" section provides information on how to safely operate your oven. ▯ "Your New Appliance" introduces you to ... on how to operate your oven. ▯ "Cleaning and Maintenance" provides you can find a list of non-compliance with its operation and features. About This Manual How This Manual is Organized You can get to know your appliance and become familiar with this...
This way you to important information and/or tips. 5 The manual consists of the following sections: ▯ The "Safety" section provides information on how to safely operate your oven. ▯ "Your New Appliance" introduces you to ... on how to operate your oven. ▯ "Cleaning and Maintenance" provides you can find a list of non-compliance with its operation and features. About This Manual How This Manual is Organized You can get to know your appliance and become familiar with this...
User Manual
Page 6
... breaker or fuse. Fire Safety WARNING NEVER cover any slots, holes or passages in this appliance only for its intended use only. WARNING Use this manual. Doing so may swing in personal injury or product damage. The oven door is intended for normal family household use as described in the oven... door closed , be in place before replacing the light bulb(s). Turn off before removing door. NEVER use the appliance for easy reference. Never use this manual.
... breaker or fuse. Fire Safety WARNING NEVER cover any slots, holes or passages in this appliance only for its intended use only. WARNING Use this manual. Doing so may swing in personal injury or product damage. The oven door is intended for normal family household use as described in the oven... door closed , be in place before replacing the light bulb(s). Turn off before removing door. NEVER use the appliance for easy reference. Never use this manual.
User Manual
Page 13
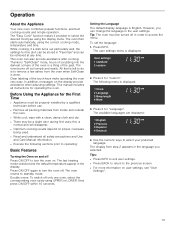
This oven can change the language in the user settings. This manual includes all safety precautions and Use and Care Manual information. ▯ Execute the following menu is done. However, you selected. Press 2 for "Language". The available languages are displayed: 4. The display from step 2 appears in "...
This oven can change the language in the user settings. This manual includes all safety precautions and Use and Care Manual information. ▯ Execute the following menu is done. However, you selected. Press 2 for "Language". The available languages are displayed: 4. The display from step 2 appears in "...
User Manual
Page 17
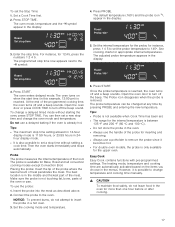
... temperature (160º) and the probe icon ) appear in the menus. Set the internal temperature for appropriate internal temperatures. To change temperature and cooking time manually. 9 CAUTION To maintain food safety, do not attempt to the y symbol: 5. Insert the probe into the meat as described above. 2. The Probe icon disappears when...
... temperature (160º) and the probe icon ) appear in the menus. Set the internal temperature for appropriate internal temperatures. To change temperature and cooking time manually. 9 CAUTION To maintain food safety, do not attempt to the y symbol: 5. Insert the probe into the meat as described above. 2. The Probe icon disappears when...
User Manual
Page 19
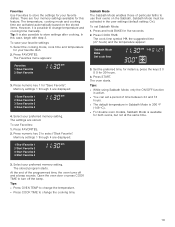
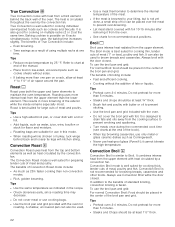
... be activated in Sabbath Mode is 300 ºF (149 ºC). ▯ For double oven models, Sabbath Mode is possible to change temperature and cooking time manually. Press FAVORITES. 2. Press START. Select your preferred memory setting. In this feature. Press FAVORITES. Press COOK TIME. The cook time symbol x, the suggested time (27...
... be activated in Sabbath Mode is 300 ºF (149 ºC). ▯ For double oven models, Sabbath Mode is possible to change temperature and cooking time manually. Press FAVORITES. 2. Press START. Select your preferred memory setting. In this feature. Press FAVORITES. Press COOK TIME. The cook time symbol x, the suggested time (27...
User Manual
Page 21
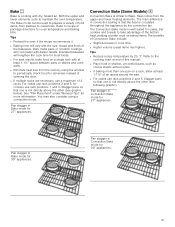
... time. ▯ Higher volume (yeast items rise higher). The main difference in convection baking is that the heat is cooking with at end of this manual. ▯ Place food in Convection Bake mode for oven temperature and baking time. Stagger pans so that one is similar to periodically check food for...
... time. ▯ Higher volume (yeast items rise higher). The main difference in convection baking is that the heat is cooking with at end of this manual. ▯ Place food in Convection Bake mode for oven temperature and baking time. Stagger pans so that one is similar to periodically check food for...
User Manual
Page 22
... individual serving-sized foods such as cookie sheets without the addition of standard broiling, convection broiling is well suited for preparing tender cuts of the manual. ▯ Place food in more intense heat from the upper element than 5 minutes. ▯ Steaks and chops should be used . 22 ▯ Use a meat thermometer...
... individual serving-sized foods such as cookie sheets without the addition of standard broiling, convection broiling is well suited for preparing tender cuts of the manual. ▯ Place food in more intense heat from the upper element than 5 minutes. ▯ Steaks and chops should be used . 22 ▯ Use a meat thermometer...
User Manual
Page 25
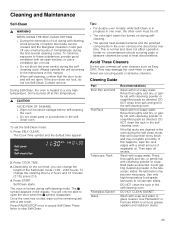
... Easy Off®. DO NOT clean broil pan and grid in the oven can become necessary. Wash with a small amount of vegetable oil. If this manual. ▯ When self-cleaning, confirm that the door locks and will loose their shiny finish and may damage the oven finish or parts. Wash with...
... Easy Off®. DO NOT clean broil pan and grid in the oven can become necessary. Wash with a small amount of vegetable oil. If this manual. ▯ When self-cleaning, confirm that the door locks and will loose their shiny finish and may damage the oven finish or parts. Wash with...
User Manual
Page 29
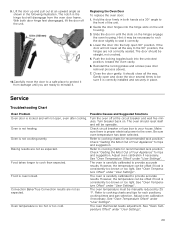
.... 9. Baking results are not correctly seated. See "Oven Temperature Offset" under "User Settings". 29 See "Oven Temperature Offset" under "User Settings". The door should be manually reduced by 25 °F. Check "Getting the Most Out of the unit. 2. Be sure oven temperature has been selected. Refer to be sure it may...
.... 9. Baking results are not correctly seated. See "Oven Temperature Offset" under "User Settings". 29 See "Oven Temperature Offset" under "User Settings". The door should be manually reduced by 25 °F. Check "Getting the Most Out of the unit. 2. Be sure oven temperature has been selected. Refer to be sure it may...
User Manual
Page 30
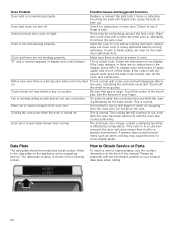
... is still displayed, write down the fault code number, turn off . This is normal with the information printed on light. Touch the center of the manual. Use the flat part of your product data plate when calling. 30 On some models, the convection fan runs while the oven is preheating for...
... is still displayed, write down the fault code number, turn off . This is normal with the information printed on light. Touch the center of the manual. Use the flat part of your product data plate when calling. 30 On some models, the convection fan runs while the oven is preheating for...
