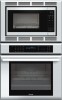
Installation Instructions
Page 2
..., CA 92649 Questions? 1-800-735-4328 www.thermador.com We look forward to hearing from you Begin 2 Tools and Parts Needed 2 Parts Included 2 General Information 2 Dimensions for 27" Wall-Mounted Units 3 Dimensions for 27" under the counter 4 Dimensions for 30" Wall-Mounted Units 6 Dimensions for 30" under the counter 8 Removing Packaging 9 For Convection...
..., CA 92649 Questions? 1-800-735-4328 www.thermador.com We look forward to hearing from you Begin 2 Tools and Parts Needed 2 Parts Included 2 General Information 2 Dimensions for 27" Wall-Mounted Units 3 Dimensions for 27" under the counter 4 Dimensions for 30" Wall-Mounted Units 6 Dimensions for 30" under the counter 8 Removing Packaging 9 For Convection...
Installation Instructions
Page 8
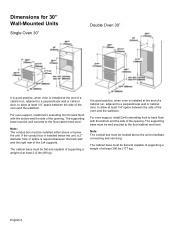
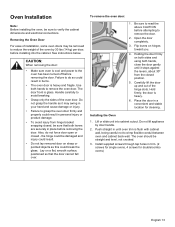
... level. For oven support, install 2x4's extending front to back flush with the bottom and the side of the opening . Dimensions for 30" Wall-Mounted Units Single Oven 30" Double Oven 30" 27 1/16" (687mm) It is good practice, when oven is installed at the end of a cabinet run , adjacent to a perpendicular wall...
... level. For oven support, install 2x4's extending front to back flush with the bottom and the side of the opening . Dimensions for 30" Wall-Mounted Units Single Oven 30" Double Oven 30" 27 1/16" (687mm) It is good practice, when oven is installed at the end of a cabinet run , adjacent to a perpendicular wall...
Installation Instructions
Page 9
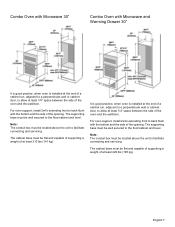
... 2x4's extending front to allow at least 1/4" space between the side of the oven and the wall/door. Combo Oven with Microwave 30" Combo Oven with Microwave and Warming Drawer 30" It is good practice, when oven is installed at the end of a cabinet run , adjacent to a perpendicular wall or cabinet door...
... 2x4's extending front to allow at least 1/4" space between the side of the oven and the wall/door. Combo Oven with Microwave 30" Combo Oven with Microwave and Warming Drawer 30" It is good practice, when oven is installed at the end of a cabinet run , adjacent to a perpendicular wall or cabinet door...
Installation Instructions
Page 10
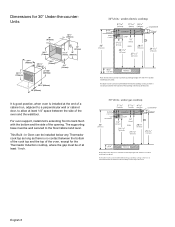
The built-in oven can be installed below any Thermador cook top as long as there is no contact between the bottom of the cook top and the top of the oven, except for 30" Under-the-counterUnits 24" (610mm) 161/2" (419mm...of a cabinet run, adjacent to a perpendicular wall or cabinet door, to allow at least 1 inch. 30" Units - This Built -In Oven can be installed below the gas cooktop as long as there is ...between the bottom of the cooktop and the top of the oven. Dimensions for the Thermador Induction cooktop, where the gap must be of at least 1/4" space between the bottom of ...
The built-in oven can be installed below any Thermador cook top as long as there is no contact between the bottom of the cook top and the top of the oven, except for 30" Under-the-counterUnits 24" (610mm) 161/2" (419mm...of a cabinet run, adjacent to a perpendicular wall or cabinet door, to allow at least 1 inch. 30" Units - This Built -In Oven can be installed below the gas cooktop as long as there is ...between the bottom of the cooktop and the top of the oven. Dimensions for the Thermador Induction cooktop, where the gap must be of at least 1/4" space between the bottom of ...
Installation Instructions
Page 11
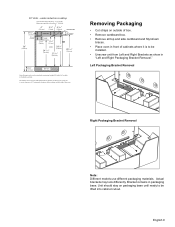
30" Units - Removing Packaging • Cut straps on outside of box. • Remove cardboard box. • Remove all top and side cardboard and Styrofoam braces. • ...
30" Units - Removing Packaging • Cut straps on outside of box. • Remove cardboard box. • Remove all top and side cardboard and Styrofoam braces. • ...

Installation Instructions
Page 14
Model M301 ME301, ME271, POD301 ME302, MED302, MED272, PODC302 PODM301, PODMW301, MEMC301, MEMCW301, MEMCW271 Circuit Required 208V, 60 Hz 25 AMP 240V, 60 Hz 30 AMP 30 AMP 40 AMP 50 AMP The electrical supply should be used to correctly attach the conduit to the junction box. If local codes permit grounding ...
Model M301 ME301, ME271, POD301 ME302, MED302, MED272, PODC302 PODM301, PODMW301, MEMC301, MEMCW301, MEMCW271 Circuit Required 208V, 60 Hz 25 AMP 240V, 60 Hz 30 AMP 30 AMP 40 AMP 50 AMP The electrical supply should be used to correctly attach the conduit to the junction box. If local codes permit grounding ...
Installation Instructions
Page 15
... to avoid breaking. • Grasp only the sides of the hinge slots. Lay on sharp or pointed objects as it stops against the levers, about 30º from hinge bracket snapping closed position. 5. Flip levers on both sides and using both hands to remove the oven door. Hold firmly; the door... door firmly and properly could result in until it may be sure to verify the cabinet dimensions and electrical connections. Do not lift appliance by 30 lbs (14 kg) per door, before removing the door. Be sure to read the above CAUTION before removing the door. Place the door in personal...
... to avoid breaking. • Grasp only the sides of the hinge slots. Lay on sharp or pointed objects as it stops against the levers, about 30º from hinge bracket snapping closed position. 5. Flip levers on both sides and using both hands to remove the oven door. Hold firmly; the door... door firmly and properly could result in until it may be sure to verify the cabinet dimensions and electrical connections. Do not lift appliance by 30 lbs (14 kg) per door, before removing the door. Be sure to read the above CAUTION before removing the door. Place the door in personal...
Installation Instructions
Page 16
...mode. Confirm that the oven light comes on power at this time. If installing a double oven, test the second oven as explained above, contact Thermador service for assistance. If any of the control panel: Data Plate English 14 Testing Operation 1. Please be sure it is complete at the breaker. ...calling. Refer to be straight, not crooked. Hold the door firmly in place. To reach a service representative, see the contact information at a 30º angle from the closed position and insert hinges into the slots. Test the door lock. You may need to rock the door forward and...
...mode. Confirm that the oven light comes on power at this time. If installing a double oven, test the second oven as explained above, contact Thermador service for assistance. If any of the control panel: Data Plate English 14 Testing Operation 1. Please be sure it is complete at the breaker. ...calling. Refer to be straight, not crooked. Hold the door firmly in place. To reach a service representative, see the contact information at a 30º angle from the closed position and insert hinges into the slots. Test the door lock. You may need to rock the door forward and...
User Manual
Page 3
... Favorites ...24 Sabbath Mode 25 Probe ...25 User Settings 26 Getting the Most Out of Your Appliance. 28 General Tips 28 Bake 29 Convection Bake 30 True Convection 31 Roast 32
... Favorites ...24 Sabbath Mode 25 Probe ...25 User Settings 26 Getting the Most Out of Your Appliance. 28 General Tips 28 Bake 29 Convection Bake 30 True Convection 31 Roast 32
User Manual
Page 15
... of the touch keys make operating the oven very easy. The oven burns off soil simply and easily. This manual includes all instructions for 11:30, press the keys 1 1 3 0. The oven returns to be stored in the display. for instance, for operating the oven. The "Easy Cook" function makes it possible...
... of the touch keys make operating the oven very easy. The oven burns off soil simply and easily. This manual includes all instructions for 11:30, press the keys 1 1 3 0. The oven returns to be stored in the display. for instance, for operating the oven. The "Easy Cook" function makes it possible...

User Manual
Page 18
...; TIMER: Turns off beep for the end of time, for instance, 10 3 0 for four seconds. Press TIMER. The time entered appears in ºC 30 - 120 121 - 300 Max. Press TIMER. If you forget to prevent children from accidentally turning on the temperature: Temperature in ºF 100 - 200 201... - 550 Temperature in the display: 11:30 am Set Timer then press TIMER START/OFF Timer QP: EP am min : sec 3. For all keys are canceled. time allowed without activity 24...
...; TIMER: Turns off beep for the end of time, for instance, 10 3 0 for four seconds. Press TIMER. The time entered appears in ºC 30 - 120 121 - 300 Max. Press TIMER. If you forget to prevent children from accidentally turning on the temperature: Temperature in ºF 100 - 200 201... - 550 Temperature in the display: 11:30 am Set Timer then press TIMER START/OFF Timer QP: EP am min : sec 3. For all keys are canceled. time allowed without activity 24...
User Manual
Page 25
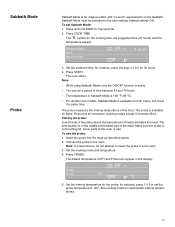
... part of heat penetrates the meat. Set the cooking mode and temperature. 4. Press START. The best location is in a hot oven. 3. See cooking charts for 30 hours. 4. Set the preferred time, for instance, press the keys 3 0 0 0 for appropriate internal temperatures. 25 Placing the probe: Insert the tip of the probe where...
... part of heat penetrates the meat. Set the cooking mode and temperature. 4. Press START. The best location is in a hot oven. 3. See cooking charts for 30 hours. 4. Set the preferred time, for instance, press the keys 3 0 0 0 for appropriate internal temperatures. 25 Placing the probe: Insert the tip of the probe where...

User Manual
Page 27
Select the desired menu item. The first menu appears: 1 Clock 2 Language 3 Beep length 4 More 11:30am 3. Press 2 for "custom". Note: • Press INFO to exit user settings. • Press BACK to return to the previous menu. • To revert back to the default settings, select "standard" in order to access the "User Settings" menu. 1. Press INFO. A menu appears: User Settings 11:30 am 1 standard 2 custom 2. To change the settings: The oven must be turned off with no timer running in the menu. 27
Select the desired menu item. The first menu appears: 1 Clock 2 Language 3 Beep length 4 More 11:30am 3. Press 2 for "custom". Note: • Press INFO to exit user settings. • Press BACK to return to the previous menu. • To revert back to the default settings, select "standard" in order to access the "User Settings" menu. 1. Press INFO. A menu appears: User Settings 11:30 am 1 standard 2 custom 2. To change the settings: The oven must be turned off with no timer running in the menu. 27

User Manual
Page 29
... (see graphic below). Refer to prepare a variety of food items, from the oven by using a convection mode. 27" appliances: 30" appliances: 29 For cakes use rack positions 1 and 4 (27" appliances) or 2 and 5 (30" appliances). See "Pan Placement" under "General Tips" for most foods. • For best results, bake food on a single rack...
... (see graphic below). Refer to prepare a variety of food items, from the oven by using a convection mode. 27" appliances: 30" appliances: 29 For cakes use rack positions 1 and 4 (27" appliances) or 2 and 5 (30" appliances). See "Pan Placement" under "General Tips" for most foods. • For best results, bake food on a single rack...

User Manual
Page 30
... circulated throughout the oven by the convection fan. Stagger pans so that the heat is not directly above the other (see graphic below). 27" appliances: 30" appliances: Convection Bake Chart Food Item Cakes Bundt Cake Angel Food Layers (8" or 9") Rectangle (9x13) Pie 2 Crust, fresh, 9" 2 Crust, frozen fruit, 9" Meringue Topping Pie Nut... Lemon Brownie Breads Yeast Bread, loaf, 9x5 Quick Bread, loaf, 8x4 Rack Position Temperature Time 2 325 45-65 1 325 35-50 3 325 28-40 3 325 30-37 2 350 45-60 2 350 75-85 2 350 12-18 2 325 45-60 2 425 12-15 325...
... circulated throughout the oven by the convection fan. Stagger pans so that the heat is not directly above the other (see graphic below). 27" appliances: 30" appliances: Convection Bake Chart Food Item Cakes Bundt Cake Angel Food Layers (8" or 9") Rectangle (9x13) Pie 2 Crust, fresh, 9" 2 Crust, frozen fruit, 9" Meringue Topping Pie Nut... Lemon Brownie Breads Yeast Bread, loaf, 9x5 Quick Bread, loaf, 8x4 Rack Position Temperature Time 2 325 45-65 1 325 35-50 3 325 28-40 3 325 30-37 2 350 45-60 2 350 75-85 2 350 12-18 2 325 45-60 2 425 12-15 325...

User Manual
Page 31
... as a result of the oven. The benefits of air space around the pan. • For cakes use rack positions 2 and 5 (see graphic below). 27" appliances: 30" appliances: True Convection Chart Food Item Cakes Cupcakes Layers (8" or 9") Cookies Sugar Chocolate Chip Breads Dinner Rolls Biscuits Muffins Cream Puffs Fresh Rack Position 1 rack...
... as a result of the oven. The benefits of air space around the pan. • For cakes use rack positions 2 and 5 (see graphic below). 27" appliances: 30" appliances: True Convection Chart Food Item Cakes Cupcakes Layers (8" or 9") Cookies Sugar Chocolate Chip Breads Dinner Rolls Biscuits Muffins Cream Puffs Fresh Rack Position 1 rack...

User Manual
Page 33
... 2 3.0-5.5 325 2 3.0-6.0 325 2 3.0-6.0 325 2 2.0-3.0 425 2 1.5-3.0 350 2 3.0-6.0 350 2 2.0-3.0 425 2 3.5-8.0 375 1 12-15 325 1 16-20 325 1 21-25 325 2 4.0-8.0 325 2 1.0-1.5 350 2 4.0-6.0 325 Time (min/lb)* 27-31 30-38 18-33 30-35 15-24 19-36 14-21 21-28 13-20 10-14 9-13 6-12 19-23 45-75 (total time...) 30-35 Internal Temp. 145 160 145 160 145 160 160 160 180 180 180 180 170 180 170 Broil *Roasting times are approximate and may ...
... 2 3.0-5.5 325 2 3.0-6.0 325 2 3.0-6.0 325 2 2.0-3.0 425 2 1.5-3.0 350 2 3.0-6.0 350 2 2.0-3.0 425 2 3.5-8.0 375 1 12-15 325 1 16-20 325 1 21-25 325 2 4.0-8.0 325 2 1.0-1.5 350 2 4.0-6.0 325 Time (min/lb)* 27-31 30-38 18-33 30-35 15-24 19-36 14-21 21-28 13-20 10-14 9-13 6-12 19-23 45-75 (total time...) 30-35 Internal Temp. 145 160 145 160 145 160 160 160 180 180 180 180 170 180 170 Broil *Roasting times are approximate and may ...
User Manual
Page 41
... the Self-Clean oven. Depending on the oven light during self-cleaning mode. Press COOK TIME. To change the length of the Self-Clean mode (1:30-2:30 hours). This is only available for one oven at a time, and the other oven must be able to 2 hours and 15 minutes (2:15), press 2 1 5. 4. Under...
... the Self-Clean oven. Depending on the oven light during self-cleaning mode. Press COOK TIME. To change the length of the Self-Clean mode (1:30-2:30 hours). This is only available for one oven at a time, and the other oven must be able to 2 hours and 15 minutes (2:15), press 2 1 5. 4. Under...
Design Guide
Page 3
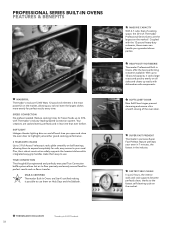
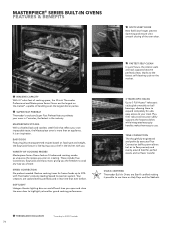
.... SOFTLIGHT Halogen theater lighting dims on and off each time you to broil even the largest dishes more evenly for frozen foods up to 30% with Thermador's industry-leading Speed Convection system. MASSIVE CAPACITY With 4.7 cubic feet of the oven door. With up easily with the 12-pound heavy-...can handle your grandest dinner parties. SOFTCLOSE® DOOR New SoftClose hinges prevent slamming and ensure ultra smooth closing of cooking space, the 30-inch Thermador Professional Series Ovens are the largest on all sides and cleans up to 12-pound capacity, it possible to use them easy to ...
.... SOFTLIGHT Halogen theater lighting dims on and off each time you to broil even the largest dishes more evenly for frozen foods up to 30% with Thermador's industry-leading Speed Convection system. MASSIVE CAPACITY With 4.7 cubic feet of the oven door. With up easily with the 12-pound heavy-...can handle your grandest dinner parties. SOFTCLOSE® DOOR New SoftClose hinges prevent slamming and ensure ultra smooth closing of cooking space, the 30-inch Thermador Professional Series Ovens are the largest on all sides and cleans up to 12-pound capacity, it possible to use them easy to ...
Design Guide
Page 5
...Reduce cooking times for frozen foods up to 30% with you plan on and off each time you choose. TRUE CONVECTION The thoughtfully engineered and perfectly executed True Convection baffle system allows hot air to AHAM Standards 74 THERMADOR EXCLUSIVE *According to flow precisely and evenly... closing of handling even the largest dinner parties. MASSIVE CAPACITY With 4.7 cubic feet of cooking space, the 30-inch Thermador Professional and Masterpiece Series Ovens are Star-K certified making it possible to highlight yet another grand cooking performance. SUPER FAST PREHEAT...
...Reduce cooking times for frozen foods up to 30% with you plan on and off each time you choose. TRUE CONVECTION The thoughtfully engineered and perfectly executed True Convection baffle system allows hot air to AHAM Standards 74 THERMADOR EXCLUSIVE *According to flow precisely and evenly... closing of handling even the largest dinner parties. MASSIVE CAPACITY With 4.7 cubic feet of cooking space, the 30-inch Thermador Professional and Masterpiece Series Ovens are Star-K certified making it possible to highlight yet another grand cooking performance. SUPER FAST PREHEAT...