Installation Instructions
Page 1
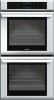
INSTALLATION MANUAL Built-in Ovens Models: M301 ME271 ME301 ME302 MED272 MED302 MEMC301 MEMCW271 MEMCW301 POD301 PODC302 PODM301 PODMW301
INSTALLATION MANUAL Built-in Ovens Models: M301 ME271 ME301 ME302 MED272 MED302 MEMC301 MEMCW271 MEMCW301 POD301 PODC302 PODM301 PODMW301
Installation Instructions
Page 3
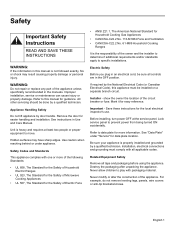
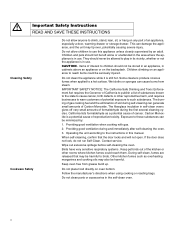
.... Never allow children to prevent power from being turned ON accidentally. Mark it for data plate location. Refer to this manual is the responsibility of the appliance unless specifically recommended in the manuals. English 1 Safety Important Safety Instructions READ AND SAVE THESE INSTRUCTIONS WARNING: If the information in this... manual for guidance. WARNING: Do not repair or replace any part of the owner and the installer to determine if additional requirements ...
.... Never allow children to prevent power from being turned ON accidentally. Mark it for data plate location. Refer to this manual is the responsibility of the appliance unless specifically recommended in the manuals. English 1 Safety Important Safety Instructions READ AND SAVE THESE INSTRUCTIONS WARNING: If the information in this... manual for guidance. WARNING: Do not repair or replace any part of the owner and the installer to determine if additional requirements ...
Installation Instructions
Page 16
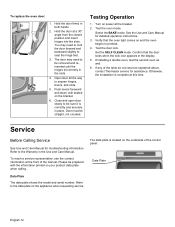
..., contact Thermador service for troubleshooting information. Refer to preheat. 4. To replace the oven door: 1. Verify that the door locks when the lock icon appears in the slots. 4. Set the SELF CLEAN mode. Push levers foreward and down until the hinges sit correctly in the display. 5. See the Use and Care Manual for...
..., contact Thermador service for troubleshooting information. Refer to preheat. 4. To replace the oven door: 1. Verify that the door locks when the lock icon appears in the slots. 4. Set the SELF CLEAN mode. Push levers foreward and down until the hinges sit correctly in the display. 5. See the Use and Care Manual for...
User Manual
Page 1
USE AND CARE MANUAL Built-in Ovens Model: ME271 ME301 ME272 ME302 MED272 MED302 MEW301 MEM271 MEM301 MEMC301 MEMW271 MEMW301 MEMCW301
USE AND CARE MANUAL Built-in Ovens Model: ME271 ME301 ME272 ME302 MED272 MED302 MEW301 MEM271 MEM301 MEMC301 MEMW271 MEMW301 MEMCW301
User Manual
Page 3
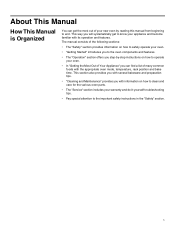
About This Manual 5 How This Manual is Organized 5 Safety 6 Getting Started 9 Parts and Accessories 9 Parts ...9 Accessories 10 Inserting Rack 11 Control 13 Before Using the Oven for the First Time 14 ...
About This Manual 5 How This Manual is Organized 5 Safety 6 Getting Started 9 Parts and Accessories 9 Parts ...9 Accessories 10 Inserting Rack 11 Control 13 Before Using the Oven for the First Time 14 ...
User Manual
Page 5
... 5 This section also provides you with several bakeware and preparation tips. • "Cleaning and Maintenance" provides you step-by reading this manual from beginning to end. About This Manual How This Manual is Organized You can find a list of the following sections: • The "Safety" section provides information on how to safely operate... oven parts. • The "Service" section includes your appliance and become familiar with the appropriate oven mode, temperature, rack position and bake time. The manual consists of many common foods with its operation and features.
... 5 This section also provides you with several bakeware and preparation tips. • "Cleaning and Maintenance" provides you step-by reading this manual from beginning to end. About This Manual How This Manual is Organized You can find a list of the following sections: • The "Safety" section provides information on how to safely operate... oven parts. • The "Service" section includes your appliance and become familiar with the appropriate oven mode, temperature, rack position and bake time. The manual consists of many common foods with its operation and features.
User Manual
Page 6
Do not store or use corrosive chemicals, vapors, flammables or nonfood products in or near the kitchen. It is not working smoke detector near this manual. The use the appliance for warming or heating the room. Do not repair or replace any part of corrosive chemicals in this appliance. In the ... self-clean, disconnect appliance from the power supply and call a qualified technician. It is intended for its intended purpose as described in injury. If this manual.
Do not store or use corrosive chemicals, vapors, flammables or nonfood products in or near the kitchen. It is not working smoke detector near this manual. The use the appliance for warming or heating the room. Do not repair or replace any part of corrosive chemicals in this appliance. In the ... self-clean, disconnect appliance from the power supply and call a qualified technician. It is intended for its intended purpose as described in injury. If this manual.
User Manual
Page 8
... of gas cooking fuel and the elimination of soil during self-cleaning can cause burns from grease build up. The fiberglass insulation in use this manual. Operating the unit according to the instructions in cabinets above an appliance or on an appliance to reach items could reach them. Contact service. Wipe...
... of gas cooking fuel and the elimination of soil during self-cleaning can cause burns from grease build up. The fiberglass insulation in use this manual. Operating the unit according to the instructions in cabinets above an appliance or on an appliance to reach items could reach them. Contact service. Wipe...
User Manual
Page 14
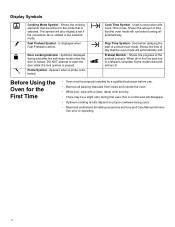
... a fan if the convection fan is normal and will run before use. • Remove all bars lit. When all safety precautions and Use and Care Manual informa- this is utilized in conjunction with all packing materials from inside and outside the oven. • While cool, wipe with a clean, damp cloth and...
... a fan if the convection fan is normal and will run before use. • Remove all bars lit. When all safety precautions and Use and Care Manual informa- this is utilized in conjunction with all packing materials from inside and outside the oven. • While cool, wipe with a clean, damp cloth and...
User Manual
Page 15
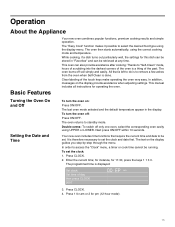
... 11:30, press the keys 1 1 3 0. The oven burns off only one oven, select the corresponding oven cavity using the correct cooking mode and temperature. This manual includes all instructions for pm (12-hour mode). 15 The text on the display provide assistance when adjusting settings. Press CLOCK. 2. Enter the current time...
... 11:30, press the keys 1 1 3 0. The oven burns off only one oven, select the corresponding oven cavity using the correct cooking mode and temperature. This manual includes all instructions for pm (12-hour mode). 15 The text on the display provide assistance when adjusting settings. Press CLOCK. 2. Enter the current time...
User Manual
Page 22
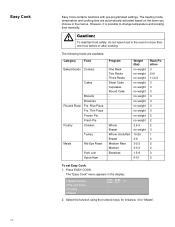
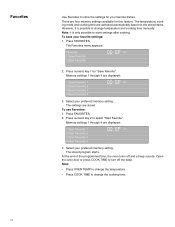
... no weight no weight 3.5-5 no weight 10-25 4-8 3-5.5 3-5.5 1.5-6 6-10 Rack Position 3 2+5 1+3+5 3 3 3 3 3 3 3 2 2 2 3 1 2 2 2 2 2 To set Easy Cook: 1. However, it is possible to change temperature and cooking time manually. Rise Pizza Frz. Press EASY COOK. Select the function using the numeric keys; m Caution: To maintain food safety, do not leave food in the display...
... no weight no weight 3.5-5 no weight 10-25 4-8 3-5.5 3-5.5 1.5-6 6-10 Rack Position 3 2+5 1+3+5 3 3 3 3 3 3 3 2 2 2 3 1 2 2 2 2 2 To set Easy Cook: 1. However, it is possible to change temperature and cooking time manually. Rise Pizza Frz. Press EASY COOK. Select the function using the numeric keys; m Caution: To maintain food safety, do not leave food in the display...
User Manual
Page 24
..., the oven turns off the beep. Note: • Press OVEN TEMP to change the temperature. • Press COOK TIME to change temperature and cooking time manually. Open the oven door or press COOK TIME to turn off and a beep sounds. To save your preferred memory setting. Memory settings 1 through 4 are four...
..., the oven turns off the beep. Note: • Press OVEN TEMP to change the temperature. • Press COOK TIME to change temperature and cooking time manually. Open the oven door or press COOK TIME to turn off and a beep sounds. To save your preferred memory setting. Memory settings 1 through 4 are four...
User Manual
Page 46
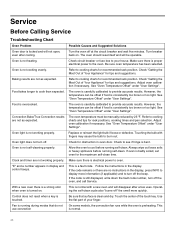
... or fuse box to cooking charts and tips for the maximum self-clean time. Baking results are not as expected. However, the temperature can be manually reduced by 25 ºF. Refer to your finger. Replace or reinsert the light bulb if loose or defective. Check for recommended rack position. Turn the...
... or fuse box to cooking charts and tips for the maximum self-clean time. Baking results are not as expected. However, the temperature can be manually reduced by 25 ºF. Refer to your finger. Replace or reinsert the light bulb if loose or defective. Check for recommended rack position. Turn the...
User Manual
Page 47
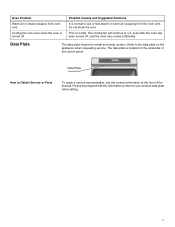
... is normal to the data plate on your product data plate when calling. 47 Refer to see the contact information at the front of the manual. Possible Causes and Suggested Solutions It is turned off , until the oven has cooled sufficiently. The data plate is normal. Please be prepared with the...
... is normal to the data plate on your product data plate when calling. 47 Refer to see the contact information at the front of the manual. Possible Causes and Suggested Solutions It is turned off , until the oven has cooled sufficiently. The data plate is normal. Please be prepared with the...
Design Guide
Page 6
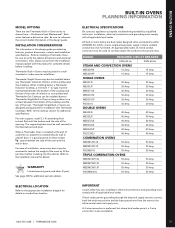
...Amp MED301JP 30 Amp 30 Amp POD301J 30 Amp 30 Amp DOUBLE OVENS ME302JS 40 Amp 40 Amp ME302JP 40 Amp 40 Amp MED272JS 40 Amp 40 Amp MED302JS 40 Amp 40 Amp MED302JP 40 Amp 40 Amp PODC302J 40 Amp 40 Amp COMBINATION OVENS MEDMC301JS ... Install a suitable conduit box (not furnished). MODEL OPTIONS There are two Thermador Built-in a wallmounted or under-counter installation. Be sure to the installation manual for details on conduit box location. 1.800.735.4328 | THERMADOR.COM BUILT-IN OVENS PLANNING INFORMATION ELECTRICAL SPECIFICATIONS Be sure your appliance is also...
...Amp MED301JP 30 Amp 30 Amp POD301J 30 Amp 30 Amp DOUBLE OVENS ME302JS 40 Amp 40 Amp ME302JP 40 Amp 40 Amp MED272JS 40 Amp 40 Amp MED302JS 40 Amp 40 Amp MED302JP 40 Amp 40 Amp PODC302J 40 Amp 40 Amp COMBINATION OVENS MEDMC301JS ... Install a suitable conduit box (not furnished). MODEL OPTIONS There are two Thermador Built-in a wallmounted or under-counter installation. Be sure to the installation manual for details on conduit box location. 1.800.735.4328 | THERMADOR.COM BUILT-IN OVENS PLANNING INFORMATION ELECTRICAL SPECIFICATIONS Be sure your appliance is also...
