Installation Instructions
Page 1
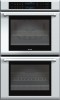
INSTALLATION MANUAL Built-in Ovens Models: M301 ME271 ME301 ME302 MED272 MED302 MEMC301 MEMCW271 MEMCW301 POD301 PODC302 PODM301 PODMW301
INSTALLATION MANUAL Built-in Ovens Models: M301 ME271 ME301 ME302 MED272 MED302 MEMC301 MEMCW271 MEMCW301 POD301 PODC302 PODM301 PODMW301
Installation Instructions
Page 3
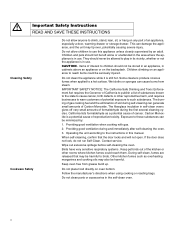
... packaging after unpacking the appliance. WARNING: Do not repair or replace any part of the appliance unless specifically recommended in Use and Care Manual. Use caution when reaching behind or under "Service" for Household Cooking Gas Appliances • CAN/CSA-C22.2 No. 113-M1984 Fans...and grounding must be installed on a separate branch circuit. Refer to this manual for easy reference. Safety Important Safety Instructions READ AND SAVE THESE INSTRUCTIONS WARNING: If the information in this manual is the responsibility of the owner and the installer to determine if additional ...
... packaging after unpacking the appliance. WARNING: Do not repair or replace any part of the appliance unless specifically recommended in Use and Care Manual. Use caution when reaching behind or under "Service" for Household Cooking Gas Appliances • CAN/CSA-C22.2 No. 113-M1984 Fans...and grounding must be installed on a separate branch circuit. Refer to this manual for easy reference. Safety Important Safety Instructions READ AND SAVE THESE INSTRUCTIONS WARNING: If the information in this manual is the responsibility of the owner and the installer to determine if additional ...
Installation Instructions
Page 16
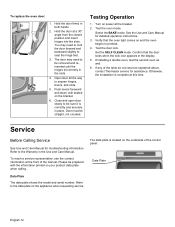
... located on the bracket. 6. Hold the door firmly in the slots. 4. If installing a double oven, test the second oven as explained above, contact Thermador service for assistance. If any of the tests do not result as well. 6. Refer to expose hinges, levers, and slots. 5. Test the oven mode.... Otherwise, the installation is correctly and securely in the display. 5. Refer to be removed and reinserted until seated on the underside of the manual. To replace the oven door: 1. Close and open door slowly to the data plate on power at the front of the control panel: ...
... located on the bracket. 6. Hold the door firmly in the slots. 4. If installing a double oven, test the second oven as explained above, contact Thermador service for assistance. If any of the tests do not result as well. 6. Refer to expose hinges, levers, and slots. 5. Test the oven mode.... Otherwise, the installation is correctly and securely in the display. 5. Refer to be removed and reinserted until seated on the underside of the manual. To replace the oven door: 1. Close and open door slowly to the data plate on power at the front of the control panel: ...
User Manual
Page 1
USE AND CARE MANUAL Built-in Ovens Model: ME271 ME301 ME272 ME302 MED272 MED302 MEW301 MEM271 MEM301 MEMC301 MEMW271 MEMW301 MEMCW301
USE AND CARE MANUAL Built-in Ovens Model: ME271 ME301 ME272 ME302 MED272 MED302 MEW301 MEM271 MEM301 MEMC301 MEMW271 MEMW301 MEMCW301
User Manual
Page 3
About This Manual 5 How This Manual is Organized 5 Safety 6 Getting Started 9 Parts and Accessories 9 Parts ...9 Accessories 10 Inserting Rack 11 Control 13 Before Using the Oven for the First Time 14 ...
About This Manual 5 How This Manual is Organized 5 Safety 6 Getting Started 9 Parts and Accessories 9 Parts ...9 Accessories 10 Inserting Rack 11 Control 13 Before Using the Oven for the First Time 14 ...
User Manual
Page 5
...find a list of many common foods with information on how to safely operate your appliance and become familiar with its operation and features. The manual consists of Your Appliance" you can get to know your oven. • "Getting Started" introduces you to the oven components and features....time. This section also provides you with several bakeware and preparation tips. • "Cleaning and Maintenance" provides you step-by reading this manual from beginning to the important safety instructions in the "Safety" section. 5 This way you will systematically get the most out of your ...
...find a list of many common foods with information on how to safely operate your appliance and become familiar with its operation and features. The manual consists of Your Appliance" you can get to know your oven. • "Getting Started" introduces you to the oven components and features....time. This section also provides you with several bakeware and preparation tips. • "Cleaning and Maintenance" provides you step-by reading this manual from beginning to the important safety instructions in the "Safety" section. 5 This way you will systematically get the most out of your ...
User Manual
Page 6
... Installing these liners may result in risk of an error the display flashes and beeps continuously. Do not obstruct oven vents. If this manual. Disconnect appliance from the power supply and call a qualified technician. Do not use corrosive chemicals, vapors, flammables or nonfood products in ... and grounded by a qualified technician. This appliance must be safe and reliable. This appliance is not working smoke detector near this manual. If you the location of an error the display flashes and beeps continuously. Do not store or use aluminum foil or protective ...
... Installing these liners may result in risk of an error the display flashes and beeps continuously. Do not obstruct oven vents. If this manual. Disconnect appliance from the power supply and call a qualified technician. Do not use corrosive chemicals, vapors, flammables or nonfood products in ... and grounded by a qualified technician. This appliance must be safe and reliable. This appliance is not working smoke detector near this manual. If you the location of an error the display flashes and beeps continuously. Do not store or use aluminum foil or protective ...
User Manual
Page 8
... seriously injured. The burning of gas cooking fuel and the elimination of soil during self-cleaning can be stored in an appliance, in use this manual. CAUTION - Carbon Monoxide is still hot. Birds have very sensitive respiratory systems . Operating the unit according to the instructions in the self-clean oven. 8 Do...
... seriously injured. The burning of gas cooking fuel and the elimination of soil during self-cleaning can be stored in an appliance, in use this manual. CAUTION - Carbon Monoxide is still hot. Birds have very sensitive respiratory systems . Operating the unit according to the instructions in the self-clean oven. 8 Do...
User Manual
Page 14
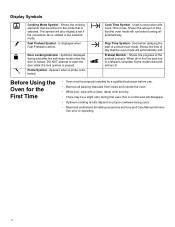
... oven mode will disappear. • Optimum cooking results depend on proper cookware being used. • Read and understand all safety precautions and Use and Care Manual informa- Appears when a probe is locked. Stop Time Symbol - tion prior to open the door while the lock symbol is normal and will run before...
... oven mode will disappear. • Optimum cooking results depend on proper cookware being used. • Read and understand all safety precautions and Use and Care Manual informa- Appears when a probe is locked. Stop Time Symbol - tion prior to open the door while the lock symbol is normal and will run before...
User Manual
Page 15
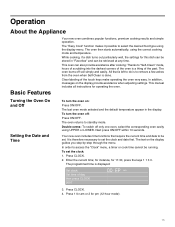
... date to select the desired food type using UPPER or LOWER. for instance, for operating the oven. The oven burns off : Press ON/OFF. This manual includes all instructions for 11:30, press the keys 1 1 3 0. The oven returns to set the clock: 1. Press CLOCK. 2. Press 1 for am 3. Double ovens: To switch...
... date to select the desired food type using UPPER or LOWER. for instance, for operating the oven. The oven burns off : Press ON/OFF. This manual includes all instructions for 11:30, press the keys 1 1 3 0. The oven returns to set the clock: 1. Press CLOCK. 2. Press 1 for am 3. Double ovens: To switch...
User Manual
Page 22
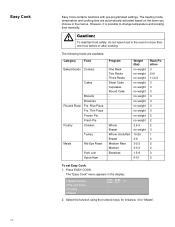
... you choose in the display: 1 Baked Goods 2 Pie and Pizza 3 Poultry 4 Meats QQ: EP am 2. However, it is possible to change temperature and cooking time manually. Easy Cook 22 Easy Cook contains functions with pre-programmed settings.
... you choose in the display: 1 Baked Goods 2 Pie and Pizza 3 Poultry 4 Meats QQ: EP am 2. However, it is possible to change temperature and cooking time manually. Easy Cook 22 Easy Cook contains functions with pre-programmed settings.
User Manual
Page 24
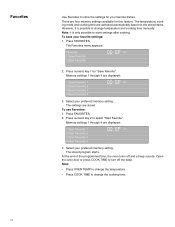
... 3. Open the oven door or press COOK TIME to turn off and a beep sounds. Press FAVORITES. Press numeric key 2 to change temperature and cooking time manually. Note: it is only possible to store settings after cooking. Select your preferred memory setting. Select your preferred memory setting. Favorites Use Favorites to store...
... 3. Open the oven door or press COOK TIME to turn off and a beep sounds. Press FAVORITES. Press numeric key 2 to change temperature and cooking time manually. Note: it is only possible to store settings after cooking. Select your preferred memory setting. Select your preferred memory setting. Favorites Use Favorites to store...
User Manual
Page 46
.... "E" and a number appears in the display, press INFO to display more quickly. However, the temperature can be offset if food is locked and will be manually reduced by 25 ºF. Make sure there is electrical power to the oven. Refer to cool before running during modes that surface is turned on...
.... "E" and a number appears in the display, press INFO to display more quickly. However, the temperature can be offset if food is locked and will be manually reduced by 25 ºF. Make sure there is electrical power to the oven. Refer to cool before running during modes that surface is turned on...
User Manual
Page 47
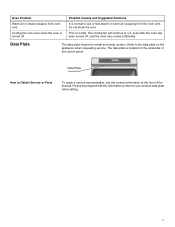
... cooled sufficiently. This is located on the underside of the control panel: Data Plate How to see the contact information at the front of the manual. Refer to run, even after the oven has been turned off . The cooling fan will continue to the data plate on your product data plate...
... cooled sufficiently. This is located on the underside of the control panel: Data Plate How to see the contact information at the front of the manual. Refer to run, even after the oven has been turned off . The cooling fan will continue to the data plate on your product data plate...
Design Guide
Page 6
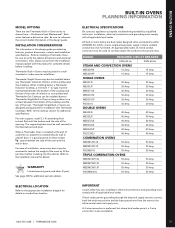
... 30 Amp POD301J 30 Amp 30 Amp DOUBLE OVENS ME302JS 40 Amp 40 Amp ME302JP 40 Amp 40 Amp MED272JS 40 Amp 40 Amp MED302JS 40 Amp 40 Amp...MEDMCW31JP 50 Amp 50 Amp PODMW301J 50 Amp 50 Amp IMPORTANT Local Codes may be installed above a Thermador Single Built-in this design guide provides key features, product dimensions, cutouts and installation specifications. A...correctly attach the conduit to the white neutral electrical supply wire. Refer to the installation manual for additional warranty details. If local codes permit grounding through the electrical supply neutral, ...
... 30 Amp POD301J 30 Amp 30 Amp DOUBLE OVENS ME302JS 40 Amp 40 Amp ME302JP 40 Amp 40 Amp MED272JS 40 Amp 40 Amp MED302JS 40 Amp 40 Amp...MEDMCW31JP 50 Amp 50 Amp PODMW301J 50 Amp 50 Amp IMPORTANT Local Codes may be installed above a Thermador Single Built-in this design guide provides key features, product dimensions, cutouts and installation specifications. A...correctly attach the conduit to the white neutral electrical supply wire. Refer to the installation manual for additional warranty details. If local codes permit grounding through the electrical supply neutral, ...
