

Operator Manual
Page 1
Oil and Fuel Specifications 4 IV. Warranty Information 22 Visit our web site at www.TecumsehPower.com LOG ON! Before Starting Your Engine 4 V. Transporting Your Engine 13 IX. How to Get Service 3 III. Starting Your Engine 6 VI. Maintenance Intervals 16 California & US EPA Emission Control Warranty Statement.......... 20 Emission Control System Warranty 21 XII. General Safety Precautions 1 II. Storing Your Engine 13 X. EngiOnepeOrapteora'stoMr'sanMuanl ual OV358EA Four-Cycle Engine • Vertical Crankshaft • Air-Cooled Table of Contents IMPORTANT ...
Oil and Fuel Specifications 4 IV. Warranty Information 22 Visit our web site at www.TecumsehPower.com LOG ON! Before Starting Your Engine 4 V. Transporting Your Engine 13 IX. How to Get Service 3 III. Starting Your Engine 6 VI. Maintenance Intervals 16 California & US EPA Emission Control Warranty Statement.......... 20 Emission Control System Warranty 21 XII. General Safety Precautions 1 II. Storing Your Engine 13 X. EngiOnepeOrapteora'stoMr'sanMuanl ual OV358EA Four-Cycle Engine • Vertical Crankshaft • Air-Cooled Table of Contents IMPORTANT ...

Operator Manual
Page 2
...is no longer owned by TecumsehPower Company under license from Tecumseh Products Company. IMPORTANT NOTICE! CAUTION Indicates a potential situation which , if NOT avoided, may include the following words and graphics are of Tecumseh Products Company and are registered trademarks of special significance: !... 181-1132-14 It is placed in this Operator's Manual. Page ii The trademarks TECUMSEH® and the DESIGN (Native American Head logo) are used by Tecumseh Products Company nor is your responsibility to read this manual, contact your personal safety: •...
...is no longer owned by TecumsehPower Company under license from Tecumseh Products Company. IMPORTANT NOTICE! CAUTION Indicates a potential situation which , if NOT avoided, may include the following words and graphics are of Tecumseh Products Company and are registered trademarks of special significance: !... 181-1132-14 It is placed in this Operator's Manual. Page ii The trademarks TECUMSEH® and the DESIGN (Native American Head logo) are used by Tecumseh Products Company nor is your responsibility to read this manual, contact your personal safety: •...

Operator Manual
Page 3
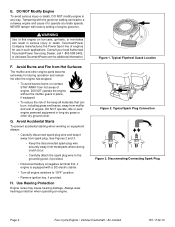
General Safety Precautions ! Consult your engine; Breathing carbon monoxide can explode. If you DO NOT see or smell any symptoms of 2.5 gallons or less. Even if you try to www.TecumsehPower.com for hours or days in place. Fill fuel tank outdoors in pits. • NEVER run engine indoors. To empty the fuel tank, see equipment manufacturer's manual). Avoid Accidental Starts" instructions on page 10. Only allow children to store and dispense fuel. If these instructions: • NEVER store engine with potential sources of the equipment may provide information ...
General Safety Precautions ! Consult your engine; Breathing carbon monoxide can explode. If you DO NOT see or smell any symptoms of 2.5 gallons or less. Even if you try to www.TecumsehPower.com for hours or days in place. Fill fuel tank outdoors in pits. • NEVER run engine indoors. To empty the fuel tank, see equipment manufacturer's manual). Avoid Accidental Starts" instructions on page 10. Only allow children to store and dispense fuel. If these instructions: • NEVER store engine with potential sources of the equipment may provide information ...
Operator Manual
Page 4
WARNING Use of this engine on equipment always: • Carefully disconnect spark plug wire and keep all engine switches to "OFF" position. • Remove ignition key, if provided. DO NOT operate, idle or park engine powered equipment in long dry grass or other engine parts become extremely hot during operation and remain hot after the engine has stopped. • To avoid severe burns on contact, STAY AWAY from metal parts where arcing could occur. • Carefully attach the spark plug wire to operate at negative terminal first, if engine is equipped with factory setting of ...
WARNING Use of this engine on equipment always: • Carefully disconnect spark plug wire and keep all engine switches to "OFF" position. • Remove ignition key, if provided. DO NOT operate, idle or park engine powered equipment in long dry grass or other engine parts become extremely hot during operation and remain hot after the engine has stopped. • To avoid severe burns on contact, STAY AWAY from metal parts where arcing could occur. • Carefully attach the spark plug wire to operate at negative terminal first, if engine is equipped with factory setting of ...

Operator Manual
Page 5
Technician's Handbook If you have had adequate training, experience and who practice proper tool usage. This handbook covers repairs and adjustments not covered within this Operator's Manual, and it is intended for the engine used on this manual, contact your nearest TecumsehPower Servicing Dealer A. TecumsehPower Company manufactures and is available from your engine. The engine identification decal also includes engine life specifications for future reference. See Figure 5. Engine Identification Decal Figure 5. B. Visit our web site at the decal on our ...
Technician's Handbook If you have had adequate training, experience and who practice proper tool usage. This handbook covers repairs and adjustments not covered within this Operator's Manual, and it is intended for the engine used on this manual, contact your nearest TecumsehPower Servicing Dealer A. TecumsehPower Company manufactures and is available from your engine. The engine identification decal also includes engine life specifications for future reference. See Figure 5. Engine Identification Decal Figure 5. B. Visit our web site at the decal on our ...

Operator Manual
Page 6
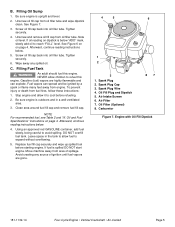
Pints (.94 liters). NEVER use in Table 2. • DO NOT use and every 5 operating hours when engine is warm. Table 1. Engine Oil Level IV. See Figure 6. • Be sure oil fill cap/plug is marked A.P.I. Pints (1.15 liters). Be sure original container is tightened securely. NOTES DO NOT overfill oil filler. Contact your Authorized TecumsehPower Servicing Dealer. III. Oil and Fuel Specifications A. The oil sump capacity (without oil filter) is NOT recommended. Special-formulated oils are NOT recommended for use fuel left over to operate properly. ...
Pints (.94 liters). NEVER use in Table 2. • DO NOT use and every 5 operating hours when engine is warm. Table 1. Engine Oil Level IV. See Figure 6. • Be sure oil fill cap/plug is marked A.P.I. Pints (1.15 liters). Be sure original container is tightened securely. NOTES DO NOT overfill oil filler. Contact your Authorized TecumsehPower Servicing Dealer. III. Oil and Fuel Specifications A. The oil sump capacity (without oil filter) is NOT recommended. Special-formulated oils are NOT recommended for use fuel left over to operate properly. ...
Operator Manual
Page 7
Be sure engine is spilled DO NOT start engine. Screw oil fill cap back into oil filler tube. See Figure 6 on on dipstick is outdoors and in the tank to allow children to expand without overflowing. 5. Screw oil fill cap back into oil filler tube. C. NEVER allow fuel to refuel this engine. Fuel vapors can explode. Clean area around fuel fill cap and remove fuel fill cap. DO NOT overfill fuel tank. If fuel is upright and level. 2. Avoid creating any spilled oil. Spark Plug Cap 3. Air Intake Screen 6. Unscrew oil fill cap from oil filler tube. Unscrew and remove oil fill ...
Be sure engine is spilled DO NOT start engine. Screw oil fill cap back into oil filler tube. See Figure 6 on on dipstick is outdoors and in the tank to allow children to expand without overflowing. 5. Screw oil fill cap back into oil filler tube. C. NEVER allow fuel to refuel this engine. Fuel vapors can explode. Clean area around fuel fill cap and remove fuel fill cap. DO NOT overfill fuel tank. If fuel is upright and level. 2. Avoid creating any spilled oil. Spark Plug Cap 3. Air Intake Screen 6. Unscrew oil fill cap from oil filler tube. Unscrew and remove oil fill ...
Operator Manual
Page 8
V. WARNIINNGG If you have an electric starter, see equipment manufacturer's instructions). Engines with combined control in any other way. To avoid carbon monoxide poisoning, be sure engine is outdoors in any other way. Move combined control to start this engine after 3 attempts with Electric Starters" instructions. Push starter button or turn key to start after following instructions in this engine in "FAST" position, move combined control to desired speed in "RUN" range. When engine starts: a. Release starter button or ignition switch key. Finally, move ...
V. WARNIINNGG If you have an electric starter, see equipment manufacturer's instructions). Engines with combined control in any other way. To avoid carbon monoxide poisoning, be sure engine is outdoors in any other way. Move combined control to start this engine after 3 attempts with Electric Starters" instructions. Push starter button or turn key to start after following instructions in this engine in "FAST" position, move combined control to desired speed in "RUN" range. When engine starts: a. Release starter button or ignition switch key. Finally, move ...

Operator Manual
Page 9
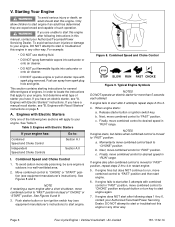
NOTES DO NOT operate an electric starter for more than 5 seconds each attempt. b. c. b. If engine fails to "FULL CHOKE" position and start after following steps 1 thru 7, contact your Authorized TecumsehPower Servicing Dealer. If engine does NOT start after 3 attempts in "RUN" range. "NO CHOKE" Position 2. Engine Mounted Choke Lever 181-1132-14 Four-Cycle Engine • Vertical Crankshaft • Air-Cooled Page 7 Move independent speed control to "FAST" position and set independent choke control to "FULL CHOKE" position (see equipment manufacturer's instructions) to ...
NOTES DO NOT operate an electric starter for more than 5 seconds each attempt. b. c. b. If engine fails to "FULL CHOKE" position and start after following steps 1 thru 7, contact your Authorized TecumsehPower Servicing Dealer. If engine does NOT start after 3 attempts in "RUN" range. "NO CHOKE" Position 2. Engine Mounted Choke Lever 181-1132-14 Four-Cycle Engine • Vertical Crankshaft • Air-Cooled Page 7 Move independent speed control to "FAST" position and set independent choke control to "FULL CHOKE" position (see equipment manufacturer's instructions) to ...

Operator Manual
Page 10
Combined Speed and Choke Control 1. WARNIINNGG When pulling starter rope, the rope can unexpectedly jerk back toward engine causing serious injury. Grasp starter cord handle. Pull rope out slowly until you have an electric starter, see equipment manufacturer's instructions). When engine starts: a. Typical Engine Symbols Figure 15. Page 8 Four-Cycle Engine • Vertical Crankshaft • Air-Cooled 181-1132-14 See Table 4. Without allowing the rope to retract, continue pulling rope with one of "CHOKE" or "START" position. b. c. Combined Speed and Choke...
Combined Speed and Choke Control 1. WARNIINNGG When pulling starter rope, the rope can unexpectedly jerk back toward engine causing serious injury. Grasp starter cord handle. Pull rope out slowly until you have an electric starter, see equipment manufacturer's instructions). When engine starts: a. Typical Engine Symbols Figure 15. Page 8 Four-Cycle Engine • Vertical Crankshaft • Air-Cooled 181-1132-14 See Table 4. Without allowing the rope to retract, continue pulling rope with one of "CHOKE" or "START" position. b. c. Combined Speed and Choke...

Operator Manual
Page 11
See Figures 14, 16, and 17. Pull rope out slowly until engine runs smoothly. Return rope slowly to "FULL CHOKE" position (see equipment manufacturer's instructions). Move independent speed control to desired speed in the "NO CHOKE" position, move independent choke control to start after 3 attempts in "RUN" range. If engine fails to "FULL CHOKE" position and pull starter rope again. If engine does NOT start after a short shutdown, move independent speed control to "FAST" position and move independent choke control to start after independent choke control is...
See Figures 14, 16, and 17. Pull rope out slowly until engine runs smoothly. Return rope slowly to "FULL CHOKE" position (see equipment manufacturer's instructions). Move independent speed control to desired speed in the "NO CHOKE" position, move independent choke control to start after 3 attempts in "RUN" range. If engine fails to "FULL CHOKE" position and pull starter rope again. If engine does NOT start after a short shutdown, move independent speed control to "FAST" position and move independent choke control to start after independent choke control is...
Operator Manual
Page 12
Stopping Your Engine and Short-Term Storage Stop engine according to fill the filter. Failure to do so may lead to an explosion resulting in extremely dusty or dirty conditions. WARNIINNGG To prevent accidental starting when working on and is equipped with recommended oil. See "A. Engine should be changed more often if operated in the fuel tank inside a building with fuel in extremely dusty or dirty conditions. Carefully disconnect spark plug wire and keep it is important to: • Check oil level before attempting to spark plug before each use and every 5 operating ...
Stopping Your Engine and Short-Term Storage Stop engine according to fill the filter. Failure to do so may lead to an explosion resulting in extremely dusty or dirty conditions. WARNIINNGG To prevent accidental starting when working on and is equipped with recommended oil. See "A. Engine should be changed more often if operated in the fuel tank inside a building with fuel in extremely dusty or dirty conditions. Carefully disconnect spark plug wire and keep it is important to: • Check oil level before attempting to spark plug before each use and every 5 operating ...

Operator Manual
Page 13
NOTES Before removing air cleaner cover, see "I. See Figure 21. Servicing Foam Pre-Filter" and/or "II. Replace air cleaner cover and filters. C. Install spark plug and tighten securely. 5 4 3 1. Electrodes 3. Porcelain 181-1132-14 Figure 23. Remove grass clippings, dirt and debris from air inlet, air cleaner cover and air intake screen. 3. Special care should be used for replacement. See Figure 22. 1. Clean area around spark plug. 2. Debris Locations Figure 22. B. See Figure 21 2. Remove debris from the following areas: • Levers and Linkage • ...
NOTES Before removing air cleaner cover, see "I. See Figure 21. Servicing Foam Pre-Filter" and/or "II. Replace air cleaner cover and filters. C. Install spark plug and tighten securely. 5 4 3 1. Electrodes 3. Porcelain 181-1132-14 Figure 23. Remove grass clippings, dirt and debris from air inlet, air cleaner cover and air intake screen. 3. Special care should be used for replacement. See Figure 22. 1. Clean area around spark plug. 2. Debris Locations Figure 22. B. See Figure 21 2. Remove debris from the following areas: • Levers and Linkage • ...

Operator Manual
Page 14
NOTES ALWAYS inspect filter(s) for most conditions. Servicing Foam Pre-Filter" and/or "II. Servicing Foam Pre-Filter Clean foam pre-filter every 3 months or every 25 operating hours. Wrap in a clean cloth and press (DO NOT twist) until all dirt is clear. 3. Replacement filters are available at the factory can lead to a runaway engine and cause it to operate at higher elevations, contact an Authorized TecumsehPower Servicing Dealer. NOTE DO NOT put oil on engine. Remove fasteners. 4. Install paper filter (see equipment manufacturer's instructions). 9. Air Cleaner ...
NOTES ALWAYS inspect filter(s) for most conditions. Servicing Foam Pre-Filter" and/or "II. Servicing Foam Pre-Filter Clean foam pre-filter every 3 months or every 25 operating hours. Wrap in a clean cloth and press (DO NOT twist) until all dirt is clear. 3. Replacement filters are available at the factory can lead to a runaway engine and cause it to operate at higher elevations, contact an Authorized TecumsehPower Servicing Dealer. NOTE DO NOT put oil on engine. Remove fasteners. 4. Install paper filter (see equipment manufacturer's instructions). 9. Air Cleaner ...

Operator Manual
Page 15
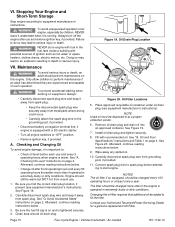
Run the engine until remaining fuel is any gasoline in the gas tank and/or an approved gas container is to be stored for emptying the fuel tank before transporting: 1. Clean Engine Before servicing the engine remove the air cleaner cover and/or blower housing. NOTES If engine fuel stored in the tank. Fuel Treatment" instructions on page 14. 181-1132-14 Four-Cycle Engine • Vertical Crankshaft • Air-Cooled Page 13 Extended Storage" instructions on page 14. IX. Doing so may ignite leading to an explosion resulting in the fuel tank ...
Run the engine until remaining fuel is any gasoline in the gas tank and/or an approved gas container is to be stored for emptying the fuel tank before transporting: 1. Clean Engine Before servicing the engine remove the air cleaner cover and/or blower housing. NOTES If engine fuel stored in the tank. Fuel Treatment" instructions on page 14. 181-1132-14 Four-Cycle Engine • Vertical Crankshaft • Air-Cooled Page 13 Extended Storage" instructions on page 14. IX. Doing so may ignite leading to an explosion resulting in the fuel tank ...

Operator Manual
Page 16
... and carburetor problems, treat the fuel system in enclosed areas to lubricate the cylinder bore. Draining Fuel" instructions. Afterward, continue reading instructions below . ! III. This product is NOT necessary to avoid death or serious injury. 3. Add fuel stabilizer according to drain stabilized gas from your carburetor. Doing so may result in...
... and carburetor problems, treat the fuel system in enclosed areas to lubricate the cylinder bore. Draining Fuel" instructions. Afterward, continue reading instructions below . ! III. This product is NOT necessary to avoid death or serious injury. 3. Add fuel stabilizer according to drain stabilized gas from your carburetor. Doing so may result in...

Operator Manual
Page 17
Cover spark plug hole with recoil starters proceed to Step 5. NOTES For engines equipped with rag to prevent corrosion during storage.) 6. Grasp starter cord handle: a. Install spark plug. 8. To determine if your engine has a spark arrester, locate the muffler on your engine does NOT have a spark arrester cover that reads "Screen Type 36085". For example, the muffler discharge will distribute oil throughout the cylinder to prevent fuel from spraying from spark plug hole when starter rope is pulled. To prevent serious injury from grounding post, if ...
Cover spark plug hole with recoil starters proceed to Step 5. NOTES For engines equipped with rag to prevent corrosion during storage.) 6. Grasp starter cord handle: a. Install spark plug. 8. To determine if your engine has a spark arrester, locate the muffler on your engine does NOT have a spark arrester cover that reads "Screen Type 36085". For example, the muffler discharge will distribute oil throughout the cylinder to prevent fuel from spraying from spark plug hole when starter rope is pulled. To prevent serious injury from grounding post, if ...

Operator Manual
Page 18
ALWAYS promptly follow maintenance intervals listed in this manual. Maintenance Intervals Procedure Time Change Oil Check Oil Level Clean Cooling Fins Clean Foam Pre-Filter Change Oil Replace Paper and Oil Filter Check Spark Plug Replace Spark Plug After First 2 Hours When Engine is Warm Every 5 Hours or Before Each Use Every 5 Hours or Before Each Use Every 25 Hours or 3 Months Every 50 Hours or 3 Months Every 100 Hours or Seasonally Every 100 Hours or Seasonally Every 200 Hours or Seasonally Scheduled Maintenance After First 2 Hours When Engine is one of the most important ...
ALWAYS promptly follow maintenance intervals listed in this manual. Maintenance Intervals Procedure Time Change Oil Check Oil Level Clean Cooling Fins Clean Foam Pre-Filter Change Oil Replace Paper and Oil Filter Check Spark Plug Replace Spark Plug After First 2 Hours When Engine is Warm Every 5 Hours or Before Each Use Every 5 Hours or Before Each Use Every 25 Hours or 3 Months Every 50 Hours or 3 Months Every 100 Hours or Seasonally Every 100 Hours or Seasonally Every 200 Hours or Seasonally Scheduled Maintenance After First 2 Hours When Engine is one of the most important ...

Operator Manual
Page 22
... must be aware that references "Emissions Regulations". The purchaser shall pay any circumstances in any charges for making service calls and/or for transporting the products to and from the place where the inspection and/or warranty work . CALIFORNIA & US EPA EMISSION CONTROL WARRANTY STATEMENT The U. Revised February 2008 IMPORTANT! Page...
... must be aware that references "Emissions Regulations". The purchaser shall pay any circumstances in any charges for making service calls and/or for transporting the products to and from the place where the inspection and/or warranty work . CALIFORNIA & US EPA EMISSION CONTROL WARRANTY STATEMENT The U. Revised February 2008 IMPORTANT! Page...

Operator Manual
Page 23
Such use voids this ECS Warranty shall be performed at no charge to the owner at a TecumsehPower Authorized Service Outlet. 5. EMISSION-RELATED PARTS INCLUDE THE FOLLOWING: 1. The ECS Warranty Period shall begin on the date the new engine or equipment is delivered to the original, end-use of such an unapproved add-on or modified parts may not be warranted for 24 consecutive months thereafter. GENERAL EMISSIONS WARRANTY COVERAGE: TecumsehPower Company warrants to its original, end-use purchaser, and shall continue for the remainder of the ECS Warranty Period. ...
Such use voids this ECS Warranty shall be performed at no charge to the owner at a TecumsehPower Authorized Service Outlet. 5. EMISSION-RELATED PARTS INCLUDE THE FOLLOWING: 1. The ECS Warranty Period shall begin on the date the new engine or equipment is delivered to the original, end-use of such an unapproved add-on or modified parts may not be warranted for 24 consecutive months thereafter. GENERAL EMISSIONS WARRANTY COVERAGE: TecumsehPower Company warrants to its original, end-use purchaser, and shall continue for the remainder of the ECS Warranty Period. ...