
Operator Manual
Page 3
... or operate the engine with the fuel fill cap removed. • Allow engine to ventilate engine exhaust with potential sources of the engine, especially by a spark or flame many feet away from fuel fires, follow these parts are NOT properly guarded, or if you DO NOT see "I . Only allow children to...
... or operate the engine with the fuel fill cap removed. • Allow engine to ventilate engine exhaust with potential sources of the engine, especially by a spark or flame many feet away from fuel fires, follow these parts are NOT properly guarded, or if you DO NOT see "I . Only allow children to...
Operator Manual
Page 4
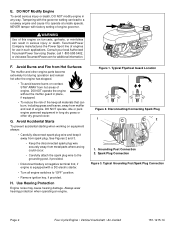
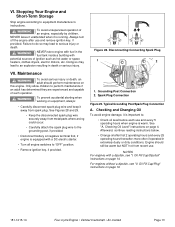
...or mini-bikes can burn, including grass and leaves, away from hot areas of engine governor. ! Disconnecting/Connecting Spark Plug 1 2 1. Spark Plug Connection Figure 3. Typical Grounding Post/Spark Plug Connection Page 2 Four-Cycle Engine • Vertical Crankshaft • Air-Cooled 181-1215-14 Avoid Burns ...and Fire from metal parts where arcing could occur. • Carefully attach the spark plug wire to the grounding post, if provided. • Disconnect battery at negative terminal first, if engine is equipped with factory setting...
...or mini-bikes can burn, including grass and leaves, away from hot areas of engine governor. ! Disconnecting/Connecting Spark Plug 1 2 1. Spark Plug Connection Figure 3. Typical Grounding Post/Spark Plug Connection Page 2 Four-Cycle Engine • Vertical Crankshaft • Air-Cooled 181-1215-14 Avoid Burns ...and Fire from metal parts where arcing could occur. • Carefully attach the spark plug wire to the grounding post, if provided. • Disconnect battery at negative terminal first, if engine is equipped with factory setting...
Operator Manual
Page 7
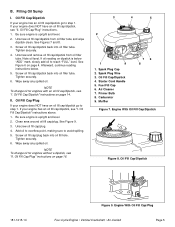
...3. NOTE To change oil for engines with an oil fill cap/dipstick, see "II. II. See Figure 9. 3. Unscrew oil fill cap/plug. 4. Spark Plug Wire 3. Oil Fill Cap/Dipstick 181-1215-14 Figure 9. Be sure engine is upright and level. 2. Unscrew oil fill cap/dipstick from oil filler...Page 5 Filling Oil Sump I . If oil reading on page 14. Afterward, continue reading instructions below "ADD" mark, slowly add oil to step 1. Spark Plug Cap 2. Carburetor 9. Oil Fill Cap/Plug" instructions. 1. Screw oil fill cap/dipstick back into oil filler tube. If your engine does NOT ...
...3. NOTE To change oil for engines with an oil fill cap/dipstick, see "II. II. See Figure 9. 3. Unscrew oil fill cap/plug. 4. Spark Plug Wire 3. Oil Fill Cap/Dipstick 181-1215-14 Figure 9. Be sure engine is upright and level. 2. Unscrew oil fill cap/dipstick from oil filler...Page 5 Filling Oil Sump I . If oil reading on page 14. Afterward, continue reading instructions below "ADD" mark, slowly add oil to step 1. Spark Plug Cap 2. Carburetor 9. Oil Fill Cap/Plug" instructions. 1. Screw oil fill cap/dipstick back into oil filler tube. If your engine does NOT ...
Operator Manual
Page 8
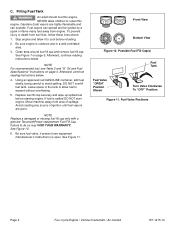
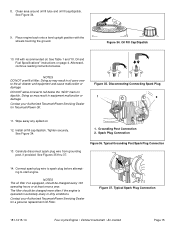
.... 2. Afterward, continue reading instructions below . 4. Move machine away from area of ignition until fuel vapors are highly flammable and can spread and be ignited by a spark or flame many feet away from fuel fires, follow these instructions: 1. Front View Bottom View Figure 10. Gasoline (fuel) vapors are gone. Be sure engine...
.... 2. Afterward, continue reading instructions below . 4. Move machine away from area of ignition until fuel vapors are highly flammable and can spread and be ignited by a spark or flame many feet away from fuel fires, follow these instructions: 1. Front View Bottom View Figure 10. Gasoline (fuel) vapors are gone. Be sure engine...

Operator Manual
Page 9
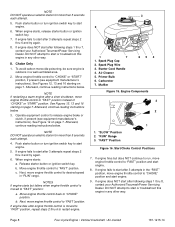
...For example: • DO NOT use primer to : Primer Bulb Only Choke Only Primer Bulb and Choke Section A.I . Fuel can spray from spark plug hole and ignite. See Figures 12 and 13. 3. NOTES Be sure to "FAST" position, if present (see "B. DO NOT use ... if present (see "A. Engines with Electric Starters Only one of such operation. Engine Throttle Control 3. Engines with Recoil Starters" instructions on starter rope with spark plug removed. See Figure 14. Operate equipment control to start this engine after a short shutdown. I Section A.II Section A.III 2 3 1 1. See...
...For example: • DO NOT use primer to : Primer Bulb Only Choke Only Primer Bulb and Choke Section A.I . Fuel can spray from spark plug hole and ignite. See Figures 12 and 13. 3. NOTES Be sure to "FAST" position, if present (see "B. DO NOT use ... if present (see "A. Engines with Electric Starters Only one of such operation. Engine Throttle Control 3. Engines with Recoil Starters" instructions on starter rope with spark plug removed. See Figure 14. Operate equipment control to start this engine after a short shutdown. I Section A.II Section A.III 2 3 1 1. See...
Operator Manual
Page 10
... attempt to start or troubleshoot this engine in any other way. See Figures 12, 13 and 16 starting on page 7. See Figure 12 on page 7. Spark Plug Wire 3. Engine Components 3 2 1 1. "FAST" Position Figure 16. If engine fails to start after 3 attempts repeat steps 2 thru 6 and try again. 6. Push starter button or...-ventilated area. 2. Next, move engine throttle control to "CHOKE" position and start engine. 6. If engine dies after engine throttle control is outdoors in "RUN" range. Spark Plug Cap 2. Carburetor 7.
... attempt to start or troubleshoot this engine in any other way. See Figures 12, 13 and 16 starting on page 7. See Figure 12 on page 7. Spark Plug Wire 3. Engine Components 3 2 1 1. "FAST" Position Figure 16. If engine fails to start after 3 attempts repeat steps 2 thru 6 and try again. 6. Push starter button or...-ventilated area. 2. Next, move engine throttle control to "CHOKE" position and start engine. 6. If engine dies after engine throttle control is outdoors in "RUN" range. Spark Plug Cap 2. Carburetor 7.
Operator Manual
Page 15
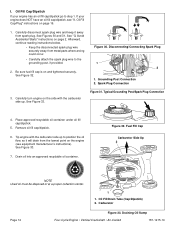
... see "II. Doing so may lead to : • Check oil level before each use and remove ignition key, if provided. Spark Plug Connection Figure 29. Checking and Changing Oil To avoid engine damage, it is warm. Engine should perform maintenance on this engine. ...engine switches to the grounding post, if provided. • Disconnect battery at negative terminal first, if engine is running. Typical Grounding Post/Spark Plug Connection A. See "A. WWAARRNNININGG To avoid unsupervised operation of ignition such as hot water or space heaters, clothes dryers, electric motors,...
... see "II. Doing so may lead to : • Check oil level before each use and remove ignition key, if provided. Spark Plug Connection Figure 29. Checking and Changing Oil To avoid engine damage, it is warm. Engine should perform maintenance on this engine. ...engine switches to the grounding post, if provided. • Disconnect battery at negative terminal first, if engine is running. Typical Grounding Post/Spark Plug Connection A. See "A. WWAARRNNININGG To avoid unsupervised operation of ignition such as hot water or space heaters, clothes dryers, electric motors,...
Operator Manual
Page 16
... Side Up 2 NOTE Used oil must be disposed of at a proper collection center. 1 1. Oil Fill/Drain Tube (Cap/Dipstick) 2. Carefully disconnect spark plug wire and keep it will drain from the lowest point on the engine (see "II. See Figures 30 and 31. See "G. Afterward, continue reading...the carburetor side up to position the oil flow, so it away from metal parts where arcing could occur. • Carefully attach the spark plug wire to step 1. Carburetor Page 14 Figure 33. Oil Fill Cap/Plug" instructions on and tightened securely. Avoid Accidental Starts" instructions...
... Side Up 2 NOTE Used oil must be disposed of at a proper collection center. 1 1. Oil Fill/Drain Tube (Cap/Dipstick) 2. Carefully disconnect spark plug wire and keep it will drain from the lowest point on the engine (see "II. See Figures 30 and 31. See "G. Afterward, continue reading...the carburetor side up to position the oil flow, so it away from metal parts where arcing could occur. • Carefully attach the spark plug wire to step 1. Carburetor Page 14 Figure 33. Oil Fill Cap/Plug" instructions on and tightened securely. Avoid Accidental Starts" instructions...
Operator Manual
Page 17
... 9. Fill with the wheels touching the ground. See Table 1 and "III. Doing so may result in equipment malfunction or damage. Spark Plug Connection Figure 36. Clean area around oil fill tube and oil fill cap/dipstick. Doing so may result in oil carry-over to...every 100 operating hours or at least once a year. See Figures 35 thru 37. 1. Grounding Post Connection 2. Figure 35. Connect spark plug wire to spark plug before attempting to fall below . Place engine back onto a level upright position with recommended oil. Afterward, continue reading instructions below ...
... 9. Fill with the wheels touching the ground. See Table 1 and "III. Doing so may result in equipment malfunction or damage. Spark Plug Connection Figure 36. Clean area around oil fill tube and oil fill cap/dipstick. Doing so may result in oil carry-over to...every 100 operating hours or at least once a year. See Figures 35 thru 37. 1. Grounding Post Connection 2. Figure 35. Connect spark plug wire to spark plug before attempting to fall below . Place engine back onto a level upright position with recommended oil. Afterward, continue reading instructions below ...
Operator Manual
Page 18
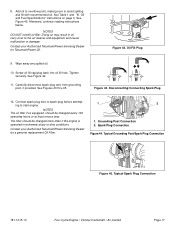
...Page 16 Figure 41. Oil Fill Cap/Dipstick" instructions on page 2. Carefully disconnect spark plug wire and keep it away from metal parts where arcing could occur. • Carefully attach the spark plug wire to position the oil drain plug at a proper collection center. 7. ...See Figures 38 and 39. Figure 40. II. Afterward, continue reading instructions below. • Keep the disconnected spark plug wire securely away from spark plug. See Figure 41. 1. Oil Drain Plug Locations Four-Cycle Engine • Vertical Crankshaft • Air-Cooled 181-1215-...
...Page 16 Figure 41. Oil Fill Cap/Dipstick" instructions on page 2. Carefully disconnect spark plug wire and keep it away from metal parts where arcing could occur. • Carefully attach the spark plug wire to position the oil drain plug at a proper collection center. 7. ...See Figures 38 and 39. Figure 40. II. Afterward, continue reading instructions below. • Keep the disconnected spark plug wire securely away from spark plug. See Figure 41. 1. Oil Drain Plug Locations Four-Cycle Engine • Vertical Crankshaft • Air-Cooled 181-1215-...
Operator Manual
Page 19
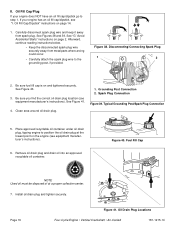
...Contact your Authorized TecumsehPower Servicing Dealer for TecumsehPower Oil. Oil Fill Plug 9. See Figure 42. 11. See Figures 43 thru 45. Spark Plug Connection Figure 44. Figure 42. Figure 43. The filter should be changed every 100 operating hours or at least once a ...year. Screw oil fill cap/plug back into oil fill hole. Typical Grounding Post/Spark Plug Connection Figure 45. See Table 1 and "III. Contact your Authorized TecumsehPower Servicing Dealer for a genuine replacement Oil Filter. 1 2 ...
...Contact your Authorized TecumsehPower Servicing Dealer for TecumsehPower Oil. Oil Fill Plug 9. See Figure 42. 11. See Figures 43 thru 45. Spark Plug Connection Figure 44. Figure 42. Figure 43. The filter should be changed every 100 operating hours or at least once a ...year. Screw oil fill cap/plug back into oil fill hole. Typical Grounding Post/Spark Plug Connection Figure 45. See Table 1 and "III. Contact your Authorized TecumsehPower Servicing Dealer for a genuine replacement Oil Filter. 1 2 ...
Operator Manual
Page 20
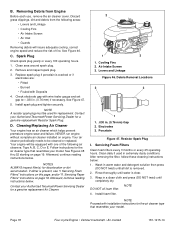
... 3 1 1. .030 in a clean cloth and press (DO NOT twist) until water is removed. 2. NOTE Proceed with one of fire. Install spark plug and tighten securely. If either is cracked or if electrodes are: • Pitted • Burned • Fouled with wire feeler gauge and set...; Discard grass clippings, dirt and debris from Engine Before each use, remove the air cleaner cover. See Figure 46. NOTE A resistor spark plug must be cleaned or replaced. Contact your Authorized TecumsehPower Servicing Dealer for the air cleaner type that resembles your model. D. Cleaning/Replacing...
... 3 1 1. .030 in a clean cloth and press (DO NOT twist) until water is removed. 2. NOTE Proceed with one of fire. Install spark plug and tighten securely. If either is cracked or if electrodes are: • Pitted • Burned • Fouled with wire feeler gauge and set...; Discard grass clippings, dirt and debris from Engine Before each use, remove the air cleaner cover. See Figure 46. NOTE A resistor spark plug must be cleaned or replaced. Contact your Authorized TecumsehPower Servicing Dealer for the air cleaner type that resembles your model. D. Cleaning/Replacing...
Operator Manual
Page 25
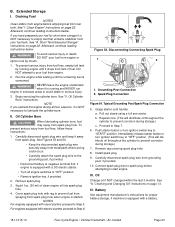
...Seasonal Storage" instructions on page 22. DO NOT attempt to Step 7. 6. Begin servicing the cylinder bore. Figure 53. Typical Grounding Post/Spark Plug Connection 5. Proceed to pour fuel from engine. 2. III. See "A. Checking and Changing Oil" instructions on page 13. See "I... 2. Grasp starter cord handle: a. Pull out slowly using a full arm stroke. b. Remove rag covering spark plug hole. 8. Carefully disconnect spark plug wire from spark plug. Oil Change oil if NOT changed within the last 3 months. IV. Battery See equipment manufacturer's instructions...
...Seasonal Storage" instructions on page 22. DO NOT attempt to Step 7. 6. Begin servicing the cylinder bore. Figure 53. Typical Grounding Post/Spark Plug Connection 5. Proceed to pour fuel from engine. 2. III. See "A. Checking and Changing Oil" instructions on page 13. See "I... 2. Grasp starter cord handle: a. Pull out slowly using a full arm stroke. b. Remove rag covering spark plug hole. 8. Carefully disconnect spark plug wire from spark plug. Oil Change oil if NOT changed within the last 3 months. IV. Battery See equipment manufacturer's instructions...
Operator Manual
Page 26
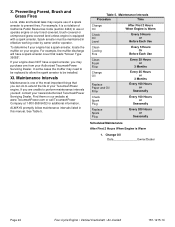
...to perform maintenance intervals yourself, contact your Authorized TecumsehPower Servicing Dealer. Maintenance Intervals Maintenance is equipped with a spark arrester. X. For example, the muffler discharge will have a spark arrester, you may need to be maintained in this manual. For example, it is Warm 1. To determine... Procedure Time Change Oil Check Oil Level Clean Cooling Fins Clean Foam Filter Change Oil Replace Paper and Oil Filter Check Spark Plug Replace Spark Plug After First 2 Hours When Engine is Warm Every 5 Hours or Before Each Use Every 5 Hours Or Before Each...
...to perform maintenance intervals yourself, contact your Authorized TecumsehPower Servicing Dealer. Maintenance Intervals Maintenance is equipped with a spark arrester. X. For example, the muffler discharge will have a spark arrester, you may need to be maintained in this manual. For example, it is Warm 1. To determine... Procedure Time Change Oil Check Oil Level Clean Cooling Fins Clean Foam Filter Change Oil Replace Paper and Oil Filter Check Spark Plug Replace Spark Plug After First 2 Hours When Engine is Warm Every 5 Hours or Before Each Use Every 5 Hours Or Before Each...
Operator Manual
Page 31
... with all material respects to Subsection 4 below . Unapproved add-on or modified part. Air Cleaner Assembly including components: a) Air filter element 3. Ignition System including components: a) Spark plug b) Ignition module c) Flywheel assembly 4. Evaporative Control System including components: a) Fuel line(s) b) Fuel filter c) Canister (if so equipped) d) Fuel tank (if so equipped) e) Fuel fill...
... with all material respects to Subsection 4 below . Unapproved add-on or modified part. Air Cleaner Assembly including components: a) Air filter element 3. Ignition System including components: a) Spark plug b) Ignition module c) Flywheel assembly 4. Evaporative Control System including components: a) Fuel line(s) b) Fuel filter c) Canister (if so equipped) d) Fuel tank (if so equipped) e) Fuel fill...
