

Operator Manual
Page 1
... Safety Precautions 1 II. Storing Your Engine 22 X. Preventing Forest, Brush and Grass Fires 24 XI. LV148EA/LV148XA LV156EA/LV156XA LV195EA/LV195XA (LEV90-120) Four-Cycle Engine • Vertical Crankshaft • Air-Cooled Table of Contents IMPORTANT NOTICE! Safety Definitions ii... I. Transporting Your Engine 21 IX. Warranty Information 30 Visit our web site at www.TecumsehPower.com LOG ON! Starting Your Engine 7 VI. Maintenance 13 VIII. How to Get Service 3 III. Register Your TecumsehPower Engine Maintenance Tips On-Line Store Locate...
... Safety Precautions 1 II. Storing Your Engine 22 X. Preventing Forest, Brush and Grass Fires 24 XI. LV148EA/LV148XA LV156EA/LV156XA LV195EA/LV195XA (LEV90-120) Four-Cycle Engine • Vertical Crankshaft • Air-Cooled Table of Contents IMPORTANT NOTICE! Safety Definitions ii... I. Transporting Your Engine 21 IX. Warranty Information 30 Visit our web site at www.TecumsehPower.com LOG ON! Starting Your Engine 7 VI. Maintenance 13 VIII. How to Get Service 3 III. Register Your TecumsehPower Engine Maintenance Tips On-Line Store Locate...
Operator Manual
Page 3
... injury or death, be overcome and unable to use your local Authorized TecumsehPower Servicing Dealer, call 1-800-558-5402, or go to start the engine. Failure to do so can quickly be sure the flywheel guard is allowed to save yourself. Carbon monoxide is a colorless,... Monoxide Poisoning All engine exhaust contains carbon monoxide, a deadly gas. To empty the fuel tank, see equipment manufacturer's manual). Avoid Accidental Starts" instructions on page 23. To prevent serious injury or death from carbon monoxide: • NEVER run engine outdoors where engine exhaust can ...
... injury or death, be overcome and unable to use your local Authorized TecumsehPower Servicing Dealer, call 1-800-558-5402, or go to start the engine. Failure to do so can quickly be sure the flywheel guard is allowed to save yourself. Carbon monoxide is a colorless,... Monoxide Poisoning All engine exhaust contains carbon monoxide, a deadly gas. To empty the fuel tank, see equipment manufacturer's manual). Avoid Accidental Starts" instructions on page 23. To prevent serious injury or death from carbon monoxide: • NEVER run engine outdoors where engine exhaust can ...
Operator Manual
Page 4
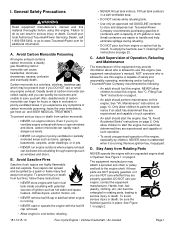
... burns on contact, STAY AWAY from spark plug. Avoid Burns and Fire from Hot Surfaces The muffler and other dry ground cover. Avoid Accidental Starts To prevent accidental starting when working on fun-carts, go-karts, or mini-bikes can result in place, if equipped. • To reduce the risk of fire...
... burns on contact, STAY AWAY from spark plug. Avoid Burns and Fire from Hot Surfaces The muffler and other dry ground cover. Avoid Accidental Starts To prevent accidental starting when working on fun-carts, go-karts, or mini-bikes can result in place, if equipped. • To reduce the risk of fire...
Operator Manual
Page 6
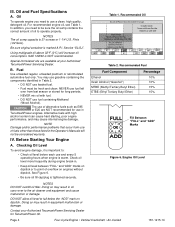
...and/or performance problems that occur from last season or stored for long periods. • NEVER mix oil with high alcohol content can cause hard starting, poor engine performance, and may result in . • Keep oil level between "FULL" and "ADD" marks on dipstick. Before... Starting Your Engine A. Check oil level more frequently during engine break-in equipment malfunction or damage. Recommended Oil TecumsehPower Recommended Oil Usage Straight Grade TecumsehPower ...
...and/or performance problems that occur from last season or stored for long periods. • NEVER mix oil with high alcohol content can cause hard starting, poor engine performance, and may result in . • Keep oil level between "FULL" and "ADD" marks on dipstick. Before... Starting Your Engine A. Check oil level more frequently during engine break-in equipment malfunction or damage. Recommended Oil TecumsehPower Recommended Oil Usage Straight Grade TecumsehPower ...
Operator Manual
Page 8
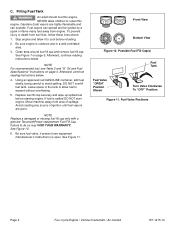
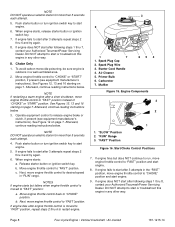
...Clean area around fuel fill cap and remove fuel fill cap. NOTE For recommended fuel, see equipment manufacturer's instructions) is spilled DO NOT start engine. Leave space in a well-ventilated area. 3. Failure to expand without overflowing. 5. Possible Fuel Fill Cap(s) Fuel Tank Fuel Valve...and "III. Afterward, continue reading instructions below . 4. Using an approved red GASOLINE container, add fuel slowly, being careful to cool before starting engine. Replace fuel fill cap securely and wipe up spilled fuel before refueling. 2. See Figure 11. Front View Bottom View Figure 10....
...Clean area around fuel fill cap and remove fuel fill cap. NOTE For recommended fuel, see equipment manufacturer's instructions) is spilled DO NOT start engine. Leave space in a well-ventilated area. 3. Failure to expand without overflowing. 5. Possible Fuel Fill Cap(s) Fuel Tank Fuel Valve...and "III. Afterward, continue reading instructions below . 4. Using an approved red GASOLINE container, add fuel slowly, being careful to cool before starting engine. Replace fuel fill cap securely and wipe up spilled fuel before refueling. 2. See Figure 11. Front View Bottom View Figure 10....

Operator Manual
Page 9
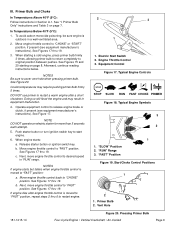
...Section A.III 2 3 1 1. NOTES Be sure to release engine brake or clutch, if present (see "A. See Figure 14. DO NOT use starting fluid. • DO NOT spray flammable vapors into carburetor or onto air cleaner. • DO NOT put flammable liquids into carburetor or onto air... • Vertical Crankshaft • Air-Cooled Page 7 V. If you are experienced and capable of engines. Primer Bulb Only 1. When starting instructions for several different types of such operation. Typical Engine Controls STOP STOP SLOW RUN FAST CHOKE PRIMER Figure 13. WWAARRNNIINNGG If you have...
...Section A.III 2 3 1 1. NOTES Be sure to release engine brake or clutch, if present (see "A. See Figure 14. DO NOT use starting fluid. • DO NOT spray flammable vapors into carburetor or onto air cleaner. • DO NOT put flammable liquids into carburetor or onto air... • Vertical Crankshaft • Air-Cooled Page 7 V. If you are experienced and capable of engines. Primer Bulb Only 1. When starting instructions for several different types of such operation. Typical Engine Controls STOP STOP SLOW RUN FAST CHOKE PRIMER Figure 13. WWAARRNNIINNGG If you have...
Operator Manual
Page 10
... continue reading instructions below . 3. Move engine throttle control back to "FAST" position. Starter Cord Handle 4. Carburetor 7. If engine does NOT start after 3 attempts repeat steps 2 thru 6 and try again. 6. Page 8 Four-Cycle Engine • Vertical Crankshaft • Air-Cooled ...3 attempts in any other way. "FAST" Position Figure 16. Operate equipment control to "FAST" position instead of "CHOKE" or "START" position. Spark Plug Wire 3. Next, move engine throttle control to release engine brake or clutch, if present (see equipment manufacturer's instructions...
... continue reading instructions below . 3. Move engine throttle control back to "FAST" position. Starter Cord Handle 4. Carburetor 7. If engine does NOT start after 3 attempts repeat steps 2 thru 6 and try again. 6. Page 8 Four-Cycle Engine • Vertical Crankshaft • Air-Cooled ...3 attempts in any other way. "FAST" Position Figure 16. Operate equipment control to "FAST" position instead of "CHOKE" or "START" position. Spark Plug Wire 3. Next, move engine throttle control to release engine brake or clutch, if present (see equipment manufacturer's instructions...
Operator Manual
Page 11
...equipment control to "FAST" position. NOTE DO NOT operate an electric starter for more than 5 seconds each attempt. 5. When engine starts: a. b. Move engine throttle control to cover vent hole when pressing primer bulb. Next, move engine throttle control to release engine ... equipment malfunction. 4. Next, move engine throttle control to "CHOKE" position. See Figures 17 thru 19. If engine dies after a short shutdown. Electric Start Switch 2. Engine Throttle Control 3. Equipment Control Figure 17. Typical Engine Symbols 3 2 1 1. "SLOW" Position 2. "RUN" Range 3. "FAST" ...
...equipment control to "FAST" position. NOTE DO NOT operate an electric starter for more than 5 seconds each attempt. 5. When engine starts: a. b. Move engine throttle control to cover vent hole when pressing primer bulb. Next, move engine throttle control to release engine ... equipment malfunction. 4. Next, move engine throttle control to "CHOKE" position. See Figures 17 thru 19. If engine dies after a short shutdown. Electric Start Switch 2. Engine Throttle Control 3. Equipment Control Figure 17. Typical Engine Symbols 3 2 1 1. "SLOW" Position 2. "RUN" Range 3. "FAST" ...
Operator Manual
Page 12
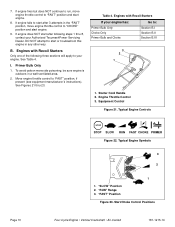
...Go to "FAST" position, if present (see equipment manufacturer's instructions). Typical Engine Symbols 3 2 1 1. "RUN" Range 3. 7. If engine does NOT start engine. 9. Primer Bulb Only 1. Move engine throttle control to : Section B.I . Starter Cord Handle 2. Equipment Control Figure 21. If engine fires but ...does NOT continue to run, move engine throttle control to start engine. 8. See Table 4. To avoid carbon monoxide poisoning, be sure engine is outdoors in any other way. Engines with Recoil Starters...
...Go to "FAST" position, if present (see equipment manufacturer's instructions). Typical Engine Symbols 3 2 1 1. "RUN" Range 3. 7. If engine does NOT start engine. 9. Primer Bulb Only 1. Move engine throttle control to : Section B.I . Starter Cord Handle 2. Equipment Control Figure 21. If engine fires but ...does NOT continue to run, move engine throttle control to start engine. 8. See Table 4. To avoid carbon monoxide poisoning, be sure engine is outdoors in any other way. Engines with Recoil Starters...
Operator Manual
Page 13
...repeat steps 2 thru 6 to retract, continue pulling rope with one rapid full arm stroke. NOTES Be sure to "FAST" position and start after engine throttle control is moved to the recoil mechanism. 5. Primer Bulb 2. Grasp starter cord handle. Without allowing the rope to ...restart engine. 7. If engine dies after 3 attempts repeat steps 2 thru 4 and try again. 7. 3. b. When engine starts: a. See Figure 21 on page 10. To avoid this risk, carefully follow these instructions: 4. To avoid this risk, carefully follow these instructions: ...
...repeat steps 2 thru 6 to retract, continue pulling rope with one rapid full arm stroke. NOTES Be sure to "FAST" position and start after engine throttle control is moved to the recoil mechanism. 5. Primer Bulb 2. Grasp starter cord handle. Without allowing the rope to ...restart engine. 7. If engine dies after 3 attempts repeat steps 2 thru 4 and try again. 7. 3. b. When engine starts: a. See Figure 21 on page 10. To avoid this risk, carefully follow these instructions: 4. To avoid this risk, carefully follow these instructions: ...
Operator Manual
Page 14
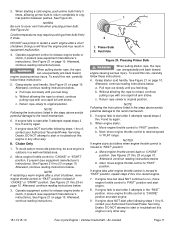
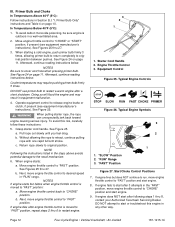
...Throttle Control 3. Typical Engine Controls STOP STOP SLOW RUN FAST CHOKE PRIMER Figure 26. "RUN" Range 3. DO NOT attempt to start or troubleshoot this risk, carefully follow these instructions: 5. In Temperatures Below 40°F (5°C): 1. To avoid carbon monoxide ...Figure 24 on page 11. Afterward, continue reading instructions below . Return rope slowly to "CHOKE" position and start after following steps 1 thru 8, contact your Authorized Tecumseh Servicing Dealer. Starter Cord Handle 2. Equipment Control Figure 25. Primer Bulb and Choke In Temperatures Above 40°...
...Throttle Control 3. Typical Engine Controls STOP STOP SLOW RUN FAST CHOKE PRIMER Figure 26. "RUN" Range 3. DO NOT attempt to start or troubleshoot this risk, carefully follow these instructions: 5. In Temperatures Below 40°F (5°C): 1. To avoid carbon monoxide ...Figure 24 on page 11. Afterward, continue reading instructions below . Return rope slowly to "CHOKE" position and start after following steps 1 thru 8, contact your Authorized Tecumseh Servicing Dealer. Starter Cord Handle 2. Equipment Control Figure 25. Primer Bulb and Choke In Temperatures Above 40°...
Operator Manual
Page 15
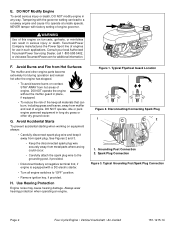
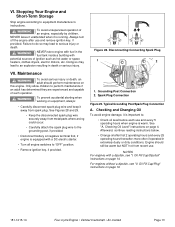
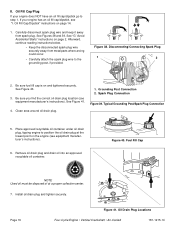
... engine. Only allow children to equipment manufacturer's instructions. Figure 28. Disconnecting/Connecting Spark Plug 1 2 1. Typical Grounding Post/Spark Plug Connection A. See "A. WWAARRNNININGG To prevent accidental starting when working on page 14. Oil Fill Cap/Dipstick" instructions on equipment, always: • Carefully disconnect spark plug wire and keep it away from spark...
... engine. Only allow children to equipment manufacturer's instructions. Figure 28. Disconnecting/Connecting Spark Plug 1 2 1. Typical Grounding Post/Spark Plug Connection A. See "A. WWAARRNNININGG To prevent accidental starting when working on page 14. Oil Fill Cap/Dipstick" instructions on equipment, always: • Carefully disconnect spark plug wire and keep it away from spark...
Operator Manual
Page 16
... drain from spark plug. Figure 31. Draining Oil Sump Four-Cycle Engine • Vertical Crankshaft • Air-Cooled 181-1215-14 Figure 32. Avoid Accidental Starts" instructions on the side with the carburetor side up . Typical Grounding Post/Spark Plug Connection 4. See Figures 30 and 31. See Figure 32. Grounding Post...
... drain from spark plug. Figure 31. Draining Oil Sump Four-Cycle Engine • Vertical Crankshaft • Air-Cooled 181-1215-14 Figure 32. Avoid Accidental Starts" instructions on the side with the carburetor side up . Typical Grounding Post/Spark Plug Connection 4. See Figures 30 and 31. See Figure 32. Grounding Post...
Operator Manual
Page 17
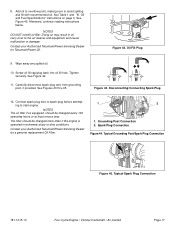
... attempting to fall below . 8. See Figures 35 thru 37. 1. See Figure 34. 9. Oil and Fuel Specifications" instructions on dipstick. DO NOT allow oil level to start engine. Wipe away any spilled oil. 12. Carefully disconnect spark plug wire from grounding post, if provided. Typical Grounding Post/Spark Plug Connection 14. Contact...
... attempting to fall below . 8. See Figures 35 thru 37. 1. See Figure 34. 9. Oil and Fuel Specifications" instructions on dipstick. DO NOT allow oil level to start engine. Wipe away any spilled oil. 12. Carefully disconnect spark plug wire from grounding post, if provided. Typical Grounding Post/Spark Plug Connection 14. Contact...
Operator Manual
Page 18
... plug and drain oil into an approved recyclable oil container. Install oil drain plug and tighten securely. Page 16 Figure 41. II. See "G" Avoid Accidental Starts" instructions on the engine (see equipment manufacturer's instructions). Disconnecting/Connecting Spark Plug 1 2 2. If your engine does NOT have an oil fill cap/dipstick go to...
... plug and drain oil into an approved recyclable oil container. Install oil drain plug and tighten securely. Page 16 Figure 41. II. See "G" Avoid Accidental Starts" instructions on the engine (see equipment manufacturer's instructions). Disconnecting/Connecting Spark Plug 1 2 2. If your engine does NOT have an oil fill cap/dipstick go to...
Operator Manual
Page 19
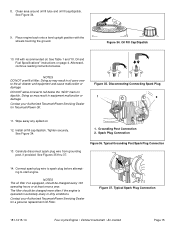
..., making sure to the air cleaner and equipment and cause malfunction or damage. Figure 43. Connect spark plug wire to spark plug before attempting to start engine. Contact your Authorized TecumsehPower Servicing Dealer for a genuine replacement Oil Filter. 1 2 1. NOTES The oil filter if so equipped, should be changed more often if...
..., making sure to the air cleaner and equipment and cause malfunction or damage. Figure 43. Connect spark plug wire to spark plug before attempting to start engine. Contact your Authorized TecumsehPower Servicing Dealer for a genuine replacement Oil Filter. 1 2 1. NOTES The oil filter if so equipped, should be changed more often if...
Operator Manual
Page 20
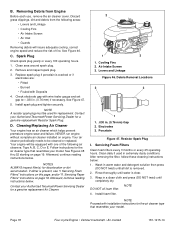
... resembles your model. Electrodes 3. Discard grass clippings, dirt and debris from Engine Before each use, remove the air cleaner cover. See Figures 48 thru 52 starting on engine. Afterward, continue reading instructions below . Cooling Fins 2. Clean area around spark plug. 2. Wash in extremely dusty conditions. Wrap in . (0.76 mm) Gap 2. Replace...
... resembles your model. Electrodes 3. Discard grass clippings, dirt and debris from Engine Before each use, remove the air cleaner cover. See Figures 48 thru 52 starting on engine. Afterward, continue reading instructions below . Cooling Fins 2. Clean area around spark plug. 2. Wash in extremely dusty conditions. Wrap in . (0.76 mm) Gap 2. Replace...
Operator Manual
Page 25
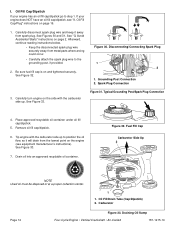
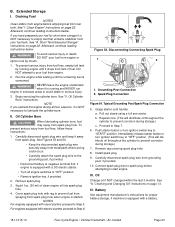
... page 22. To prevent serious injury from engine or siphon fuel by running and NEVER run engine in enclosed areas to "START" position. For engines equipped with recoil starters proceed to spark plug before emptying fuel from lack of clean engine oil into... instructions on page 22. Afterward, continue reading instructions below . See "A. Afterward, continue reading instructions below . DO NOT attempt to start engine. Run the engine while waiting until it is NOT necessary to empty fuel that contains stabilizer from engine before attempting to pour fuel...
... page 22. To prevent serious injury from engine or siphon fuel by running and NEVER run engine in enclosed areas to "START" position. For engines equipped with recoil starters proceed to spark plug before emptying fuel from lack of clean engine oil into... instructions on page 22. Afterward, continue reading instructions below . See "A. Afterward, continue reading instructions below . DO NOT attempt to start engine. Run the engine while waiting until it is NOT necessary to empty fuel that contains stabilizer from engine before attempting to pour fuel...

