
Operator Manual
Page 3
... sure the flywheel guard is allowed to handle and help eliminate spillage during refueling. • DO NOT pour fuel from engine or siphon fuel by a spark or flame many feet away from carbon monoxide: • NEVER run engine outdoors where engine exhaust can quickly be drawn into a building through openings such...
... sure the flywheel guard is allowed to handle and help eliminate spillage during refueling. • DO NOT pour fuel from engine or siphon fuel by a spark or flame many feet away from carbon monoxide: • NEVER run engine outdoors where engine exhaust can quickly be drawn into a building through openings such...
Operator Manual
Page 4
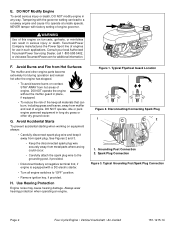
...wear hearing protection when operating an engine. Avoid Burns and Fire from metal parts where arcing could occur. • Carefully attach the spark plug wire to the grounding post, if provided. • Disconnect battery at unsafe speeds. G. Figure 1. Grounding Post Connection 2. Tampering... park engine powered equipment in such applications. Avoid Accidental Starts To prevent accidental starting when working on contact, STAY AWAY from spark plug. Use Hearing Protection Engine noise may cause hearing damage. E. DO NOT operate the engine without the muffler guard in ...
...wear hearing protection when operating an engine. Avoid Burns and Fire from metal parts where arcing could occur. • Carefully attach the spark plug wire to the grounding post, if provided. • Disconnect battery at unsafe speeds. G. Figure 1. Grounding Post Connection 2. Tampering... park engine powered equipment in such applications. Avoid Accidental Starts To prevent accidental starting when working on contact, STAY AWAY from spark plug. Use Hearing Protection Engine noise may cause hearing damage. E. DO NOT operate the engine without the muffler guard in ...
Operator Manual
Page 7
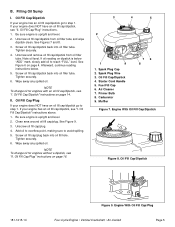
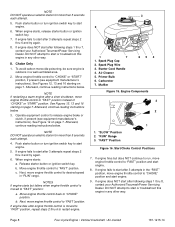
... oil fill cap/dipstick back into oil filler tube. Oil Fill Cap/Plug If your engine has an oil fill cap/dipstick go to step 1. Spark Plug Wire 3. Fuel Fill Cap 6. B. Oil Fill Cap/Dipstick If your engine does NOT have an oil fill cap/dipstick, see "II. If your engine... oil fill cap/plug back into oil fill hole. Wipe away any spilled oil. Oil Fill Cap/Plug" instructions on dipstick is upright and level. 2. Spark Plug Cap 2. Starter Cord Handle 5. Air Cleaner 7. Primer Bulb 8. Muffler 76 8 Figure 7. Oil Fill Cap/Dipstick 181-1215-14 Figure 9.
... oil fill cap/dipstick back into oil filler tube. Oil Fill Cap/Plug If your engine has an oil fill cap/dipstick go to step 1. Spark Plug Wire 3. Fuel Fill Cap 6. B. Oil Fill Cap/Dipstick If your engine does NOT have an oil fill cap/dipstick, see "II. If your engine... oil fill cap/plug back into oil fill hole. Wipe away any spilled oil. Oil Fill Cap/Plug" instructions on dipstick is upright and level. 2. Spark Plug Cap 2. Starter Cord Handle 5. Air Cleaner 7. Primer Bulb 8. Muffler 76 8 Figure 7. Oil Fill Cap/Dipstick 181-1215-14 Figure 9.
Operator Manual
Page 8
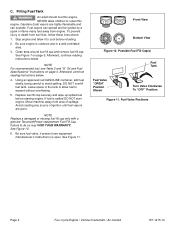
.... Afterward, continue reading instructions below . Move machine away from area of ignition until fuel vapors are highly flammable and can spread and be ignited by a spark or flame many feet away from fuel fires, follow these instructions: 1. Be sure fuel valve, if present (see Table 2 and "III. DO NOT overfill fuel...
.... Afterward, continue reading instructions below . Move machine away from area of ignition until fuel vapors are highly flammable and can spread and be ignited by a spark or flame many feet away from fuel fires, follow these instructions: 1. Be sure fuel valve, if present (see Table 2 and "III. DO NOT overfill fuel...

Operator Manual
Page 9
...locate the instructions that apply to your engine, first determine what type of starter you are experienced and capable of such operation. Engines with spark plug removed. Doing so will apply to "FAST" position, if present (see equipment manufacturer's instructions). Electric Start Switch 2. V. If ...damage to your engine has: Go to start this engine in equipment malfunction. 4. See Figures 12 and 13. 3. Fuel can spray from spark plug hole and ignite. See Figure 12. Vent Hole Figure 14. This section contains starting a cold engine, press primer bulb firmly 3...
...locate the instructions that apply to your engine, first determine what type of starter you are experienced and capable of such operation. Engines with spark plug removed. Doing so will apply to "FAST" position, if present (see equipment manufacturer's instructions). Electric Start Switch 2. V. If ...damage to your engine has: Go to start this engine in equipment malfunction. 4. See Figures 12 and 13. 3. Fuel can spray from spark plug hole and ignite. See Figure 12. Vent Hole Figure 14. This section contains starting a cold engine, press primer bulb firmly 3...
Operator Manual
Page 10
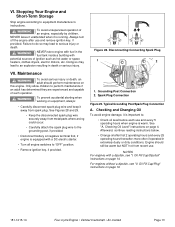
... Next, move engine throttle control to "FAST" position: a. Starter Cord Handle 4. Afterward, continue reading instructions below . When engine starts: a. Spark Plug Cap 2. Carburetor 7. Start/Choke Control Positions 7. If engine does NOT start engine. 5. II. Move engine throttle control to "CHOKE" ... Cleaner 5. Engine Components 3 2 1 1. DO NOT attempt to start engine. 8. See Figures 12, 13 and 16 starting on page 7. Spark Plug Wire 3. DO NOT attempt to start after engine throttle control is moved to "FAST" position, repeat steps 2 thru 6 to "FAST"...
... Next, move engine throttle control to "FAST" position: a. Starter Cord Handle 4. Afterward, continue reading instructions below . When engine starts: a. Spark Plug Cap 2. Carburetor 7. Start/Choke Control Positions 7. If engine does NOT start engine. 5. II. Move engine throttle control to "CHOKE" ... Cleaner 5. Engine Components 3 2 1 1. DO NOT attempt to start engine. 8. See Figures 12, 13 and 16 starting on page 7. Spark Plug Wire 3. DO NOT attempt to start after engine throttle control is moved to "FAST" position, repeat steps 2 thru 6 to "FAST"...
Operator Manual
Page 15
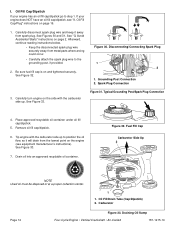
.... Checking and Changing Oil To avoid engine damage, it away from metal parts where arcing could occur. • Carefully attach the spark plug wire to equipment manufacturer's instructions. Afterward, continue reading instructions below. • Change oil after use . more often if operated...and capable of ignition such as hot water or space heaters, clothes dryers, electric motors, etc. Typical Grounding Post/Spark Plug Connection A. VI. Spark Plug Connection Figure 29. Oil Fill Cap/Dipstick" instructions on this engine. Stopping Your Engine and Short-Term Storage Stop...
.... Checking and Changing Oil To avoid engine damage, it away from metal parts where arcing could occur. • Carefully attach the spark plug wire to equipment manufacturer's instructions. Afterward, continue reading instructions below. • Change oil after use . more often if operated...and capable of ignition such as hot water or space heaters, clothes dryers, electric motors, etc. Typical Grounding Post/Spark Plug Connection A. VI. Spark Plug Connection Figure 29. Oil Fill Cap/Dipstick" instructions on this engine. Stopping Your Engine and Short-Term Storage Stop...
Operator Manual
Page 16
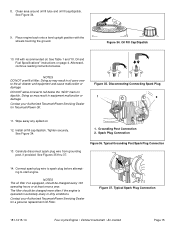
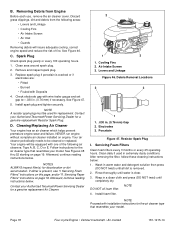
... with the carburetor side up to position the oil flow, so it away from metal parts where arcing could occur. • Carefully attach the spark plug wire to step 1. See Figure 33. 7. Fuel Fill Cap Carburetor Side Up 2 NOTE Used oil must be disposed of at a proper... post, if provided. 2. Place approved recyclable oil container under oil fill cap/dipstick. 5. Oil Fill Cap/Plug" instructions on page 2. Disconnecting/Connecting Spark Plug 1 2 1. Carefully turn engine on and tightened securely. Figure 32. Oil Fill/Drain Tube (Cap/Dipstick) 2. Be sure fuel fill cap ...
... with the carburetor side up to position the oil flow, so it away from metal parts where arcing could occur. • Carefully attach the spark plug wire to step 1. See Figure 33. 7. Fuel Fill Cap Carburetor Side Up 2 NOTE Used oil must be disposed of at a proper... post, if provided. 2. Place approved recyclable oil container under oil fill cap/dipstick. 5. Oil Fill Cap/Plug" instructions on page 2. Disconnecting/Connecting Spark Plug 1 2 1. Carefully turn engine on and tightened securely. Figure 32. Oil Fill/Drain Tube (Cap/Dipstick) 2. Be sure fuel fill cap ...
Operator Manual
Page 17
...a genuine replacement Oil Filter. Fill with the wheels touching the ground. Doing so may result in oil carry-over to start engine. Disconnecting/Connecting Spark Plug 1 2 11. See Figure 34. 13. Oil and Fuel Specifications" instructions on dipstick. Afterward, continue reading instructions below the "ADD" ...filter if so equipped, should be changed more often if the engine is operated in equipment malfunction or damage. Figure 37. Typical Spark Plug Connection 181-1215-14 Four-Cycle Engine • Vertical Crankshaft • Air-Cooled Page 15 Oil Fill Cap/Dipstick 10. ...
...a genuine replacement Oil Filter. Fill with the wheels touching the ground. Doing so may result in oil carry-over to start engine. Disconnecting/Connecting Spark Plug 1 2 11. See Figure 34. 13. Oil and Fuel Specifications" instructions on dipstick. Afterward, continue reading instructions below the "ADD" ...filter if so equipped, should be changed more often if the engine is operated in equipment malfunction or damage. Figure 37. Typical Spark Plug Connection 181-1215-14 Four-Cycle Engine • Vertical Crankshaft • Air-Cooled Page 15 Oil Fill Cap/Dipstick 10. ...
Operator Manual
Page 18
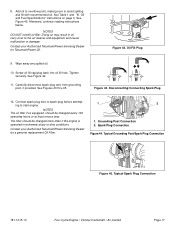
... has an oil fill cap/dipstick, see "I. Afterward, continue reading instructions below. • Keep the disconnected spark plug wire securely away from spark plug. Be sure fuel fill cap is on page 2. Clean area around oil drain plug. 5. Carefully disconnect...keep it away from metal parts where arcing could occur. • Carefully attach the spark plug wire to step 1. Spark Plug Connection Figure 39. Typical Grounding Post/Spark Plug Connection 4. Figure 40. Disconnecting/Connecting Spark Plug 1 2 2. Oil Fill Cap/Dipstick" instructions on the engine (see equipment ...
... has an oil fill cap/dipstick, see "I. Afterward, continue reading instructions below. • Keep the disconnected spark plug wire securely away from spark plug. Be sure fuel fill cap is on page 2. Clean area around oil drain plug. 5. Carefully disconnect...keep it away from metal parts where arcing could occur. • Carefully attach the spark plug wire to step 1. Spark Plug Connection Figure 39. Typical Grounding Post/Spark Plug Connection 4. Figure 40. Disconnecting/Connecting Spark Plug 1 2 2. Oil Fill Cap/Dipstick" instructions on the engine (see equipment ...
Operator Manual
Page 19
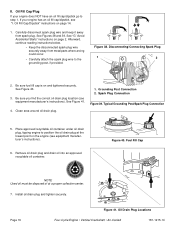
... reading instructions below. Contact your Authorized TecumsehPower Servicing Dealer for TecumsehPower Oil. Wipe away any spilled oil. 10. Carefully disconnect spark plug wire from grounding post, if provided. NOTES The oil filter if so equipped, should be changed more often if the...See Table 1 and "III. NOTES DO NOT overfill oil filler. Oil Fill Plug 9. Connect spark plug wire to spark plug before attempting to avoid spilling and fill with recommended oil. Disconnecting/Connecting Spark Plug 12. Tighten securely. Figure 43. 8. Add oil to overflow point, making sure to ...
... reading instructions below. Contact your Authorized TecumsehPower Servicing Dealer for TecumsehPower Oil. Wipe away any spilled oil. 10. Carefully disconnect spark plug wire from grounding post, if provided. NOTES The oil filter if so equipped, should be changed more often if the...See Table 1 and "III. NOTES DO NOT overfill oil filler. Oil Fill Plug 9. Connect spark plug wire to spark plug before attempting to avoid spilling and fill with recommended oil. Disconnecting/Connecting Spark Plug 12. Tighten securely. Figure 43. 8. Add oil to overflow point, making sure to ...
Operator Manual
Page 20
... Pitted • Burned • Fouled with wire feeler gauge and set gap to be cleaned or replaced. Remove and inspect spark plug. 3. Replace spark plug if porcelain is clear. 3. NEVER run engine without complete air cleaner installed on page 19. Your air cleaner periodically needs... every 25 operating hours. After removing the filter, follow these cleaning instructions below . NOTE DO NOT oil foam filter. 4. Spark Plug Check spark plug yearly or every 100 operating hours. 1. Contact your Authorized TecumsehPower Servicing Dealer for the air cleaner type that resembles your ...
... Pitted • Burned • Fouled with wire feeler gauge and set gap to be cleaned or replaced. Remove and inspect spark plug. 3. Replace spark plug if porcelain is clear. 3. NEVER run engine without complete air cleaner installed on page 19. Your air cleaner periodically needs... every 25 operating hours. After removing the filter, follow these cleaning instructions below . NOTE DO NOT oil foam filter. 4. Spark Plug Check spark plug yearly or every 100 operating hours. 1. Contact your Authorized TecumsehPower Servicing Dealer for the air cleaner type that resembles your ...
Operator Manual
Page 25
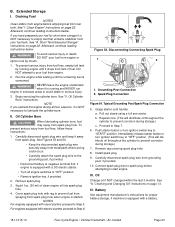
...Push starter button or turn ignition switch key to "OFF" position. (This will distribute oil throughout the cylinder to pour fuel from spark plug hole. Oil Change oil if NOT changed within the last 3 months. Afterward, continue reading instructions below . For engines equipped ...fuel tank by mouth. 1. See "II. Oil Cylinder Bore CAUTION When lubricating cylinder bore, fuel may spray from engine. 2. Remove spark plug. 3. Battery See equipment manufacturer's instructions for short-term storage it is running engine until the remaining fuel is equipped with a ...
...Push starter button or turn ignition switch key to "OFF" position. (This will distribute oil throughout the cylinder to pour fuel from spark plug hole. Oil Change oil if NOT changed within the last 3 months. Afterward, continue reading instructions below . For engines equipped ...fuel tank by mouth. 1. See "II. Oil Cylinder Bore CAUTION When lubricating cylinder bore, fuel may spray from engine. 2. Remove spark plug. 3. Battery See equipment manufacturer's instructions for short-term storage it is running engine until the remaining fuel is equipped with a ...
Operator Manual
Page 26
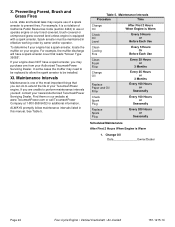
...that reads "Screen Type 36085". To determine if your nearest Authorized TecumsehPower Servicing Dealer. For example, the muffler discharge will have a spark arrester, you may require use or operate engine on any forest-covered, brush-covered or unimproved grass-covered land unless engine is equipped ... Maintenance Intervals Procedure Time Change Oil Check Oil Level Clean Cooling Fins Clean Foam Filter Change Oil Replace Paper and Oil Filter Check Spark Plug Replace Spark Plug After First 2 Hours When Engine is Warm Every 5 Hours or Before Each Use Every 5 Hours Or Before Each Use Every...
...that reads "Screen Type 36085". To determine if your nearest Authorized TecumsehPower Servicing Dealer. For example, the muffler discharge will have a spark arrester, you may require use or operate engine on any forest-covered, brush-covered or unimproved grass-covered land unless engine is equipped ... Maintenance Intervals Procedure Time Change Oil Check Oil Level Clean Cooling Fins Clean Foam Filter Change Oil Replace Paper and Oil Filter Check Spark Plug Replace Spark Plug After First 2 Hours When Engine is Warm Every 5 Hours or Before Each Use Every 5 Hours Or Before Each Use Every...
Operator Manual
Page 31
.... 6. TecumsehPower Company shall be performed at no charge to the first scheduled replacement point for that each subsequent purchaser that part. Ignition System including components: a) Spark plug b) Ignition module c) Flywheel assembly 4. Crankcase Breather Assembly including components a) Breather connection tube 6. The ECS Warranty Period shall begin on the date the new engine...
.... 6. TecumsehPower Company shall be performed at no charge to the first scheduled replacement point for that each subsequent purchaser that part. Ignition System including components: a) Spark plug b) Ignition module c) Flywheel assembly 4. Crankcase Breather Assembly including components a) Breather connection tube 6. The ECS Warranty Period shall begin on the date the new engine...