Owners Manual
Page 4
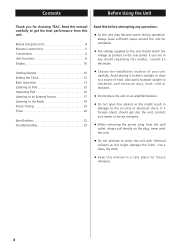
... Control Unit 5 Connections 6 Unit Functions 8 Display 10 Getting Started 10 Setting the Clock 12 Basic Operation 13 Listening to iPod 15 Operating iPod 16 Listening to an External Source 17 Listening to the Radio 18 Preset Tuning 19 Timer 20 Specifications 22 Troubleshooting 23 Read ...this before attempting any doubt regarding this matter, consult an electrician. < Choose the installation location of heat. If you for choosing TEAC....
... Control Unit 5 Connections 6 Unit Functions 8 Display 10 Getting Started 10 Setting the Clock 12 Basic Operation 13 Listening to iPod 15 Operating iPod 16 Listening to an External Source 17 Listening to the Radio 18 Preset Tuning 19 Timer 20 Specifications 22 Troubleshooting 23 Read ...this before attempting any doubt regarding this matter, consult an electrician. < Choose the installation location of heat. If you for choosing TEAC....

Owners Manual
Page 8
Insert an iPod mobile digital device into this button for more than 2 seconds to set sleep timer. Unit Functions B C D E FG A A R Q PON M L K J I H STANDBAY/ON Q FUNCTION R C ALARM MENU FM/AM G 1 2 ...
Insert an iPod mobile digital device into this button for more than 2 seconds to set sleep timer. Unit Functions B C D E FG A A R Q PON M L K J I H STANDBAY/ON Q FUNCTION R C ALARM MENU FM/AM G 1 2 ...

Owners Manual
Page 9
.... I DISPLAY In standby mode, use these buttons to select a preset station. J AUX IN You can connect a portable audio player to confirm selection in menus. In iPod mode, use this button to turn the unit off time. L SNOOZE/DIMMER After the TIMER ON time is also used for a part of a track. V SELECT... Use this button to this jack. Q Standby/on ( ) Use this button to check the timer on or standby. 9 In iPod mode, use these buttons to select the source you want to listen to tune in this jack, and adjust the volume using the VOLUME button...
.... I DISPLAY In standby mode, use these buttons to select a preset station. J AUX IN You can connect a portable audio player to confirm selection in menus. In iPod mode, use this button to turn the unit off time. L SNOOZE/DIMMER After the TIMER ON time is also used for a part of a track. V SELECT... Use this button to this jack. Q Standby/on ( ) Use this button to check the timer on or standby. 9 In iPod mode, use these buttons to select the source you want to listen to tune in this jack, and adjust the volume using the VOLUME button...
Owners Manual
Page 10
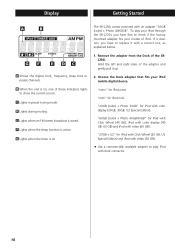
...check if the factory mounted adapter fits your iPod mobile digital device. "nano" for iPod with Click Wheel (20 GB, U2 Special Edition) and iPod with video (30 GB). < Use a commercially available adapter to play your iPod through the SR-L230i, you have to replace it does not,... you have first to show the current source. "20GB + U2" for iPod nano. To play iPod with a correct one of iPod. D Lights during muting. If it with dock connector. ...
...check if the factory mounted adapter fits your iPod mobile digital device. "nano" for iPod with Click Wheel (20 GB, U2 Special Edition) and iPod with video (30 GB). < Use a commercially available adapter to play your iPod through the SR-L230i, you have to replace it does not,... you have first to show the current source. "20GB + U2" for iPod nano. To play iPod with a correct one of iPod. D Lights during muting. If it with dock connector. ...
Owners Manual
Page 11
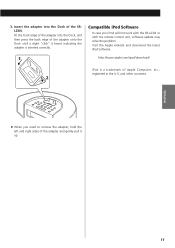
... into the Dock of the SRL230i. Compatible iPod Software In case your iPod will not work with the SR-L230i or with the remote control unit, software update may solve the problem. ENGLISH 11 Visit the Apple website and download the latest iPod Software. 1 http://www.apple.com/ipod/download/ iPod is inserted correctly. 3. and other countries...
... into the Dock of the SRL230i. Compatible iPod Software In case your iPod will not work with the SR-L230i or with the remote control unit, software update may solve the problem. ENGLISH 11 Visit the Apple website and download the latest iPod Software. 1 http://www.apple.com/ipod/download/ iPod is inserted correctly. 3. and other countries...
Owners Manual
Page 13
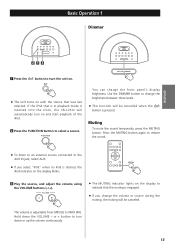
... brightness between three levels. < This function will be cancelled when the button is pressed. or + button to turn on and start playback of the iPod. 2 Press the FUNCTION button to select a source. Hold down or up the volume continuously. 13 Muting To mute the sound temporarily, press the ... source connected to MAX (40). If the iPod that was last selected. Basic Operation 1 Dimmer ENGLISH 213 1 Press the button to turn the unit on. < The unit turns on with the source that is in playback mode is inserted into the Dock, the SR-L230i will automatically turn down the VOLUME -
... brightness between three levels. < This function will be cancelled when the button is pressed. or + button to turn on and start playback of the iPod. 2 Press the FUNCTION button to select a source. Hold down or up the volume continuously. 13 Muting To mute the sound temporarily, press the ... source connected to MAX (40). If the iPod that was last selected. Basic Operation 1 Dimmer ENGLISH 213 1 Press the button to turn the unit on. < The unit turns on with the source that is in playback mode is inserted into the Dock, the SR-L230i will automatically turn down the VOLUME -
Owners Manual
Page 15
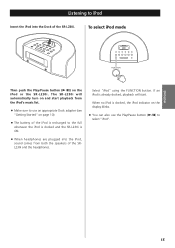
... iPod is recharged to select "iPod". ENGLISH 15 Listening to iPod Insert the iPod into the iPod, sound comes from the iPod's music list. < Make sure to use the Play/Pause button (y/J) to the full whenever the iPod is docked and the SR-L230i is docked, the iPod indicator on the iPod or the SR-L230i. Select "iPod" using the FUNCTION button. When no iPod...
... iPod is recharged to select "iPod". ENGLISH 15 Listening to iPod Insert the iPod into the iPod, sound comes from the iPod's music list. < Make sure to use the Play/Pause button (y/J) to the full whenever the iPod is docked and the SR-L230i is docked, the iPod indicator on the iPod or the SR-L230i. Select "iPod" using the FUNCTION button. When no iPod...
Owners Manual
Page 16
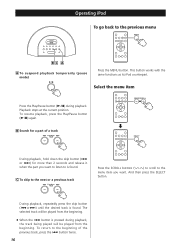
This button works with the same functions as its iPod counterpart. PRESET/SCROLL B Search for more than 2 seconds and release it when the part you want to listen to the menu item you want . C To ... desired track is pressed during playback. or /) for a part of the previous track, press the . And then press the SELECT button. button is found . Operating iPod To go back to the beginning of a track SELECT During playback, hold down the skip button (. Select the menu item Press the Play/Pause button...
This button works with the same functions as its iPod counterpart. PRESET/SCROLL B Search for more than 2 seconds and release it when the part you want to listen to the menu item you want . C To ... desired track is pressed during playback. or /) for a part of the previous track, press the . And then press the SELECT button. button is found . Operating iPod To go back to the beginning of a track SELECT During playback, hold down the skip button (. Select the menu item Press the Play/Pause button...
Owners Manual
Page 17
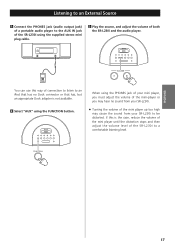
ENGLISH 17 If this way of connection to listen to an iPod that has no sound from your SR-L230i. < Turning the volume of the mini player up too high may cause the sound from your SR-L230i to be distorted. You can use this is not available. 2 Select "AUX" using the supplied ...stereo mini plug cable. 3 Play the source, and adjust the volume of both the SR-L230i and the audio player. Listening to an External Source 1 Connect the PHONES jack (audio output jack) of a portable audio player to a comfortable listening level....
ENGLISH 17 If this way of connection to listen to an iPod that has no sound from your SR-L230i. < Turning the volume of the mini player up too high may cause the sound from your SR-L230i to be distorted. You can use this is not available. 2 Select "AUX" using the supplied ...stereo mini plug cable. 3 Play the source, and adjust the volume of both the SR-L230i and the audio player. Listening to an External Source 1 Connect the PHONES jack (audio output jack) of a portable audio player to a comfortable listening level....

Owners Manual
Page 20
... minute, and then press the ALARM 1 or ALARM 2 button. or /) to set the hour, and then press the ALARM 1 or ALARM 2 button. "iPod" or "TUNER" blinks. 6 Select a source (iPod or TUNER) using the skip buttons (.//), and then press the ALARM 1 or ALARM 2 button. < You cannot select "AUX". 20 or /) to set the...
... minute, and then press the ALARM 1 or ALARM 2 button. or /) to set the hour, and then press the ALARM 1 or ALARM 2 button. "iPod" or "TUNER" blinks. 6 Select a source (iPod or TUNER) using the skip buttons (.//), and then press the ALARM 1 or ALARM 2 button. < You cannot select "AUX". 20 or /) to set the...
Owners Manual
Page 21
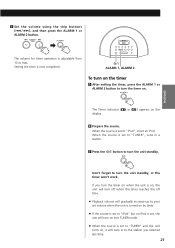
ALARM 1, ALARM 2 To turn on the timer 1 After setting the timer, press the ALARM 1 or ALARM 2 button to "iPod" but no iPod is set volume when the unit is turned on the display. 2 Prepare the source. The Timer indicator ( or ) appears on by timer. < If the source ... then press the ALARM 1 or ALARM 2 button. Don't forget to turn the timer on into TUNER mode. < When the source is adjustable from 10 to "iPod", insert an iPod. ENGLISH The volume for timer operation is set to max. If you selected last time. 21 Setting the timer is now completed.
ALARM 1, ALARM 2 To turn on the timer 1 After setting the timer, press the ALARM 1 or ALARM 2 button to "iPod" but no iPod is set volume when the unit is turned on the display. 2 Prepare the source. The Timer indicator ( or ) appears on by timer. < If the source ... then press the ALARM 1 or ALARM 2 button. Don't forget to turn the timer on into TUNER mode. < When the source is adjustable from 10 to "iPod", insert an iPod. ENGLISH The volume for timer operation is set to max. If you selected last time. 21 Setting the timer is now completed.
Owners Manual
Page 23
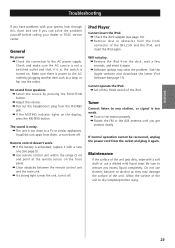
...wait a few seconds, and insert it is, the switch is too close to any excess liquid completely. Visit the Apple website and download the latest iPod Software (see page 10). Maintenance If the surface of the unit gets dirty, wipe with a new one (see page 5). e If the battery is... dealer or TEAC service center. e Pull out the headphone's plug from speakers. iPod Player Cannot insert the iPod. e Check the dock adapter (see page 11). e Set off . Install the unit apart from the outlet and plug it off the HOLD switch of the SR-L230i and the iPod, and insert the iPod again. e...
...wait a few seconds, and insert it is, the switch is too close to any excess liquid completely. Visit the Apple website and download the latest iPod Software (see page 10). Maintenance If the surface of the unit gets dirty, wipe with a new one (see page 5). e If the battery is... dealer or TEAC service center. e Pull out the headphone's plug from speakers. iPod Player Cannot insert the iPod. e Check the dock adapter (see page 11). e Set off . Install the unit apart from the outlet and plug it off the HOLD switch of the SR-L230i and the iPod, and insert the iPod again. e...