LP-R550USB Brochure
Page 1
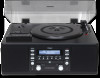
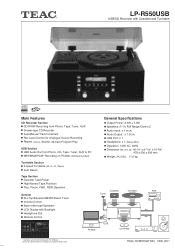
TEAC CORPORATION, FEB. 2011 LP-R550USB USB/CD Recorder with Cassette and Turntable Main Features CD Recorder Section CD-R/RW Recording from Phono, Tape, Tuner, AUX Drawer-type CD Recorder Auto/Manual Track Increment Rec Level Control for Analogue Source Recording Repeat (1/ALL), Shuffle, 32-track Program Play USB Section USB Audio Out from Phono, CD, Tape, Tuner, AUX to change without notice. Design...
TEAC CORPORATION, FEB. 2011 LP-R550USB USB/CD Recorder with Cassette and Turntable Main Features CD Recorder Section CD-R/RW Recording from Phono, Tape, Tuner, AUX Drawer-type CD Recorder Auto/Manual Track Increment Rec Level Control for Analogue Source Recording Repeat (1/ALL), Shuffle, 32-track Program Play USB Section USB Audio Out from Phono, CD, Tape, Tuner, AUX to change without notice. Design...
Owners Manual
Page 4
...Unit Functions and Remote Control 12 Basic Operation 13 Listening to the Radio 14 Preset Tuning 15 Listening to a Record 16 Listening to a CD 18 Programmed Playback 20 Repeat Playback 21 Shuffle Playback 22 Time Display 22 Listening to get the best performance from ...this unit. Contents Thank you for choosing TEAC. Read this manual carefully to a Cassette Tape 1 23 Before Recording 24 Recording 1 25 Finalizing 28 Erasing or Unfinalizing a CD-RW 29 REC OFF Timer 30 Recording into a computer 32 Troubleshooting 33 Messages 34 Specifications 35 4
...Unit Functions and Remote Control 12 Basic Operation 13 Listening to the Radio 14 Preset Tuning 15 Listening to a Record 16 Listening to a CD 18 Programmed Playback 20 Repeat Playback 21 Shuffle Playback 22 Time Display 22 Listening to get the best performance from ...this unit. Contents Thank you for choosing TEAC. Read this manual carefully to a Cassette Tape 1 23 Before Recording 24 Recording 1 25 Finalizing 28 Erasing or Unfinalizing a CD-RW 29 REC OFF Timer 30 Recording into a computer 32 Troubleshooting 33 Messages 34 Specifications 35 4

Owners Manual
Page 5
... during playback. < When the unit is turned on, switching on the TV may be between 5°C and 35°C (41°F and 95°F). The CD-RW recorder is not malfunction in a circular motion. Do NOT lift or move the unit during transportation. Handling precautions < Do not touch the... disc loaded may damage the disc or the unit. Only handle records, by the edges or the label, with transport locking screw. If the record becomes dirty, gently wipe the surface in the unit or the TV. TEAC does not endorse any doubt regarding this manual in damage to secure the turntable with...
... during playback. < When the unit is turned on, switching on the TV may be between 5°C and 35°C (41°F and 95°F). The CD-RW recorder is not malfunction in a circular motion. Do NOT lift or move the unit during transportation. Handling precautions < Do not touch the... disc loaded may damage the disc or the unit. Only handle records, by the edges or the label, with transport locking screw. If the record becomes dirty, gently wipe the surface in the unit or the TV. TEAC does not endorse any doubt regarding this manual in damage to secure the turntable with...
Owners Manual
Page 6
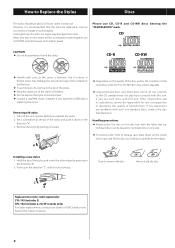
... the stylus is recommended that the stylus be responsible for SP records only) For stylus replacements, contact your dealer or TEAC listed on the center of the case and lift the disc out, holding it down on the back of reproduction. CD-R CD-RW < Handle with care, as you experience any consequences or guarantee...
... the stylus is recommended that the stylus be responsible for SP records only) For stylus replacements, contact your dealer or TEAC listed on the center of the case and lift the disc out, holding it down on the back of reproduction. CD-R CD-RW < Handle with care, as you experience any consequences or guarantee...
Owners Manual
Page 7
...However, if space is important that could cause the laser pickup to "skip." < Do not expose discs to the disc's plastic surface. CD-R, by contrast, may be recorded. Once this has been done, no further data can be sticky and damage the unit. < Do not stick papers or protective sheets on... sensitive to the care and handling of this may be written on a CD-R or CD-RW disc, a standard CD player will not be returned to record. Once they cannot be erased or re-recorded. Note that a CD-RW disc that an audio CD created using this unit will do not use any protective coating spray. <...
...However, if space is important that could cause the laser pickup to "skip." < Do not expose discs to the disc's plastic surface. CD-R, by contrast, may be recorded. Once this has been done, no further data can be sticky and damage the unit. < Do not stick papers or protective sheets on... sensitive to the care and handling of this may be written on a CD-R or CD-RW disc, a standard CD player will not be returned to record. Once they cannot be erased or re-recorded. Note that a CD-RW disc that an audio CD created using this unit will do not use any protective coating spray. <...
Owners Manual
Page 10
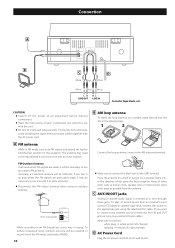
...the instructions of each component you want to connect your unit to a new location. To play or record sound from the antenna. CAUTION: < Switch off the power to all other wires such as power ... from an external source such as CD player or cassette tape deck, connect the source to the appropriate jack using an outdoor antenna. 75 Ω connector While recording from FM broadcast, noise may need... to use an outdoor FM antenna. To reduce unwanted noise, outdoor antenna will be required or record it will be necessary to find the best position for the reception. Place the antenna on a...
...the instructions of each component you want to connect your unit to a new location. To play or record sound from the antenna. CAUTION: < Switch off the power to all other wires such as power ... from an external source such as CD player or cassette tape deck, connect the source to the appropriate jack using an outdoor antenna. 75 Ω connector While recording from FM broadcast, noise may need... to use an outdoor FM antenna. To reduce unwanted noise, outdoor antenna will be required or record it will be necessary to find the best position for the reception. Place the antenna on a...
Owners Manual
Page 12
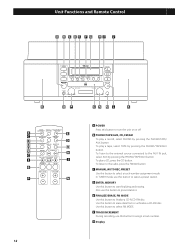
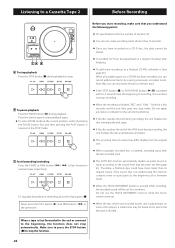
... listen to the external source connected to the radio, press the FM/AM button. Also use this button to assign a track number. To play a record, select PHONO by pressing the PHONO/TAPE/AUX button. To play a tape, select TAPE by pressing the PHONO/TAPE/ AUX button. In TUNER mode,... use this button to select a track-number-assignment mode. F TRACK INCREMENT During recording, use this button to finalize a CD-R/CD-RW disc. To listen to the AUX IN jack, select AUX by pressing the PHONO/TAPE/AUX button. B PHONO/TAPE/AUX...
... listen to the external source connected to the radio, press the FM/AM button. Also use this button to assign a track number. To play a record, select PHONO by pressing the PHONO/TAPE/AUX button. To play a tape, select TAPE by pressing the PHONO/TAPE/ AUX button. In TUNER mode,... use this button to select a track-number-assignment mode. F TRACK INCREMENT During recording, use this button to finalize a CD-R/CD-RW disc. To listen to the AUX IN jack, select AUX by pressing the PHONO/TAPE/AUX button. B PHONO/TAPE/AUX...
Owners Manual
Page 13
... you use headphones, first reduce the volume level to skip tracks. O Disc Tray P REC LEVEL In record pause mode, use this button to adjust the recording level. V SHUFFLE In CD mode, use this button to search for shuffle playback. Then, insert the plug from your headphones into the... operating the remote control unit, point it toward the remote sensor. Hold down these buttons to stop playback or recording. R PROGRAM In CD mode, use this button to program tracks. I RECORD Use this button for a part of remote control unit. 1 Press the POWER button to AUX jacks, select ...
... you use headphones, first reduce the volume level to skip tracks. O Disc Tray P REC LEVEL In record pause mode, use this button to adjust the recording level. V SHUFFLE In CD mode, use this button to search for shuffle playback. Then, insert the plug from your headphones into the... operating the remote control unit, point it toward the remote sensor. Hold down these buttons to stop playback or recording. R PROGRAM In CD mode, use this button to program tracks. I RECORD Use this button for a part of remote control unit. 1 Press the POWER button to AUX jacks, select ...

Owners Manual
Page 18
...to open the tray. 3 Place a disc on the tray with the printed label face up. CD: A commercial pre-recorded CD CD-R: A finalized CD-R CD-RW: A finalized CD-RW NO TOC CD-R: A CD-R which has yet to be finalized NO TOC CD-RW: A CD-RW which has yet to be finalized blank: No disc or unreadable disc Note that, when a...Never place more than one disc on the tray. < Do not force the tray by hand during loading. Listening to a CD 4 Press the OPEN/CLOSE button (L) to close the tray. 1 Press the CD button. < Be careful not to pinch your finger. < It takes a few seconds for a few seconds. Wait until ...
...to open the tray. 3 Place a disc on the tray with the printed label face up. CD: A commercial pre-recorded CD CD-R: A finalized CD-R CD-RW: A finalized CD-RW NO TOC CD-R: A CD-R which has yet to be finalized NO TOC CD-RW: A CD-RW which has yet to be finalized blank: No disc or unreadable disc Note that, when a...Never place more than one disc on the tray. < Do not force the tray by hand during loading. Listening to a CD 4 Press the OPEN/CLOSE button (L) to close the tray. 1 Press the CD button. < Be careful not to pinch your finger. < It takes a few seconds for a few seconds. Wait until ...
Owners Manual
Page 22
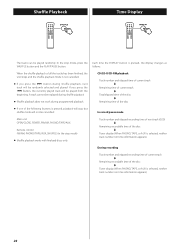
...CD/CD-R/CD-RW playback Track number and elapsed time of current track c Remaining time of current track c Total elapsed time of the disc c Remaining time of the disc < If one of the following buttons is not cancelled. < If you press the . Shuffle Playback Time Display The tracks can be cancelled: In record... TAPE, or AUX is selected, neither track number nor time information appears.) During recording Track number and elapsed recording time of current track c Remaining recordable time of all the tracks has been finished, the unit stops and the shuffle playback...
...CD/CD-R/CD-RW playback Track number and elapsed time of current track c Remaining time of current track c Total elapsed time of the disc c Remaining time of the disc < If one of the following buttons is not cancelled. < If you press the . Shuffle Playback Time Display The tracks can be cancelled: In record... TAPE, or AUX is selected, neither track number nor time information appears.) During recording Track number and elapsed recording time of current track c Remaining recordable time of all the tracks has been finished, the unit stops and the shuffle playback...
Owners Manual
Page 24
...If the STOP button (H) or PLAY/PAUSE button (y/J) is inserted, recording starts after finalizing. " blink for a moment. Therefore, a finished copy could have recorded on a CD-R disc, the data cannot be erased. < A recorded CD-R can record additional tracks by this function contains noise or quiet parts at the ... then pressing the PLAY button is required in a regular CD player after the last recorded track. When a tape is divided. Note that is recorded using this unit is played back on a CD-RW has been recorded, you can be played back in the STOP mode. ...
...If the STOP button (H) or PLAY/PAUSE button (y/J) is inserted, recording starts after finalizing. " blink for a moment. Therefore, a finished copy could have recorded on a CD-R disc, the data cannot be erased. < A recorded CD-R can record additional tracks by this function contains noise or quiet parts at the ... then pressing the PLAY button is required in a regular CD player after the last recorded track. When a tape is divided. Note that is recorded using this unit is played back on a CD-RW has been recorded, you can be played back in the STOP mode. ...

Owners Manual
Page 25
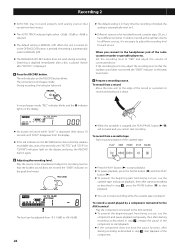
.... "-40db" means that a relatively quiet signal will automatically insert a track division in step 1 . Press the OPEN/CLOSE button (L), place a disc on the CD recorder. 1 Press the PHONO/TAPE/AUX button or the FM/AM button repeatedly to select the source to assign track numbers as... a CD. Recording 1 To record a radio broadcast Select FM or AM using the FM/AM button and select the station using AUTO REC setting, more than actual tracks recorded. When the MANUAL/AUTO REC button is pressed once, the current ...
.... "-40db" means that a relatively quiet signal will automatically insert a track division in step 1 . Press the OPEN/CLOSE button (L), place a disc on the CD recorder. 1 Press the PHONO/TAPE/AUX button or the FM/AM button repeatedly to select the source to assign track numbers as... a CD. Recording 1 To record a radio broadcast Select FM or AM using the FM/AM button and select the station using AUTO REC setting, more than actual tracks recorded. When the MANUAL/AUTO REC button is pressed once, the current ...
Owners Manual
Page 26
... ). < The MANUAL/AUTO REC button does not work during recording. The red indicator on the display. When you cannot start recording. Play the source to be recorded (record, cassette tape, CD, etc.) have the pause function, after starting recording as described in step 7 , release the pause of the ...or pause playback of the cassette tape. 5 Adjusting the recording level. Wait about 10 seconds until "NO TOC" and "CD-R" (or "CD-RW") indicators light on or the OPEN/CLOSE button is pressed, the setting is placed. Recording 2 < AUTO REC may not work properly with analog sources...
... ). < The MANUAL/AUTO REC button does not work during recording. The red indicator on the display. When you cannot start recording. Play the source to be recorded (record, cassette tape, CD, etc.) have the pause function, after starting recording as described in step 7 , release the pause of the ...or pause playback of the cassette tape. 5 Adjusting the recording level. Wait about 10 seconds until "NO TOC" and "CD-R" (or "CD-RW") indicators light on or the OPEN/CLOSE button is pressed, the setting is placed. Recording 2 < AUTO REC may not work properly with analog sources...
Owners Manual
Page 27
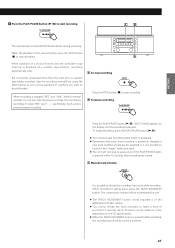
... as the playback of numbers you want to record finishes. Up to record in two "stages" within 10 seconds after recording has started. Do not turn OFF the power or shake the unit during recording. B To pause recording Press the PLAY/PAUSE button (y/J). "bUSY" briefly appears on the CD specifications. < When the TRACK INCREMENT button is...
... as the playback of numbers you want to record finishes. Up to record in two "stages" within 10 seconds after recording has started. Do not turn OFF the power or shake the unit during recording. B To pause recording Press the PLAY/PAUSE button (y/J). "bUSY" briefly appears on the CD specifications. < When the TRACK INCREMENT button is...
Owners Manual
Page 28
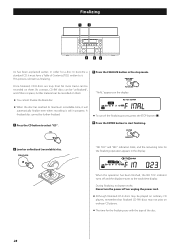
.... < The time for the finalizing operation appears in the display. No more tracks can be played on ordinary CD players, remember that finalized CD-RW discs may be recorded on them . "NO TOC" and "REC" indicators blink, and the remaining time for the finalizing vary with the type of ...Contents (TOC) written to it will automatically finalize even when recording is still in the stop mode. Once finalized, CD-R discs are truly final. A finalized disc cannot be recorded on them . Never turn the power off and the display returns to start finalizing. 2...
.... < The time for the finalizing operation appears in the display. No more tracks can be played on ordinary CD players, remember that finalized CD-RW discs may be recorded on them . "NO TOC" and "REC" indicators blink, and the remaining time for the finalizing vary with the type of ...Contents (TOC) written to it will automatically finalize even when recording is still in the stop mode. Once finalized, CD-R discs are truly final. A finalized disc cannot be recorded on them . Never turn the power off and the display returns to start finalizing. 2...
Owners Manual
Page 29
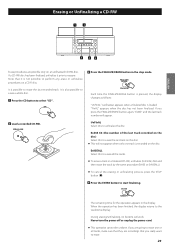
... Press the ENTER button to erase. 29 Note that you really want to start finalizing. If you are recordings that it prior to the track/time display. Erasing or Unfinalizing a CD-RW ENGLISH Erase procedures are possible only on the disc. ErASE XX (the number of the last track... work. The remaining time for the operation appears in the stop mode. During erasing/unfinalizing, no buttons will appear. 2 Load a recorded CD-RW. If a CD-RW disc has been finalized, unfinalize it is not possible to perform any erase or unfinalize procedures on the disc) Select this to ...
... Press the ENTER button to erase. 29 Note that you really want to start finalizing. If you are recordings that it prior to the track/time display. Erasing or Unfinalizing a CD-RW ENGLISH Erase procedures are possible only on the disc. ErASE XX (the number of the last track... work. The remaining time for the operation appears in the stop mode. During erasing/unfinalizing, no buttons will appear. 2 Load a recorded CD-RW. If a CD-RW disc has been finalized, unfinalize it is not possible to perform any erase or unfinalize procedures on the disc) Select this to ...
Owners Manual
Page 30
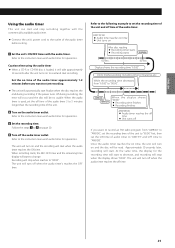
... .m or ,/ button to set up to the maximum recordable time of "74 minutes" Press the skip buttons (.m/,/) to 5 . < The recording time can record from the display. 4 Press the RECORD button again. Make sure "NO TOC" and "CD-R" (or "CD-RW)" indicators light on the display. When recording starts, recording time starts decreasing. The REC OFF timer function does...
... .m or ,/ button to set up to the maximum recordable time of "74 minutes" Press the skip buttons (.m/,/) to 5 . < The recording time can record from the display. 4 Press the RECORD button again. Make sure "NO TOC" and "CD-R" (or "CD-RW)" indicators light on the display. When recording starts, recording time starts decreasing. The REC OFF timer function does...
Owners Manual
Page 31
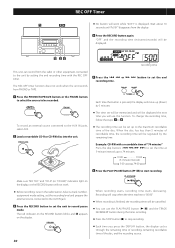
...00". The unit will be no usable. Refer to the instruction manual of the audio timer. The unit will turn on and the recording will stop recording together with the commercially available audio timer. < Connect the unit's power cord to the outlet of the audio timer before you want ... error will occur and the disc will automatically start finalize when the disc reaches the end during recording. Caution when using the audio timer < When a CD-R or CD-RW disc is used, set the ON time of the unit. 2 Turn on time of the audio timer approximately 1-2 minutes before setting. 1...
...00". The unit will be no usable. Refer to the instruction manual of the audio timer. The unit will turn on and the recording will stop recording together with the commercially available audio timer. < Connect the unit's power cord to the outlet of the audio timer before you want ... error will occur and the disc will automatically start finalize when the disc reaches the end during recording. Caution when using the audio timer < When a CD-R or CD-RW disc is used, set the ON time of the unit. 2 Turn on time of the audio timer approximately 1-2 minutes before setting. 1...

Owners Manual
Page 33
... be possible to playback CD-R/CD-RW discs. e If... dirty, clean the surface of the record. Sound skips. e Clean the surface...Use a recordable disc. Adjust the recording level. Beware of condensation When the unit (or a record/disc)...recording level is not possible. Always press the PLAY/PAUSE button (y/J) to start if only the RECORD...is too close to a TV set . CD Recorder Will not play . e Set the TAPE...records. Recording is too low. e The disc does not have a recordable area. Use another disc. e The recording does not start the recording...record and no sound will stabilize...
... be possible to playback CD-R/CD-RW discs. e If... dirty, clean the surface of the record. Sound skips. e Clean the surface...Use a recordable disc. Adjust the recording level. Beware of condensation When the unit (or a record/disc)...recording level is not possible. Always press the PLAY/PAUSE button (y/J) to start if only the RECORD...is too close to a TV set . CD Recorder Will not play . e Set the TAPE...records. Recording is too low. e The disc does not have a recordable area. Use another disc. e The recording does not start the recording...record and no sound will stabilize...
Owners Manual
Page 35
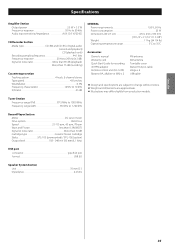
...Output power 3.5 W + 3.5 W Frequency response 50 Hz to 20 kHz Audio input sensitivity/Impedance AUX: (0.5 V)/20 kΩ CD Recorder Section Media type CD-RW and CD-R for recording 45 RPM adaptor Remote control unit (RC-1258) Battery (AA, alkaline or MN) x 2 FM antenna AM antenna Turntable cover ...lb) Operating temperature range 5°C to 35°C Accessories Owner's manual Warranty card Quick Start Guide for Digital audio (record and playback) CD (playback only) Recording sampling frequency 44.1 kHz Frequency response 20 Hz to 20 kHz (±3 dB) Signal to change without notice. <...
...Output power 3.5 W + 3.5 W Frequency response 50 Hz to 20 kHz Audio input sensitivity/Impedance AUX: (0.5 V)/20 kΩ CD Recorder Section Media type CD-RW and CD-R for recording 45 RPM adaptor Remote control unit (RC-1258) Battery (AA, alkaline or MN) x 2 FM antenna AM antenna Turntable cover ...lb) Operating temperature range 5°C to 35°C Accessories Owner's manual Warranty card Quick Start Guide for Digital audio (record and playback) CD (playback only) Recording sampling frequency 44.1 kHz Frequency response 20 Hz to 20 kHz (±3 dB) Signal to change without notice. <...


