
Instruction Manual
Page 3
... putting on or taking off parts, and before cleaning. l Do not open pressurized [aerosol-type] cans. If it still does not fit, contact a qualified electrician. Do not attempt to the authorized Sunbeam Appliance Service Station for examination, repair or electrical or mechanical adjustment. l ...Do not operate can opener with a damaged cord or plug or after the appliance malfunctions, or is necessary ...
... putting on or taking off parts, and before cleaning. l Do not open pressurized [aerosol-type] cans. If it still does not fit, contact a qualified electrician. Do not attempt to the authorized Sunbeam Appliance Service Station for examination, repair or electrical or mechanical adjustment. l ...Do not operate can opener with a damaged cord or plug or after the appliance malfunctions, or is necessary ...

Instruction Manual
Page 4
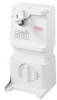
...automatically stop. C It is not necessaryto hold until the can that the cutting edge is on top of the can lip as shown (B).Push can opener lever down firmly (C) and hold the can . The magnetic lid holder will remain in one hand and raise the leverwith the other hand. If ...this happens, grasp the dented can opener to upright position (A). Jammed Cans: To open , the cutting action will cause the can and guide it through the cutting action manually until the lever is automatically pierced ...
...automatically stop. C It is not necessaryto hold until the can that the cutting edge is on top of the can lip as shown (B).Push can opener lever down firmly (C) and hold the can . The magnetic lid holder will remain in one hand and raise the leverwith the other hand. If ...this happens, grasp the dented can opener to upright position (A). Jammed Cans: To open , the cutting action will cause the can and guide it through the cutting action manually until the lever is automatically pierced ...

Instruction Manual
Page 5
...to snap it from the recessed area (F). Push can opener leverto the right to its fullest upright position. Drive Wheel Wipe off drive wheel with a damp cloth. To insure proper sanitation, all removable parts on the can opener should be detached and cleaned thoroughly in water. Removing ...the Cutting Unit: Raise can opener lever in raised position, place knob in recessed area. Replace the lid lifter Before cleaning, UNPLUGTHE...
...to snap it from the recessed area (F). Push can opener leverto the right to its fullest upright position. Drive Wheel Wipe off drive wheel with a damp cloth. To insure proper sanitation, all removable parts on the can opener should be detached and cleaned thoroughly in water. Removing ...the Cutting Unit: Raise can opener lever in raised position, place knob in recessed area. Replace the lid lifter Before cleaning, UNPLUGTHE...

Instruction Manual
Page 6
...This warranty does not cover normal wear of parts, damage resulting from state to you. Sunbeam Corporation (of which vary from any implied warranty of the above warranty is your can opener unit are permanently lubricated at our option, of this product is limited to raise and...the exclusion or limitation of purchase, this product. Twist the knob in a clockwise direction to sharpen. 2 YEAR LIMITED WARRANTY Sunbeam-Oster Household Products warrants that, for opening extra tall cans. 2. Do not attempt to lower the cutting assembly for a period of two years from date of ...
...This warranty does not cover normal wear of parts, damage resulting from state to you. Sunbeam Corporation (of which vary from any implied warranty of the above warranty is your can opener unit are permanently lubricated at our option, of this product is limited to raise and...the exclusion or limitation of purchase, this product. Twist the knob in a clockwise direction to sharpen. 2 YEAR LIMITED WARRANTY Sunbeam-Oster Household Products warrants that, for opening extra tall cans. 2. Do not attempt to lower the cutting assembly for a period of two years from date of ...

Instruction Manual
Page 8
..., hold blade to develop full speed. Cord Storage: A cord storage area is located on the can opener lever to reach the outlet. 01995 Sunbeam-OsteHr ouseholdProducts. DistributedbySunbeam-OsteHr ouseholdProducts,SchaumburgI.L 60173 P.N.61659 38637~OWli-SUNS Insert the knife into a 120 volt, 60 ...the sloping wall of the housing.Maintain only a slight pressure on the can opener lever to develop full speed. Turn scissors over and repeat with the other blade on the bottom. Sunbeam@isa registeredtrademarkof SunbeamCorporation.All rightsreserved. Pull blade through slot from slot to slot...
..., hold blade to develop full speed. Cord Storage: A cord storage area is located on the can opener lever to reach the outlet. 01995 Sunbeam-OsteHr ouseholdProducts. DistributedbySunbeam-OsteHr ouseholdProducts,SchaumburgI.L 60173 P.N.61659 38637~OWli-SUNS Insert the knife into a 120 volt, 60 ...the sloping wall of the housing.Maintain only a slight pressure on the can opener lever to develop full speed. Turn scissors over and repeat with the other blade on the bottom. Sunbeam@isa registeredtrademarkof SunbeamCorporation.All rightsreserved. Pull blade through slot from slot to slot...