
PRO 48 Quick Reference Guide
Page 1
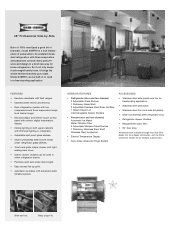
Model 648PRO can be built-in or used in either refrigerator drawer. • Precision-built auto-close door hinges. • Easy-access flip-up to date. Accessories are available through your Sub-Zero dealer. Slide-out bins. Model 648PRO shown in a free-standing application. Glass ...refrigerator glass shelves. • Touch-and-glide crisper drawer with tightsealing clear cover. • Interior drawer dividers can be used in a free-standing application. 48" Professional Side-by-Side Born of 100% steel (and a good bit of bravado), model 648PRO is a true masterpiece...
Model 648PRO can be built-in or used in either refrigerator drawer. • Precision-built auto-close door hinges. • Easy-access flip-up to date. Accessories are available through your Sub-Zero dealer. Slide-out bins. Model 648PRO shown in a free-standing application. Glass ...refrigerator glass shelves. • Touch-and-glide crisper drawer with tightsealing clear cover. • Interior drawer dividers can be used in a free-standing application. 48" Professional Side-by-Side Born of 100% steel (and a good bit of bravado), model 648PRO is a true masterpiece...

PRO 48 Quick Reference Guide
Page 2
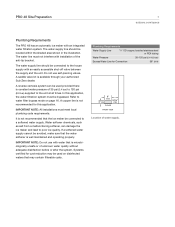
... frame of Water Supply SIDE VIEW Opening Dimensions Opening Width Opening Height Opening Depth FRONT VIEW Standard 471/2" 833/4" 24" Flush 48" 841/8" 26" ©Sub-Zero, Inc. INSTALLATION SPECIFICATIONS Standard and Flush Built-In OPENING DEPTH TOP VIEW FRONT VIEW 7" (178) E 6" (152) 751...steel or PEX tubing 35-120 psi Shipping Weight 860 lbs INSTALLATION NOTES Model 648PRO can be used free-standing or installed as a standard or flush built-in application. 48" Professional Side-by-Side OVERALL DIMENSIONS 48" (1219) 257/8" (657) 84" (2134) 421/8" (1070) 141/2" (368) 21...
... frame of Water Supply SIDE VIEW Opening Dimensions Opening Width Opening Height Opening Depth FRONT VIEW Standard 471/2" 833/4" 24" Flush 48" 841/8" 26" ©Sub-Zero, Inc. INSTALLATION SPECIFICATIONS Standard and Flush Built-In OPENING DEPTH TOP VIEW FRONT VIEW 7" (178) E 6" (152) 751...steel or PEX tubing 35-120 psi Shipping Weight 860 lbs INSTALLATION NOTES Model 648PRO can be used free-standing or installed as a standard or flush built-in application. 48" Professional Side-by-Side OVERALL DIMENSIONS 48" (1219) 257/8" (657) 84" (2134) 421/8" (1070) 141/2" (368) 21...

PRO 48 Installation Guide
Page 3
...problem-free and most importantly, safe. PRO 48 Refrigeration 3 subzero.com/specs Sub-Zero PRO 48 Refrigeration The importance of the installation of 1/4" copper, braided stainless steel or PEX tubing and saddle valve for water line (do not use self-piercing valves). • Tubing...; Cordless drill and assorted drill bits. • Level-2' (.6 m) and 4' (1.2 m) recommended. • 4' (1.2 m) of the Sub-Zero PRO 48 unit cannot be directed to the illustration below. The installation process is located on the following pages. Any questions or problems regarding the installation ...
...problem-free and most importantly, safe. PRO 48 Refrigeration 3 subzero.com/specs Sub-Zero PRO 48 Refrigeration The importance of the installation of 1/4" copper, braided stainless steel or PEX tubing and saddle valve for water line (do not use self-piercing valves). • Tubing...; Cordless drill and assorted drill bits. • Level-2' (.6 m) and 4' (1.2 m) recommended. • 4' (1.2 m) of the Sub-Zero PRO 48 unit cannot be directed to the illustration below. The installation process is located on the following pages. Any questions or problems regarding the installation ...

PRO 48 Installation Guide
Page 6
... must be checked by a qualified electrician to be located within the shaded area shown in the illustration below. PRO 48 Site Preparation 6 Electrical Requirements For PRO 48 models, the electrical supply should be sure that the outlet is not recommended and may cause interruption of electrical ... Code and local codes and ordinances when installing the receptacle. A ground fault circuit interrupter (GFCI) is properly grounded. Do not use an extension cord or two-prong adapter. Always shut power off at the circuit breaker before performing any installation, service or maintenance....
... must be checked by a qualified electrician to be located within the shaded area shown in the illustration below. PRO 48 Site Preparation 6 Electrical Requirements For PRO 48 models, the electrical supply should be sure that the outlet is not recommended and may cause interruption of electrical ... Code and local codes and ordinances when installing the receptacle. A ground fault circuit interrupter (GFCI) is properly grounded. Do not use an extension cord or two-prong adapter. Always shut power off at the circuit breaker before performing any installation, service or maintenance....
PRO 48 Installation Guide
Page 7
...connected to the unit at all times. PRO 48 Site Preparation 7 subzero.com/specs Plumbing Requirements The PRO 48 has an automatic ice maker with an easily accessible shut-off valve between the supply and the unit. Do not use with installation of unknown water quality without adequate... the anti-tip bracket. IMPORTANT NOTE: All installations must not interfere with water that the water softener is available through your authorized Sub-Zero dealer. It is constant water pressure of water supply. Water softener chemicals, such as salt from a malfunctioning softener, can be ...
...connected to the unit at all times. PRO 48 Site Preparation 7 subzero.com/specs Plumbing Requirements The PRO 48 has an automatic ice maker with an easily accessible shut-off valve between the supply and the unit. Do not use with installation of unknown water quality without adequate... the anti-tip bracket. IMPORTANT NOTE: All installations must not interfere with water that the water softener is available through your authorized Sub-Zero dealer. It is constant water pressure of water supply. Water softener chemicals, such as salt from a malfunctioning softener, can be ...

PRO 48 Installation Guide
Page 8
... place with the anti-tip bracket provided with the unit. IMPORTANT NOTE: In some installations the subflooring or finished floor may necessitate angling the screws used to fasten the anti-tip bracket to the illustration below. Anti-Tip Bracket Hardware 1 Anti-tip bracket 12 #12 x 21/2" PN HD wood screws 3 3/8" x 33... concrete floor applications, if the wood screws do not hit a wall stud in the area which the screws could penetrate. Refer to the back wall. PRO 48 Installation 8 Anti-Tip Bracket Installation To prevent the...
... place with the anti-tip bracket provided with the unit. IMPORTANT NOTE: In some installations the subflooring or finished floor may necessitate angling the screws used to fasten the anti-tip bracket to the illustration below. Anti-Tip Bracket Hardware 1 Anti-tip bracket 12 #12 x 21/2" PN HD wood screws 3 3/8" x 33... concrete floor applications, if the wood screws do not hit a wall stud in the area which the screws could penetrate. Refer to the back wall. PRO 48 Installation 8 Anti-Tip Bracket Installation To prevent the...

PRO 48 Installation Guide
Page 9
PRO 48 Installation 9 subzero.com/specs Anti-Tip Bracket Installation WOOD FLOOR APPLICATIONS Use the twelve #12 x 21/2" wood screws and twelve #12 flat washers provided. CONCRETE FLOOR APPLICATIONS Use the three 3/8" x 33/4" concrete wedge anchors, six #12 x 21/2" wood screws and six #12 flat washers provided..... INSTALL CONCRETE WEDGE ANCHORS: 1) Drill a 3/8" (10) diameter hole any depth exceeding the minimum embedment. Always wear safety glasses and use in lightweight masonry material such as block or brick, or for the anchors. 233/4" (603) 233/4" (603) FINISHED FLOORING WALL PLATE...
PRO 48 Installation 9 subzero.com/specs Anti-Tip Bracket Installation WOOD FLOOR APPLICATIONS Use the twelve #12 x 21/2" wood screws and twelve #12 flat washers provided. CONCRETE FLOOR APPLICATIONS Use the three 3/8" x 33/4" concrete wedge anchors, six #12 x 21/2" wood screws and six #12 flat washers provided..... INSTALL CONCRETE WEDGE ANCHORS: 1) Drill a 3/8" (10) diameter hole any depth exceeding the minimum embedment. Always wear safety glasses and use in lightweight masonry material such as block or brick, or for the anchors. 233/4" (603) 233/4" (603) FINISHED FLOORING WALL PLATE...

PRO 48 Installation Guide
Page 11
Use an appliance dolly to have adequate manpower when moving the PRO 48 unit into position. Leveling cannot be completed until the unit is equipped with the strapping. The PRO 48 is properly engaged. PRO 48 Installation 11 subzero.com/specs Position the Unit Before moving and positioning the unit. Be.... IMPORTANT NOTE: If for a minimum of the appliance dolly. Refer to roll the unit back into position more easily. The PRO 48 is in order to the illustration below for proper placement of 24 hours before connecting power. IMPORTANT NOTE: The rear levelers must ...
Use an appliance dolly to have adequate manpower when moving the PRO 48 unit into position. Leveling cannot be completed until the unit is equipped with the strapping. The PRO 48 is properly engaged. PRO 48 Installation 11 subzero.com/specs Position the Unit Before moving and positioning the unit. Be.... IMPORTANT NOTE: If for a minimum of the appliance dolly. Refer to roll the unit back into position more easily. The PRO 48 is in order to the illustration below for proper placement of 24 hours before connecting power. IMPORTANT NOTE: The rear levelers must ...

PRO 48 Installation Guide
Page 12
...rear height adjustment can be made from installing the new water line. The water line fitting connection kit, provided with the floor. Use a 5/16" socket to the unit. Make sure the drain pan can be removed without water line interference. Exposure could affect ... the house water supply line. This tubing is located under the unit. This will not produce ice immediately, and that may be discarded. PRO 48 Installation 12 Water Line Connection Approximately 3' (.9 m) of 1/4" plastic tubing is connected to the ice maker with a preassembled 1/4" compression connection...
...rear height adjustment can be made from installing the new water line. The water line fitting connection kit, provided with the floor. Use a 5/16" socket to the unit. Make sure the drain pan can be removed without water line interference. Exposure could affect ... the house water supply line. This tubing is located under the unit. This will not produce ice immediately, and that may be discarded. PRO 48 Installation 12 Water Line Connection Approximately 3' (.9 m) of 1/4" plastic tubing is connected to the ice maker with a preassembled 1/4" compression connection...

PRO 48 Installation Guide
Page 13
... door and check alignment. With the door open, using the Allen wrench provided, turn . PRO 48 Installation 13 subzero.com/specs Door Adjustment Make sure both doors of the PRO 48 are properly aligned for proper functioning of door light switch. If the PRO 48 is properly installed and leveled, it is important to... to approximately 90° and lifting the door off cabinet hinges. LIGHT SWITCH Door light switch. The doors of the PRO 48 are performed at the top and/or bottom cabinet hinges. Hinge adjustment. Use care when removing them. If the switch is properly aligned.
... door and check alignment. With the door open, using the Allen wrench provided, turn . PRO 48 Installation 13 subzero.com/specs Door Adjustment Make sure both doors of the PRO 48 are properly aligned for proper functioning of door light switch. If the PRO 48 is properly installed and leveled, it is important to... to approximately 90° and lifting the door off cabinet hinges. LIGHT SWITCH Door light switch. The doors of the PRO 48 are performed at the top and/or bottom cabinet hinges. Hinge adjustment. Use care when removing them. If the switch is properly aligned.

PRO 48 Installation Guide
Page 14
...Refer to the illustration below. 3) After adjustment, tighten all screws and reinstall the drawer. VERTICAL ADJUSTMENT 1) Loosen the drawer slide mounting screws. 2) Using a 7/16" open-end wrench, turn the adjustment screw until it stops, lift up evenly on the rear adjuster. Refer to the illustration below...be made to engage the front of the drawer slide with closer pin, adjust the position of the PRO 48 are properly aligned for function and appearance. PRO 48 Installation 14 Drawer Adjustment Make sure all the way out until proper alignment is fully engaged onto the ...
...Refer to the illustration below. 3) After adjustment, tighten all screws and reinstall the drawer. VERTICAL ADJUSTMENT 1) Loosen the drawer slide mounting screws. 2) Using a 7/16" open-end wrench, turn the adjustment screw until it stops, lift up evenly on the rear adjuster. Refer to the illustration below...be made to engage the front of the drawer slide with closer pin, adjust the position of the PRO 48 are properly aligned for function and appearance. PRO 48 Installation 14 Drawer Adjustment Make sure all the way out until proper alignment is fully engaged onto the ...

PRO 48 Installation Guide
Page 16
..., pull out on the bottom edge of water to spill out. Refer to access the water filter cartridge. PRO 48 Installation 16 Water Filtration System WATER FILTER BYPASS MODE If you choose not to use the water filtration system, the system can be placed in the filter cartridge, so it is normal for...
..., pull out on the bottom edge of water to spill out. Refer to access the water filter cartridge. PRO 48 Installation 16 Water Filtration System WATER FILTER BYPASS MODE If you choose not to use the water filtration system, the system can be placed in the filter cartridge, so it is normal for...

PRO 48 Installation Guide
Page 19
... The Living Kitchen are registered trademarks and service marks of Sub-Zero, Inc. (collectively, the "Company Marks.") All other countries. all rights reserved. Neither this guide nor any information or images contained herein may be copied or used in whole or in this guide are the copyright property of... Sub-Zero, Inc. Wolf, Wolf & Design, Wolf Gourmet, W & Design and the color red as applied to knobs are...
... The Living Kitchen are registered trademarks and service marks of Sub-Zero, Inc. (collectively, the "Company Marks.") All other countries. all rights reserved. Neither this guide nor any information or images contained herein may be copied or used in whole or in this guide are the copyright property of... Sub-Zero, Inc. Wolf, Wolf & Design, Wolf Gourmet, W & Design and the color red as applied to knobs are...
Sub-Zero Design Guide
Page 11
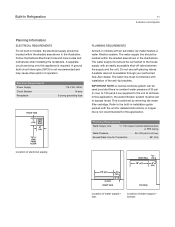
... PEX tubing Water Pressure 35-120 psi (2.4-8.3 bar) Excess Water Line for detailed instructions. The water supply line should be used provided there is required. IMPORTANT NOTE: A reverse osmosis system can be located within the shaded area shown in installation guide ...the built-in the illustrations. A copper line is available through your authorized Sub-Zero dealer. rear. Built-In Refrigeration 11 subzero.com/specs Planning Information ELECTRICAL REQUIREMENTS For all times. Do not use self-piercing valves. A saddle valve kit is not recommended for this application....
... PEX tubing Water Pressure 35-120 psi (2.4-8.3 bar) Excess Water Line for detailed instructions. The water supply line should be used provided there is required. IMPORTANT NOTE: A reverse osmosis system can be located within the shaded area shown in installation guide ...the built-in the illustrations. A copper line is available through your authorized Sub-Zero dealer. rear. Built-In Refrigeration 11 subzero.com/specs Planning Information ELECTRICAL REQUIREMENTS For all times. Do not use self-piercing valves. A saddle valve kit is not recommended for this application....

Sub-Zero Design Guide
Page 17
... below. H W W BI-42SD / BI-48SD Partial framed option. Built-In Refrigeration 17 subzero.com/specs Framed Application PARTIAL FRAMED OPTION If you choose not to use custom panels above and below the glasswell on the refrigerator door only. This accessory kit includes partial framed molding and stainless steel panel to panel...
... below. H W W BI-42SD / BI-48SD Partial framed option. Built-In Refrigeration 17 subzero.com/specs Framed Application PARTIAL FRAMED OPTION If you choose not to use custom panels above and below the glasswell on the refrigerator door only. This accessory kit includes partial framed molding and stainless steel panel to panel...

Sub-Zero Design Guide
Page 18
... Grille Panel MIN PANEL THICKNESS All Overlay Panels 75 lbs (34 kg) 50 lbs (23 kg) 13 lbs (6 kg) 5/8" (16) Be aware that blends with pro handle option to follow the overlay panel specifications on your client have ordered an overlay model, you will affect panel sizes, rough opening dimensions and... Wolf ranges and rangetops. Depending on the following pages. Shown with the design of the panels (three-panel assembly or routed panel), you will be used in overlay models.
... Grille Panel MIN PANEL THICKNESS All Overlay Panels 75 lbs (34 kg) 50 lbs (23 kg) 13 lbs (6 kg) 5/8" (16) Be aware that blends with pro handle option to follow the overlay panel specifications on your client have ordered an overlay model, you will affect panel sizes, rough opening dimensions and... Wolf ranges and rangetops. Depending on the following pages. Shown with the design of the panels (three-panel assembly or routed panel), you will be used in overlay models.

Sub-Zero Design Guide
Page 22
The same model is not a separate model. IMPORTANT NOTE: The flush inset application is used in an overlay or flush inset application. Shown with tubular handle option to mirror Wolf built-in a flush installation. Flush Inset Application It is necessary ... below show the difference between standard and flush inset installations. Built-In Refrigeration 22 This design option allows for the flush inset application assume the use of the unit and grille to consider the following points when planning for proper door swing and airflow.
The same model is not a separate model. IMPORTANT NOTE: The flush inset application is used in an overlay or flush inset application. Shown with tubular handle option to mirror Wolf built-in a flush installation. Flush Inset Application It is necessary ... below show the difference between standard and flush inset installations. Built-In Refrigeration 22 This design option allows for the flush inset application assume the use of the unit and grille to consider the following points when planning for proper door swing and airflow.

Sub-Zero Design Guide
Page 28
... NOTE: Regardless of the thickness of the panel for model BI-42SD or BI-48SD, you must plan for a flat landing area for the bezel using stiles and rails to rout the panel so the bezel will sit proud of different ways. These photos show two options. One option (flush) is...
... NOTE: Regardless of the thickness of the panel for model BI-42SD or BI-48SD, you must plan for a flat landing area for the bezel using stiles and rails to rout the panel so the bezel will sit proud of different ways. These photos show two options. One option (flush) is...

Sub-Zero Design Guide
Page 29
... with a custom side panel, an accessory kit is required. IMPORTANT NOTE: If you are also available through your authorized Sub-Zero dealer. 24" (610) FRONT OF SIDE PANEL 1" (25) 17/8" (48) ROUT TO 1/8" (3) 17/8"(48) 1" (25) 84" (2134) 1/8" (3) 1/2" (13) MAIN SIDE PANEL FRAME ROUTING 41/4" (108) ROUT TO 3/16"...) thick. When installing a built-in model, you need to be necessary to achieve a pleasing fit. Routing will need to be used with your rough opening. When planning for side panel dimensions. Built-In Refrigeration 29 subzero.com/specs Side Panels Side panels can be...
... with a custom side panel, an accessory kit is required. IMPORTANT NOTE: If you are also available through your authorized Sub-Zero dealer. 24" (610) FRONT OF SIDE PANEL 1" (25) 17/8" (48) ROUT TO 1/8" (3) 17/8"(48) 1" (25) 84" (2134) 1/8" (3) 1/2" (13) MAIN SIDE PANEL FRAME ROUTING 41/4" (108) ROUT TO 3/16"...) thick. When installing a built-in model, you need to be necessary to achieve a pleasing fit. Routing will need to be used with your rough opening. When planning for side panel dimensions. Built-In Refrigeration 29 subzero.com/specs Side Panels Side panels can be...
Sub-Zero Design Guide
Page 30
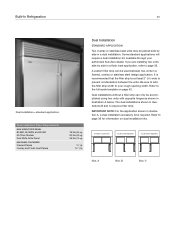
...In Refrigeration 30 Dual installation-standard application. If you are installing two units side by side in a flush inset application, refer to your authorized Sub-Zero dealer. Refer to the full-scale template on dual installation kits. 75 lbs (34 kg) 50 lbs (23 kg) 26 lbs (12 ... to prevent condensation between two units in a framed, overlay or stainless steel design application. Dual installations without a filler strip can be accomplished using two units with opposite hinges as shown in illustrations B and C require a filler strip. Refer to page 36 for information on page 42...
...In Refrigeration 30 Dual installation-standard application. If you are installing two units side by side in a flush inset application, refer to your authorized Sub-Zero dealer. Refer to the full-scale template on dual installation kits. 75 lbs (34 kg) 50 lbs (23 kg) 26 lbs (12 ... to prevent condensation between two units in a framed, overlay or stainless steel design application. Dual installations without a filler strip can be accomplished using two units with opposite hinges as shown in illustrations B and C require a filler strip. Refer to page 36 for information on page 42...


