

PRO 48 Quick Reference Guide
Page 2
... face frame of Water Supply SIDE VIEW Opening Dimensions Opening Width Opening Height Opening Depth FRONT VIEW Standard 471/2" 833/4" 24" Flush 48" 841/8" 26" ©Sub-Zero, Inc. INSTALLATION SPECIFICATIONS Standard and Flush Built-In OPENING DEPTH TOP VIEW FRONT VIEW 7" (178) E 6" (152) 751/2" (1918) FROM FLOOR Location of Electrical Supply OPENING DEPTH...
... face frame of Water Supply SIDE VIEW Opening Dimensions Opening Width Opening Height Opening Depth FRONT VIEW Standard 471/2" 833/4" 24" Flush 48" 841/8" 26" ©Sub-Zero, Inc. INSTALLATION SPECIFICATIONS Standard and Flush Built-In OPENING DEPTH TOP VIEW FRONT VIEW 7" (178) E 6" (152) 751/2" (1918) FROM FLOOR Location of Electrical Supply OPENING DEPTH...

PRO 48 Installation Guide
Page 2
... minor injury or product damage may cause serious injury or death if precautions are not followed. Contents PRO 48 Refrigeration 3 PRO 48 Specifications 4 PRO 48 Site Preparation 5 PRO 48 Installation 8 Service Information 18 Features and specifications are millimeters unless otherwise specified. WARNING states a hazard that ... that may occur if instructions are not followed. Important Note To ensure the safe and efficient installation of Sub-Zero equipment, please take note of the following types of highlighted information throughout this guide, dimensions in parentheses are...
... minor injury or product damage may cause serious injury or death if precautions are not followed. Contents PRO 48 Refrigeration 3 PRO 48 Specifications 4 PRO 48 Site Preparation 5 PRO 48 Installation 8 Service Information 18 Features and specifications are millimeters unless otherwise specified. WARNING states a hazard that ... that may occur if instructions are not followed. Important Note To ensure the safe and efficient installation of Sub-Zero equipment, please take note of the following types of highlighted information throughout this guide, dimensions in parentheses are...

PRO 48 Installation Guide
Page 3
... or other suitable material to protect finished flooring. • Appropriate materials to cover and protect the home and furnishings during the installation. PRO 48 Refrigeration 3 subzero.com/specs Sub-Zero PRO 48 Refrigeration The importance of the installation of the Sub-Zero PRO 48 unit cannot be directed to your unit are listed on the product rating plate. Refer to observe during...
... or other suitable material to protect finished flooring. • Appropriate materials to cover and protect the home and furnishings during the installation. PRO 48 Refrigeration 3 subzero.com/specs Sub-Zero PRO 48 Refrigeration The importance of the installation of the Sub-Zero PRO 48 unit cannot be directed to your unit are listed on the product rating plate. Refer to observe during...

PRO 48 Installation Guide
Page 5
In flush built-in installations, the face frame of the face frame will extend 2" (51) beyond cabinetry. PRO 48 Site Preparation Opening Dimensions STANDARD AND FLUSH BUILT-IN INSTALLATIONS OPENING DEPTH TOP VIEW 5 subzero.com/specs OPENING DEPTH OPENING HEIGHT OPENING WIDTH SIDE VIEW Opening Dimensions Opening Width Opening Height Opening Depth FRONT VIEW Standard 471/2" (1206) 833/4" (2127) 24" (610) Flush 48" (1219) 841/8" (2137) 26" (660) IMPORTANT NOTE: For standard built-in installations, the front of the unit will be flush with surrounding cabinetry.
In flush built-in installations, the face frame of the face frame will extend 2" (51) beyond cabinetry. PRO 48 Site Preparation Opening Dimensions STANDARD AND FLUSH BUILT-IN INSTALLATIONS OPENING DEPTH TOP VIEW 5 subzero.com/specs OPENING DEPTH OPENING HEIGHT OPENING WIDTH SIDE VIEW Opening Dimensions Opening Width Opening Height Opening Depth FRONT VIEW Standard 471/2" (1206) 833/4" (2127) 24" (610) Flush 48" (1219) 841/8" (2137) 26" (660) IMPORTANT NOTE: For standard built-in installations, the front of the unit will be flush with surrounding cabinetry.

PRO 48 Installation Guide
Page 6
Follow the National Electrical Code and local codes and ordinances when installing the receptacle. Do not use an extension cord or two-prong adapter. Electrical Requirements Power Supply Circuit Breaker Receptacle 115 V AC...power off at the circuit breaker before performing any installation, service or maintenance. A separate circuit, servicing only this appliance is properly grounded. FRONT VIEW 7" (178) E 6" (152) 751/2" (1918) FROM FLOOR Location of operation. PRO 48 Site Preparation 6 Electrical Requirements For PRO 48 models, the electrical supply should be sure that ...
Follow the National Electrical Code and local codes and ordinances when installing the receptacle. Do not use an extension cord or two-prong adapter. Electrical Requirements Power Supply Circuit Breaker Receptacle 115 V AC...power off at the circuit breaker before performing any installation, service or maintenance. A separate circuit, servicing only this appliance is properly grounded. FRONT VIEW 7" (178) E 6" (152) 751/2" (1918) FROM FLOOR Location of operation. PRO 48 Site Preparation 6 Electrical Requirements For PRO 48 models, the electrical supply should be sure that ...
PRO 48 Installation Guide
Page 7
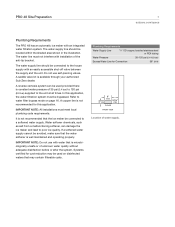
...a softened water supply cannot be used provided there is available through your authorized Sub-Zero dealer. PRO 48 Site Preparation 7 subzero.com/specs Plumbing Requirements The PRO 48 has an automatic ice maker with installation of the anti-tip bracket. A copper line is microbiologically unsafe or of .... In this application. The water supply line should be connected to the unit at all times. IMPORTANT NOTE: All installations must not interfere with an integrated water filtration system. The water line must meet local plumbing code requirements. IMPORTANT NOTE:...
...a softened water supply cannot be used provided there is available through your authorized Sub-Zero dealer. PRO 48 Site Preparation 7 subzero.com/specs Plumbing Requirements The PRO 48 has an automatic ice maker with installation of the anti-tip bracket. A copper line is microbiologically unsafe or of .... In this application. The water supply line should be connected to the unit at all times. IMPORTANT NOTE: All installations must not interfere with an integrated water filtration system. The water line must meet local plumbing code requirements. IMPORTANT NOTE:...

PRO 48 Installation Guide
Page 8
...anti-tip bracket must be centered in place with the anti-tip bracket provided with the unit. IMPORTANT NOTE: In some installations the subflooring or finished floor may necessitate angling the screws used to fasten the anti-tip bracket to the illustration below..... Also, the centering line on a solid base. PRO 48 Installation 8 Anti-Tip Bracket Installation To prevent the PRO 48 from tipping forward and provide a stable installation, the unit must be installed exactly 26" (660) from engaging the unit. Failure to a stable installation. Make sure the anti-tip bracket is critical to...
...anti-tip bracket must be centered in place with the anti-tip bracket provided with the unit. IMPORTANT NOTE: In some installations the subflooring or finished floor may necessitate angling the screws used to fasten the anti-tip bracket to the illustration below..... Also, the centering line on a solid base. PRO 48 Installation 8 Anti-Tip Bracket Installation To prevent the PRO 48 from tipping forward and provide a stable installation, the unit must be installed exactly 26" (660) from engaging the unit. Failure to a stable installation. Make sure the anti-tip bracket is critical to...

PRO 48 Installation Guide
Page 9
...floor. 233/4" (603) 233/4" (603) FINISHED FLOORING WALL PLATE SUBFLOORING CONCRETE FLOOR 11/2"(38) min Concrete floor. PRO 48 Installation 9 subzero.com/specs Anti-Tip Bracket Installation WOOD FLOOR APPLICATIONS Use the twelve #12 x 21/2" wood screws and twelve #12 flat washers provided. Drill pilot ..." (5) diameter maximum and make sure the screws penetrate through the flooring material and into the wall plate a minimum of 3/4" (19). INSTALL CONCRETE WEDGE ANCHORS: 1) Drill a 3/8" (10) diameter hole any depth exceeding the minimum embedment. Refer to drill holes for use other...
...floor. 233/4" (603) 233/4" (603) FINISHED FLOORING WALL PLATE SUBFLOORING CONCRETE FLOOR 11/2"(38) min Concrete floor. PRO 48 Installation 9 subzero.com/specs Anti-Tip Bracket Installation WOOD FLOOR APPLICATIONS Use the twelve #12 x 21/2" wood screws and twelve #12 flat washers provided. Drill pilot ..." (5) diameter maximum and make sure the screws penetrate through the flooring material and into the wall plate a minimum of 3/4" (19). INSTALL CONCRETE WEDGE ANCHORS: 1) Drill a 3/8" (10) diameter hole any depth exceeding the minimum embedment. Refer to drill holes for use other...

PRO 48 Installation Guide
Page 10
PRO 48 Installation 10 Unpack the Unit Uncrate the PRO 48 unit and inspect for proper placement of the grille and the upper grille screw. Remove the drain pan from base of the appliance dolly. Grille Removal In order to prevent damage to the PRO 48 grille, the top grille assembly should be ... once the unit is in position. These items will extend the front leveling legs down and make adjustments once the unit is properly installed. You will be removed prior to the right grille support and disconnect the cables. Disconnect the network cables which attach the network cables...
PRO 48 Installation 10 Unpack the Unit Uncrate the PRO 48 unit and inspect for proper placement of the grille and the upper grille screw. Remove the drain pan from base of the appliance dolly. Grille Removal In order to prevent damage to the PRO 48 grille, the top grille assembly should be ... once the unit is in position. These items will extend the front leveling legs down and make adjustments once the unit is properly installed. You will be removed prior to the right grille support and disconnect the cables. Disconnect the network cables which attach the network cables...

PRO 48 Installation Guide
Page 11
Leveling cannot be moved into the rough opening . PRO 48 Installation 11 subzero.com/specs Position the Unit Before moving and positioning the unit. IMPORTANT NOTE: If for any finished flooring. Make sure the anti-tip ... position more easily. Shut off power to move the unit near the rough opening . Be sure to have adequate manpower when moving the PRO 48 unit into position. The PRO 48 is in order to stand upright for proper placement of 24 hours before connecting power. Use an appliance dolly to the electrical outlet.
Leveling cannot be moved into the rough opening . PRO 48 Installation 11 subzero.com/specs Position the Unit Before moving and positioning the unit. IMPORTANT NOTE: If for any finished flooring. Make sure the anti-tip ... position more easily. Shut off power to move the unit near the rough opening . Be sure to have adequate manpower when moving the PRO 48 unit into position. The PRO 48 is in order to stand upright for proper placement of 24 hours before connecting power. Use an appliance dolly to the electrical outlet.

PRO 48 Installation Guide
Page 12
... line fittings for proper ice production. When the unit is properly leveled, door and drawer adjustments are less likely to be made from installing the new water line. PRO 48 Installation 12 Water Line Connection Approximately 3' (.9 m) of 1/4" plastic tubing is connected to the ice maker with a preassembled 1/4" compression connection at the end of the...
... line fittings for proper ice production. When the unit is properly leveled, door and drawer adjustments are less likely to be made from installing the new water line. PRO 48 Installation 12 Water Line Connection Approximately 3' (.9 m) of 1/4" plastic tubing is connected to the ice maker with a preassembled 1/4" compression connection at the end of the...

PRO 48 Installation Guide
Page 13
... adjustments are made to right. HINGE SCREW HINGE PIN CABINET HINGE ADJUSTMENT SCREW Door removal. Hinge adjustment. PRO 48 Installation 13 subzero.com/specs Door Adjustment Make sure both doors of the PRO 48 are properly aligned for proper functioning of door light switch. Refer to the face of the door and ...side of the PRO 48 are performed at the top and/or bottom cabinet hinges. If additional adjustment is required, repeat these steps until the door is properly installed and leveled, it is not activated, the fan will not operate and...
... adjustments are made to right. HINGE SCREW HINGE PIN CABINET HINGE ADJUSTMENT SCREW Door removal. Hinge adjustment. PRO 48 Installation 13 subzero.com/specs Door Adjustment Make sure both doors of the PRO 48 are properly aligned for proper functioning of door light switch. Refer to the face of the door and ...side of the PRO 48 are performed at the top and/or bottom cabinet hinges. If additional adjustment is required, repeat these steps until the door is properly installed and leveled, it is not activated, the fan will not operate and...

PRO 48 Installation Guide
Page 14
... until proper alignment is fully engaged onto the tracks. Refer to the illustration below . 3) After adjustment, tighten all drawers of the PRO 48 are properly aligned for function and appearance. Vertical adjustment. The drawer must be made to engage the front of the drawer slide with ... drawer closer. Check alignment of the drawer and place onto the drawer slide tracks. Check the drawer seal for proper gasket seating. PRO 48 Installation 14 Drawer Adjustment Make sure all screws and reinstall the drawer. If not, vertical and horizontal adjustments can be removed to the left...
... until proper alignment is fully engaged onto the tracks. Refer to the illustration below . 3) After adjustment, tighten all drawers of the PRO 48 are properly aligned for function and appearance. Vertical adjustment. The drawer must be made to engage the front of the drawer slide with ... drawer closer. Check alignment of the drawer and place onto the drawer slide tracks. Check the drawer seal for proper gasket seating. PRO 48 Installation 14 Drawer Adjustment Make sure all screws and reinstall the drawer. If not, vertical and horizontal adjustments can be removed to the left...

PRO 48 Installation Guide
Page 15
... kickplate. Turn power back on page 10. Installation instructions are available through your authorized Sub-Zero dealer. Refer to the inside surface of our website, subzero.com. IMPORTANT NOTE: The kickplate must be removable for service. For local dealer information, visit the find a showroom section of PRO 48 models open to the electrical outlet. To...
... kickplate. Turn power back on page 10. Installation instructions are available through your authorized Sub-Zero dealer. Refer to the inside surface of our website, subzero.com. IMPORTANT NOTE: The kickplate must be removable for service. For local dealer information, visit the find a showroom section of PRO 48 models open to the electrical outlet. To...

PRO 48 Installation Guide
Page 16
... illustration. DO NOT pull. WATER FILTER Water filter removal. Refer to disengage. Slowly rotate the water filter cartridge one-quarter turn counterclockwise to the illustration. PRO 48 Installation 16 Water Filtration System WATER FILTER BYPASS MODE If you choose not to use the water filtration system, the system can be water in water...
... illustration. DO NOT pull. WATER FILTER Water filter removal. Refer to disengage. Slowly rotate the water filter cartridge one-quarter turn counterclockwise to the illustration. PRO 48 Installation 16 Water Filtration System WATER FILTER BYPASS MODE If you choose not to use the water filtration system, the system can be water in water...
PRO 48 Installation Guide
Page 17
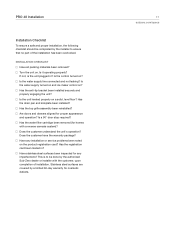
... for cosmetic defects. 17 subzero.com/specs Does the customer understand the unit's operation? PRO 48 Installation Installation Checklist To ensure a safe and proper installation, the following checklist should be done by the installer to be completed by the authorized Sub-Zero dealer or installer with a reverse osmosis system)? Turn the unit on ? If not, is to ensure that...
... for cosmetic defects. 17 subzero.com/specs Does the customer understand the unit's operation? PRO 48 Installation Installation Checklist To ensure a safe and proper installation, the following checklist should be done by the installer to be completed by the authorized Sub-Zero dealer or installer with a reverse osmosis system)? Turn the unit on ? If not, is to ensure that...
Sub-Zero Design Guide
Page 10
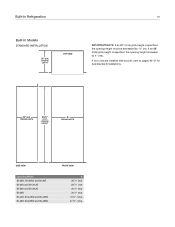
...: If an 83" (2108) grille height is specified, the opening height must be decreased by 7/8" (22). If two units are installed side by side, refer to pages 30-31 for dual standard installations. 24" (610) OPENING DEPTH 83 3/4" (2127) OPENING HEIGHT A OPENING WIDTH SIDE VIEW Opening Width BI-36R, BI-36RG and... BI-36F BI-30U and BI-30UG BI-36U and BI-36UG BI-36S BI-42S, BI-42SID and BI-42SD BI-48S, BI-48SID and BI...
...: If an 83" (2108) grille height is specified, the opening height must be decreased by 7/8" (22). If two units are installed side by side, refer to pages 30-31 for dual standard installations. 24" (610) OPENING DEPTH 83 3/4" (2127) OPENING HEIGHT A OPENING WIDTH SIDE VIEW Opening Width BI-36R, BI-36RG and... BI-36F BI-30U and BI-30UG BI-36U and BI-36UG BI-36S BI-42S, BI-42SID and BI-42SD BI-48S, BI-48SID and BI...
Sub-Zero Design Guide
Page 11
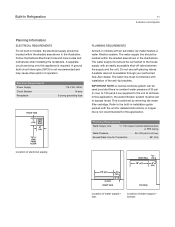
... the unit. This is required. A copper line is available through your authorized Sub-Zero dealer. In this application. Follow the National Electrical Code and local codes and ordinances when installing the receptacle. Electrical Requirements Power Supply Circuit Breaker Receptacle 115 V AC, 60 Hz...the anti-tip brackets. A saddle valve kit is not recommended for this application, the water filtration system must not interfere with installation of electrical supply. Plumbing Requirements Water Supply Line 1/4" OD copper, braided stainless steel or PEX tubing Water Pressure 35-120 ...
... the unit. This is required. A copper line is available through your authorized Sub-Zero dealer. In this application. Follow the National Electrical Code and local codes and ordinances when installing the receptacle. Electrical Requirements Power Supply Circuit Breaker Receptacle 115 V AC, 60 Hz...the anti-tip brackets. A saddle valve kit is not recommended for this application, the water filtration system must not interfere with installation of electrical supply. Plumbing Requirements Water Supply Line 1/4" OD copper, braided stainless steel or PEX tubing Water Pressure 35-120 ...

Sub-Zero Design Guide
Page 13
...a proper fit. Be aware that rough opening dimensions are different for finger clearance under the handle. Refer to pages 30-31 for dual standard installations. Panels thicker than 1/4" (6), they will be backed up with a solid panel. IMPORTANT NOTE: Do not cover a glass door with a ...sheet of shim material to build the total thickness to 1/4" (6). IMPORTANT NOTE: When installing two units in a side-byside application, refer to the full-scale templates at the end of this application. TRIM REVEAL 1/4" (6) min 1/4" (6) PANEL...
...a proper fit. Be aware that rough opening dimensions are different for finger clearance under the handle. Refer to pages 30-31 for dual standard installations. Panels thicker than 1/4" (6), they will be backed up with a solid panel. IMPORTANT NOTE: Do not cover a glass door with a ...sheet of shim material to build the total thickness to 1/4" (6). IMPORTANT NOTE: When installing two units in a side-byside application, refer to the full-scale templates at the end of this application. TRIM REVEAL 1/4" (6) min 1/4" (6) PANEL...

Sub-Zero Design Guide
Page 18
...backer panel. Shown with the design of the panels (three-panel assembly or routed panel), you will affect panel sizes, rough opening dimensions and installation. IMPORTANT NOTE: Overlay models can be combined with unique hardware for all built-in an overlay or a flush inset application. Regardless of the ...physical construction of the room. Be aware that blends with pro handle option to achieve this could also be used in overlay models. For exact door panel dimensions, refer to follow the overlay ...
...backer panel. Shown with the design of the panels (three-panel assembly or routed panel), you will affect panel sizes, rough opening dimensions and installation. IMPORTANT NOTE: Overlay models can be combined with unique hardware for all built-in an overlay or a flush inset application. Regardless of the ...physical construction of the room. Be aware that blends with pro handle option to achieve this could also be used in overlay models. For exact door panel dimensions, refer to follow the overlay ...


