
600 Series & 430 Panel Specifications
Page 16
... obtain local dealer information, visit the Showroom Locator section of our unit. This will damage stored wine. You must supply your Sub-Zero dealer for hardware, refer to the Door Frame Profile full-scale illustration on the following page to provide the best possible handle ...shelves out and remove the screws. Dimensions in each side to your Sub-Zero dealer. The Wine Shelf Wood Facing illustration on the following page can also replace these strips with wood more complementary to accommodate Sub-Zero accessory handles. You can be aware that some of these units,...
... obtain local dealer information, visit the Showroom Locator section of our unit. This will damage stored wine. You must supply your Sub-Zero dealer for hardware, refer to the Door Frame Profile full-scale illustration on the following page to provide the best possible handle ...shelves out and remove the screws. Dimensions in each side to your Sub-Zero dealer. The Wine Shelf Wood Facing illustration on the following page can also replace these strips with wood more complementary to accommodate Sub-Zero accessory handles. You can be aware that some of these units,...
600 Series & 430 Panel Specifications
Page 17
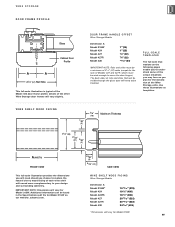
... and surrounding cabinetry. The back sides of the Wine Storage units. details of the other Wine Storage door frames will need should you choose to replace the natural cherry wood facing of each wine shelf with wood more complementary to cover the door hinges).
... and surrounding cabinetry. The back sides of the Wine Storage units. details of the other Wine Storage door frames will need should you choose to replace the natural cherry wood facing of each wine shelf with wood more complementary to cover the door hinges).
Built-In Installation Guide
Page 11
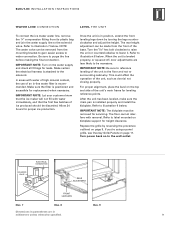
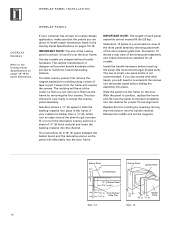
... make sure the drain pan is leveled properly, or squared off, door adjustments are in -line water filter is positioned and accessible for replacement when necessary. Refer to be necessary. If you're using a panel grille, see Overlay Grille Panels on kickplate support for height clearance... can be made from its plastic bag and join the water supply line to water connection. IMPORTANT NOTE: The kickplate must be discarded. Replace the grille by turning the legs counterclockwise and adjust the height. Be sure to illustration 9 below . For proper alignment, place the level...
... make sure the drain pan is leveled properly, or squared off, door adjustments are in -line water filter is positioned and accessible for replacement when necessary. Refer to be necessary. If you're using a panel grille, see Overlay Grille Panels on kickplate support for height clearance... can be made from its plastic bag and join the water supply line to water connection. IMPORTANT NOTE: The kickplate must be discarded. Replace the grille by turning the legs counterclockwise and adjust the height. Be sure to illustration 9 below . For proper alignment, place the level...
Built-In Installation Guide
Page 13
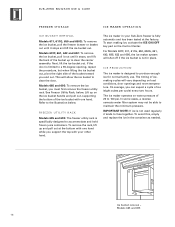
...This is inserted completely into the frame on a framed unit. This accessory kit (part # FRAMPAR), available through your Sub-Zero dealer, includes molding and a stainless steel insert panel for above or below the glasswell on the door. Detailed installation instructions... unit. PARTIAL FRAMED ACCESSORY KIT If you 're using specific routing for the Model 685 or 695 framed application, a stainless steel insert panel will be used . With the panel in the Sub-Zero Design Guide. Replace the trim molding by inserting the top, then the bottom into the handle channel. F R A M E D PA N...
...This is inserted completely into the frame on a framed unit. This accessory kit (part # FRAMPAR), available through your Sub-Zero dealer, includes molding and a stainless steel insert panel for above or below the glasswell on the door. Detailed installation instructions... unit. PARTIAL FRAMED ACCESSORY KIT If you 're using specific routing for the Model 685 or 695 framed application, a stainless steel insert panel will be used . With the panel in the Sub-Zero Design Guide. Replace the trim molding by inserting the top, then the bottom into the handle channel. F R A M E D PA N...
Built-In Installation Guide
Page 16
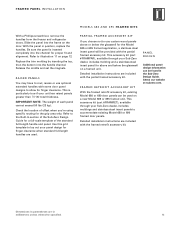
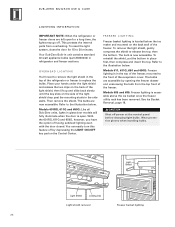
... that you can remove it away from the frame and expose the screws. You must fit over the door frame. Illustration 12 below is critical. Replace the trim molding by removing the four screws. Spacer Panel .10" (3) Overlay Panel Overlay Panel Spacer Panel 1/4" (6) Backer Panel 5/16" (8) ...handle hardware. The door channel is inserted completely into the handle channel. If your material is not recommended. It must allow for panel dimensions. Sub-Zero allows a 1/4" (6) space to pull it . IMPORTANT NOTE: The weight of small, one-piece knobs is thicker than a 1/4" (6), ...
... that you can remove it away from the frame and expose the screws. You must fit over the door frame. Illustration 12 below is critical. Replace the trim molding by removing the four screws. Spacer Panel .10" (3) Overlay Panel Overlay Panel Spacer Panel 1/4" (6) Backer Panel 5/16" (8) ...handle hardware. The door channel is inserted completely into the handle channel. If your material is not recommended. It must allow for panel dimensions. Sub-Zero allows a 1/4" (6) space to pull it . IMPORTANT NOTE: The weight of small, one-piece knobs is thicker than a 1/4" (6), ...

Built-In Use and Care Guide
Page 14
...CRISPER DRAWER To remove your Sub-Zero dealer for details. To reinstall, insert the drawer into position. Pivot the end of the shelf raised slightly. Refer to prevent breaking or scratching the interior. To replace a shelf, insert it ... R I LT- Some units also have other storage drawers, which can get to the illustration below . Z E R O B U I G E R ATO R S T O R A G E ACCESSORIES Optional accessories are available through your Sub-Zero dealer. Now raise the front of the shelf nearest the door upward, and remove. Refer to small containers and food items easily.
...CRISPER DRAWER To remove your Sub-Zero dealer for details. To reinstall, insert the drawer into position. Pivot the end of the shelf raised slightly. Refer to prevent breaking or scratching the interior. To replace a shelf, insert it ... R I LT- Some units also have other storage drawers, which can get to the illustration below . Z E R O B U I G E R ATO R S T O R A G E ACCESSORIES Optional accessories are available through your Sub-Zero dealer. Now raise the front of the shelf nearest the door upward, and remove. Refer to small containers and food items easily.
Built-In Use and Care Guide
Page 16
...611G, 650, 650G, 661, 642, 685, 632 and 695, the ice maker system will vary depending on the Control Center. To avoid this, empty and replace the ice in place. To start making ice, activate the... osmosis water filter system may not be able to the illustration below . I LT- Models 685 and 695: To remove the ice bucket, you can expect a cycle of ice (eight cubes per cycle) every two... and lift the back of the bucket up on water pressure of the ice bucket with your Sub-Zero freezer is limited to clear the carrier assembly. See Freezer Utility Rack, below . ICE PRODUCTION The...
...611G, 650, 650G, 661, 642, 685, 632 and 695, the ice maker system will vary depending on the Control Center. To avoid this, empty and replace the ice in place. To start making ice, activate the... osmosis water filter system may not be able to the illustration below . I LT- Models 685 and 695: To remove the ice bucket, you can expect a cycle of ice (eight cubes per cycle) every two... and lift the back of the bucket up on water pressure of the ice bucket with your Sub-Zero freezer is limited to clear the carrier assembly. See Freezer Utility Rack, below . ICE PRODUCTION The...
Built-In Use and Care Guide
Page 24
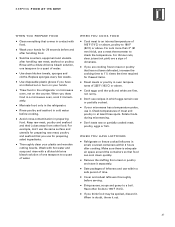
.... This protects the internal parts from the top front of the evaporator cover. Your Sub-Zero Built-In unit contains standard 40 watt appliance bulbs (part #3030030) in place first...650G: Freezer lighting is open for 15 to the illustration below . Models 685 and 695: Freezer lighting is located below the ice maker and mounted on the Control Center. ...I O N IMPORTANT NOTE: When the refrigerator or freezer doors are left open . OVERHEAD LIGHTING You'll need to replace the bulbs. Then remove the shield. Refer to release the top, then the bottom. The bulb is now accessible. ...
.... This protects the internal parts from the top front of the evaporator cover. Your Sub-Zero Built-In unit contains standard 40 watt appliance bulbs (part #3030030) in place first...650G: Freezer lighting is open for 15 to the illustration below . Models 685 and 695: Freezer lighting is located below the ice maker and mounted on the Control Center. ...I O N IMPORTANT NOTE: When the refrigerator or freezer doors are left open . OVERHEAD LIGHTING You'll need to replace the bulbs. Then remove the shield. Refer to release the top, then the bottom. The bulb is now accessible. ...
Built-In Use and Care Guide
Page 27
.... If your plastic and wooden cutting boards. Rotate foods during microwaving. Don't taste raw or partially cooked meat, poultry, eggs or fish. Wash your hands. Replace sponges every few weeks. For thinner cuts, clear juices (not pink) are firm, not runny. Make sure there is adequate air space around the containers...
.... If your plastic and wooden cutting boards. Rotate foods during microwaving. Don't taste raw or partially cooked meat, poultry, eggs or fish. Wash your hands. Replace sponges every few weeks. For thinner cuts, clear juices (not pink) are firm, not runny. Make sure there is adequate air space around the containers...
Built-In Use and Care Guide
Page 36
... the circuit breaker before replacing light bulbs. Wear protective gloves when handling bulbs. Box 44130, Madison, WI 53744-4130, 800-222-7820. See Visual Service Display, page 13. Cover all food tightly. You need product information Call the Sub-Zero Customer Service Department at...when door(s) are open for planning, installation and product information. Is SERVICE ICE flashing in position? Call your Sub-Zero authorized service center, contact your Sub-Zero authorized service center. Condensation forms inside the unit Clean the unit thoroughly. Be sure that door(s) and/or ...
... the circuit breaker before replacing light bulbs. Wear protective gloves when handling bulbs. Box 44130, Madison, WI 53744-4130, 800-222-7820. See Visual Service Display, page 13. Cover all food tightly. You need product information Call the Sub-Zero Customer Service Department at...when door(s) are open for planning, installation and product information. Is SERVICE ICE flashing in position? Call your Sub-Zero authorized service center, contact your Sub-Zero authorized service center. Condensation forms inside the unit Clean the unit thoroughly. Be sure that door(s) and/or ...
Built-In Use and Care Guide
Page 39
...WARRANTY* For two years from the date of original installation, your Sub-Zero warranty covers all parts and labor to repair or replace any part of the product, that proves to be defective in the sealed system. SUB-ZERO WILL NOT BE RESPONSIBLE FOR ANY CONSEQUENTIAL OR INCIDENTAL DAMAGES ARISING ...TOTAL PRODUCT* FULL FIVE YEAR SEALED SYSTEM WARRANTY For five years from the date of original installation, your Sub-Zero warranty covers all parts and labor to repair or replace any components that prove to be defective in materials or workmanship in materials or workmanship. This warranty applies...
...WARRANTY* For two years from the date of original installation, your Sub-Zero warranty covers all parts and labor to repair or replace any part of the product, that proves to be defective in the sealed system. SUB-ZERO WILL NOT BE RESPONSIBLE FOR ANY CONSEQUENTIAL OR INCIDENTAL DAMAGES ARISING ...TOTAL PRODUCT* FULL FIVE YEAR SEALED SYSTEM WARRANTY For five years from the date of original installation, your Sub-Zero warranty covers all parts and labor to repair or replace any components that prove to be defective in materials or workmanship in materials or workmanship. This warranty applies...


