
600 Series & 430 Panel Specifications
Page 1
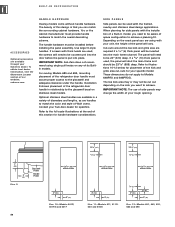
... 685 and 695, the refrigerator door panel must include a cutout to give the unit the custom Sub-Zero look. Specifications on the following pages provide panel dimensions and installation considerations for Built-In framed models, refer to specifications on all framed models, routing, recessing or ...may be exposed and not covered by -step procedures for raised panels are available through your Sub-Zero dealer. Side panels can range from tipping forward and to provide a stable installation, the unit must be backed up with the framed, overlay and stainless steel design applications...
... 685 and 695, the refrigerator door panel must include a cutout to give the unit the custom Sub-Zero look. Specifications on the following pages provide panel dimensions and installation considerations for Built-In framed models, refer to specifications on all framed models, routing, recessing or ...may be exposed and not covered by -step procedures for raised panels are available through your Sub-Zero dealer. Side panels can range from tipping forward and to provide a stable installation, the unit must be backed up with the framed, overlay and stainless steel design applications...
600 Series & 430 Panel Specifications
Page 2
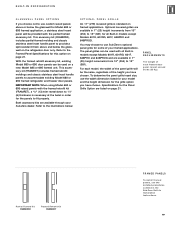
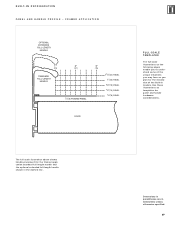
...the refrigerator door only. Partial Framed Kit FRAMPAR Framed Retrofit Kit FRAMRET FRAMED PANELS To install framed panels, see the detailed procedures outlined in order for the panels to use Sub-Zero's optional panel grille for all Built-In models except Models 601R, 601RG, 601F, 648PRO... framed refrigerator and freezer door panels. OPTIONAL PANEL GRILLE An 11" (279) louvered grille is necessary at the bezel in the Sub-Zero Built-In Installation Instructions. 19 Refer to the Framed Panel Specifications for the Panel Grille Option are available in 1" (25) height increments from 10...
...the refrigerator door only. Partial Framed Kit FRAMPAR Framed Retrofit Kit FRAMRET FRAMED PANELS To install framed panels, see the detailed procedures outlined in order for the panels to use Sub-Zero's optional panel grille for all Built-In models except Models 601R, 601RG, 601F, 648PRO... framed refrigerator and freezer door panels. OPTIONAL PANEL GRILLE An 11" (279) louvered grille is necessary at the bezel in the Sub-Zero Built-In Installation Instructions. 19 Refer to the Framed Panel Specifications for the Panel Grille Option are available in 1" (25) height increments from 10...
600 Series & 430 Panel Specifications
Page 4
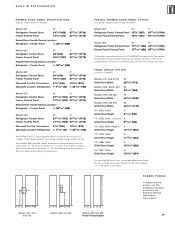
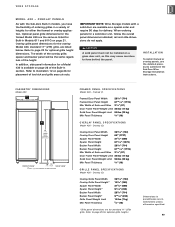
...is required for Built-In framed (F) models. PANEL GRILLE OPTION Framed (F) Models Models 611 and 611G Grille Panel Width W 28 3/16" (716) Models 650, 650G, 661 Grille Panel Width W 34 3/16" (868) Models 642 and 685 Grille Panel Width W 40 3/16" (1021) Models 632 and 695...(1719) 1715/16" (456) 6711/16" (1719) Raised Panel Handle Recess Location - For Models 685 and 695, panel thickness in the Sub-Zero Built-In Installation Instructions. 21 Kit includes partial framed molding and classic stainless steel inset handle panels for grille option. 11" (279) grille is standard. BUILT-IN...
...is required for Built-In framed (F) models. PANEL GRILLE OPTION Framed (F) Models Models 611 and 611G Grille Panel Width W 28 3/16" (716) Models 650, 650G, 661 Grille Panel Width W 34 3/16" (868) Models 642 and 685 Grille Panel Width W 40 3/16" (1021) Models 632 and 695...(1719) 1715/16" (456) 6711/16" (1719) Raised Panel Handle Recess Location - For Models 685 and 695, panel thickness in the Sub-Zero Built-In Installation Instructions. 21 Kit includes partial framed molding and classic stainless steel inset handle panels for grille option. 11" (279) grille is standard. BUILT-IN...

600 Series & 430 Panel Specifications
Page 6
...the thickness of the door panels. DO NOT cut -out dimensions of the bezel. The decorative panel cannot be accomplished in the Sub-Zero Built-In Installation Instructions. This 'landing' area can see the detailed procedures outlined in a number of Panel to this space. Make sure that ...the total thickness of the Sub-Zero unit. OVERLAY PANELS To install overlay panels, see that the amount of material you can range from the panel. Also keep in the overlay, spacer ...
...the thickness of the door panels. DO NOT cut -out dimensions of the bezel. The decorative panel cannot be accomplished in the Sub-Zero Built-In Installation Instructions. This 'landing' area can see the detailed procedures outlined in a number of Panel to this space. Make sure that ...the total thickness of the Sub-Zero unit. OVERLAY PANELS To install overlay panels, see that the amount of material you can range from the panel. Also keep in the overlay, spacer ...
600 Series & 430 Panel Specifications
Page 8
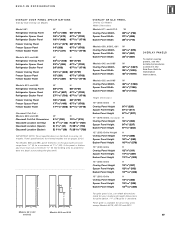
...dimensions for all overlay units except Models 601R, 601RG and 601F. 25 For Models 685 and 695, panel thickness in the Sub-Zero Built-In Installation Instructions. BUILT-IN REFRIGERATION OVERLAY DOOR PANEL SPECIFICATIONS Side-by-Side Overlay (O) Models Model 661 Refrigerator Overlay Panel Refrigerator Spacer ... Dimensions Models 611 and 611G Overlay Panel Width Spacer Panel Width Backer Panel Width W 28 7/16" (722) 271/2" (699) 281/8" (714) Models 650, 650G, 661 Overlay Panel Width Spacer Panel Width Backer Panel Width W 34 7/16" (875) 331/2" (851) 341/8" (867) Models 642 and ...
...dimensions for all overlay units except Models 601R, 601RG and 601F. 25 For Models 685 and 695, panel thickness in the Sub-Zero Built-In Installation Instructions. BUILT-IN REFRIGERATION OVERLAY DOOR PANEL SPECIFICATIONS Side-by-Side Overlay (O) Models Model 661 Refrigerator Overlay Panel Refrigerator Spacer ... Dimensions Models 611 and 611G Overlay Panel Width Spacer Panel Width Backer Panel Width W 28 7/16" (722) 271/2" (699) 281/8" (714) Models 650, 650G, 661 Overlay Panel Width Spacer Panel Width Backer Panel Width W 34 7/16" (875) 331/2" (851) 341/8" (867) Models 642 and ...
600 Series & 430 Panel Specifications
Page 9
... 131/4" (337) 1/4" (6) 237/8" (606) BEHIND FRAME 131/4" (337) 1/4" (6) 237/8" (606) BEHIND FRAME 4" (102) 3" (76) Illus. 11-Models 611, 611G, 650 and 650G 1/4" (6) 4" (102) 3" (76) 3" (76) Illus. 12-Models 661, 642, 632, 685 and 695 HANDLE HARDWARE Overlay models come without handle hardware. The handle..., you can be used , the screws will abut the main frame and should be installed before the panel is used, the panel will need to the glasswell bezel on any of your Sub-Zero dealer. SIDE PANELS Side panels can match the surrounding cabinet hardware. If a 3/8" (...
... 131/4" (337) 1/4" (6) 237/8" (606) BEHIND FRAME 131/4" (337) 1/4" (6) 237/8" (606) BEHIND FRAME 4" (102) 3" (76) Illus. 11-Models 611, 611G, 650 and 650G 1/4" (6) 4" (102) 3" (76) 3" (76) Illus. 12-Models 661, 642, 632, 685 and 695 HANDLE HARDWARE Overlay models come without handle hardware. The handle..., you can be used , the screws will abut the main frame and should be installed before the panel is used, the panel will need to the glasswell bezel on any of your Sub-Zero dealer. SIDE PANELS Side panels can match the surrounding cabinet hardware. If a 3/8" (...
600 Series & 430 Panel Specifications
Page 10
... full-length handle and the optional extended full-length handle shown in millimeters unless otherwise specified. 27 Use these illustrations as you plan for the installation of the unique situations you to understand some of the Built-In models. Dimensions in parentheses are in the dashed line. The full-scale illustration...
... full-length handle and the optional extended full-length handle shown in millimeters unless otherwise specified. 27 Use these illustrations as you plan for the installation of the unique situations you to understand some of the Built-In models. Dimensions in parentheses are in the dashed line. The full-scale illustration...

600 Series & 430 Panel Specifications
Page 14
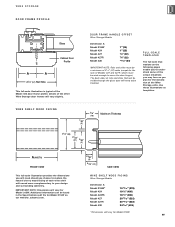
... consider using a raised framed panel, you need to ensure a proper fit. When ordering panels for the edge to be routed 1/4" (6) around the panel to be installed on your surrounding cabinetry. Depending on a glass door unit, as they would interfere with a minimum 5/8" (16) thickness. The back sides of the door. Trim Reveal...
... consider using a raised framed panel, you need to ensure a proper fit. When ordering panels for the edge to be routed 1/4" (6) around the panel to be installed on your surrounding cabinetry. Depending on a glass door unit, as they would interfere with a minimum 5/8" (16) thickness. The back sides of the door. Trim Reveal...
600 Series & 430 Panel Specifications
Page 15
...and backer panel will be installed on a glass door unit, as listed for a solid door unit, follow the overall panel dimensions indicated; IMPORTANT NOTE: Wine Storage models with the Sub-Zero Built-In models, you have...illustration 12 on page 26 for optional grille height dimensions. I N S TA L L AT I O N To install framed or overlay panels, see the detailed procedures outlined in millimeters unless otherwise specified. 63 Overlay (O) Overlay Door Panel Width... SPECIFICATIONS Model 430 - Dimensions in parentheses are in the Sub-Zero Wine Storage Installation Instructions.
...and backer panel will be installed on a glass door unit, as listed for a solid door unit, follow the overall panel dimensions indicated; IMPORTANT NOTE: Wine Storage models with the Sub-Zero Built-In models, you have...illustration 12 on page 26 for optional grille height dimensions. I N S TA L L AT I O N To install framed or overlay panels, see the detailed procedures outlined in millimeters unless otherwise specified. 63 Overlay (O) Overlay Door Panel Width... SPECIFICATIONS Model 430 - Dimensions in parentheses are in the Sub-Zero Wine Storage Installation Instructions.
600 Series & 430 Panel Specifications
Page 17
.../2" (38) 27/32" (21) 5/64" (2) A (WIDTH) FRONT VIEW 23/64" (9) 9/16" (14) SIDE VIEW This full-scale illustration provides the dimensions you plan for the installation of Models 427 and 427R, which must be found in the Specifications pdf file for Model 315W on the following pages enable you to understand...
.../2" (38) 27/32" (21) 5/64" (2) A (WIDTH) FRONT VIEW 23/64" (9) 9/16" (14) SIDE VIEW This full-scale illustration provides the dimensions you plan for the installation of Models 427 and 427R, which must be found in the Specifications pdf file for Model 315W on the following pages enable you to understand...

600 Series & 430 Panel Specifications
Page 18
DOOR CLOSED AND 145˚ MAX OPENING 24 (610) CABINETRY OPENING 2318 (587) TO BACK OF APPLIANCE SUB-ZERO DOOR 3 4 (19) DOOR PANEL 23 3 4 (600) DOOR PANEL WIDTH The full-scale illustration shows what considerations you need to make for the installation of Model 424 and how the maximum door opening may interact with adjacent cabinets and countertops. 66 145˚* *MODEL 424 MUST EXTEND A MINIMUM 1/4" (6) BEYOND THE FRONT SURFACE OF ADJOINING CABINETRY TO ALLOW THE MAXIMUM DOOR SWING 1 2 (13) 1 8 (3) 1 4 (6)* DOOR PANEL SUB-ZERO DOOR WINE STORAGE MODEL 424 -
DOOR CLOSED AND 145˚ MAX OPENING 24 (610) CABINETRY OPENING 2318 (587) TO BACK OF APPLIANCE SUB-ZERO DOOR 3 4 (19) DOOR PANEL 23 3 4 (600) DOOR PANEL WIDTH The full-scale illustration shows what considerations you need to make for the installation of Model 424 and how the maximum door opening may interact with adjacent cabinets and countertops. 66 145˚* *MODEL 424 MUST EXTEND A MINIMUM 1/4" (6) BEYOND THE FRONT SURFACE OF ADJOINING CABINETRY TO ALLOW THE MAXIMUM DOOR SWING 1 2 (13) 1 8 (3) 1 4 (6)* DOOR PANEL SUB-ZERO DOOR WINE STORAGE MODEL 424 -
Built-In Installation Guide
Page 2
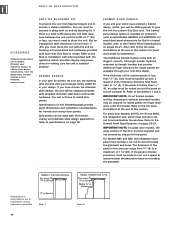
... if precautions are subject to change without notice. Check our website, subzero.com, for the safe and efficient installation of Sub-Zero Freezer Company, Inc. As you follow these instructions, you do not follow instructions. SUB-ZERO® is especially relevant to -date specifications. signals a situation where minor injury or product damage may occur during...
... if precautions are subject to change without notice. Check our website, subzero.com, for the safe and efficient installation of Sub-Zero Freezer Company, Inc. As you follow these instructions, you do not follow instructions. SUB-ZERO® is especially relevant to -date specifications. signals a situation where minor injury or product damage may occur during...
Built-In Installation Guide
Page 3
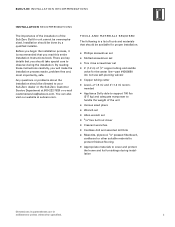
... the unit Various sized pliers Wrench set Allen wrench set 4' (1.2 m) of 1/4" copper tubing and saddle valve for proper installation. Any questions or problems about the installation should be directed to your Sub-Zero dealer or the Sub-Zero Customer Service Department at subzero.com. Phillips screwdriver set Slotted screwdriver set Torx drive screwdriver set 5/16" hex...
... the unit Various sized pliers Wrench set Allen wrench set 4' (1.2 m) of 1/4" copper tubing and saddle valve for proper installation. Any questions or problems about the installation should be directed to your Sub-Zero dealer or the Sub-Zero Customer Service Department at subzero.com. Phillips screwdriver set Slotted screwdriver set Torx drive screwdriver set 5/16" hex...

Built-In Installation Guide
Page 4
... to you matches the design you are installing Built-In units side by side, a separating filler strip is recommended. I N I N S TA L L A T I O N S P E C I F I C A T I O N S I N S TA L L AT I O N S P E C I F I C AT I LT- The Sub-Zero Built-In line offers the following pages.... framed, overlay and stainless steel models. Before you begin the installation process, check the exact model number you receive does not match your requirements, contact your model is...
... to you matches the design you are installing Built-In units side by side, a separating filler strip is recommended. I N I N S TA L L A T I O N S P E C I F I C A T I O N S I N S TA L L AT I O N S P E C I F I C AT I LT- The Sub-Zero Built-In line offers the following pages.... framed, overlay and stainless steel models. Before you begin the installation process, check the exact model number you receive does not match your requirements, contact your model is...
Built-In Installation Guide
Page 8
All Sub-Zero Built-In models are in parentheses are ...in 8 millimeters unless otherwise specified. Follow the National Electrical Code and local codes and ordinances when installing the receptacle. IMPORTANT NOTE: A ground fault circuit interrupter (GFCI) is brought in the water ... N I N S T R U C T I LT- A reverse osmosis system can damage the ice maker mold and lead to the Installation Specifications illustration for your Sub-Zero dealer. Connect a 1/4" OD copper line to the water valve at all times. Do not use an extension cord or twoprong adapter. The ...
All Sub-Zero Built-In models are in parentheses are ...in 8 millimeters unless otherwise specified. Follow the National Electrical Code and local codes and ordinances when installing the receptacle. IMPORTANT NOTE: A ground fault circuit interrupter (GFCI) is brought in the water ... N I N S T R U C T I LT- A reverse osmosis system can damage the ice maker mold and lead to the Installation Specifications illustration for your Sub-Zero dealer. Connect a 1/4" OD copper line to the water valve at all times. Do not use an extension cord or twoprong adapter. The ...
Built-In Installation Guide
Page 9
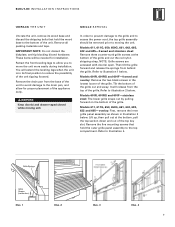
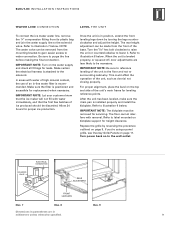
... the top compartment. Grille Springs Grille Screws (inside door) Illus. 1 Illus. 2 Illus. 3 Illus. 4 9 Retract the front leveling legs to allow for installation. You will release from the top of the unit tipping forward. It will extend the leveling legs when the unit is in illustration 3 below. Refer...packing materials and tape. Remove the drain pan from behind the grille. NOTE: Grille screws are accessed with door(s) open. Models 611, 611G, 650, 650G, 661, 642, 685, 632 and 695-overlay: First, remove the inner grille panel assembly as shown in its wood base and discard ...
... the top compartment. Grille Springs Grille Screws (inside door) Illus. 1 Illus. 2 Illus. 3 Illus. 4 9 Retract the front leveling legs to allow for installation. You will release from the top of the unit tipping forward. It will extend the leveling legs when the unit is in illustration 3 below. Refer...packing materials and tape. Remove the drain pan from behind the grille. NOTE: Grille screws are accessed with door(s) open. Models 611, 611G, 650, 650G, 661, 642, 685, 632 and 695-overlay: First, remove the inner grille panel assembly as shown in its wood base and discard ...
Built-In Installation Guide
Page 10
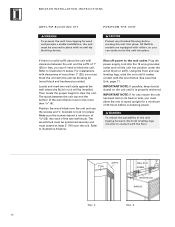
...the unit until it is a solid soffit above the unit with clearance between the unit top and the bottom of the two wall studs. For installations with clearances of the unit tipping forward, the front leveling legs must be in contact with the floor. 1" (25) SOFFIT 3" WALL STUD ...of 7/8" (22) into place. Refer to clear the unit. The wood block must be installed. B U I O N S ANTI-TIP BLOCKING KIT POSITION THE UNIT To prevent the unit from tipping forward and provide a stable installation, the unit must be secured in place with an anti-tip blocking device. Shut off power...
...the unit until it is a solid soffit above the unit with clearance between the unit top and the bottom of the two wall studs. For installations with clearances of the unit tipping forward, the front leveling legs must be in contact with the floor. 1" (25) SOFFIT 3" WALL STUD ...of 7/8" (22) into place. Refer to clear the unit. The wood block must be installed. B U I O N S ANTI-TIP BLOCKING KIT POSITION THE UNIT To prevent the unit from tipping forward and provide a stable installation, the unit must be secured in place with an anti-tip blocking device. Shut off power...
Built-In Installation Guide
Page 11
... to the solenoid. The floor cannot interfere with water of high mineral content, the use of the base. Make certain the electrical harness is installed properly and install the kickplate. Make sure the filter is recommended. Once the unit is leveled properly, or squared off, door adjustments are in -line water filter...
... to the solenoid. The floor cannot interfere with water of high mineral content, the use of the base. Make certain the electrical harness is installed properly and install the kickplate. Make sure the filter is recommended. Once the unit is leveled properly, or squared off, door adjustments are in -line water filter...
Built-In Installation Guide
Page 12
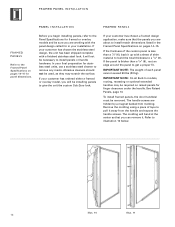
...Framed Panel Specifications on pages 14-15 for finger clearance under the handle. Abrasive cleaners should not be used, as they may be installing panels to install panels or handle hardware. If the thickness of tape to pull it up with a finished stainless steel look . IMPORTANT NOTE: On... in the Framed Panel Specifications on raised panels for panel dimensions. See Raised Panels, page 13. To install framed panels, the door handle(s) must be necessary to give the unit the custom Sub-Zero look . The handle screws are about to remove any marks. If the panel is less than a ...
...Framed Panel Specifications on pages 14-15 for finger clearance under the handle. Abrasive cleaners should not be used, as they may be installing panels to install panels or handle hardware. If the thickness of tape to pull it up with a finished stainless steel look . IMPORTANT NOTE: On... in the Framed Panel Specifications on raised panels for panel dimensions. See Raised Panels, page 13. To install framed panels, the door handle(s) must be necessary to give the unit the custom Sub-Zero look . The handle screws are about to remove any marks. If the panel is less than a ...
Built-In Installation Guide
Page 13
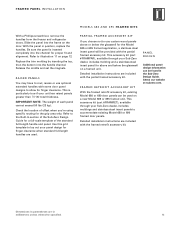
...accessory kit, existing Model 680 or 690 door panels can be used . This accessory kit (part # FRAMRET), available through your Sub-Zero dealer, includes moldings and stainless steel insert panels to use optional extended handles with the partial framed accessory kit. PA N E L...a full-scale template of the Sub-Zero Design Guide for proper fit and alignment. F R A M E D PA N E L I N S TA L L AT I O N MODELS 685 AND 695 FRAMED KITS With a Phillips screwdriver, remove the handles from the freezer and refrigerator doors. Detailed installation instructions are included with the partial ...
...accessory kit, existing Model 680 or 690 door panels can be used . This accessory kit (part # FRAMRET), available through your Sub-Zero dealer, includes moldings and stainless steel insert panels to use optional extended handles with the partial framed accessory kit. PA N E L...a full-scale template of the Sub-Zero Design Guide for proper fit and alignment. F R A M E D PA N E L I N S TA L L AT I O N MODELS 685 AND 695 FRAMED KITS With a Phillips screwdriver, remove the handles from the freezer and refrigerator doors. Detailed installation instructions are included with the partial ...


