
632 Quick Reference Guide
Page 1
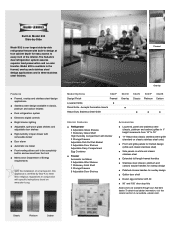
.../Finish Framed Louvered Grille Panel Grille - To obtain local dealer information, visit the Locator section of a harness kit, this appliance is certified by -side refrigerator/freezer with removable divider Door alarm Automatic ice maker Front venting ...632 is our largest side-by Star-K to meet strict religious regulations in conjunction with specific instructions found on classic stainless steel units) Front and grille panels for overlay design Gallon door shelf Dozen egg container with lid 90˚ and 105˚ door stop kits Accessories are available through your Sub-Zero...
.../Finish Framed Louvered Grille Panel Grille - To obtain local dealer information, visit the Locator section of a harness kit, this appliance is certified by -side refrigerator/freezer with removable divider Door alarm Automatic ice maker Front venting ...632 is our largest side-by Star-K to meet strict religious regulations in conjunction with specific instructions found on classic stainless steel units) Front and grille panels for overlay design Gallon door shelf Dozen egg container with lid 90˚ and 105˚ door stop kits Accessories are available through your Sub-Zero...
Built-In Installation Guide
Page 9
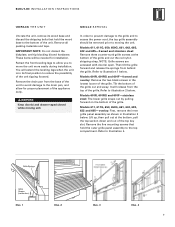
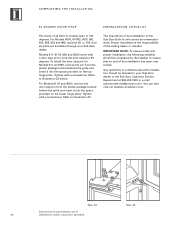
...611, 611G, 650, 650G, 661, 642, 685, 632 and 695-framed and stainless steel: Remove three counter-sunk grille screws at the bottom, pull the top section down and out of the grille and cut the red nylon shipping strap. Models 601R, ...632 and 695-overlay: First, remove the inner grille panel assembly as shown in the lowest louver of the unit to avoid damage to illustration 4. Refer to the drain pan, and allow you to reduce the possibility of the grille. I N I N S TA L L A T I O N I N S T R U C T I O N S U N PAC K T H E U N I LT- B U I T GRILLE REMOVAL Uncrate the unit, remove...
...611, 611G, 650, 650G, 661, 642, 685, 632 and 695-framed and stainless steel: Remove three counter-sunk grille screws at the bottom, pull the top section down and out of the grille and cut the red nylon shipping strap. Models 601R, ...632 and 695-overlay: First, remove the inner grille panel assembly as shown in the lowest louver of the unit to avoid damage to illustration 4. Refer to the drain pan, and allow you to reduce the possibility of the grille. I N I N S TA L L A T I O N I N S T R U C T I O N S U N PAC K T H E U N I LT- B U I T GRILLE REMOVAL Uncrate the unit, remove...
Built-In Installation Guide
Page 11
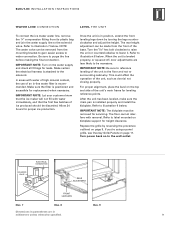
... -line water filter is leveled properly, or squared off, door adjustments are less likely to be removed from the mounting bracket to gain easier access to illustration 9 below . Refer to water connection. Replace the grille by turning the legs counterclockwise and adjust the height. Refer to purge the line before making the...
... -line water filter is leveled properly, or squared off, door adjustments are less likely to be removed from the mounting bracket to gain easier access to illustration 9 below . Refer to water connection. Replace the grille by turning the legs counterclockwise and adjust the height. Refer to purge the line before making the...
Built-In Installation Guide
Page 16
...panel to slide the backing material into the handle channel. We recommend larger D-style pulls. Sub-Zero allows a 1/4" (6) space to get a proper fit or mount the decorative overlay panel...Panel Spacer Panel 1/4" (6) Backer Panel 5/16" (8) min 5/32" (4) Door / Drawer / 1/16" (2) Grille Trim Illus. 12 ~3/4" (19) Backer Panel .10" (3) 1/4" (6) Illus. 13 16 Overlay models are about... to pull it . The use screws with thick heads, you can remove it away from the frame and expose the screws. Slide the panel into the channel. Be sure the panel...
...panel to slide the backing material into the handle channel. We recommend larger D-style pulls. Sub-Zero allows a 1/4" (6) space to get a proper fit or mount the decorative overlay panel...Panel Spacer Panel 1/4" (6) Backer Panel 5/16" (8) min 5/32" (4) Door / Drawer / 1/16" (2) Grille Trim Illus. 12 ~3/4" (19) Backer Panel .10" (3) 1/4" (6) Illus. 13 16 Overlay models are about... to pull it . The use screws with thick heads, you can remove it away from the frame and expose the screws. Slide the panel into the channel. Be sure the panel...

Built-In Installation Guide
Page 17
...632 and 695: Remove the inner grille panel assembly as for the glasswell bezel. Ice Key Pad Lock Indicator Touch Pad Water Key Pad Light Key Pad Water Grille Glasswell Bezel Illus. 14 Illus. 15 Dimensions in parentheses are specifying. Installing overlay panels for the exact sizing of the Sub-Zero... unit. If the panel is the same procedure as described in Grille Removal, page 9. Reattach the top frame by pressing mandrels into the door trim. Remove the bezel by reversing the procedure outlined in the...
...632 and 695: Remove the inner grille panel assembly as for the glasswell bezel. Ice Key Pad Lock Indicator Touch Pad Water Key Pad Light Key Pad Water Grille Glasswell Bezel Illus. 14 Illus. 15 Dimensions in parentheses are specifying. Installing overlay panels for the exact sizing of the Sub-Zero... unit. If the panel is the same procedure as described in Grille Removal, page 9. Reattach the top frame by pressing mandrels into the door trim. Remove the bezel by reversing the procedure outlined in the...
Built-In Installation Guide
Page 22
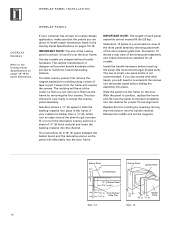
... 650, remove the pin from the plastic package located behind the grille and insert it into the space provided on the lower hinge plate. For Models 601R, 601RG, 601F, 661, 642, 685, 632 and 695, optional 90˚ or 105˚ door stop pin to limit the door swing to your Sub-Zero dealer. Illus...
... 650, remove the pin from the plastic package located behind the grille and insert it into the space provided on the lower hinge plate. For Models 601R, 601RG, 601F, 661, 642, 685, 632 and 695, optional 90˚ or 105˚ door stop pin to limit the door swing to your Sub-Zero dealer. Illus...
Built-In Use and Care Guide
Page 4
...Optional accessories are Star-K compliant to any area of Architects standards. I LT- Glass door models add a contemporary look that made Sub-Zero famous-feature an advanced grille design, innovative handle design and elegant hinges. Bright lighting spreads even illumination throughout each come in conjunction with the exception of the ...models blend seamlessly into your Sub-Zero dealer. 4 Controls are all doors give extra-tight seals. Our solid-core doors improve insulation and structural integrity. The compartment features removable dividers, with specific instructions found...
...Optional accessories are Star-K compliant to any area of Architects standards. I LT- Glass door models add a contemporary look that made Sub-Zero famous-feature an advanced grille design, innovative handle design and elegant hinges. Bright lighting spreads even illumination throughout each come in conjunction with the exception of the ...models blend seamlessly into your Sub-Zero dealer. 4 Controls are all doors give extra-tight seals. Our solid-core doors improve insulation and structural integrity. The compartment features removable dividers, with specific instructions found...
Built-In Use and Care Guide
Page 18
...LIGHT key pad on the glasswell are deactivated to allow cleaning or to prevent unintended ice and water dispensing. To clean the area, remove the water grille by pressing the LIGHT key pad on the glasswell is pressed. To deactivate the lock feature, hold the ICE key pad down the... LIGHT key pad until dispensing is used to prevent small children from using the dispenser. Z E R O B U I LLE For Models 685 and 695, a water grille at the base of the glasswell will illuminate until the key pad lights flash once and the red LOCK icon is illuminated (approximately five seconds...
...LIGHT key pad on the glasswell are deactivated to allow cleaning or to prevent unintended ice and water dispensing. To clean the area, remove the water grille by pressing the LIGHT key pad on the glasswell is pressed. To deactivate the lock feature, hold the ICE key pad down the... LIGHT key pad until dispensing is used to prevent small children from using the dispenser. Z E R O B U I LLE For Models 685 and 695, a water grille at the base of the glasswell will illuminate until the key pad lights flash once and the red LOCK icon is illuminated (approximately five seconds...
Built-In Use and Care Guide
Page 21
... available from Signature Limited Laboratory, P. Z E R O B U I GNATU RE POLISH Do not submerge or pour hot water over cold glass shelves. Wipe up spills after removing the dispenser water grille. S U B - To bring out the maximum metallic luster of all three finishes, lightly wipe the surface with a little baking soda. The carbon stainless steel finish...
... available from Signature Limited Laboratory, P. Z E R O B U I GNATU RE POLISH Do not submerge or pour hot water over cold glass shelves. Wipe up spills after removing the dispenser water grille. S U B - To bring out the maximum metallic luster of all three finishes, lightly wipe the surface with a little baking soda. The carbon stainless steel finish...
Built-In Use and Care Guide
Page 22
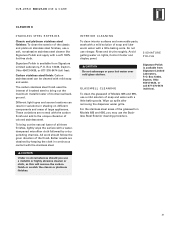
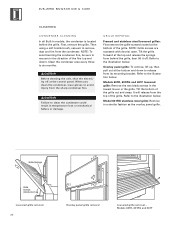
... or damage. Tilt the bottom of the grille. GRILLE REMOVAL Framed and stainless steel louvered grilles: First remove the grille screws located at the bottom and down ). Refer to six months. Grille Springs Grille Screws (inside door) Louvered grille removal 22 3 3 2 2 1 1 Overlay panel grille removal Louvered grille removal - Before cleaning the unit, shut the electricity off . NOTE: Grille screws are accessed with door(s) open. NOTE...
... or damage. Tilt the bottom of the grille. GRILLE REMOVAL Framed and stainless steel louvered grilles: First remove the grille screws located at the bottom and down ). Refer to six months. Grille Springs Grille Screws (inside door) Louvered grille removal 22 3 3 2 2 1 1 Overlay panel grille removal Louvered grille removal - Before cleaning the unit, shut the electricity off . NOTE: Grille screws are accessed with door(s) open. NOTE...


