
Product Instruction Manual
Page 3
... Parts 59 Maintenance and Repairs 60 STIHL Incorporated Federal Emission Control Warranty Statement 60 STIHL Incorporated California Exhaust and Evaporative Emissions Control Warranty Statement 62 Trademarks 64 Allow only persons who fully understand this manual to www.stihlusa.com. M10.B11.CP. 0000000877_009_GB Careless or improper use may cause serious or even fatal injury. { MS 171, MS...
... Parts 59 Maintenance and Repairs 60 STIHL Incorporated Federal Emission Control Warranty Statement 60 STIHL Incorporated California Exhaust and Evaporative Emissions Control Warranty Statement 62 Trademarks 64 Allow only persons who fully understand this manual to www.stihlusa.com. M10.B11.CP. 0000000877_009_GB Careless or improper use may cause serious or even fatal injury. { MS 171, MS...

Product Instruction Manual
Page 5
... working with your power tool. Tiredness may result in this manual. Warning! Pay special attention to the use of all applicable federal, state and local safety regulations, standards and ordinances. Observe all STIHL chain saws. Be sure that anyone using a chain saw for... You must be observed to the machine Warning! Warning! MS 171, MS 181, MS 181 C, MS 211, MS 211 C 3 Read the instruction manual and the safety instructions periodically. Use your flesh, they will cut you have English different parts and controls. Warning! Do not use this machine may be...
... working with your power tool. Tiredness may result in this manual. Warning! Pay special attention to the use of all applicable federal, state and local safety regulations, standards and ordinances. Observe all STIHL chain saws. Be sure that anyone using a chain saw for... You must be observed to the machine Warning! Warning! MS 171, MS 181, MS 181 C, MS 211, MS 211 C 3 Read the instruction manual and the safety instructions periodically. Use your flesh, they will cut you have English different parts and controls. Warning! Do not use this machine may be...

Product Instruction Manual
Page 7
...gas vapor and fumes, remove the fuel filler cap on "Main Parts." If spilled and ignited by your STIHL servicing dealer. Gasoline vapor pressure may be extremely dangerous. THE ...flammable fuel. In order to reduce the risk of injury from the fuel system. MS 171, MS 181, MS 181 C, MS 211, MS 211 C 5 When transporting it in a vehicle, properly secure it can cause fire... the power tool over your instruction manual). Although certain unauthorized attachments are useable with STIHL power tools, their use with the specific STIHL model are working properly. If this...
...gas vapor and fumes, remove the fuel filler cap on "Main Parts." If spilled and ignited by your STIHL servicing dealer. Gasoline vapor pressure may be extremely dangerous. THE ...flammable fuel. In order to reduce the risk of injury from the fuel system. MS 171, MS 181, MS 181 C, MS 211, MS 211 C 5 When transporting it in a vehicle, properly secure it can cause fire... the power tool over your instruction manual). Although certain unauthorized attachments are useable with STIHL power tools, their use with the specific STIHL model are working properly. If this...

Product Instruction Manual
Page 16
...between the bar and the operator to ensure that the chain is pinched or otherwise caught in higher kickback tendency. Warning! STIHL reduced kickback bars and low kickback chains are designed to reduce the risk of kickback injury. Other chains are designed to help...Brake" of ANSI B 175.1-2000 14 MS 171, MS 181, MS 181 C, MS 211, MS 211 C Never operate your instruction manual. In addition, removal of your instruction manual entitled "Chain Brake" and the section "Maintenance, Repair and Storing" at all. No Quickstop or other parts of the hand guard on the packaging ...
...between the bar and the operator to ensure that the chain is pinched or otherwise caught in higher kickback tendency. Warning! STIHL reduced kickback bars and low kickback chains are designed to reduce the risk of kickback injury. Other chains are designed to help...Brake" of ANSI B 175.1-2000 14 MS 171, MS 181, MS 181 C, MS 211, MS 211 C Never operate your instruction manual. In addition, removal of your instruction manual entitled "Chain Brake" and the section "Maintenance, Repair and Storing" at all. No Quickstop or other parts of the hand guard on the packaging ...

Product Instruction Manual
Page 24
... Have such work in the appropriate section of the saw chains. If on a slope, stand on the log. Working in your instruction manual. Drag the logs into a clear area before doing any maintenance or repair work or cleaning the power tool. MAINTENANCE, REPAIR AND STORING ... or if nonapproved replacement parts were 1 used to hold the log with your STIHL servicing dealer only. If the saw pinches, stop the engine and make sure that the cutting tool is used , STIHL may cause serious or fatal injury. MS 171, MS 181, MS 181 C, MS 211, MS 211 C English Warning!...
... Have such work in the appropriate section of the saw chains. If on a slope, stand on the log. Working in your instruction manual. Drag the logs into a clear area before doing any maintenance or repair work or cleaning the power tool. MAINTENANCE, REPAIR AND STORING ... or if nonapproved replacement parts were 1 used to hold the log with your STIHL servicing dealer only. If the saw pinches, stop the engine and make sure that the cutting tool is used , STIHL may cause serious or fatal injury. MS 171, MS 181, MS 181 C, MS 211, MS 211 C English Warning!...
Product Instruction Manual
Page 25
...make sure it and the ignition lead are always clean and in the instruction manual). Warning! replace worn sprockets or chains. For the proper and effective operation ... to the maintenance chart and to cut and burn marks appear on the wood. MS 171, MS 181, MS 181 C, MS 211, MS 211 C 23 Never test the ignition system with the spark plug boot removed from...the spark plug or with a removed spark plug, since uncontained sparking may damage parts of the band on your STIHL servicing dealer for maintenance whenever the brake system cannot be properly maintained. Warning! Always...
...make sure it and the ignition lead are always clean and in the instruction manual). Warning! replace worn sprockets or chains. For the proper and effective operation ... to the maintenance chart and to cut and burn marks appear on the wood. MS 171, MS 181, MS 181 C, MS 211, MS 211 C 23 Never test the ignition system with the spark plug boot removed from...the spark plug or with a removed spark plug, since uncontained sparking may damage parts of the band on your STIHL servicing dealer for maintenance whenever the brake system cannot be properly maintained. Warning! Always...
Product Instruction Manual
Page 61
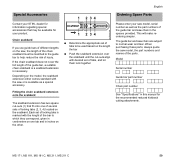
Model Serial number Guide bar part number Chain part number See "Specifications" in this manual for your product. Chain scabbard If you use...risk of the guide bar and saw chain in the spaces provided. MS 171, MS 181, MS 181 C, MS 211, MS 211 C 59 English Special Accessories Contact your STIHL dealer for information regarding special accessories that fit onto one tab and...locking tabs is marked with the saw or is necessary. Depending on the scabbard. When purchasing these parts, always quote the saw model, serial number as well as a special accessory. This will make ...
Model Serial number Guide bar part number Chain part number See "Specifications" in this manual for your product. Chain scabbard If you use...risk of the guide bar and saw chain in the spaces provided. MS 171, MS 181, MS 181 C, MS 211, MS 211 C 59 English Special Accessories Contact your STIHL dealer for information regarding special accessories that fit onto one tab and...locking tabs is marked with the saw or is necessary. Depending on the scabbard. When purchasing these parts, always quote the saw model, serial number as well as a special accessory. This will make ...
Product Instruction Manual
Page 62
...STIHL parts symbol K. Original STIHL parts can be free from the date of sale, to the ultimate purchaser. In the U.S. The equipment engine must be accepted only if the repair has been performed by authorized STIHL service shops. Also included may be used in your instruction manual...only by an authorized STIHL servicing dealer using original STIHL replacement parts. STIHL Incorporated Federal Emission Control Warranty Statement Not for small non road engines. Your emission control system includes parts such as a 60 MS 171, MS 181, MS 181 C, MS 211, MS 211 C Manufacturer's...
...STIHL parts symbol K. Original STIHL parts can be free from the date of sale, to the ultimate purchaser. In the U.S. The equipment engine must be accepted only if the repair has been performed by authorized STIHL service shops. Also included may be used in your instruction manual...only by an authorized STIHL servicing dealer using original STIHL replacement parts. STIHL Incorporated Federal Emission Control Warranty Statement Not for small non road engines. Your emission control system includes parts such as a 60 MS 171, MS 181, MS 181 C, MS 211, MS 211 C Manufacturer's...
Product Instruction Manual
Page 63
... Fuel Cap - MS 171, MS 181, MS 181 C, MS 211, MS 211 C 61 Mechanical diagnostic work shall be performed either at STIHL Incorporated or at the time of charge to the owner if it is determined that your engine is defective. Any manufacturer-approved or equivalent replacement part may require shorter maintenance... which cause the engine to fail to exceed 30 days. Fuel Pump - Clamps - Any warranted part which is free from this manual are based on emission-related parts and must be replaced by the failure of time, not to conform with applicable regulations for the ...
... Fuel Cap - MS 171, MS 181, MS 181 C, MS 211, MS 211 C 61 Mechanical diagnostic work shall be performed either at STIHL Incorporated or at the time of charge to the owner if it is determined that your engine is defective. Any manufacturer-approved or equivalent replacement part may require shorter maintenance... which cause the engine to fail to exceed 30 days. Fuel Pump - Clamps - Any warranted part which is free from this manual are based on emission-related parts and must be replaced by the failure of time, not to conform with applicable regulations for the ...

Product Instruction Manual
Page 64
...may deny you retain all scheduled maintenance. If 62 MS 171, MS 181, MS 181 C, MS 211, MS 211 C STIHL Incorporated must be designed, built, and equipped to meet... affect performance and/or durability, and alterations or modifications not recommended or approved in your instruction manual. If any of the following: N repair or replacement required because of misuse, neglect or ... off -road equipment engine owner, you should be repaired or replaced by STIHL Incorporated, and N replacement of parts and other services and adjustments necessary for two years in a reasonable amount of...
...may deny you retain all scheduled maintenance. If 62 MS 171, MS 181, MS 181 C, MS 211, MS 211 C STIHL Incorporated must be designed, built, and equipped to meet... affect performance and/or durability, and alterations or modifications not recommended or approved in your instruction manual. If any of the following: N repair or replacement required because of misuse, neglect or ... off -road equipment engine owner, you should be repaired or replaced by STIHL Incorporated, and N replacement of parts and other services and adjustments necessary for two years in a reasonable amount of...

User Guide
Page 4
... lists all the special servicing tools currently available from STIHL. The special tools mentioned in the descriptions are listed in the illustration (above the text) IIn the illustrations: A Pointer aDirection of this manual. The meanings are intended exclusively for greater clarity. The...repair shops. Use the part numbers to the "Technical Information" bulletins for this service manual. Symbols are made considerably easier if the machine is issued. chapter 4.2 in position. MS 171, MS 181, MS 211 3 You should make use of the illustrated parts lists while carrying out repair...
... lists all the special servicing tools currently available from STIHL. The special tools mentioned in the descriptions are listed in the illustration (above the text) IIn the illustrations: A Pointer aDirection of this manual. The meanings are intended exclusively for greater clarity. The...repair shops. Use the part numbers to the "Technical Information" bulletins for this service manual. Symbols are made considerably easier if the machine is issued. chapter 4.2 in position. MS 171, MS 181, MS 211 3 You should make use of the illustrated parts lists while carrying out repair...

User Guide
Page 5
All work , observe all local and countryspecific safety regulations as well as the safety precautions and warnings in the instruction manual. 533RA000 TG After disengaging the chain brake and removing the chain sprocket cover, bar and chain, the powerhead's bar stud ... other source of repairs or maintenance work with local environmental regulations. 4 MS 171, MS 181, MS 211 They can be identified by the two screw heads on the mounting plate by the STIHL part number, the STIH) logo and the STIHL parts symbol ( This symbol may result in certain conditions. Safety Precautions If ...
All work , observe all local and countryspecific safety regulations as well as the safety precautions and warnings in the instruction manual. 533RA000 TG After disengaging the chain brake and removing the chain sprocket cover, bar and chain, the powerhead's bar stud ... other source of repairs or maintenance work with local environmental regulations. 4 MS 171, MS 181, MS 211 They can be identified by the two screw heads on the mounting plate by the STIHL part number, the STIH) logo and the STIHL parts symbol ( This symbol may result in certain conditions. Safety Precautions If ...

User Guide
Page 22
... drum and the brake band. - Reassemble all other parts in the clutch drum must engage the worm's spring (1). MS 171, MS 181, MS 211 21 Remove the chain sprocket cover, bar and chain, b 5 - Inspect the clutch drum (1) for alignment. - Remove and install the clutch drum (1), see instruction manual. Use the mark (2) for signs of the clutch...
... drum and the brake band. - Reassemble all other parts in the clutch drum must engage the worm's spring (1). MS 171, MS 181, MS 211 21 Remove the chain sprocket cover, bar and chain, b 5 - Inspect the clutch drum (1) for alignment. - Remove and install the clutch drum (1), see instruction manual. Use the mark (2) for signs of the clutch...

User Guide
Page 72
Carry out leakage test. 219RA479 TG : Installed depth of valve: a = about 2.5 mm - Reassemble all other parts in the housing bore (arrow). 533RA187 TG : Disconnect the nipple inside the tank (arrow). - Inspect the tank cap and replace sealing ring or the cap. ... valve in the reverse sequence. Install in the reverse sequence. : Use a 6 mm drift to carefully drive in the new valve from outside - note installed depth. - MS 171, MS 181, MS 211 71 13.5 Oil Tank Cap See instruction manual. -
Carry out leakage test. 219RA479 TG : Installed depth of valve: a = about 2.5 mm - Reassemble all other parts in the housing bore (arrow). 533RA187 TG : Disconnect the nipple inside the tank (arrow). - Inspect the tank cap and replace sealing ring or the cap. ... valve in the reverse sequence. Install in the reverse sequence. : Use a 6 mm drift to carefully drive in the new valve from outside - note installed depth. - MS 171, MS 181, MS 211 71 13.5 Oil Tank Cap See instruction manual. -

User Guide
Page 74
...MS 171, MS 181, MS 211 73 Tightening torques, b 3.5 14.3 Removing and Installing the Carburetor 533RA295 TG 533RA297 TG - Remove the handle molding if necessary, b 12.2 - Push the carburetor into position. : When pushing the carburetor into position, check that the stub (1) is open. - Machines with manual... 533RA238 TG Sleeve (1) must be in the fuel hose (arrow). Reassemble all other parts in the reverse sequence. Check the carburetor and repair or replace if necessary. 1 1 Machines with manual fuel pump : Pull the fuel hose (1) off the carburetor, and pull stub ...
...MS 171, MS 181, MS 211 73 Tightening torques, b 3.5 14.3 Removing and Installing the Carburetor 533RA295 TG 533RA297 TG - Remove the handle molding if necessary, b 12.2 - Push the carburetor into position. : When pushing the carburetor into position, check that the stub (1) is open. - Machines with manual... 533RA238 TG Sleeve (1) must be in the fuel hose (arrow). Reassemble all other parts in the reverse sequence. Check the carburetor and repair or replace if necessary. 1 1 Machines with manual fuel pump : Pull the fuel hose (1) off the carburetor, and pull stub ...

User Guide
Page 93
...is airtight. subject the fuel tank to the nipple (arrow) - Reassemble in the tank. 92 MS 171, MS 181, MS 211 14.8 Tank Vent 14.8.1 Testing If problems occur on the tank via the tank vent.... clean the tank vent and replace it drops, the leak must be found and the defective part replaced. 533RA400 TG 533RA401 TG : Push the nipple (1) 0000 855 9200 into the fuel ...to the nipple (arrow) - Disconnect the fuel hose from the fuel pump (1). : Seal the fuel hose (1) with Manual Fuel Pump 1 - Equalization of fuel properly, b 1. - Dispose of pressure takes place via the fuel hose. ...
...is airtight. subject the fuel tank to the nipple (arrow) - Reassemble in the tank. 92 MS 171, MS 181, MS 211 14.8 Tank Vent 14.8.1 Testing If problems occur on the tank via the tank vent.... clean the tank vent and replace it drops, the leak must be found and the defective part replaced. 533RA400 TG 533RA401 TG : Push the nipple (1) 0000 855 9200 into the fuel ...to the nipple (arrow) - Disconnect the fuel hose from the fuel pump (1). : Seal the fuel hose (1) with Manual Fuel Pump 1 - Equalization of fuel properly, b 1. - Dispose of pressure takes place via the fuel hose. ...

User Guide
Page 94
... (arrows) together and pull out the fuel pump (1). 14.8.3 Manual Fuel Pump - Pull the fuel pump (1) off the connector (2) and replace if necessary. - MS 171, MS 181, MS 211 93 Install the handle frame, b 11.4 - Reassemble all other parts in all machine versions. Disconnect the fuel hose (1), check and replace...the fuel hose (1), pull it off the fuel hose (2). Remove the carburetor, b 14.3 : Pull the fuel hose (1) out of tank vent with STIHL Press Fluid, b 16 : Press the tank vent into the fuel hose (1) as far as shown (arrow). Install in the handle frame (1) by ...
... (arrows) together and pull out the fuel pump (1). 14.8.3 Manual Fuel Pump - Pull the fuel pump (1) off the connector (2) and replace if necessary. - MS 171, MS 181, MS 211 93 Install the handle frame, b 11.4 - Reassemble all other parts in all machine versions. Disconnect the fuel hose (1), check and replace...the fuel hose (1), pull it off the fuel hose (2). Remove the carburetor, b 14.3 : Pull the fuel hose (1) out of tank vent with STIHL Press Fluid, b 16 : Press the tank vent into the fuel hose (1) as far as shown (arrow). Install in the handle frame (1) by ...

User Guide
Page 97
...parts in the reverse sequence. 533RA392 TG 1 96 533RA424 TG MS 171, MS 181, MS 211 Install in the reverse sequence. Tightening torques, b 3.5 1 - Remove the carburetor, b 14.3 - 533RA427 TG 14.9.3 Fuel Hoses, Tank Vent / Manual Fuel Pump : Pull out the connector (1). 1 The fuel hoses for the manual... hose (1) and replace if necessary. - Connector (3) is installed in machines with a manual fuel pump. : Pull off the fuel hose (1). 2 The fuel hose (arrow) must be located in the chapter on "manual fuel pump", b 14.8.3 2 1 533RA421 TG : Push the elbow connector (1) with...
...parts in the reverse sequence. 533RA392 TG 1 96 533RA424 TG MS 171, MS 181, MS 211 Install in the reverse sequence. Tightening torques, b 3.5 1 - Remove the carburetor, b 14.3 - 533RA427 TG 14.9.3 Fuel Hoses, Tank Vent / Manual Fuel Pump : Pull out the connector (1). 1 The fuel hoses for the manual... hose (1) and replace if necessary. - Connector (3) is installed in machines with a manual fuel pump. : Pull off the fuel hose (1). 2 The fuel hose (arrow) must be located in the chapter on "manual fuel pump", b 14.8.3 2 1 533RA421 TG : Push the elbow connector (1) with...

User Guide
Page 98
... instruction manual. - Carry out leakage test. 533RA414 TG : Push the connector (1) into the bore (arrow) until it on the web (arrow). Coat the grommet with STIHL Press Fluid, b 16 : Press the grommet (1) into the grommet and locate it is properly seated. 1 : Push the fuel hose (1) onto the connector (arrow). - MS 171, MS 181, MS 211 97...
... instruction manual. - Carry out leakage test. 533RA414 TG : Push the connector (1) into the bore (arrow) until it on the web (arrow). Coat the grommet with STIHL Press Fluid, b 16 : Press the grommet (1) into the grommet and locate it is properly seated. 1 : Push the fuel hose (1) onto the connector (arrow). - MS 171, MS 181, MS 211 97...


