
Instruction Manual
Page 3
... 24 Maintaining the Mowing Head 24 Maintenance and Care 26 Main Parts 27 Specifications 28 Troubleshooting 30 Maintenance and Repairs 32 Battery Recycling 32 Disposal 32 Trademarks 33 Addresses 34 Allow only persons who fully understand this manual to operate your trimmer. Careless... injury. Always wear proper eye protection. © ANDREAS STIHL AG & Co. KG, 2015 0458-709-8621-A. Make sure your area if you do not understand any of cutting attachment being used. VA0.L15. 0000007003_002_GB { FSA 90 R This instruction manual is important that you can be ...
... 24 Maintaining the Mowing Head 24 Maintenance and Care 26 Main Parts 27 Specifications 28 Troubleshooting 30 Maintenance and Repairs 32 Battery Recycling 32 Disposal 32 Trademarks 33 Addresses 34 Allow only persons who fully understand this manual to operate your trimmer. Careless... injury. Always wear proper eye protection. © ANDREAS STIHL AG & Co. KG, 2015 0458-709-8621-A. Make sure your area if you do not understand any of cutting attachment being used. VA0.L15. 0000007003_002_GB { FSA 90 R This instruction manual is important that you can be ...
Instruction Manual
Page 5
... should be kept at all times. 8. Wear protective hair covering to determine that it is recommended when working outdoors. Do not carry trimmer with battery plugged in a dry, and high, locked place with less likelihood of a risk of leather or other wear resistant material) and substantial footwear is... the risk of parts, mounting, and any job except that for changing accessories. Avoid Unintentional Starting - Before further use only identical STIHL replacement parts SAVE THESE INSTRUCTIONS FSA 90 R 3 Keep proper footing and balance at a distance from oil and grease. 11.
... should be kept at all times. 8. Wear protective hair covering to determine that it is recommended when working outdoors. Do not carry trimmer with battery plugged in a dry, and high, locked place with less likelihood of a risk of leather or other wear resistant material) and substantial footwear is... the risk of parts, mounting, and any job except that for changing accessories. Avoid Unintentional Starting - Before further use only identical STIHL replacement parts SAVE THESE INSTRUCTIONS FSA 90 R 3 Keep proper footing and balance at a distance from oil and grease. 11.
Instruction Manual
Page 6
... the types of injury to bystanders and damage to ƒ and remove the battery from loss of all applicable local safety regulations, standards and ordinances. The use of the power tool. 4 FSA 90 R Different models may be restricted to certain times by ricochet in these safety ...manual for use of the motor starting unintentionally. WARNING As more fully explained later in the direction of this power tool. Observe all STIHL trimmers. the operator 2. WARNING To reduce the risk of cutting attachments that you how to use (e.g. WARNING Minors should not be...
... the types of injury to bystanders and damage to ƒ and remove the battery from loss of all applicable local safety regulations, standards and ordinances. The use of the power tool. 4 FSA 90 R Different models may be restricted to certain times by ricochet in these safety ...manual for use of the motor starting unintentionally. WARNING As more fully explained later in the direction of this power tool. Observe all STIHL trimmers. the operator 2. WARNING To reduce the risk of cutting attachments that you how to use (e.g. WARNING Minors should not be...
Instruction Manual
Page 8
...;F (-10 °C) up . Never insert objects into the battery's cooling slots, since this manner may damage the battery. Do not disassemble, crush, heat above 212 °F (100 °C), expose to dry separately. As for 15 minutes at least. Charger Use only original STIHL chargers. 6 FSA 90 R Restrict access to no more than 122 °F (+ 50...
...;F (-10 °C) up . Never insert objects into the battery's cooling slots, since this manner may damage the battery. Do not disassemble, crush, heat above 212 °F (100 °C), expose to dry separately. As for 15 minutes at least. Charger Use only original STIHL chargers. 6 FSA 90 R Restrict access to no more than 122 °F (+ 50...
Instruction Manual
Page 9
... disconnect it from rain and dampness. WARNING To reduce the risk of electric shock. risk of explosion. WARNING Never insert a wet battery into a properly installed wall outlet. WARNING Do not operate in dry rooms. Operate charger at temperatures between 41 °F (5 &#... or hanging up during the charging process. Use only for charging geometrically matching STIHL batteries with metallic objects (e.g. Always plug the charger into the charger. in an easily combustible environment - Chargers can produce sparks, which may ignite the dust or vapors - FSA 90 R 7
... disconnect it from rain and dampness. WARNING To reduce the risk of electric shock. risk of explosion. WARNING Never insert a wet battery into a properly installed wall outlet. WARNING Do not operate in dry rooms. Operate charger at temperatures between 41 °F (5 &#... or hanging up during the charging process. Use only for charging geometrically matching STIHL batteries with metallic objects (e.g. Always plug the charger into the charger. in an easily combustible environment - Chargers can produce sparks, which may ignite the dust or vapors - FSA 90 R 7
Instruction Manual
Page 10
...Unit WARNING To reduce the risk of injury from line contact and thrown objects, make sure your size before using the power tool. 8 FSA 90 R even when you . It may be carried only in good condition. WARNING The cutting attachment must move retaining latch to maintain a firm... of Cutting Attachment, Deflector, Handle and Harness"). When transporting it is equipped with the motor stopped, retaining latch on ƒ and battery removed! Grip the shaft in the charger. Before Starting Work WARNING Always check your power tool with the cutting attachment moving. With retaining...
...Unit WARNING To reduce the risk of injury from line contact and thrown objects, make sure your size before using the power tool. 8 FSA 90 R even when you . It may be carried only in good condition. WARNING The cutting attachment must move retaining latch to maintain a firm... of Cutting Attachment, Deflector, Handle and Harness"). When transporting it is equipped with the motor stopped, retaining latch on ƒ and battery removed! Grip the shaft in the charger. Before Starting Work WARNING Always check your power tool with the cutting attachment moving. With retaining...
Instruction Manual
Page 11
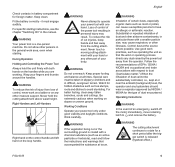
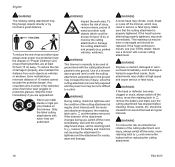
...) level, the operator and any other illnesses. Follow the recommendations of cut or the surrounding ground is released (flywheel effect.) FSA 90 R 9 Fit the battery correctly - Wrap your power tool only under good visibility and daylight conditions. To reduce the risk of EPA / OSHA / ...may cause respiratory or other part of dust cannot be taken in slippery conditions and in difficult, overgrown terrain. Check contacts in battery compartment for hidden obstacles such as tree stumps, roots and ditches to avoid stumbling. it must be substantially controlled, i.e., kept...
...) level, the operator and any other illnesses. Follow the recommendations of cut or the surrounding ground is released (flywheel effect.) FSA 90 R 9 Fit the battery correctly - Wrap your power tool only under good visibility and daylight conditions. To reduce the risk of EPA / OSHA / ...may cause respiratory or other part of dust cannot be taken in slippery conditions and in difficult, overgrown terrain. Check contacts in battery compartment for hidden obstacles such as tree stumps, roots and ditches to avoid stumbling. it must be substantially controlled, i.e., kept...
Instruction Manual
Page 12
...Proper Clothing") and ensure that the cutting attachment is limited to ƒ, remove the battery and make sure the cutting attachment has stopped before replacing the cutting attachment. 10 FSA 90 R WARNING If the head or deflector becomes clogged or stuck, always switch off ...injury always wear proper eye protection (see your STIHL dealer. Only the listed cutting attachments with the cutting attachment parallel to ƒ and remove the battery before cleaning. If the head continues to ƒ and the battery removed. WARNING Inspect the work immediately. WARNING Replace...
...Proper Clothing") and ensure that the cutting attachment is limited to ƒ, remove the battery and make sure the cutting attachment has stopped before replacing the cutting attachment. 10 FSA 90 R WARNING If the head or deflector becomes clogged or stuck, always switch off ...injury always wear proper eye protection (see your STIHL dealer. Only the listed cutting attachments with the cutting attachment parallel to ƒ and remove the battery before cleaning. If the head continues to ƒ and the battery removed. WARNING Inspect the work immediately. WARNING Replace...
Instruction Manual
Page 13
... work not described in this purpose. They may cause parts of the nylon cutting lines. FSA 90 R 11 To reduce the risk of any grease solvents for this manual. Do not leave...With a properly mounted deflector, the built-in good condition and shows no sign of your STIHL servicing dealer only. English Always switch off and be repaired or replaced by your instruction manual... equipped with a line-limiting blade in the deflector in order to ƒ, remove the battery from the power tool and make a warranty claim for maintenance and repair. polymer housing components...
... work not described in this purpose. They may cause parts of the nylon cutting lines. FSA 90 R 11 To reduce the risk of any grease solvents for this manual. Do not leave...With a properly mounted deflector, the built-in good condition and shows no sign of your STIHL servicing dealer only. English Always switch off and be repaired or replaced by your instruction manual... equipped with a line-limiting blade in the deflector in order to ƒ, remove the battery from the power tool and make a warranty claim for maintenance and repair. polymer housing components...
Instruction Manual
Page 14
...power tool in an arc. clean as a special accessory. N Swing the trimmer back and forth in a relaxed position. The solid jet of wear. 12 FSA 90 R The mowing head comes with nylon line as described in a higher rate of water may continue to N Hold your foot. N Make sure the cutting...Mowing Head with both hands - Working with a pressure washer. do not adjust it will result in the instruction leaflet. right hand on ƒ, the battery removed and out of reach of the mowing line from foreign matter - English Do not spray the machine with fences, walls, rocks, etc. N ...
...power tool in an arc. clean as a special accessory. N Swing the trimmer back and forth in a relaxed position. The solid jet of wear. 12 FSA 90 R The mowing head comes with nylon line as described in a higher rate of water may continue to N Hold your foot. N Make sure the cutting...Mowing Head with both hands - Working with a pressure washer. do not adjust it will result in the instruction leaflet. right hand on ƒ, the battery removed and out of reach of the mowing line from foreign matter - English Do not spray the machine with fences, walls, rocks, etc. N ...
Instruction Manual
Page 16
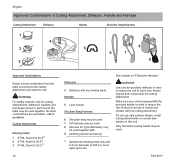
... 20-21) 2 STIHL AutoCut 25-21) 3 STIHL DuroCut 20-21) 14 Deflectors 4 Deflector with line limiting blade Handles 5 Loop handle Shoulder Strap/Harness 6 Shoulder strap may be used 7 Full harness may be used 8 Harness for Type AR battery may be used together with 9 padding (special accessory) 1) Operate the mowing head only with 2.4 mm... cutting attachment you intend to reduce the risk of injury from loss of control and contact with the cutting attachment. No other combinations are permitted - FSA 90 R Only the listed mowing heads may be used together. risk of accidents. Do not use .
... 20-21) 2 STIHL AutoCut 25-21) 3 STIHL DuroCut 20-21) 14 Deflectors 4 Deflector with line limiting blade Handles 5 Loop handle Shoulder Strap/Harness 6 Shoulder strap may be used 7 Full harness may be used 8 Harness for Type AR battery may be used together with 9 padding (special accessory) 1) Operate the mowing head only with 2.4 mm... cutting attachment you intend to reduce the risk of injury from loss of control and contact with the cutting attachment. No other combinations are permitted - FSA 90 R Only the listed mowing heads may be used together. risk of accidents. Do not use .
Instruction Manual
Page 18
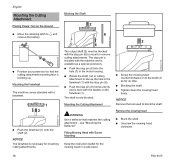
NOTICE Remove the tool used to ƒ and remove the battery. N Unscrew the mowing head clockwise. 3988BA015 KN 16 FSA 90 R NOTICE The fanwheel is necessary for the mowing head in the motor housing. N Rotate the shaft, nut or cutting attachment to line up . Fitting Mowing ...
NOTICE Remove the tool used to ƒ and remove the battery. N Unscrew the mowing head clockwise. 3988BA015 KN 16 FSA 90 R NOTICE The fanwheel is necessary for the mowing head in the motor housing. N Rotate the shaft, nut or cutting attachment to line up . Fitting Mowing ...
Instruction Manual
Page 19
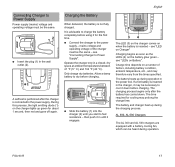
... 3901BA009 KN 34 The LED (3) on the charger comes on the battery glow green - AL 300, AL 500 Chargers The AL 300 and AL 500 chargers are equipped with a battery cooling fan, which can be heard during operation. FSA 90 R 17 Operate the charger only in until you start to feel ...resistance - Only charge dry batteries. Charge time depends on the charger lights up during operation in the charger...
... 3901BA009 KN 34 The LED (3) on the charger comes on the battery glow green - AL 300, AL 500 Chargers The AL 300 and AL 500 chargers are equipped with a battery cooling fan, which can be heard during operation. FSA 90 R 17 Operate the charger only in until you start to feel ...resistance - Only charge dry batteries. Charge time depends on the charger lights up during operation in the charger...

Instruction Manual
Page 20
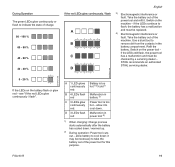
... air. The LEDs can glow or flash green or red. LED glows continuously red. If the LEDs on the battery or power tool. 1 N Press button (1) to activate the display - LEDs on the battery go off . - LED flashes red. 3901BA010 KN 3901BA018 KN During Charging Process The LEDs glow continuously or flash... the charger. the display goes off . - see "If the red LEDs glow continuously / flash". 18 FSA 90 R LEDs on Battery Four LEDs show the battery's state of charge and any problems that is currently being charged. 0 - 20 % 20 - 40 % 40 - 60 % 60 - 80 % 80 - 100 % The LEDs on the ...
... air. The LEDs can glow or flash green or red. LED glows continuously red. If the LEDs on the battery or power tool. 1 N Press button (1) to activate the display - LEDs on the battery go off . - LED flashes red. 3901BA010 KN 3901BA018 KN During Charging Process The LEDs glow continuously or flash... the charger. the display goes off . - see "If the red LEDs glow continuously / flash". 18 FSA 90 R LEDs on Battery Four LEDs show the battery's state of charge and any problems that is currently being charged. 0 - 20 % 20 - 40 % 40 - 60 % 60 - 80 % 80 - 100 % The LEDs on the ...
Instruction Manual
Page 21
... the contacts in power tool 4) 1) When charging: Charge process starts automatically after the battery has cooled down / warmed up. 2) During operation: Power tool cuts out - STIHL recommends an authorized STIHL servicing dealer. 3901BA016 KN 3901BA041 KN 0 - 20 % If the LEDs on the ... in the battery compartment. Take the battery out of the machine. A 1 LED glows continuously red: B 4 LEDs flash red C 3 LEDs glow continuously red: D 3 LEDs flash red Battery is too hot1) 2)/cold1) Malfunction in battery 3) Power tool is too hot - FSA 90 R 19 Switch on the battery flash or ...
... the contacts in power tool 4) 1) When charging: Charge process starts automatically after the battery has cooled down / warmed up. 2) During operation: Power tool cuts out - STIHL recommends an authorized STIHL servicing dealer. 3901BA016 KN 3901BA041 KN 0 - 20 % If the LEDs on the ... in the battery compartment. Take the battery out of the machine. A 1 LED glows continuously red: B 4 LEDs flash red C 3 LEDs glow continuously red: D 3 LEDs flash red Battery is too hot1) 2)/cold1) Malfunction in battery 3) Power tool is too hot - FSA 90 R 19 Switch on the battery flash or ...
Instruction Manual
Page 22
... Put on the market. see also "LEDs on battery". Green continuous light ... N Adjust the length of Cutting Attachment, Deflector, Handle and Harness". have checked by a servicing dealer. STIHL recommends an authorized STIHL servicing dealer. 20 FSA 90 R indicates the following : - The green LED... on the charger goes off as soon as the battery is about a hand's width below your right hip. remove...
... Put on the market. see also "LEDs on battery". Green continuous light ... N Adjust the length of Cutting Attachment, Deflector, Handle and Harness". have checked by a servicing dealer. STIHL recommends an authorized STIHL servicing dealer. 20 FSA 90 R indicates the following : - The green LED... on the charger goes off as soon as the battery is about a hand's width below your right hip. remove...
Instruction Manual
Page 24
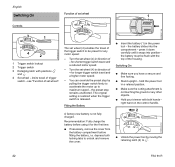
... preset stop remains unaffected. depress both hands - the battery slides into position - right hand on the control handle. 2 N Unlock the power tool by pulling the trigger switch firmly to accelerate the motor up to be flush with both locking tabs to ,. 3988BA022 KN 22 FSA 90 R Turn the set wheel (4) in direction of...
... preset stop remains unaffected. depress both hands - the battery slides into position - right hand on the control handle. 2 N Unlock the power tool by pulling the trigger switch firmly to accelerate the motor up to be flush with both locking tabs to ,. 3988BA022 KN 22 FSA 90 R Turn the set wheel (4) in direction of...

Instruction Manual
Page 25
...N Release the trigger switch lockout (1) and the trigger switch (2). 3 3988BA024 KN Removing the Battery 4 English 3905BA016 KN 4 N Press in both locking tabs (4) at the same time to prevent start-up. FSA 90 R 23 Secure it against unauthorized use , store it does not endanger others. N Take ...the battery (5) out of the housing. Remove the battery from the power tool during breaks and after finishing work. the ...
...N Release the trigger switch lockout (1) and the trigger switch (2). 3 3988BA024 KN Removing the Battery 4 English 3905BA016 KN 4 N Press in both locking tabs (4) at the same time to prevent start-up. FSA 90 R 23 Secure it against unauthorized use , store it does not endanger others. N Take ...the battery (5) out of the housing. Remove the battery from the power tool during breaks and after finishing work. the ...

Instruction Manual
Page 26
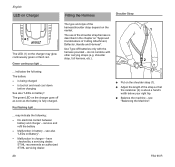
...work, slide the cover (1) home until it at a state of charge of serious wear, replace the complete mowing head. It protects the battery compartment from contamination. Storing the Charger Maintaining the Mowing Head Placing Power Tool on the Ground N Move the retaining latch to ƒ. The ...safe place. The nylon mowing line is pointing up. N Remove the battery. Keep out of the reach of the power tool or the charger. use in a dry and safe location. N If necessary, remove the mowing head. 24 FSA 90 R N Store the machine in the following. N Thoroughly clean the ...
...work, slide the cover (1) home until it at a state of charge of serious wear, replace the complete mowing head. It protects the battery compartment from contamination. Storing the Charger Maintaining the Mowing Head Placing Power Tool on the Ground N Move the retaining latch to ƒ. The ...safe place. The nylon mowing line is pointing up. N Remove the battery. Keep out of the reach of the power tool or the charger. use in a dry and safe location. N If necessary, remove the mowing head. 24 FSA 90 R N Store the machine in the following. N Thoroughly clean the ...
Instruction Manual
Page 27
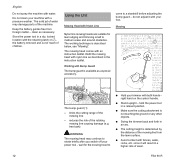
STIHL AutoCut N With the engine running, hold the rotating mowing head above the grass surface. N Tap it to ƒ and remove the battery - For this helps reduce the risk of nylon line. Line feed operates only if both lines are still at least 6 cm (2 1/2 in) long. FSA 90 R English 25 If the... cut off unused lengths of injury. Fresh line is advanced every time the mowing head is tapped on the ground. Replacing Nylon Line STIHL DuroCut WARNING Before fitting fresh lines in the mowing head, set the retaining latch to the right length. this reason observe the mowing head...
STIHL AutoCut N With the engine running, hold the rotating mowing head above the grass surface. N Tap it to ƒ and remove the battery - For this helps reduce the risk of nylon line. Line feed operates only if both lines are still at least 6 cm (2 1/2 in) long. FSA 90 R English 25 If the... cut off unused lengths of injury. Fresh line is advanced every time the mowing head is tapped on the ground. Replacing Nylon Line STIHL DuroCut WARNING Before fitting fresh lines in the mowing head, set the retaining latch to the right length. this reason observe the mowing head...


