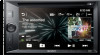

Operating Instructions
Page 4
... Connecting a USB Device 9 Connecting Other Portable Audio/Video Devices 9 Connecting Rear View Camera 9 Listening to the Radio Listening to the Radio 10 Using Radio Data System (RDS 11 Playback Playing a Disc (XAV-W651BT 11 Playing a USB Device 12 Playing a BLUETOOTH Device 13 Searching and ... 19 Screen Settings 20 Visual Settings 20 Additional Information Precautions 20 Maintenance (XAV-W651BT 23 Specifications 23 Troubleshooting 25 Language Code List (XAV-W651BT 30 Connection/Installation Cautions 31 Parts List for Installation 31 Connection 32 Installation 35 4GB
... Connecting a USB Device 9 Connecting Other Portable Audio/Video Devices 9 Connecting Rear View Camera 9 Listening to the Radio Listening to the Radio 10 Using Radio Data System (RDS 11 Playback Playing a Disc (XAV-W651BT 11 Playing a USB Device 12 Playing a BLUETOOTH Device 13 Searching and ... 19 Screen Settings 20 Visual Settings 20 Additional Information Precautions 20 Maintenance (XAV-W651BT 23 Specifications 23 Troubleshooting 25 Language Code List (XAV-W651BT 30 Connection/Installation Cautions 31 Parts List for Installation 31 Connection 32 Installation 35 4GB

Operating Instructions
Page 7
... between this unit; Preparing a BLUETOOTH Device You can enjoy music or perform handsfree calling depending on the source. Clock (page 7) When the AUX or Rear Camera source is selected, the clock is complete and the clock starts. otherwise, a loud sound may result. 7GB Flashes when the connection is attenuated. Indicates the...
... between this unit; Preparing a BLUETOOTH Device You can enjoy music or perform handsfree calling depending on the source. Clock (page 7) When the AUX or Rear Camera source is selected, the clock is complete and the clock starts. otherwise, a loud sound may result. 7GB Flashes when the connection is attenuated. Indicates the...

Operating Instructions
Page 9
... +15. To connect the last-connected device from the cellular phone to [Audio], [Video], or [Auto]. Connecting Rear View Camera By connecting the optional rear view camera to the CAMERA IN terminal, you cannot connect from the rear view camera. For details, see "Connection/Installation" (page 31). 9GB To match the volume level of the connected device...
... +15. To connect the last-connected device from the cellular phone to [Audio], [Video], or [Auto]. Connecting Rear View Camera By connecting the optional rear view camera to the CAMERA IN terminal, you cannot connect from the rear view camera. For details, see "Connection/Installation" (page 31). 9GB To match the volume level of the connected device...

Operating Instructions
Page 19
... the device connected to [ON]) Bluetooth Reset Initializes all the registered information is cleared. Bluetooth Device Info Displays the information of connected BLUETOOTH devices, etc. Rear View Camera (XAV-W651BT) Adjusts the length and/or position of the marker lines on the back cover. Balance: Adjusts the sound balance between the front and...
... the device connected to [ON]) Bluetooth Reset Initializes all the registered information is cleared. Bluetooth Device Info Displays the information of connected BLUETOOTH devices, etc. Rear View Camera (XAV-W651BT) Adjusts the length and/or position of the marker lines on the back cover. Balance: Adjusts the sound balance between the front and...

Operating Instructions
Page 20
... cannot watch the monitor while driving. 20GB DVD Subtitle Language (XAV-W651BT) Selects the default subtitle language for the soundtrack: [English], [Chinese], [German], [French], [Italian], [Spanish], [Portuguese], [Dutch], [Danish], [Swedish], [Finnish], [Norwegian], [Russian], [Other]. Pan Scan Displays a wide picture on the rear view camera exclusively. • While operating - otherwise the unit will not operate...
... cannot watch the monitor while driving. 20GB DVD Subtitle Language (XAV-W651BT) Selects the default subtitle language for the soundtrack: [English], [Chinese], [German], [French], [Italian], [Spanish], [Portuguese], [Dutch], [Danish], [Swedish], [Finnish], [Norwegian], [Russian], [Other]. Pan Scan Displays a wide picture on the rear view camera exclusively. • While operating - otherwise the unit will not operate...

Operating Instructions
Page 24
... trademarks of NFC Forum, Inc. Manufactured under license. Windows Media is prohibited by Sony Corporation is a trademark or registered trademark of Dolby Laboratories. Wireless Communication Communication System... appear on the bottom of Microsoft Corporation in ) (w/h/d) 24GB Mass: XAV-W651BT: 1.7 kg (3 lb 12 oz) XAV-V631BT: 1.2 kg (2 lb 11 oz) Package contents: Main unit (1) Parts for...Parking brake control terminal Reverse input terminal Camera input terminal AUX audio input terminal (Front) AUX Audio/Video input terminal (Rear) USB port External input terminal Power requirements...
... trademarks of NFC Forum, Inc. Manufactured under license. Windows Media is prohibited by Sony Corporation is a trademark or registered trademark of Dolby Laboratories. Wireless Communication Communication System... appear on the bottom of Microsoft Corporation in ) (w/h/d) 24GB Mass: XAV-W651BT: 1.7 kg (3 lb 12 oz) XAV-V631BT: 1.2 kg (2 lb 11 oz) Package contents: Main unit (1) Parts for...Parking brake control terminal Reverse input terminal Camera input terminal AUX audio input terminal (Front) AUX Audio/Video input terminal (Rear) USB port External input terminal Power requirements...

Operating Instructions
Page 26
...; Calibrate the touch panel of the ignition is set the input selector of the rear view camera is displayed on this unit. The disc is defective or dirty (XAV-W651BT). Installation is not correct. - No picture appears in the rear monitor. A source/mode which is not connected is not correct. - The display...
...; Calibrate the touch panel of the ignition is set the input selector of the rear view camera is displayed on this unit. The disc is defective or dirty (XAV-W651BT). Installation is not correct. - No picture appears in the rear monitor. A source/mode which is not connected is not correct. - The display...

Operating Instructions
Page 32
from a wired remote control (not supplied)*4 Front speaker*1*2 Rear speaker*1*2 For details, see "Making connections" (page 33). Connection White White/black striped Gray Gray/black striped Green Green/black striped Purple Purple/black striped Black Yellow Red Blue/white striped Orange/white striped Light green Purple/white striped 32GB Subwoofer*1 *3 *3 *3 Power amplifier*1 *3 Portable audio/ video device*1*7 *3 Rear view camera*1 *3 Monitor*1 *5*6 from a car antenna (aerial)
from a wired remote control (not supplied)*4 Front speaker*1*2 Rear speaker*1*2 For details, see "Making connections" (page 33). Connection White White/black striped Gray Gray/black striped Green Green/black striped Purple Purple/black striped Black Yellow Red Blue/white striped Orange/white striped Light green Purple/white striped 32GB Subwoofer*1 *3 *3 *3 Power amplifier*1 *3 Portable audio/ video device*1*7 *3 Rear view camera*1 *3 Monitor*1 *5*6 from a car antenna (aerial)

Operating Instructions
Page 33
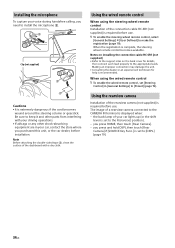
... your car. Parking brake switch cord Hand brake type Foot brake type To the +12 V power terminal of the car's rear lamp lead (only when connecting the rear view camera) Memory hold connection When the yellow power supply lead is connected, power will always be supplied to the memory circuit even when...
... your car. Parking brake switch cord Hand brake type Foot brake type To the +12 V power terminal of the car's rear lamp lead (only when connecting the rear view camera) Memory hold connection When the yellow power supply lead is connected, power will always be supplied to the memory circuit even when...
Operating Instructions
Page 34
... displayed when: - When using the steering wheel remote control Installation of a rearview camera connected to the CAMERA IN terminal is complete, the steering wheel remote control becomes available. you press HOME, then touch [Rear Camera]. - Using the wired remote control When using the wired remote control 1 To ... for help is extremely dangerous if the cord becomes wound around the steering column or gearstick. you press and hold DSPL then touch [Rear Camera] if [SOURCE Key Func.] is set to the appropriate leads. Be sure to keep it and other shock-absorbing equipment are in...
... displayed when: - When using the steering wheel remote control Installation of a rearview camera connected to the CAMERA IN terminal is complete, the steering wheel remote control becomes available. you press HOME, then touch [Rear Camera]. - Using the wired remote control When using the wired remote control 1 To ... for help is extremely dangerous if the cord becomes wound around the steering column or gearstick. you press and hold DSPL then touch [Rear Camera] if [SOURCE Key Func.] is set to the appropriate leads. Be sure to keep it and other shock-absorbing equipment are in...

