Operating Instructions
Page 1
Refer to these numbers whenever you call upon your Sony dealer regarding this product. XAV-70BT ©2010 Sony Corporation XAV-70BT Serial No. 4-164-314-13 (1) AV Center AV Center Operating Instructions US Mode d'emploi FR Manual de instrucciones ES Owner's Record The model and serial numbers are located on the bottom of the unit. Model No. Record the serial number in the space provided below.
Refer to these numbers whenever you call upon your Sony dealer regarding this product. XAV-70BT ©2010 Sony Corporation XAV-70BT Serial No. 4-164-314-13 (1) AV Center AV Center Operating Instructions US Mode d'emploi FR Manual de instrucciones ES Owner's Record The model and serial numbers are located on the bottom of the unit. Model No. Record the serial number in the space provided below.

Operating Instructions
Page 2
Refer servicing to excessive heat such as direct sunlight, fire or the like. However, there is no ACC position Be sure to qualified personnel only. Increase the separation between the radiator and person's body (excluding extremities: hands, wrists, feet and ankles). This equipment complies with at least 20 cm and more of optical instruments with the instructions, may cause harmful interference to radio communications. special handling may cause undesired operation of RF energy that any other antenna or transmitter. Refer servicing to set forth for a Class B ...
Refer servicing to excessive heat such as direct sunlight, fire or the like. However, there is no ACC position Be sure to qualified personnel only. Increase the separation between the radiator and person's body (excluding extremities: hands, wrists, feet and ankles). This equipment complies with at least 20 cm and more of optical instruments with the instructions, may cause harmful interference to radio communications. special handling may cause undesired operation of RF energy that any other antenna or transmitter. Refer servicing to set forth for a Class B ...

Operating Instructions
Page 3
Table of Contents Notes on safety 6 Notes on installation 6 Copyrights 6 Notes on Bluetooth 8 Playable discs and symbols used in the mood map - Radio Storing and receiving stations 21 Storing automatically - Parental control 24 Activating parental control 24 Changing the area and its movie rating level 24 Repeat and shuffle play 24 Direct search play 25 USB Device Operations Playing a USB device 26 Repeat and shuffle play 32 Operating an iPod directly - Playback control . . . 22 Configuring audio settings 23 Changing the audio language/format . . . . . 23 Changing the ...
Table of Contents Notes on safety 6 Notes on installation 6 Copyrights 6 Notes on Bluetooth 8 Playable discs and symbols used in the mood map - Radio Storing and receiving stations 21 Storing automatically - Parental control 24 Activating parental control 24 Changing the area and its movie rating level 24 Repeat and shuffle play 24 Direct search play 25 USB Device Operations Playing a USB device 26 Repeat and shuffle play 32 Operating an iPod directly - Playback control . . . 22 Configuring audio settings 23 Changing the audio language/format . . . . . 23 Changing the ...

Operating Instructions
Page 4
Bluetooth Before using the Bluetooth function 34 Basic procedure of the Bluetooth function 34 Bluetooth status indication 35 Installing the external microphone XA-MC10 35 Pairing 35 Searching from this unit 43 Bluetooth settings 43 Sound Adjustment Selecting the sound quality - Intelligent Time Alignment Tune . . . . . 46 Speaker configuration and volume setup . . . . 46 Creating a virtual center speaker - RBE 46 Adjusting the speaker volume 47 Monitor Adjustment Adjusting the monitor angle 47 Touch panel calibration 47 Setting the background screen 48 Selecting the picture ...
Bluetooth Before using the Bluetooth function 34 Basic procedure of the Bluetooth function 34 Bluetooth status indication 35 Installing the external microphone XA-MC10 35 Pairing 35 Searching from this unit 43 Bluetooth settings 43 Sound Adjustment Selecting the sound quality - Intelligent Time Alignment Tune . . . . . 46 Speaker configuration and volume setup . . . . 46 Creating a virtual center speaker - RBE 46 Adjusting the speaker volume 47 Monitor Adjustment Adjusting the monitor angle 47 Touch panel calibration 47 Setting the background screen 48 Selecting the picture ...
Operating Instructions
Page 5
... Support site If you have any questions or for the latest support information on this product, please visit the web site below: http://esupport.sony.com http://www.sony.com/mobileAV Provides information on: • Models and manufacturers of compatible digital audio players • Models and manufacturers of compatible cellular phones and...
... Support site If you have any questions or for the latest support information on this product, please visit the web site below: http://esupport.sony.com http://www.sony.com/mobileAV Provides information on: • Models and manufacturers of compatible digital audio players • Models and manufacturers of compatible cellular phones and...
Operating Instructions
Page 6
... regulations. • While driving - The monitor connected to the background screen after you try to the background screen, but audio source can be installed by Sony Corporation is under license from Dolby Laboratories. If everything is prohibited. Manufactured under license. Other trademarks and trade names are trademarks of their respective owners...
... regulations. • While driving - The monitor connected to the background screen after you try to the background screen, but audio source can be installed by Sony Corporation is under license from Dolby Laboratories. If everything is prohibited. Manufactured under license. Other trademarks and trade names are trademarks of their respective owners...
Operating Instructions
Page 7
... Open Globe, Inc. Gracenote Software, copyright © 2000-2010 Gracenote. Gracenote and CDDB are trademarks or registered trademarks of Sony Ericsson Mobile Communications AB. iPod is the industry standard in the U.S. Apple, Macintosh and iTunes are provided by Monotype Imaging ... technology and related content delivery. The Gracenote logo and logotype, and the "Powered by Gracenote" logo are registered trademarks of Sony Corporation. ADDITIONAL INFORMATION INCLUDING THAT RELATING TO PROMOTIONAL, INTERNAL AND COMMERCIAL USES AND LICENSING MAY BE OBTAINED FROM MPEG LA, LLC...
... Open Globe, Inc. Gracenote Software, copyright © 2000-2010 Gracenote. Gracenote and CDDB are trademarks or registered trademarks of Sony Ericsson Mobile Communications AB. iPod is the industry standard in the U.S. Apple, Macintosh and iTunes are provided by Monotype Imaging ... technology and related content delivery. The Gracenote logo and logotype, and the "Powered by Gracenote" logo are registered trademarks of Sony Corporation. ADDITIONAL INFORMATION INCLUDING THAT RELATING TO PROMOTIONAL, INTERNAL AND COMMERCIAL USES AND LICENSING MAY BE OBTAINED FROM MPEG LA, LLC...
Operating Instructions
Page 8
... well as medical emergencies). Consult with your car. Notes on the use Changes or modifications to this unit not expressly approved by Sony may void the user's authority to operate the equipment. Emergency calls This Bluetooth car handsfree and the electronic device connected to the ...handsfree operate using this product. Driving Check the laws and regulations on Bluetooth Caution IN NO EVENT SHALL SONY BE LIABLE FOR ANY INCIDENTAL, INDIRECT OR CONSEQUENTIAL DAMAGES OR OTHER DAMAGES INCLUDING, WITHOUT LIMITATION, LOSS OF PROFITS, LOSS OF REVENUE, LOSS...
... well as medical emergencies). Consult with your car. Notes on the use Changes or modifications to this unit not expressly approved by Sony may void the user's authority to operate the equipment. Emergency calls This Bluetooth car handsfree and the electronic device connected to the ...handsfree operate using this product. Driving Check the laws and regulations on Bluetooth Caution IN NO EVENT SHALL SONY BE LIABLE FOR ANY INCIDENTAL, INDIRECT OR CONSEQUENTIAL DAMAGES OR OTHER DAMAGES INCLUDING, WITHOUT LIMITATION, LOSS OF PROFITS, LOSS OF REVENUE, LOSS...

Operating Instructions
Page 9
Disc symbol in manual Disc format DVD VIDEO DVD-R*1 / DVD-R DL*1 / DVD-RW*1 (Video mode/VR mode) VIDEO DVD+R*1 / DVD+R DL*1 / DVD+RW*1 Video CD (Ver. 1.0/1.1/2.0) AUDIO Audio CD CD-ROM*2 / CD-R*2 / CD-RW*2 *1 Audio files can also be used in this unit, as well as a general term for DVD VIDEOs, DVD-Rs/DVD-RWs, and DVD+Rs/ DVD+RWs. Available functions differ depending on their file types. Note Even compatible discs may be stored. *2 Video/image files can play various video/audio discs. Note "DVD" may not be stored. Format symbol in manual File type MP3 audio file WMA ...
Disc symbol in manual Disc format DVD VIDEO DVD-R*1 / DVD-R DL*1 / DVD-RW*1 (Video mode/VR mode) VIDEO DVD+R*1 / DVD+R DL*1 / DVD+RW*1 Video CD (Ver. 1.0/1.1/2.0) AUDIO Audio CD CD-ROM*2 / CD-R*2 / CD-RW*2 *1 Audio files can also be used in this unit, as well as a general term for DVD VIDEOs, DVD-Rs/DVD-RWs, and DVD+Rs/ DVD+RWs. Available functions differ depending on their file types. Note Even compatible discs may be stored. *2 Video/image files can play various video/audio discs. Note "DVD" may not be stored. Format symbol in manual File type MP3 audio file WMA ...
Operating Instructions
Page 10
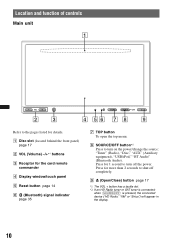
A Disc slot (located behind the front panel) page 17 B VOL (Volume) -/+*1 buttons C Receptor for details. H SOURCE/OFF button*2 Press to turn off completely. Press for 1 second to turn on the power/change the source: "Tuner" (Radio), "Disc," "AUX" (Auxiliary equipment), "USB/iPod," "BT Audio" (Bluetooth Audio). I Z (Open/Close) button page 17 *1 The VOL + button has a tactile dot. *2 If an HD Radio tuner or SAT tuner is connected: when (SOURCE/OFF) is pressed, the connected device ("HD Radio," "XM" or "Sirius") will appear in the display. 10 Press for more than 2 seconds to ...
A Disc slot (located behind the front panel) page 17 B VOL (Volume) -/+*1 buttons C Receptor for details. H SOURCE/OFF button*2 Press to turn off completely. Press for 1 second to turn on the power/change the source: "Tuner" (Radio), "Disc," "AUX" (Auxiliary equipment), "USB/iPod," "BT Audio" (Bluetooth Audio). I Z (Open/Close) button page 17 *1 The VOL + button has a tactile dot. *2 If an HD Radio tuner or SAT tuner is connected: when (SOURCE/OFF) is pressed, the connected device ("HD Radio," "XM" or "Sirius") will appear in the display. 10 Press for more than 2 seconds to ...

Operating Instructions
Page 11
E "ATT" (Attenuate) key*1 To attenuate the sound. To cancel, touch again. J Source select keys*2 To change the source: "Tuner" (Radio), "Disc," "AUX" (Auxiliary equipment), "USB/iPod," "SensMe™," "BT Audio" (Bluetooth Audio). *1 Appears only when a source is selected. *2 If an HD Radio tuner or SAT tuner is selected: 1 Source List 2 Top Top menu: 45 ATT 12:00 3 67 M.OFF AV Source BT Phone Source list: 4 8 5 12:00 9 62 A "Source List" key To open the source list. ATT Top Tuner Disc AUX USB/iPod SensMe™ BT Audio 0 External 12:00 11 B "Top" key To open ...
E "ATT" (Attenuate) key*1 To attenuate the sound. To cancel, touch again. J Source select keys*2 To change the source: "Tuner" (Radio), "Disc," "AUX" (Auxiliary equipment), "USB/iPod," "SensMe™," "BT Audio" (Bluetooth Audio). *1 Appears only when a source is selected. *2 If an HD Radio tuner or SAT tuner is selected: 1 Source List 2 Top Top menu: 45 ATT 12:00 3 67 M.OFF AV Source BT Phone Source list: 4 8 5 12:00 9 62 A "Source List" key To open the source list. ATT Top Tuner Disc AUX USB/iPod SensMe™ BT Audio 0 External 12:00 11 B "Top" key To open ...

Operating Instructions
Page 12
A OFF button Press to turn off the monitor and the button illumination. F Number buttons page 25 Radio: Press to operate the audio controls simply. To cancel, press again. Card remote commander RM-X170 8 1 9 2 q; 3 qa 4 qs 5 qd qf 6 qg 7 qh • The card remote commander can be generally used to receive stored stations. Press and hold to store stations. B MONITOR OFF button To turn off completely. C POSITION button To switch the listening position ("Front L"/ "Front R"/"Front"/"All"/"Custom"/"OFF"). H ATT (Attenuate) button To attenuate the sound. Press and ...
A OFF button Press to turn off the monitor and the button illumination. F Number buttons page 25 Radio: Press to operate the audio controls simply. To cancel, press again. Card remote commander RM-X170 8 1 9 2 q; 3 qa 4 qs 5 qd qf 6 qg 7 qh • The card remote commander can be generally used to receive stored stations. Press and hold to store stations. B MONITOR OFF button To turn off completely. C POSITION button To switch the listening position ("Front L"/ "Front R"/"Front"/"All"/"Custom"/"OFF"). H ATT (Attenuate) button To attenuate the sound. Press and ...

Operating Instructions
Page 13
J .m/M> buttons Radio: Press to skip a track. Bluetooth Audio*3: Press to tune in stations automatically. Disc*2/USB: Press to change the audio channel.) (SUBTITLE): To change the subtitle language. (ANGLE): To change the viewing angle. (TOP MENU): To open the top menu on a DVD. (MENU): To open the menu on a disc. Press and hold momentarily to reverse/fast-forward track. L ZAP button To enter the ZAPPIN™ mode. Press and hold to reverse/fastforward the video. M Press and hold to find a station manually. K DVD playback setting buttons (AUDIO): To change the audio ...
J .m/M> buttons Radio: Press to skip a track. Bluetooth Audio*3: Press to tune in stations automatically. Disc*2/USB: Press to change the audio channel.) (SUBTITLE): To change the subtitle language. (ANGLE): To change the viewing angle. (TOP MENU): To open the top menu on a DVD. (MENU): To open the menu on a disc. Press and hold momentarily to reverse/fast-forward track. L ZAP button To enter the ZAPPIN™ mode. Press and hold to reverse/fastforward the video. M Press and hold to find a station manually. K DVD playback setting buttons (AUDIO): To change the audio ...
Operating Instructions
Page 14
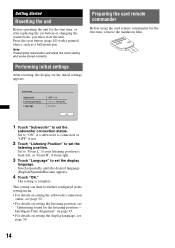
Note Pressing the reset button will erase the clock setting and some stored contents. Set to set the display language. Intelligent Time Alignment" on page 45. • For details on setting the listening position, see page 50. 14 Press the reset button (page 10) with a pointed object, such as a ball-point pen. Preparing the card remote commander Before using the card remote commander for the initial settings appears. This setting can then be further configured in the setting menu. • For details on setting the subwoofer connection status, see page 52. • For ...
Note Pressing the reset button will erase the clock setting and some stored contents. Set to set the display language. Intelligent Time Alignment" on page 45. • For details on setting the listening position, see page 50. 14 Press the reset button (page 10) with a pointed object, such as a ball-point pen. Preparing the card remote commander Before using the card remote commander for the initial settings appears. This setting can then be further configured in the setting menu. • For details on setting the subwoofer connection status, see page 52. • For ...

Operating Instructions
Page 15
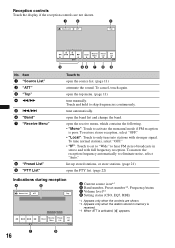
Basic Operations Listening to close the band list. 4 Perform tuning. Repeat this procedure until the desired frequency is received. Source List ATT Top P1 P2 P3 BTM P4 P5 P6 Memory Band Receive Preset PTY Menu List List 15 12:00 Source List ATT Top FM1 FM2 FM3 AM1 AM2 Band Receive Preset PTY Menu List List 15 12:00 3 Touch the desired band ("FM1," "FM2," "FM3," "AM1" or "AM2"). Touch "Band" to the radio 1 Touch "Source List," then "Tuner." The band list appears. Scanning stops when the unit receives a station. continue to next page t 15 From...
Basic Operations Listening to close the band list. 4 Perform tuning. Repeat this procedure until the desired frequency is received. Source List ATT Top P1 P2 P3 BTM P4 P5 P6 Memory Band Receive Preset PTY Menu List List 15 12:00 Source List ATT Top FM1 FM2 FM3 AM1 AM2 Band Receive Preset PTY Menu List List 15 12:00 3 Touch the desired band ("FM1," "FM2," "FM3," "AM1" or "AM2"). Touch "Band" to the radio 1 Touch "Source List," then "Tuner." The band list appears. Scanning stops when the unit receives a station. continue to next page t 15 From...
Operating Instructions
Page 16
Touch and hold to eliminate noise, select "Auto." To tune normal stations, select "OFF." • "IF": Touch to set to "Wide" to activate the monaural mode if FM reception is activated, appears. list up stored stations, or store stations. (page 21) open the band list and change the band. tune automatically. open the PTY list. (page 22) Indications during reception A B Source List ATT Top 16 15 C Band Receive Menu Preset List PTY List 12:00 D A Current source icon*1 B Band number, Preset number*2, Frequency/status C Volume level*3 D Setting status (CSO, EQ7, RBE) *1...
Touch and hold to eliminate noise, select "Auto." To tune normal stations, select "OFF." • "IF": Touch to set to "Wide" to activate the monaural mode if FM reception is activated, appears. list up stored stations, or store stations. (page 21) open the band list and change the band. tune automatically. open the PTY list. (page 22) Indications during reception A B Source List ATT Top 16 15 C Band Receive Menu Preset List PTY List 12:00 D A Current source icon*1 B Band number, Preset number*2, Frequency/status C Volume level*3 D Setting status (CSO, EQ7, RBE) *1...

Operating Instructions
Page 17
The front panel opens automatically. 2 Insert the disc (label side up a picture or music feature. The front panel closes automatically, then playback starts. If the menu control panel does not appear by touching the display in a place other than menu item area. The front panel opens automatically, then the disc is ejected. 2 Press Z on the main unit. If the disc contains JPEG files The slide show starts automatically. To eject the disc 1 Press Z on the main unit to close the front panel. continue to confirm. Playing discs Depending on the main unit. If the DVD menu appears ...
The front panel opens automatically. 2 Insert the disc (label side up a picture or music feature. The front panel closes automatically, then playback starts. If the menu control panel does not appear by touching the display in a place other than menu item area. The front panel opens automatically, then the disc is ejected. 2 Press Z on the main unit. If the disc contains JPEG files The slide show starts automatically. To eject the disc 1 Press Z on the main unit to close the front panel. continue to confirm. Playing discs Depending on the main unit. If the DVD menu appears ...

Operating Instructions
Page 18
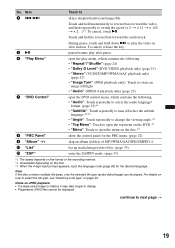
Common to open the top menu. (page 11) 18 Playback controls Touch the display if the playback controls are not shown. To cancel, touch again. open the source list. (page 11) attenuate the sound. Item 1 "Source List" 2 "ATT" 3 "Top" Touch to all discs/formats 1 2 3 Source List ATT Top Source List ATT Top 15 4 5 DVD Control Play Menu SHUF 12:00 6 Source List ATT Top 15 MPEG-4 Source List ATT DVD Control 7 Play Menu SHUF 12:00 Top PBC Panel Play Menu SHUF 15 12:00 8 9 Source List ATT 0 Top Album 15 9 List 0 Play Menu SHUF 12:00 ZAP List Play ...
Common to open the top menu. (page 11) 18 Playback controls Touch the display if the playback controls are not shown. To cancel, touch again. open the source list. (page 11) attenuate the sound. Item 1 "Source List" 2 "ATT" 3 "Top" Touch to all discs/formats 1 2 3 Source List ATT Top Source List ATT Top 15 4 5 DVD Control Play Menu SHUF 12:00 6 Source List ATT Top 15 MPEG-4 Source List ATT DVD Control 7 Play Menu SHUF 12:00 Top PBC Panel Play Menu SHUF 15 12:00 8 9 Source List ATT 0 Top Album 15 9 List 0 Play Menu SHUF 12:00 ZAP List Play ...
Operating Instructions
Page 19
Touch and hold momentarily to next page t 19 To cancel, release the key. 5u pause/resume play after pause. 6 "Play Menu" open the menu on the disc.*2 8 "PBC Panel" show the control panel for the desired language. For details on how to 4 ./> skip a chapter/track/scene/image/file. continue to reverse/fast-forward the video; No. During pause, touch and hold to display. • Progressive JPEG files cannot be played. Note If the disc contains multiple file types, only the selected file type (audio/video/image) can be displayed. and then repeatedly to play menu, ...
Touch and hold momentarily to next page t 19 To cancel, release the key. 5u pause/resume play after pause. 6 "Play Menu" open the menu on the disc.*2 8 "PBC Panel" show the control panel for the desired language. For details on how to 4 ./> skip a chapter/track/scene/image/file. continue to reverse/fast-forward the video; No. During pause, touch and hold to display. • Progressive JPEG files cannot be played. Note If the disc contains multiple file types, only the selected file type (audio/video/image) can be displayed. and then repeatedly to play menu, ...

Operating Instructions
Page 20
ZAP List Play Menu SHUF Album 15 12:00 G 20 A Source List ATT MPEG-4 Top 15 B C DVD Control Play Menu SHUF 12:00 D E Source List ATT F Top A Current source icon B Volume level*1 C Format, Playback status, Elapsed playback time*2, Chapter/title/album (folder)/track number*3*4, Audio Format*5, Setting status (CSO, EQ7, RBE) D Playback status, Elapsed playback time*2 E Track name, Album name, Artist name F Album artwork display*6 G Format, Track number, Album number*7, Setting status (CSO, EQ7, RBE) *1 When ATT is activated, appears. *2 During JPEG playback or VCD playback ...
ZAP List Play Menu SHUF Album 15 12:00 G 20 A Source List ATT MPEG-4 Top 15 B C DVD Control Play Menu SHUF 12:00 D E Source List ATT F Top A Current source icon B Volume level*1 C Format, Playback status, Elapsed playback time*2, Chapter/title/album (folder)/track number*3*4, Audio Format*5, Setting status (CSO, EQ7, RBE) D Playback status, Elapsed playback time*2 E Track name, Album name, Artist name F Album artwork display*6 G Format, Track number, Album number*7, Setting status (CSO, EQ7, RBE) *1 When ATT is activated, appears. *2 During JPEG playback or VCD playback ...
