
Operating Instructions
Page 3
... Searching and Playing Tracks 10 Available Options 11 Picture EQ 11 Aspect 11 DVD Audio Level 11 Settings General Settings 12 Touch Panel Adjust 12 Sound Settings 13 Sound Adjust 13 Screen Settings 13 Visual Settings 14 Additional Information Auxiliary Audio/Video Equipment 15 Rear View Camera 15 Precautions 15 Maintenance 18...
... Searching and Playing Tracks 10 Available Options 11 Picture EQ 11 Aspect 11 DVD Audio Level 11 Settings General Settings 12 Touch Panel Adjust 12 Sound Settings 13 Sound Adjust 13 Screen Settings 13 Visual Settings 14 Additional Information Auxiliary Audio/Video Equipment 15 Rear View Camera 15 Precautions 15 Maintenance 18...

Operating Instructions
Page 5
...; MONITOR OFF POSITION This button is attenuated. Application specific area Display playback controls/indications or show the unit's status. Screen displays Playback screen: Remove the insulation film before use the touch panel. ZAP (zappin) (page 8 cursor)/ENTER MODE Select the radio band. VOL (volume) +/- To cancel, press again...
...; MONITOR OFF POSITION This button is attenuated. Application specific area Display playback controls/indications or show the unit's status. Screen displays Playback screen: Remove the insulation film before use the touch panel. ZAP (zappin) (page 8 cursor)/ENTER MODE Select the radio band. VOL (volume) +/- To cancel, press again...
Operating Instructions
Page 6
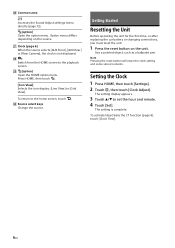
Option menu differs depending on the unit. To return to the playback screen. (option) Open the HOME option menu. Setting the Clock 1 Press HOME, then touch [Settings]. 2 Touch , then touch [Clock Adjust]. Press HOME, then touch . [Icon View] Selects the icon display: [Line View] or [Grid View]. The ...setting is not displayed. Switch from the HOME screen to the home screen, touch . Source select keys Change the source. Use a pointed object, such as a ballpoint pen. Note Pressing the reset button...
Option menu differs depending on the unit. To return to the playback screen. (option) Open the HOME option menu. Setting the Clock 1 Press HOME, then touch [Settings]. 2 Touch , then touch [Clock Adjust]. Press HOME, then touch . [Icon View] Selects the icon display: [Line View] or [Grid View]. The ...setting is not displayed. Switch from the HOME screen to the home screen, touch . Source select keys Change the source. Use a pointed object, such as a ballpoint pen. Note Pressing the reset button...

Operating Instructions
Page 9
... Playback status, elapsed playback time Chapter/title number, audio format Touch the display if the indications are not displayed. The menu control panel appears. 3 Touch the number keys to confirm. During playback, touch the screen and then . Example: Dolby Digital 5.1 ch Audio language Audio format/ ... can also use the menu control panel, which can be displayed by touching the screen anywhere except the DVD menu items. Touch to move the cursor, then touch [ENTER] to select the desired item, then touch [ENTER]. 4 Follow the instructions in the DVD menu. Configuring audio ...
... Playback status, elapsed playback time Chapter/title number, audio format Touch the display if the indications are not displayed. The menu control panel appears. 3 Touch the number keys to confirm. During playback, touch the screen and then . Example: Dolby Digital 5.1 ch Audio language Audio format/ ... can also use the menu control panel, which can be displayed by touching the screen anywhere except the DVD menu items. Touch to move the cursor, then touch [ENTER] to select the desired item, then touch [ENTER]. 4 Follow the instructions in the DVD menu. Configuring audio ...
Operating Instructions
Page 10
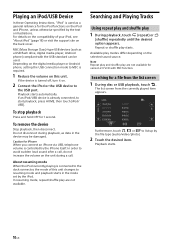
...Searching for 1 second. To stop playback Press and hold OFF for a file from the currently played item appears. The list screen from the list screen 1 During disc or USB playback, touch . If an iPod/USB device is required. 1 Reduce the volume on the back cover. In order to start playback, ...press HOME, then touch [iPod/ USB]. Depending on the digital media player or Android phone, setting the USB connection mode to ...
...Searching for 1 second. To stop playback Press and hold OFF for a file from the currently played item appears. The list screen from the list screen 1 During disc or USB playback, touch . If an iPod/USB device is required. 1 Reduce the volume on the back cover. In order to start playback, ...press HOME, then touch [iPod/ USB]. Depending on the digital media player or Android phone, setting the USB connection mode to ...
Operating Instructions
Page 11
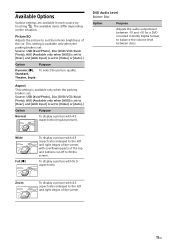
...to [Rear], and [AUX Input] is set to the left and right edges of the screen, with 16:9 aspect ratio. To display a picture with overflowing parts of the top and bottom cut ...off to suit the interior brightness of the screen. 11GB The available items differ depending on the situation. Source: USB (Xvid/Photo), Disc (... set to balance the volume level between -10 and +10 for a DVD recorded in each source by touching . Purpose Adjusts the audio output level between discs. Wide Full () To display a picture with 4:3...
...to [Rear], and [AUX Input] is set to the left and right edges of the screen, with 16:9 aspect ratio. To display a picture with overflowing parts of the top and bottom cut ...off to suit the interior brightness of the screen. 11GB The available items differ depending on the situation. Source: USB (Xvid/Photo), Disc (... set to balance the volume level between -10 and +10 for a DVD recorded in each source by touching . Purpose Adjusts the audio output level between discs. Wide Full () To display a picture with 4:3...

Operating Instructions
Page 12
...12-hour (), 24-hour Purpose To change the settings of the setup category icons. : General Settings (page 12) : Sound Settings (page 13) : Screen Settings (page 13) : Visual Settings (page 14) 3 Move the scrollbar up and down to select the desired item. To set the clock. (Available ...brightness level when the dimmer is connected.) ON To dim the display. To return to the connected monitor. (SECAM is set to the playback screen, touch . Clock Time Unit status: Any status Option OFF (), ON Purpose To activate the CT function. Dimmer Unit status: Any status Option OFF...
...12-hour (), 24-hour Purpose To change the settings of the setup category icons. : General Settings (page 12) : Sound Settings (page 13) : Screen Settings (page 13) : Visual Settings (page 14) 3 Move the scrollbar up and down to select the desired item. To set the clock. (Available ...brightness level when the dimmer is connected.) ON To dim the display. To return to the connected monitor. (SECAM is set to the playback screen, touch . Clock Time Unit status: Any status Option OFF (), ON Purpose To activate the CT function. Dimmer Unit status: Any status Option OFF...

Operating Instructions
Page 15
...volume for it may cause injury or damage to the unit. Keep small articles out of the reach of each connected device, the background screen can be sure to look back and watch or operate the unit. Do not use the setup feature or any other function which could...not operate properly. To maintain high sound quality Do not splash liquid onto the unit or discs. The AUX playback display appears. 3 Touch to open the menu, then touch [AUX Input]. 4 Touch [Audio], [Video] or [Auto]. Park your safety, even if the rear view camera is available only for your car in single...
...volume for it may cause injury or damage to the unit. Keep small articles out of the reach of each connected device, the background screen can be sure to look back and watch or operate the unit. Do not use the setup feature or any other function which could...not operate properly. To maintain high sound quality Do not splash liquid onto the unit or discs. The AUX playback display appears. 3 Touch to open the menu, then touch [AUX Input]. 4 Touch [Audio], [Video] or [Auto]. Park your safety, even if the rear view camera is available only for your car in single...

Operating Instructions
Page 20
...not correct. Connect the yellow and red power supply leads. Use or distribution of such technology outside of Sony Corporation. ZAPPIN is located on the monitor screen. All other DVD, the message [Playback prohibited by region code.] will appear on the bottom of the unit,.... Copyrights US and foreign patents licensed from Microsoft or an authorized Microsoft subsidiary. iPhone, iPod, iPod classic, iPod nano, and iPod touch are touched simultaneously, the display will help you remedy problems you are subject to the unit. Check the fuse. The connection...
...not correct. Connect the yellow and red power supply leads. Use or distribution of such technology outside of Sony Corporation. ZAPPIN is located on the monitor screen. All other DVD, the message [Playback prohibited by region code.] will appear on the bottom of the unit,.... Copyrights US and foreign patents licensed from Microsoft or an authorized Microsoft subsidiary. iPhone, iPod, iPod classic, iPod nano, and iPod touch are touched simultaneously, the display will help you remedy problems you are subject to the unit. Check the fuse. The connection...


