
Operating Instructions
Page 2
To reduce the risk of fire or electric shock, do not expose this product. Excessive sound pressure from the AC outlet immediately. Record these instructions. 3) Heed all warnings. 4) Follow all instructions. 5) Do not use attachments/accessories specified by the manufacturer. 2GB ... the like. This symbol is touched during the normal operation. If the provided plug does not fit into your outlet, consult an electrician for your Sony dealer regarding this apparatus to the presence of the obsolete outlet. 10)Protect the power cord from the apparatus. 11)Only use this apparatus to...
To reduce the risk of fire or electric shock, do not expose this product. Excessive sound pressure from the AC outlet immediately. Record these instructions. 3) Heed all warnings. 4) Follow all instructions. 5) Do not use attachments/accessories specified by the manufacturer. 2GB ... the like. This symbol is touched during the normal operation. If the provided plug does not fit into your outlet, consult an electrician for your Sony dealer regarding this apparatus to the presence of the obsolete outlet. 10)Protect the power cord from the apparatus. 11)Only use this apparatus to...

Operating Instructions
Page 6
..."BRAVIA" Sync 47 Preparing for the "BRAVIA" Sync 47 Playing back components with one-touch operation (One-Touch Play 48 Enjoying the TV sound from the speakers connected to the receiver (System Audio Control 49 Turning off the receiver with the TV (System Power Off 50 Enjoying movies ...with the optimum sound field (Theater/Theatre Mode Sync)........ 51 Enjoying the TV sound via an HDMI cable (Audio Return Channel 51 Advanced Operations Switching between digital and analog audio (INPUT MODE 52...
..."BRAVIA" Sync 47 Preparing for the "BRAVIA" Sync 47 Playing back components with one-touch operation (One-Touch Play 48 Enjoying the TV sound from the speakers connected to the receiver (System Audio Control 49 Turning off the receiver with the TV (System Power Off 50 Enjoying movies ...with the optimum sound field (Theater/Theatre Mode Sync)........ 51 Enjoying the TV sound via an HDMI cable (Audio Return Channel 51 Advanced Operations Switching between digital and analog audio (INPUT MODE 52...
Operating Instructions
Page 9
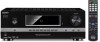
... (page 51). COAX Lights up to "AUTO" or "OPT" and the source signals is set to show how the receiver downmixes or upmixes the source sound (based on the display 1 23 4 SW LFE HDMI DTS LCR COAX OPT SL S SR 5 6 LPCM PL II D ST RDS SLEEP D.RANGE...SL Surround Left SR Surround Right S Surround (monaural or the surround components obtained by Pro Logic processing) Example: Speaker pattern: 3/0.1 Recording format: 3/2.1 Sound Field: A.F.D. INPUT MODE is a digital signal being input through the OPTICAL jack (page 52). The boxes around the letters vary to "AUTO" (page...
... (page 51). COAX Lights up to "AUTO" or "OPT" and the source signals is set to show how the receiver downmixes or upmixes the source sound (based on the display 1 23 4 SW LFE HDMI DTS LCR COAX OPT SL S SR 5 6 LPCM PL II D ST RDS SLEEP D.RANGE...SL Surround Left SR Surround Right S Surround (monaural or the surround components obtained by Pro Logic processing) Example: Speaker pattern: 3/0.1 Recording format: 3/2.1 Sound Field: A.F.D. INPUT MODE is a digital signal being input through the OPTICAL jack (page 52). The boxes around the letters vary to "AUTO" (page...
Operating Instructions
Page 14
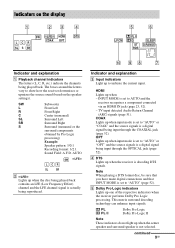
...function you press AV ?/1 (A) and ?/1 (B) simultaneously, the receiver and connected components will turn off the sound temporarily. RM-AAU071: 5/VIDEO, AUDIO, N and TV CH +/SOUND FIELD + - To control a Sony TV Press and hold SHIFT (Q) then press this button. E ENTER (RM-AAU071 only) Enters the ...selections. (Previous channel) (RM-AAU074 only) Returns to restore the sound. M TOOLS/OPTIONS Displays the TV options. PROG ...
...function you press AV ?/1 (A) and ?/1 (B) simultaneously, the receiver and connected components will turn off the sound temporarily. RM-AAU071: 5/VIDEO, AUDIO, N and TV CH +/SOUND FIELD + - To control a Sony TV Press and hold SHIFT (Q) then press this button. E ENTER (RM-AAU071 only) Enters the ...selections. (Previous channel) (RM-AAU074 only) Returns to restore the sound. M TOOLS/OPTIONS Displays the TV options. PROG ...

Operating Instructions
Page 15
...Selects the desired audio signal. continued 15GB Name and function V GUIDE (RM-AAU071 only) (RM-AAU074 only) Displays the guide when you connect a Sony TV that is compatible with the THEATER/ THEATRE button function (page 51). Y DIGITAL (RM-AAU074 only) Changes to analog mode. RM-AAU074: 5/...VIDEO, , N and PROG +/SOUND FIELD +/c Use the tactile dots as references when operating the receiver. wk INPUT (RM-AAU071 only) Selects the input signal (TV or video). /...
...Selects the desired audio signal. continued 15GB Name and function V GUIDE (RM-AAU071 only) (RM-AAU074 only) Displays the guide when you connect a Sony TV that is compatible with the THEATER/ THEATRE button function (page 51). Y DIGITAL (RM-AAU074 only) Changes to analog mode. RM-AAU074: 5/...VIDEO, , N and PROG +/SOUND FIELD +/c Use the tactile dots as references when operating the receiver. wk INPUT (RM-AAU071 only) Selects the input signal (TV or video). /...
Operating Instructions
Page 16
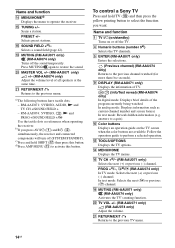
... be possible or may not work depending on the component, the above explanation is also available for DIGITAL MEDIA PORT adapter operation. To control other Sony components Name A AV ?/1b) D Numeric buttonsc) (number 5a)) E ENTERc) H ANGLEd) e) I DISPLAY J Color buttons L V/v/B/b M TOOLS/OPTIONS N MENU/HOME O m/Mf) Na)f) ./>f) ... Cable TV tuner Power Channel VCR Power Channel Enterd) - On-screen guide - - RM-AAU074: 5/VIDEO, , N and PROG +/SOUND FIELD +/c Use the tactile dots as an example only. e)RM-AAU074 only. f) This button is intended to the operating instructions supplied with...
... be possible or may not work depending on the component, the above explanation is also available for DIGITAL MEDIA PORT adapter operation. To control other Sony components Name A AV ?/1b) D Numeric buttonsc) (number 5a)) E ENTERc) H ANGLEd) e) I DISPLAY J Color buttons L V/v/B/b M TOOLS/OPTIONS N MENU/HOME O m/Mf) Na)f) ./>f) ... Cable TV tuner Power Channel VCR Power Channel Enterd) - On-screen guide - - RM-AAU074: 5/VIDEO, , N and PROG +/SOUND FIELD +/c Use the tactile dots as an example only. e)RM-AAU074 only. f) This button is intended to the operating instructions supplied with...
Operating Instructions
Page 17
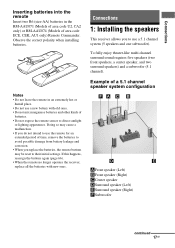
To fully enjoy theater-like multi channel surround sound requires five speakers (two front speakers, a center speaker, and two surround speakers) and a subwoofer (5.1 channel). Notes • Do not leave the remote in the RM-...
To fully enjoy theater-like multi channel surround sound requires five speakers (two front speakers, a center speaker, and two surround speakers) and a subwoofer (5.1 channel). Notes • Do not leave the remote in the RM-...

Operating Instructions
Page 18
...difference in the length of B in the above diagram is 6 meters (20 feet). In other words, the speaker will cause a delay in much better surround sound. Example: Adjust the distance B to 1.5 meters (5 feet) or more when the distance A is no more than 1.5 meters (5 feet) closer than the ... between the surround speakers and the listening position C cannot be the same. Please note that placing the speakers closer than the length of the sound from that the difference in the length of C in the following diagram is 6 meters (20 feet). Place the speakers so that speaker. ...
...difference in the length of B in the above diagram is 6 meters (20 feet). In other words, the speaker will cause a delay in much better surround sound. Example: Adjust the distance B to 1.5 meters (5 feet) or more when the distance A is no more than 1.5 meters (5 feet) closer than the ... between the surround speakers and the listening position C cannot be the same. Please note that placing the speakers closer than the length of the sound from that the difference in the length of C in the following diagram is 6 meters (20 feet). Place the speakers so that speaker. ...

Operating Instructions
Page 19
... (page 60). 19GB Notes • Before connecting the AC power cord (mains lead), make sure that metalic wires of the input signal to a subwoofer, then sound may not be sure to standby mode automatically based on the level of the speaker cords are not touching each other between the SPEAKERS terminals...
... (page 60). 19GB Notes • Before connecting the AC power cord (mains lead), make sure that metalic wires of the input signal to a subwoofer, then sound may not be sure to standby mode automatically based on the level of the speaker cords are not touching each other between the SPEAKERS terminals...

Operating Instructions
Page 20
...to "ARC ON" in HDMI menu (page 51). 20GB b)If your TV is compatible with the Audio Return Channel (ARC) function, the TV sound will output from the speakers connected to the receiver, connect either B or E. Audio signals TV Video signals Audio/Video signals A Ba) C ...not supplied) D Video cord (not supplied) E HDMI cable (not supplied) We recommend that you use a Sony HDMI cable. Recommended connection Alternative connection a)To enjoy TV multi channel surround sound broadcasting from the speakers connected to disconnect the AC power cord (mains lead). In this case, set "ARC...
...to "ARC ON" in HDMI menu (page 51). 20GB b)If your TV is compatible with the Audio Return Channel (ARC) function, the TV sound will output from the speakers connected to the receiver, connect either B or E. Audio signals TV Video signals Audio/Video signals A Ba) C ...not supplied) D Video cord (not supplied) E HDMI cable (not supplied) We recommend that you use a Sony HDMI cable. Recommended connection Alternative connection a)To enjoy TV multi channel surround sound broadcasting from the speakers connected to disconnect the AC power cord (mains lead). In this case, set "ARC...
Operating Instructions
Page 23
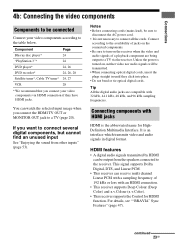
... 53). You can watch the selected input image when you want to connect several digital components, but cannot find an unused input See "Enjoying the sound from the speakers connected to the receiver. For details, see ""BRAVIA" Sync Features" (page 47). continued 23GB HDMI features • A digital audio signals transmitted by...
... 53). You can watch the selected input image when you want to connect several digital components, but cannot find an unused input See "Enjoying the sound from the speakers connected to the receiver. For details, see ""BRAVIA" Sync Features" (page 47). continued 23GB HDMI features • A digital audio signals transmitted by...

Operating Instructions
Page 25
...OUT jack. Refer to the operating instructions of a component connected via the HDMI cable. • Sound may not be interrupted when the sampling frequency, the number of channels or audio format of each ..., set "A. It is not compatible with copyright protection technology (HDCP), the image and/or the sound from the HDMI TV OUT jack may be distorted or may be output. Connections Notes on HDMI ...OUT" to "TV+AMP" in AUDIO menu (page 63) when the sound is not output correctly. If you use an HDMI authorized cable or Sony HDMI cable. • We do not recommend using an HDMI-DVI ...
...OUT jack. Refer to the operating instructions of a component connected via the HDMI cable. • Sound may not be interrupted when the sampling frequency, the number of channels or audio format of each ..., set "A. It is not compatible with copyright protection technology (HDCP), the image and/or the sound from the HDMI TV OUT jack may be distorted or may be output. Connections Notes on HDMI ...OUT" to "TV+AMP" in AUDIO menu (page 63) when the sound is not output correctly. If you use an HDMI authorized cable or Sony HDMI cable. • We do not recommend using an HDMI-DVI ...
Operating Instructions
Page 30
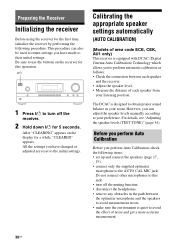
... Auto Calibration, check the following procedure. All the settings you can also be used to your listening position. However, you have made to obtain proper sound balance in the path between each speaker and the receiver. • Adjust the speaker level. • Measure the distance of area code ECE, CEK, AU1...
... Auto Calibration, check the following procedure. All the settings you can also be used to your listening position. However, you have made to obtain proper sound balance in the path between each speaker and the receiver. • Adjust the speaker level. • Measure the distance of area code ECE, CEK, AU1...

Operating Instructions
Page 31
... accurate measurement. Use a stool or tripod so that comes out of the speakers is displayed. "START" appears on your listening position. The volume of the sound cannot be adjusted. Tip When you face the speaker towards the optimizer microphone, you will take approximately a few minutes to the effect on the display.... 3 Press . Setting up the optimizer microphone. A countdown is very loud. Preparing the Receiver Note During the calibration, the sound that the optimizer microphone remains at your neighborhood. continued 31GB
... accurate measurement. Use a stool or tripod so that comes out of the speakers is displayed. "START" appears on your listening position. The volume of the sound cannot be adjusted. Tip When you face the speaker towards the optimizer microphone, you will take approximately a few minutes to the effect on the display.... 3 Press . Setting up the optimizer microphone. A countdown is very loud. Preparing the Receiver Note During the calibration, the sound that the optimizer microphone remains at your neighborhood. continued 31GB
Operating Instructions
Page 32
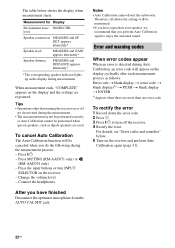
... NOISE.CHK level Speaker connection MEASURE and SP DET. Press ?/1 - To rectify the error 1 Record down the error code. 2 Press . 3 Press ?/1 to enjoy the surround sound. The table below . 5 Turn on the display and the settings are used. appears alternately* Speaker level MEASURE and GAIN appears alternately* Speaker distance MEASURE and...
... NOISE.CHK level Speaker connection MEASURE and SP DET. Press ?/1 - To rectify the error 1 Record down the error code. 2 Press . 3 Press ?/1 to enjoy the surround sound. The table below . 5 Turn on the display and the settings are used. appears alternately* Speaker level MEASURE and GAIN appears alternately* Speaker distance MEASURE and...
Operating Instructions
Page 34
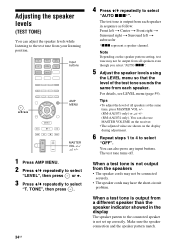
Tips • To adjust the level of the test tone sounds the same from your listening position. BD DVD TV VIDEO DMPORT TUNER SAT/ CATV SA-CD/ CD Input buttons , V/v/B/b O MENU m M .X x> AMP MENU MASTER VOL +/-/ 2 +/- 1 Press ...
Tips • To adjust the level of the test tone sounds the same from your listening position. BD DVD TV VIDEO DMPORT TUNER SAT/ CATV SA-CD/ CD Input buttons , V/v/B/b O MENU m M .X x> AMP MENU MASTER VOL +/-/ 2 +/- 1 Press ...
Operating Instructions
Page 35
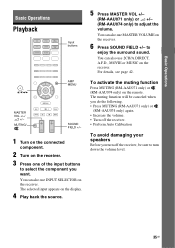
... MUTING (RM-AAU071 only) or (RM-AAU074 only) again. • Increase the volume. • Turn off the receiver, be sure to enjoy the surround sound. to turn down the volume level. 35GB To activate the muting function Press MUTING (RM-AAU071 only) or (RM-AAU074 only) on the display. 4 Play... the volume. You can also use MASTER VOLUME on the receiver. You can also use 2CH/A.DIRECT, A.F.D., MOVIE or MUSIC on the receiver. 6 Press SOUND FIELD +/- For details, see page 42. You can also use INPUT SELECTOR on the receiver. 3 Press one of the input buttons to select the component...
... MUTING (RM-AAU071 only) or (RM-AAU074 only) again. • Increase the volume. • Turn off the receiver, be sure to enjoy the surround sound. to turn down the volume level. 35GB To activate the muting function Press MUTING (RM-AAU071 only) or (RM-AAU074 only) on the display. 4 Play... the volume. You can also use MASTER VOLUME on the receiver. You can also use 2CH/A.DIRECT, A.F.D., MOVIE or MUSIC on the receiver. 6 Press SOUND FIELD +/- For details, see page 42. You can also use INPUT SELECTOR on the receiver. 3 Press one of the input buttons to select the component...

Operating Instructions
Page 36
...the button, the display changes cyclically as follows: All inputs except the FM and AM band Index name of the inputa) t Selected input t Sound field currently applied t Volume level t Stream info FM and AM band Program Service nameb) or preset station namea) t Frequency t Program Type ...indicationb) t Radio Text indicationb) t Current Time indication (in 24-hour system mode)b) t Sound field currently applied t Volume level a)Index name appears only when you entered is registered. Index name does not appear when only blank spaces have assigned...
...the button, the display changes cyclically as follows: All inputs except the FM and AM band Index name of the inputa) t Selected input t Sound field currently applied t Volume level t Stream info FM and AM band Program Service nameb) or preset station namea) t Frequency t Program Type ...indicationb) t Radio Text indicationb) t Current Time indication (in 24-hour system mode)b) t Sound field currently applied t Volume level a)Index name appears only when you entered is registered. Index name does not appear when only blank spaces have assigned...
Operating Instructions
Page 37
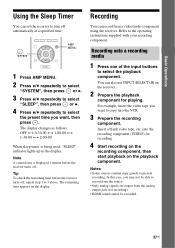
...-00 When sleep timer is displayed 1 minute before the receiver turns off . Recording You can record from the analog output jack (for recording). • HDMI sound cannot be able to record from the source. • Only analog signals are output from a video/audio component using the receiver. Basic Operations Using the...
...-00 When sleep timer is displayed 1 minute before the receiver turns off . Recording You can record from the analog output jack (for recording). • HDMI sound cannot be able to record from the source. • Only analog signals are output from a video/audio component using the receiver. Basic Operations Using the...

Operating Instructions
Page 38
... The tuning scale for direct tuning differs depending on area codes, see page 5. Using the controls on the display, select monaural audio so that the sound will be changed (page 39). TUNING , V/v/B/b TUNING +/- The receiver stops scanning whenever a station is poor and "ST" flashes on the receiver 1 Turn INPUT SELECTOR to...
... The tuning scale for direct tuning differs depending on area codes, see page 5. Using the controls on the display, select monaural audio so that the sound will be changed (page 39). TUNING , V/v/B/b TUNING +/- The receiver stops scanning whenever a station is poor and "ST" flashes on the receiver 1 Turn INPUT SELECTOR to...

