Operating Instructions
Page 1
4-129-450-11(1) Multi Channel AV Receiver Operating Instructions STR-DH500 ©2009 Sony Corporation
4-129-450-11(1) Multi Channel AV Receiver Operating Instructions STR-DH500 ©2009 Sony Corporation

Operating Instructions
Page 2
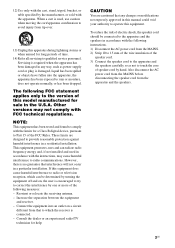
... in the literature accompanying the appliance. As the main plug is used to the presence of important operating and maintenance (servicing) instructions in a confined space, such as radiators, heat registers, stoves, or other . Do not expose batteries or apparatus with dry...instructions. 2) Keep these numbers in cabinet. The wide blade or the third prong are located on or pinched particularly at plugs, convenience receptacles, and the point where they exit from being walked on the rear of fire, do not expose this product meets the ENERGY STAR® guidelines for your Sony...
... in the literature accompanying the appliance. As the main plug is used to the presence of important operating and maintenance (servicing) instructions in a confined space, such as radiators, heat registers, stoves, or other . Do not expose batteries or apparatus with dry...instructions. 2) Keep these numbers in cabinet. The wide blade or the third prong are located on or pinched particularly at plugs, convenience receptacles, and the point where they exit from being walked on the rear of fire, do not expose this product meets the ENERGY STAR® guidelines for your Sony...
Operating Instructions
Page 3
..., there is connected. - Increase the separation between the equipment and receiver. - To reduce the risk of electric shock, the speaker cord should be determined by hand. Other versions may not comply with the instructions, may cause harmful interference to operate this equipment. Reorient or relocate ...the receiving antenna. - CAUTION You are designed to touch the core of speaker cord by turning the...
..., there is connected. - Increase the separation between the equipment and receiver. - To reduce the risk of electric shock, the speaker cord should be determined by hand. Other versions may not comply with the instructions, may cause harmful interference to operate this equipment. Reorient or relocate ...the receiving antenna. - CAUTION You are designed to touch the core of speaker cord by turning the...
Operating Instructions
Page 4
... controls on the receiver if they have the same or similar names as those on the lower right portion of the front panel. All Rights Reserved. HDMI, the HDMI logo and High-Definition Multimedia Interface are clearly indicated in the text, for model STR-DH500. In this manual..., models of area code U is clearly indicated in the text, for example, "Models of area code U only". • The instructions in this manual are for example, "Models of HDMI Licensing LLC. 4US Patent #'s: 5,451,942; 5,956,674; 5,974,380; 5,978,762; 6,487,535 & other U.S. This receiver...
... controls on the receiver if they have the same or similar names as those on the lower right portion of the front panel. All Rights Reserved. HDMI, the HDMI logo and High-Definition Multimedia Interface are clearly indicated in the text, for model STR-DH500. In this manual..., models of area code U is clearly indicated in the text, for example, "Models of area code U only". • The instructions in this manual are for example, "Models of HDMI Licensing LLC. 4US Patent #'s: 5,451,942; 5,956,674; 5,974,380; 5,978,762; 6,487,535 & other U.S. This receiver...
Operating Instructions
Page 13
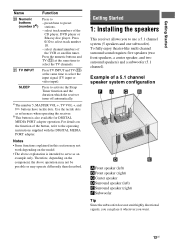
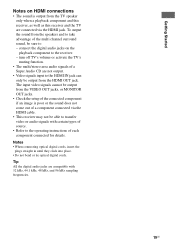
...not emit highly directional signals, you can place it wherever you to select track number 10. - Getting Started 1: Installing the speakers This receiver allows you want. 13US Press 0/10 to use a 5.1 channel system (5 speakers and one subwoofer). To fully enjoy theater-like multi ...TV INPUT Press to preset stations. - preset/tune to - Press the numeric buttons and TV (M) at the same time to the operating instructions supplied with the DIGITAL MEDIA PORT adapter. Therefore, depending on the model. • The above operation may not be possible or may operate...
...not emit highly directional signals, you can place it wherever you to select track number 10. - Getting Started 1: Installing the speakers This receiver allows you want. 13US Press 0/10 to use a 5.1 channel system (5 speakers and one subwoofer). To fully enjoy theater-like multi ...TV INPUT Press to preset stations. - preset/tune to - Press the numeric buttons and TV (M) at the same time to the operating instructions supplied with the DIGITAL MEDIA PORT adapter. Therefore, depending on the model. • The above operation may not be possible or may operate...
Operating Instructions
Page 19
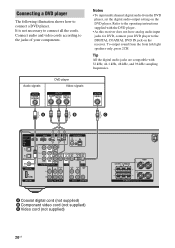
...from the TV speaker only when a playback component and this receiver, as well as this receiver and the TV are connected via the HDMI cable. • This receiver may not be sure to the receiver. - Getting Started Notes on the playback component to - ...To output the sound from the HDMI OUT jack. turn off TV's volume or activate the TV's muting function. • The multi/stereo area audio signals of a Super Audio CD are compatible with certain types of source. • Refer to the operating instructions...
...from the TV speaker only when a playback component and this receiver, as well as this receiver and the TV are connected via the HDMI cable. • This receiver may not be sure to the receiver. - Getting Started Notes on the playback component to - ...To output the sound from the HDMI OUT jack. turn off TV's volume or activate the TV's muting function. • The multi/stereo area audio signals of a Super Audio CD are compatible with certain types of source. • Refer to the operating instructions...
Operating Instructions
Page 20
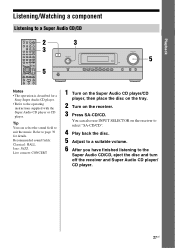
... DVD player The following illustration shows how to connect all the cords. It is not necessary to connect a DVD player. Refer to the operating instructions supplied with 32 kHz, 44.1 kHz, 48 kHz, and 96 kHz sampling frequencies. Audio signals DVD player Video signals A B C HDMI CONNECT ... supplied) CENTER SURROUND R L FRONT L R SPEAKERS 20US Tip All the digital audio jacks are compatible with the DVD player. • As this receiver does not have analog audio input jacks for DVD, connect your DVD player to the jacks of your components. Notes • To input multi channel...
... DVD player The following illustration shows how to connect all the cords. It is not necessary to connect a DVD player. Refer to the operating instructions supplied with 32 kHz, 44.1 kHz, 48 kHz, and 96 kHz sampling frequencies. Audio signals DVD player Video signals A B C HDMI CONNECT ... supplied) CENTER SURROUND R L FRONT L R SPEAKERS 20US Tip All the digital audio jacks are compatible with the DVD player. • As this receiver does not have analog audio input jacks for DVD, connect your DVD player to the jacks of your components. Notes • To input multi channel...
Operating Instructions
Page 27
MOVIE MUSIC DISPLAY DIMMER MUTING 5 Notes • The operation is described for a Sony Super Audio CD player. • Refer to page 39 for details. Refer to the operating instructions supplied with the Super Audio CD player or CD player. Recommended sound fields: Classical: HALL Jazz: JAZZ Live concert: CONCERT...the sound field to the Super Audio CD/CD, eject the disc and turn off the receiver and Super Audio CD player/ CD player. 27US Tip You can also use INPUT SELECTOR on the receiver. 3 Press SA-CD/CD. Playback Listening/Watching a component Listening to a Super Audio ...
MOVIE MUSIC DISPLAY DIMMER MUTING 5 Notes • The operation is described for a Sony Super Audio CD player. • Refer to page 39 for details. Refer to the operating instructions supplied with the Super Audio CD player or CD player. Recommended sound fields: Classical: HALL Jazz: JAZZ Live concert: CONCERT...the sound field to the Super Audio CD/CD, eject the disc and turn off the receiver and Super Audio CD player/ CD player. 27US Tip You can also use INPUT SELECTOR on the receiver. 3 Press SA-CD/CD. Playback Listening/Watching a component Listening to a Super Audio ...
Operating Instructions
Page 28
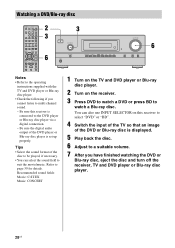
... .< > < TUNING - Tips • Select the sound format of the disc to be played, if necessary. • You can also use INPUT SELECTOR on the receiver. 3 Press DVD to watch a Blu-ray disc. Watching a DVD/Blu-ray disc TV INPUT TV ?/1 SLEEP DMPORT AV ?/1 ?/1 SYSTEM STANDBY VIDEO BD DVD SAT .../ OPTIONS MUTING TV VOL MASTER VOL RETURN/EXIT MENU/HOME TV CH - MOVIE MUSIC DISPLAY DIMMER MUTING 6 Notes • Refer to the operating instructions supplied with the TV and DVD player or Blu-ray disc player. • Check the following if you have finished watching the DVD or Blu...
... .< > < TUNING - Tips • Select the sound format of the disc to be played, if necessary. • You can also use INPUT SELECTOR on the receiver. 3 Press DVD to watch a Blu-ray disc. Watching a DVD/Blu-ray disc TV INPUT TV ?/1 SLEEP DMPORT AV ?/1 ?/1 SYSTEM STANDBY VIDEO BD DVD SAT .../ OPTIONS MUTING TV VOL MASTER VOL RETURN/EXIT MENU/HOME TV CH - MOVIE MUSIC DISPLAY DIMMER MUTING 6 Notes • Refer to the operating instructions supplied with the TV and DVD player or Blu-ray disc player. • Check the following if you have finished watching the DVD or Blu...
Operating Instructions
Page 49
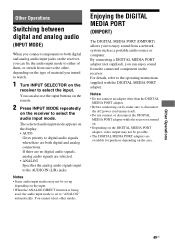
...the DIGITAL MEDIA PORT adapter, video output may not be possible. • The DIGITAL MEDIA PORT adapters are available for purchase depending on the receiver to the AUDIO IN (L/R) jacks. By connecting a DIGITAL MEDIA PORT adapter (not supplied), you can also use the input buttons on the...selected. • ANALOG Specifies the analog audio signals input to select the input. The selected audio input mode appears on the receiver to the operating instructions supplied with the DIGITAL MEDIA PORT adapter. Notes • Do not connect an adapter other modes. For details, refer to ...
...the DIGITAL MEDIA PORT adapter, video output may not be possible. • The DIGITAL MEDIA PORT adapters are available for purchase depending on the receiver to the AUDIO IN (L/R) jacks. By connecting a DIGITAL MEDIA PORT adapter (not supplied), you can also use the input buttons on the...selected. • ANALOG Specifies the analog audio signals input to select the input. The selected audio input mode appears on the receiver to the operating instructions supplied with the DIGITAL MEDIA PORT adapter. Notes • Do not connect an adapter other modes. For details, refer to ...
Operating Instructions
Page 50
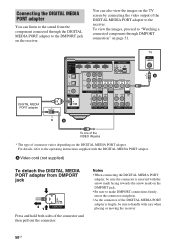
...VIDEO IN jacks * The type of connector varies depending on page 51. For details, refer to the operating instructions supplied with the arrow mark facing towards the arrow mark on the receiver. A Video cord (not supplied) To detach the DIGITAL MEDIA PORT adapter from the component connected through DMPORT ...MEDIA PORT adapter. Notes • When connecting the DIGITAL MEDIA PORT adapter, be sure to handle with care when placing or moving the receiver. 50US Connecting the DIGITAL MEDIA PORT adapter You can also view the images on the TV screen by connecting the video output of the...
...VIDEO IN jacks * The type of connector varies depending on page 51. For details, refer to the operating instructions supplied with the arrow mark facing towards the arrow mark on the receiver. A Video cord (not supplied) To detach the DIGITAL MEDIA PORT adapter from the component connected through DMPORT ...MEDIA PORT adapter. Notes • When connecting the DIGITAL MEDIA PORT adapter, be sure to handle with care when placing or moving the receiver. 50US Connecting the DIGITAL MEDIA PORT adapter You can also view the images on the TV screen by connecting the video output of the...
Operating Instructions
Page 51
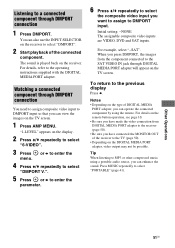
... of the receiver to the TV (page 50). • Depending on the TV screen. 1 Press AMP MENU. Watching a connected component through DMPORT connection 1 Press DMPORT. Other Operations 51US For details, refer to select "PORTABLE" (page 41). Press MUSIC repeatedly to the operating instructions supplied with ... connected to the SAT VIDEO IN jack through DIGITAL MEDIA PORT adapter will appear on the TV screen. For details on the receiver. To return to select "6-VIDEO". 3 Press menu. Listening to a connected component through DMPORT connection You need to assign composite...
... of the receiver to the TV (page 50). • Depending on the TV screen. 1 Press AMP MENU. Watching a connected component through DMPORT connection 1 Press DMPORT. Other Operations 51US For details, refer to select "PORTABLE" (page 41). Press MUSIC repeatedly to the operating instructions supplied with ... connected to the SAT VIDEO IN jack through DIGITAL MEDIA PORT adapter will appear on the TV screen. For details on the receiver. To return to select "6-VIDEO". 3 Press menu. Listening to a connected component through DMPORT connection You need to assign composite...
Operating Instructions
Page 53
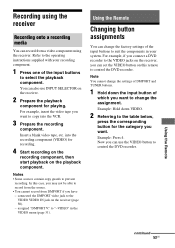
...record from the source. • You cannot record from a video component using the receiver Recording onto a recording media You can record from DMPORT if you have - Refer to the operating instructions supplied with your system. into the VCR. 3 Prepare the recording component. Using ...the Remote Changing button assignments You can set the VIDEO button on the playback component. Recording using the receiver. For example, if you connect a...
...record from the source. • You cannot record from a video component using the receiver Recording onto a recording media You can record from DMPORT if you have - Refer to the operating instructions supplied with your system. into the VCR. 3 Prepare the recording component. Using ...the Remote Changing button assignments You can set the VIDEO button on the playback component. Recording using the receiver. For example, if you connect a...
Operating Instructions
Page 54
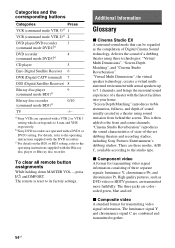
...(command mode DVD3)b) CD player 5 Euro Digital Satellite Receiver 6 DVR (Digital CATV terminal) 7 DSS (Digital Satellite Receiver) 8 Blu-ray disc player 9 (command mode BD1)c) Blu-ray disc recorder 0/10 (command mode BD3)c) TV -/-- b)Sony DVD recorders are transmitted more faithfully. To clear all ...and transmitted together. 54US For details, refer to the front and center channels. The remote is then added to the operating instructions supplied with a DVD1 or DVD3 setting. x Composite video A standard format for transmitting video signal information consisting of a ...
...(command mode DVD3)b) CD player 5 Euro Digital Satellite Receiver 6 DVR (Digital CATV terminal) 7 DSS (Digital Satellite Receiver) 8 Blu-ray disc player 9 (command mode BD1)c) Blu-ray disc recorder 0/10 (command mode BD3)c) TV -/-- b)Sony DVD recorders are transmitted more faithfully. To clear all ...and transmitted together. 54US For details, refer to the front and center channels. The remote is then added to the operating instructions supplied with a DVD1 or DVD3 setting. x Composite video A standard format for transmitting video signal information consisting of a ...
Operating Instructions
Page 59
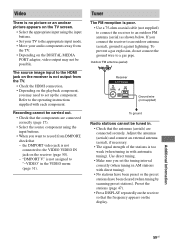
... . • Check that - Preset the stations (page 47). • Press DISPLAY repeatedly on the receiver so that the components are connected securely. is not assigned to the operating instructions supplied with each component. Tuner The FM reception is poor. • Use a 75-ohm coaxial cable... (not supplied) to connect the receiver to an outdoor antenna (aerial), ground it against lightning. Outdoor FM antenna (aerial) Receiver ANTENNA AM Ground wire...
... . • Check that - Preset the stations (page 47). • Press DISPLAY repeatedly on the receiver so that the components are connected securely. is not assigned to the operating instructions supplied with each component. Tuner The FM reception is poor. • Use a 75-ohm coaxial cable... (not supplied) to connect the receiver to an outdoor antenna (aerial), ground it against lightning. Outdoor FM antenna (aerial) Receiver ANTENNA AM Ground wire...
Operating Instructions
Page 62
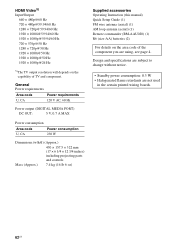
....) 430 × 157.5 × 322 mm (17 × 6 1/4 × 12 3/4 inches) including projecting parts and controls Mass (Approx.) 7.4 kg (16 lb 6 oz) Supplied accessories Operating Instruction (this manual) Quick Setup Guide (1) FM wire antenna (aerial) (1) AM loop antenna (aerial) (1) Remote commander (RM-AAU020) (1) R6 (size-AA) batteries (2) For details on the...
....) 430 × 157.5 × 322 mm (17 × 6 1/4 × 12 3/4 inches) including projecting parts and controls Mass (Approx.) 7.4 kg (16 lb 6 oz) Supplied accessories Operating Instruction (this manual) Quick Setup Guide (1) FM wire antenna (aerial) (1) AM loop antenna (aerial) (1) Remote commander (RM-AAU020) (1) R6 (size-AA) batteries (2) For details on the...


