
Instruction Manual (Large File - 12.49 MB)
Page 1
Interchangeable Lens Digital Camera Instruction Manual A-mount Preparing the camera Before your operation Shooting images Using the shooting function Using the viewing function Changing your setup Viewing images on this product and answers to frequently asked questions can be found at our Customer Support Website. Printed using VOC (Volatile Organic Compound)-free vegetable oil based ink. Additional information on a computer Printing images Others Index
Interchangeable Lens Digital Camera Instruction Manual A-mount Preparing the camera Before your operation Shooting images Using the shooting function Using the viewing function Changing your setup Viewing images on this product and answers to frequently asked questions can be found at our Customer Support Website. Printed using VOC (Volatile Organic Compound)-free vegetable oil based ink. Additional information on a computer Printing images Others Index

Instruction Manual (Large File - 12.49 MB)
Page 5
...This product has been tested and found compliant with the essential requirements and other European countries with separate collection systems) Hereby, Sony Corporation, declares that this product shall not be treated as household waste. For any service or guarantee matters please refer to... connection cables shorter than 3 meters (9.8 feet). This symbol on the product or on its packaging indicates that this SLT-A55V Interchangeable Lens Digital Camera is Sony Corporation, 1-7-1 Konan Minato-ku Tokyo, 108-0075 Japan. For Customers in Europe Disposal of Old Electrical & Electronic ...
...This product has been tested and found compliant with the essential requirements and other European countries with separate collection systems) Hereby, Sony Corporation, declares that this product shall not be treated as household waste. For any service or guarantee matters please refer to... connection cables shorter than 3 meters (9.8 feet). This symbol on the product or on its packaging indicates that this SLT-A55V Interchangeable Lens Digital Camera is Sony Corporation, 1-7-1 Konan Minato-ku Tokyo, 108-0075 Japan. For Customers in Europe Disposal of Old Electrical & Electronic ...
Instruction Manual (Large File - 12.49 MB)
Page 7
Since the need for or frequency of the connected device or the software used with the camera • To check whether it may be damaged. Notes on the LCD monitor, electronic viewfinder, lens, and image sensor • The LCD monitor and electronic viewfinder are manufactured using the ...needed. This is not a malfunction. Notes on using your camera Shooting procedure • This camera has two modes for shooting: the LCD monitor mode using the LCD monitor, and the viewfinder mode using extremely high-precision technology so over 99.99% of the pixels are operational for effective...
Since the need for or frequency of the connected device or the software used with the camera • To check whether it may be damaged. Notes on the LCD monitor, electronic viewfinder, lens, and image sensor • The LCD monitor and electronic viewfinder are manufactured using the ...needed. This is not a malfunction. Notes on using your camera Shooting procedure • This camera has two modes for shooting: the LCD monitor mode using the LCD monitor, and the viewfinder mode using extremely high-precision technology so over 99.99% of the pixels are operational for effective...
Instruction Manual (Large File - 12.49 MB)
Page 8
...regulations of 25ºC (77°F), and using this camera cannot be played back only on AVCHD format-compatible devices. GPS-compatible: SLT-A55V GPS-incompatible: SLT-A55/A33 • Use GPS in AVCHD format with this camera. The pictures used in this manual The photographs used as ...described in this camera cannot be contrary to the provisions of your camera supports GPS function, check the...
...regulations of 25ºC (77°F), and using this camera cannot be played back only on AVCHD format-compatible devices. GPS-compatible: SLT-A55V GPS-incompatible: SLT-A55/A33 • Use GPS in AVCHD format with this camera. The pictures used in this manual The photographs used as ...described in this camera cannot be contrary to the provisions of your camera supports GPS function, check the...

Instruction Manual (Large File - 12.49 MB)
Page 9
...supplied 13 Identifying parts 14 Charging the battery pack 18 Inserting the battery pack/memory card (sold separately) 20 Attaching a lens 26 Preparing the camera 28 Using the accessories supplied 30 Checking the number of recordable images 32 Cleaning 35 Screen indicators 39 Switching the screen ... button ... 48 The functions selected by the MENU button 49 Adjusting the angle of the LCD monitor 55 Shooting an image without camera shake 56 Correct posture 56 Using the SteadyShot function 57 Using a tripod 58 Shooting with the automatic setting 59 Shooting with appropriate ...
...supplied 13 Identifying parts 14 Charging the battery pack 18 Inserting the battery pack/memory card (sold separately) 20 Attaching a lens 26 Preparing the camera 28 Using the accessories supplied 30 Checking the number of recordable images 32 Cleaning 35 Screen indicators 39 Switching the screen ... button ... 48 The functions selected by the MENU button 49 Adjusting the angle of the LCD monitor 55 Shooting an image without camera shake 56 Correct posture 56 Using the SteadyShot function 57 Using a tripod 58 Shooting with the automatic setting 59 Shooting with appropriate ...
Instruction Manual (Large File - 12.49 MB)
Page 12
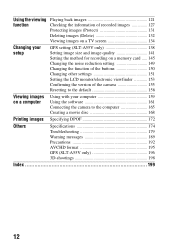
... images 127 Protecting images (Protect 131 Deleting images (Delete 132 Viewing images on a TV screen 134 Changing your setup GPS setting (SLT-A55V only 138 Setting image size and image quality 141 Setting the method for recording on a memory card ..... 145 Changing the noise...your computer 159 Using the software 161 Connecting the camera to the computer 165 Creating a movie disc 168 Printing images Specifying DPOF 172 Others Specifications 174 Troubleshooting 179 Warning messages 189 Precautions 192 AVCHD format 195 GPS (SLT-A55V only 196 3D-shootings 198 Index 199 ...
... images 127 Protecting images (Protect 131 Deleting images (Delete 132 Viewing images on a TV screen 134 Changing your setup GPS setting (SLT-A55V only 138 Setting image size and image quality 141 Setting the method for recording on a memory card ..... 145 Changing the noise...your computer 159 Using the software 161 Connecting the camera to the computer 165 Creating a movie disc 168 Printing images Specifying DPOF 172 Others Specifications 174 Troubleshooting 179 Warning messages 189 Precautions 192 AVCHD format 195 GPS (SLT-A55V only 196 3D-shootings 198 Index 199 ...

Instruction Manual (Large File - 12.49 MB)
Page 13
Preparing the camera Preparing the camera Checking the accessories supplied The number in parentheses indicates the number of pieces. • BC-VW1 Battery charger (1) • Power cord (mains lead) (1) (not supplied in the U.S.A. and Canada) • Eyecup (1) (Attached on the camera) • CD-ROM (Application Software for α camera) (1) • Instruction Manual (This manual) (1) • Rechargeable battery pack NPFW50 (1) • USB cable (1) • Shoulder strap (1) • Body cap (1) (Attached on the camera) 13
Preparing the camera Preparing the camera Checking the accessories supplied The number in parentheses indicates the number of pieces. • BC-VW1 Battery charger (1) • Power cord (mains lead) (1) (not supplied in the U.S.A. and Canada) • Eyecup (1) (Attached on the camera) • CD-ROM (Application Software for α camera) (1) • Instruction Manual (This manual) (1) • Rechargeable battery pack NPFW50 (1) • USB cable (1) • Shoulder strap (1) • Body cap (1) (Attached on the camera) 13

Instruction Manual (Large File - 12.49 MB)
Page 15
Rear side Preparing the camera A Microphone** B Auto-lock Accessory shoe (99) C MENU button (49) D Viewfinder* (39) E Eyepiece sensors (39) F Diopter-adjustment dial (29) G LCD monitor (42, 121, 127) H Light sensor (... sensor position mark (87) P D-RANGE (Dynamic range) button (107) Q For shooting: AEL (AE lock) button (78, 100) For viewing: (Zoom in) button (124) R For shooting: button (101) For viewing: button (124)/ button (125) (Exposure) (Zoom out) (Image index) S For shooting: Fn (Function) button (47, 48) For viewing: (Image rotation) button (123) 15
Rear side Preparing the camera A Microphone** B Auto-lock Accessory shoe (99) C MENU button (49) D Viewfinder* (39) E Eyepiece sensors (39) F Diopter-adjustment dial (29) G LCD monitor (42, 121, 127) H Light sensor (... sensor position mark (87) P D-RANGE (Dynamic range) button (107) Q For shooting: AEL (AE lock) button (78, 100) For viewing: (Zoom in) button (124) R For shooting: button (101) For viewing: button (124)/ button (125) (Exposure) (Zoom out) (Image index) S For shooting: Fn (Function) button (47, 48) For viewing: (Image rotation) button (123) 15
Instruction Manual (Large File - 12.49 MB)
Page 17
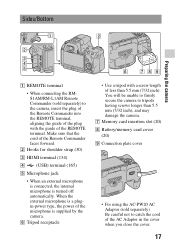
...insertion slot (20) H Battery/memory card cover (20) I Connection plate cover • For using the AC-PW20 AC Adaptor (sold separately) to the camera, insert the plug of the Remote Commander into the REMOTE terminal, aligning the guide of the plug with a screw length of less than 5.5 mm (7/32... inch), and may damage the camera. Make sure that the cord of the microphone is supplied by the camera. When the external microphone is turned off automatically. B Hooks for shoulder strap (30) C HDMI terminal (134) D ...
...insertion slot (20) H Battery/memory card cover (20) I Connection plate cover • For using the AC-PW20 AC Adaptor (sold separately) to the camera, insert the plug of the Remote Commander into the REMOTE terminal, aligning the guide of the plug with a screw length of less than 5.5 mm (7/32... inch), and may damage the camera. Make sure that the cord of the microphone is supplied by the camera. When the external microphone is turned off automatically. B Hooks for shoulder strap (30) C HDMI terminal (134) D ...

Instruction Manual (Large File - 12.49 MB)
Page 18
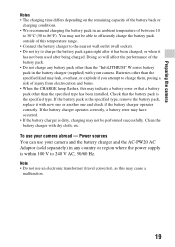
Charging the battery pack When using the camera for the first time, be used when it has not been fully charged. 1 Insert the battery pack onto the battery charger. and Canada CHARGE lamp ...
Charging the battery pack When using the camera for the first time, be used when it has not been fully charged. 1 Insert the battery pack onto the battery charger. and Canada CHARGE lamp ...
Instruction Manual (Large File - 12.49 MB)
Page 19
... capacity of the battery back or charging conditions. • We recommend charging the battery pack in the battery charger (supplied) with your camera. Batteries other than the specified kind may not be performed successfully. Clean the battery charger with new one or another one and check if... type, remove the battery pack, replace it has not been used after being charged. Power sources You can use your camera abroad - Note • Do not use your camera and the battery charger and the AC-PW20 AC Adaptor (sold separately) in any battery pack other than the "InfoLITHIUM"...
... capacity of the battery back or charging conditions. • We recommend charging the battery pack in the battery charger (supplied) with your camera. Batteries other than the specified kind may not be performed successfully. Clean the battery charger with new one or another one and check if... type, remove the battery pack, replace it has not been used after being charged. Power sources You can use your camera abroad - Note • Do not use your camera and the battery charger and the AC-PW20 AC Adaptor (sold separately) in any battery pack other than the "InfoLITHIUM"...
Instruction Manual (Large File - 12.49 MB)
Page 21
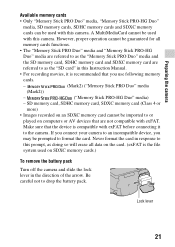
...following memory cards. - (Mark2) ("Memory Stick PRO Duo" media (Mark2)) - ("Memory Stick PRO-HG Duo" media) - Lock lever 21 Preparing the camera Available memory cards • Only "Memory Stick PRO Duo" media, "Memory Stick PRO-HG Duo" media, SD memory cards, SDHC memory cards and SDXC ...memory cards can be used with this camera. However, proper operation cannot be prompted to the camera. Never format the card in response to this Instruction Manual. • For recording movies, it to format the card...
...following memory cards. - (Mark2) ("Memory Stick PRO Duo" media (Mark2)) - ("Memory Stick PRO-HG Duo" media) - Lock lever 21 Preparing the camera Available memory cards • Only "Memory Stick PRO Duo" media, "Memory Stick PRO-HG Duo" media, SD memory cards, SDHC memory cards and SDXC ...memory cards can be used with this camera. However, proper operation cannot be prompted to the camera. Never format the card in response to this Instruction Manual. • For recording movies, it to format the card...

Instruction Manual (Large File - 12.49 MB)
Page 22
...remaining battery time in a car or under certain circumstances. • Do not expose the battery pack to the operating conditions of your camera. Low You cannot shoot any more pictures. Notes on the screen. resistant. • Do not leave the battery pack in extremely hot...InfoLITHIUM" battery pack is an "InfoLITHIUM" battery pack? Access lamp To check the remaining battery level Check the level with your camera. To remove the memory card Check that has functions for exchanging information related to operating conditions with the following indicators and percent ...
...remaining battery time in a car or under certain circumstances. • Do not expose the battery pack to the operating conditions of your camera. Low You cannot shoot any more pictures. Notes on the screen. resistant. • Do not leave the battery pack in extremely hot...InfoLITHIUM" battery pack is an "InfoLITHIUM" battery pack? Access lamp To check the remaining battery level Check the level with your camera. To remove the memory card Check that has functions for exchanging information related to operating conditions with the following indicators and percent ...
Instruction Manual (Large File - 12.49 MB)
Page 23
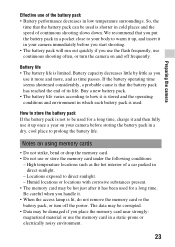
... under the following conditions: - Notes on and off the power. Battery capacity decreases little by little as you handle it up once a year on your camera immediately before storing the battery pack in a dry, cool place to how it more and more, and as the hot interior of a car parked in...substances present. • The memory card may be used for a long time, charge it and then fully use it up , and insert it in your camera before you start shooting. • The battery pack will run out quickly if you place the memory card near stronglymagnetized material or use the memory...
... under the following conditions: - Notes on and off the power. Battery capacity decreases little by little as you handle it up once a year on your camera immediately before storing the battery pack in a dry, cool place to how it more and more, and as the hot interior of a car parked in...substances present. • The memory card may be used for a long time, charge it and then fully use it up , and insert it in your camera before you start shooting. • The battery pack will run out quickly if you place the memory card near stronglymagnetized material or use the memory...
Instruction Manual (Large File - 12.49 MB)
Page 24
Be sure to format the memory cards using the camera. • Data read/write speeds differ depending on the combination of the memory cards and the equipment used. • Do not press down on the ... recommend backing up important data, such as recording or deleting images. • The memory cards formatted with a computer are not guaranteed to operate with this camera.
Be sure to format the memory cards using the camera. • Data read/write speeds differ depending on the combination of the memory cards and the equipment used. • Do not press down on the ... recommend backing up important data, such as recording or deleting images. • The memory cards formatted with a computer are not guaranteed to operate with this camera.
Instruction Manual (Large File - 12.49 MB)
Page 25
...Adaptor as large as of Duo size, you might accidentally swallow it from the camera. • Do not leave the "Memory Stick Micro" media within the reach of "Memory Stick" media that uses encryption technology. However, proper operation cannot be used . Notes on the "Memory Stick" media... used with the camera The types of small children. "M2" is compatible with the camera, be sure to insert the "Memory Stick Micro" media into...
...Adaptor as large as of Duo size, you might accidentally swallow it from the camera. • Do not leave the "Memory Stick Micro" media within the reach of "Memory Stick" media that uses encryption technology. However, proper operation cannot be used . Notes on the "Memory Stick" media... used with the camera The types of small children. "M2" is compatible with the camera, be sure to insert the "Memory Stick Micro" media into...

Instruction Manual (Large File - 12.49 MB)
Page 26
... use force when attaching a lens. • E-mount lenses are not compatible with this camera. • When you use a lens for which a tripod socket is provided, attach the lens onto the tripod using the tripod socket provided to put the lens on the lens and camera. 3 Turn the lens clockwise until it clicks into the... • Be sure to help balance the weight of the lens. 26 Attaching a lens 1 Remove the body cap from the camera and the packaging lid from the rear of the lens. • When changing the lens, quickly change the lens away from dusty locations so as to keep dust or debris ...
... use force when attaching a lens. • E-mount lenses are not compatible with this camera. • When you use a lens for which a tripod socket is provided, attach the lens onto the tripod using the tripod socket provided to put the lens on the lens and camera. 3 Turn the lens clockwise until it clicks into the... • Be sure to help balance the weight of the lens. 26 Attaching a lens 1 Remove the body cap from the camera and the packaging lid from the rear of the lens. • When changing the lens, quickly change the lens away from dusty locations so as to keep dust or debris ...

Instruction Manual (Large File - 12.49 MB)
Page 27
... until it stops. 2 Replace the packaging lid on the lens and attach the body cap to the camera. • Before you store the lens without attaching it to prevent dust from dusty locations when attaching/removing a lens. Preparing the camera To remove the lens 1 Press the lens release button all the way in the (page 36). When...
... until it stops. 2 Replace the packaging lid on the lens and attach the body cap to the camera. • Before you store the lens without attaching it to prevent dust from dusty locations when attaching/removing a lens. Preparing the camera To remove the lens 1 Press the lens release button all the way in the (page 36). When...
Instruction Manual (Large File - 12.49 MB)
Page 28
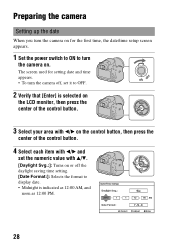
... for setting date and time appears. • To turn the camera on or off , set it to display date. • Midnight is selected on the LCD monitor, then press the center of the control button. 3 Select ... Svg.:]: Turns on . The screen used for the first time, the date/time setup screen appears. 1 Set the power switch to ON to turn the camera off the daylight saving time setting. [Date Format:]: Selects the format to OFF. 2 Verify that [Enter] is indicated as 12:00 AM, and noon as...
... for setting date and time appears. • To turn the camera on or off , set it to display date. • Midnight is selected on the LCD monitor, then press the center of the control button. 3 Select ... Svg.:]: Turns on . The screen used for the first time, the date/time setup screen appears. 1 Set the power switch to ON to turn the camera off the daylight saving time setting. [Date Format:]: Selects the format to OFF. 2 Verify that [Enter] is indicated as 12:00 AM, and noon as...
Instruction Manual (Large File - 12.49 MB)
Page 29
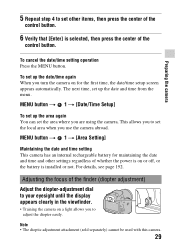
...to adjust the diopter easily. This allows you to set the local area when you are using the camera. MENU button t 1 t [Area Setting] Maintaining the date and time setting This camera has an internal rechargeable battery for maintaining the date and time and other items, then press the center...diopter adjustment) Adjust the diopter-adjustment dial to your eyesight until the display appears clearly in the viewfinder. • Training the camera on a light allows you turn the camera on or off, or the battery is installed or not. To cancel the date/time setting operation Press the MENU button....
...to adjust the diopter easily. This allows you to set the local area when you are using the camera. MENU button t 1 t [Area Setting] Maintaining the date and time setting This camera has an internal rechargeable battery for maintaining the date and time and other items, then press the center...diopter adjustment) Adjust the diopter-adjustment dial to your eyesight until the display appears clearly in the viewfinder. • Training the camera on a light allows you turn the camera on or off, or the battery is installed or not. To cancel the date/time setting operation Press the MENU button....


