
Instruction Manual (Large File - 12.49 MB)
Page 9
... 13 Identifying parts 14 Charging the battery pack 18 Inserting the battery pack/memory card (sold separately) 20 Attaching a lens 26 Preparing the camera 28 Using the accessories supplied 30 Checking the number of recordable images 32 Cleaning 35 Screen indicators 39 Switching the screen mode between the LCD monitor and the...
... 13 Identifying parts 14 Charging the battery pack 18 Inserting the battery pack/memory card (sold separately) 20 Attaching a lens 26 Preparing the camera 28 Using the accessories supplied 30 Checking the number of recordable images 32 Cleaning 35 Screen indicators 39 Switching the screen mode between the LCD monitor and the...

Instruction Manual (Large File - 12.49 MB)
Page 13
Preparing the camera Preparing the camera Checking the accessories supplied The number in parentheses indicates the number of pieces. • BC-VW1 Battery charger (1) • Power cord (mains lead) (1) (not supplied in the U.S.A. and Canada) • Eyecup (1) (Attached on the camera) • CD-ROM (Application Software for α camera) (1) • Instruction Manual (This manual) (1) • Rechargeable battery pack NPFW50 (1) • USB cable (1) • Shoulder strap (1) • Body cap (1) (Attached on the camera) 13
Preparing the camera Preparing the camera Checking the accessories supplied The number in parentheses indicates the number of pieces. • BC-VW1 Battery charger (1) • Power cord (mains lead) (1) (not supplied in the U.S.A. and Canada) • Eyecup (1) (Attached on the camera) • CD-ROM (Application Software for α camera) (1) • Instruction Manual (This manual) (1) • Rechargeable battery pack NPFW50 (1) • USB cable (1) • Shoulder strap (1) • Body cap (1) (Attached on the camera) 13

Instruction Manual (Large File - 12.49 MB)
Page 15
Rear side Preparing the camera A Microphone** B Auto-lock Accessory shoe (99) C MENU button (49) D Viewfinder* (39) E Eyepiece sensors (39) F Diopter-adjustment dial (29) G LCD monitor (42, 121, 127) H Light sensor (153) I (Playback) button (121) J...sensor position mark (87) P D-RANGE (Dynamic range) button (107) Q For shooting: AEL (AE lock) button (78, 100) For viewing: (Zoom in) button (124) R For shooting: button (101) For viewing: button (124)/ button (125) (Exposure) (Zoom out) (Image index) S For shooting: Fn (Function) button (47, 48) For viewing: (Image rotation) button (123) 15
Rear side Preparing the camera A Microphone** B Auto-lock Accessory shoe (99) C MENU button (49) D Viewfinder* (39) E Eyepiece sensors (39) F Diopter-adjustment dial (29) G LCD monitor (42, 121, 127) H Light sensor (153) I (Playback) button (121) J...sensor position mark (87) P D-RANGE (Dynamic range) button (107) Q For shooting: AEL (AE lock) button (78, 100) For viewing: (Zoom in) button (124) R For shooting: button (101) For viewing: button (124)/ button (125) (Exposure) (Zoom out) (Image index) S For shooting: Fn (Function) button (47, 48) For viewing: (Image rotation) button (123) 15

Instruction Manual (Large File - 12.49 MB)
Page 30
The other accessories are described in the following pages. • Rechargeable battery pack (page 18) • Battery charger (page 18) • Power cord (mains lead) (not supplied in the U.S.A. and Canada) (page 18) • USB cable (page 165) • CD-ROM (page 161) Attaching the shoulder strap Attach both ends of the strap onto the camera. 30 Using the accessories supplied This section describes how to use the shoulder strap and eyecup.
The other accessories are described in the following pages. • Rechargeable battery pack (page 18) • Battery charger (page 18) • Power cord (mains lead) (not supplied in the U.S.A. and Canada) (page 18) • USB cable (page 165) • CD-ROM (page 161) Attaching the shoulder strap Attach both ends of the strap onto the camera. 30 Using the accessories supplied This section describes how to use the shoulder strap and eyecup.

Instruction Manual (Large File - 12.49 MB)
Page 97
...) Does not fire even the built-in flash pops up to the correct position and recorded images may block the light of the flash. lock Accessory shoe, the flash may not pop up . For details, refer to P, A, S, M, the [Flash Off] or [Autoflash] items cannot be selected. Notes •...grabbing the flash emitter. • Shooting conditions required to shoot a brighter image of people and backgrounds. • You can shoot with the flash. Remove the lens hood when using the flash. • When using the flash, shoot the subject at a distance of 1 m (3.3 feet) or greater. • When shooting...
...) Does not fire even the built-in flash pops up to the correct position and recorded images may block the light of the flash. lock Accessory shoe, the flash may not pop up . For details, refer to P, A, S, M, the [Flash Off] or [Autoflash] items cannot be selected. Notes •...grabbing the flash emitter. • Shooting conditions required to shoot a brighter image of people and backgrounds. • You can shoot with the flash. Remove the lens hood when using the flash. • When using the flash, shoot the subject at a distance of 1 m (3.3 feet) or greater. • When shooting...
Instruction Manual (Large File - 12.49 MB)
Page 99
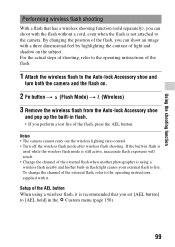
... flash to fire. For the actual steps of shooting, refer to the operating instructions of the flash. 1 Attach the wireless flash to the Auto-lock Accessory shoe and turn both the camera and the flash on the subject. If the built-in flash is used while the wireless flash mode is... the AEL button. By changing the position of light and shadow on . 2 Fn button t (Flash Mode) t (Wireless) 3 Remove the wireless flash from the Auto-lock Accessory shoe and pop up the built-in flash. • If you perform a test fire of the external flash, refer to the operating instructions supplied with...
... flash to fire. For the actual steps of shooting, refer to the operating instructions of the flash. 1 Attach the wireless flash to the Auto-lock Accessory shoe and turn both the camera and the flash on the subject. If the built-in flash is used while the wireless flash mode is... the AEL button. By changing the position of light and shadow on . 2 Fn button t (Flash Mode) t (Wireless) 3 Remove the wireless flash from the Auto-lock Accessory shoe and pop up the built-in flash. • If you perform a test fire of the external flash, refer to the operating instructions supplied with...

Instruction Manual (Large File - 12.49 MB)
Page 194
If such a problem occurs, consult a doctor immediately. 194 A memory card, etc., may cause dirt on the flash surface to become discolored or to stick to the flash surface, resulting in insufficient light emission. • Keep the camera, supplied accessories, etc., out of the reach of flash emission may be swallowed. • Clean the flash surface before use. The heat of children.
If such a problem occurs, consult a doctor immediately. 194 A memory card, etc., may cause dirt on the flash surface to become discolored or to stick to the flash surface, resulting in insufficient light emission. • Keep the camera, supplied accessories, etc., out of the reach of flash emission may be swallowed. • Clean the flash surface before use. The heat of children.