Operating Instructions
Page 3
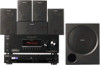
...incorporates Dolby* Digital and Pro Logic Surround and the DTS** Digital Surround System. * Manufactured under license from Dolby Laboratories. About This Manual • The instructions in this manual describe the controls on the remote. Center speaker SS-CNP900 - Sub woofer SA-WP780 • The ...-MSP7000 - You can also use the controls on the receiver if they have the same or similar names as those on the supplied remote. This receiver incorporates High-Definition Multimedia Interface (HDMITM) technology. Note for model HT-7100DH. About area codes The area code of...
...incorporates Dolby* Digital and Pro Logic Surround and the DTS** Digital Surround System. * Manufactured under license from Dolby Laboratories. About This Manual • The instructions in this manual describe the controls on the remote. Center speaker SS-CNP900 - Sub woofer SA-WP780 • The ...-MSP7000 - You can also use the controls on the receiver if they have the same or similar names as those on the supplied remote. This receiver incorporates High-Definition Multimedia Interface (HDMITM) technology. Note for model HT-7100DH. About area codes The area code of...
Operating Instructions
Page 10
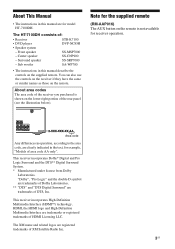
...AV ?/1 ? / 1 SYSTEM STANDBY VIDEO 1 VIDEO 2 VIDEO 3 DVD SAT TV SA-CD/CD TUNER 1 2 3 AUX DMPORT RECEIVER 4 2CH A.F.D. ql qk qj f O RETURN/ EXIT MENU OPTIONS TOOLS - F ANTENNA section FM ANTENNA jack Connects to control non-Sony audio/video components. XM terminal Connects to... the AM loop antenna supplied with this receiver (page 26). For details, see "Programming the remote" (page 70). MOVIE MUSIC 5 wg CATEGORY SLEEP MODE D.TUNING AUTO...
...AV ?/1 ? / 1 SYSTEM STANDBY VIDEO 1 VIDEO 2 VIDEO 3 DVD SAT TV SA-CD/CD TUNER 1 2 3 AUX DMPORT RECEIVER 4 2CH A.F.D. ql qk qj f O RETURN/ EXIT MENU OPTIONS TOOLS - F ANTENNA section FM ANTENNA jack Connects to control non-Sony audio/video components. XM terminal Connects to... the AM loop antenna supplied with this receiver (page 26). For details, see "Programming the remote" (page 70). MOVIE MUSIC 5 wg CATEGORY SLEEP MODE D.TUNING AUTO...
Operating Instructions
Page 11
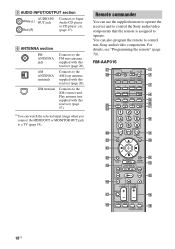
... programmed to operate. MOVIE F D. TUNING Press to buttons - J DISPLAY Press to select information displayed on page 70. You can program the remote to control non-Sony components following the steps in tuner AUX Not assigned DMPORT DIGITAL MEDIA PORT adapter Press to activate the receiver operation (page 33). H Numeric Press the .... To turn off , press TV (Z) and then press AV ?/1. G AUTO CAL Press to preset stations. (number 5a)) - When you press ?/1 (B) at the same time (SYSTEM STANDBY). mode. To turn off the receiver and other components (SYSTEM STANDBY).
... programmed to operate. MOVIE F D. TUNING Press to buttons - J DISPLAY Press to select information displayed on page 70. You can program the remote to control non-Sony components following the steps in tuner AUX Not assigned DMPORT DIGITAL MEDIA PORT adapter Press to activate the receiver operation (page 33). H Numeric Press the .... To turn off , press TV (Z) and then press AV ?/1. G AUTO CAL Press to preset stations. (number 5a)) - When you press ?/1 (B) at the same time (SYSTEM STANDBY). mode. To turn off the receiver and other components (SYSTEM STANDBY).
Operating Instructions
Page 21
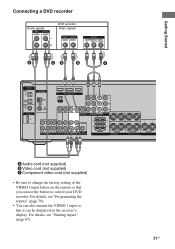
... FRONT B R FRONT A SPEAKERS L R SURROUND CENTER A Audio cord (not supplied) B Video cord (not supplied) C Component video cord (not supplied) • Be sure to control your DVD recorder. For details, see "Programming the remote" (page 70). • You can also rename the VIDEO 1 input so that it can be displayed on... the remote so that you can use the button to change the factory setting of...
... FRONT B R FRONT A SPEAKERS L R SURROUND CENTER A Audio cord (not supplied) B Video cord (not supplied) C Component video cord (not supplied) • Be sure to control your DVD recorder. For details, see "Programming the remote" (page 70). • You can also rename the VIDEO 1 input so that it can be displayed on... the remote so that you can use the button to change the factory setting of...
Operating Instructions
Page 23
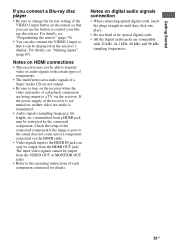
... output to a TV via the HDMI cable. • Video signals input to the HDMI IN jack can use the button to control your bluray disc player. For details, see "Programming the remote" (page 70). • You can also rename the VIDEO 2 input so that you can only be able to transfer video.... Notes on HDMI connections • This receiver may be output from the HDMI OUT jack. The input video signals cannot be restricted by the connected component. Getting Started If you connect a Blu-ray disc player • Be sure to change the factory setting of each...
... output to a TV via the HDMI cable. • Video signals input to the HDMI IN jack can use the button to control your bluray disc player. For details, see "Programming the remote" (page 70). • You can also rename the VIDEO 2 input so that you can only be able to transfer video.... Notes on HDMI connections • This receiver may be output from the HDMI OUT jack. The input video signals cannot be restricted by the connected component. Getting Started If you connect a Blu-ray disc player • Be sure to change the factory setting of each...

Operating Instructions
Page 70
...information on pages 71-74 for the component you can program the remote to control nonSony components by changing the code. Note that the remote can use those components as part of the numeric code correspond... code (or one of the codes if more than one code exists) for Sony components that accept infrared wireless control signals. 1 Press RM SET UP. For details, see page 73. 4 Press...component and the maker of the component (the first digit and the last two digits of your system. Once the numeric code has been verified, the RM SET UP indicator slowly flashes twice and the remote...
...information on pages 71-74 for the component you can program the remote to control nonSony components by changing the code. Note that the remote can use those components as part of the numeric code correspond... code (or one of the codes if more than one code exists) for Sony components that accept infrared wireless control signals. 1 Press RM SET UP. For details, see page 73. 4 Press...component and the maker of the component (the first digit and the last two digits of your system. Once the numeric code has been verified, the RM SET UP indicator slowly flashes twice and the remote...
Operating Instructions
Page 71
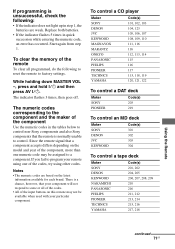
.... • If the indicator flashes 5 times in the tables below to control non-Sony components and also Sony components that the remote is normally unable to control. Notes • The numeric codes are weak. The numeric codes corresponding to the component and the maker of the component Use the numeric codes in quick succession while entering the numeric code...
.... • If the indicator flashes 5 times in the tables below to control non-Sony components and also Sony components that the remote is normally unable to control. Notes • The numeric codes are weak. The numeric codes corresponding to the component and the maker of the component Use the numeric codes in quick succession while entering the numeric code...
Operating Instructions
Page 80
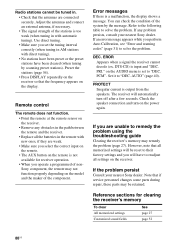
...Remote control The remote does not function. • Point the remote at the remote sensor on the remote is set the tuning interval correctly (when tuning in the path between the remote and the receiver. • Replace all memorized settings will be reset to their factory settings and you operate a programmed of the system... the remote. • The AUX button on the receiver. • Remove any problem persists, consult your nearest Sony dealer....antenna, if necessary. • The signal strength of the component. Error messages If there is output from the speakers. Use...
...Remote control The remote does not function. • Point the remote at the remote sensor on the remote is set the tuning interval correctly (when tuning in the path between the remote and the receiver. • Replace all memorized settings will be reset to their factory settings and you operate a programmed of the system... the remote. • The AUX button on the receiver. • Remove any problem persists, consult your nearest Sony dealer....antenna, if necessary. • The signal strength of the component. Error messages If there is output from the speakers. Use...

Operating Instructions
Page 82
...× 157.5 × 316 mm (17 × 6 1/4 × 12 1/2 inches) including projecting parts and controls Mass (Approx.) 8.0 kg (17 lb 11 oz) Speaker section • Front speakers (SS-MSP7000) • Center ... With 6 ohm loads, from 250 milliwatts to change without notice. Speaker system Active subwoofer, magnetically shielded Speaker unit 200 mm cone type Enclosure type Acoustically...• Sub woofer (4) Remote commander RM-AAP016 (1) R6 (size-AA) batteries (2) Optimizer microphone (ECM-AC2 or ECM-AC2a) (1) For details on the area code of the component you are subject to rated...
...× 157.5 × 316 mm (17 × 6 1/4 × 12 1/2 inches) including projecting parts and controls Mass (Approx.) 8.0 kg (17 lb 11 oz) Speaker section • Front speakers (SS-MSP7000) • Center ... With 6 ohm loads, from 250 milliwatts to change without notice. Speaker system Active subwoofer, magnetically shielded Speaker unit 200 mm cone type Enclosure type Acoustically...• Sub woofer (4) Remote commander RM-AAP016 (1) R6 (size-AA) batteries (2) Optimizer microphone (ECM-AC2 or ECM-AC2a) (1) For details on the area code of the component you are subject to rated...


