Reference Guide
Page 8
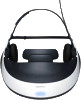
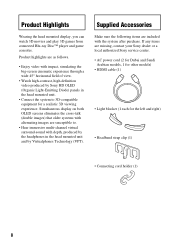
...the following items are as follows. • Enjoy video with the system after purchase. Product Highlights Wearing the head mounted display, you can watch 3D movies and play 3D games from connected Blu-ray Disc™ player and game consoles. Product highlights are included with impact, simulating...; horizontal field of view. • Watch high-contrast, high-definition video produced by Sony HD OLED (Organic Light-Emitting Diode) panels in the head mounted unit and by the headphones in the head mounted unit. • Connect the system to . • Hear immersive multi-channel virtual ...
...the following items are as follows. • Enjoy video with the system after purchase. Product Highlights Wearing the head mounted display, you can watch 3D movies and play 3D games from connected Blu-ray Disc™ player and game consoles. Product highlights are included with impact, simulating...; horizontal field of view. • Watch high-contrast, high-definition video produced by Sony HD OLED (Organic Light-Emitting Diode) panels in the head mounted unit and by the headphones in the head mounted unit. • Connect the system to . • Hear immersive multi-channel virtual ...

Reference Guide
Page 17
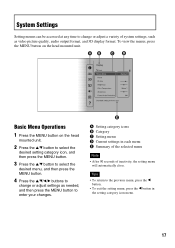
... • After 90 seconds of system settings, such as video picture quality, audio output format, and 3D display format. To view the menus, press the MENU button on the head mounted unit. 2 Press the v/V button to select the desired setting category icon, and then press the MENU...buttons to change or adjust a variety of inactivity, the setting menu will automatically close. Basic Menu Operations 1 Press the MENU button on the head mounted unit. A Setting category icons B Category C Setting menu D Current settings in the setting category icon menu. 17 Tips • To return to ...
... • After 90 seconds of system settings, such as video picture quality, audio output format, and 3D display format. To view the menus, press the MENU button on the head mounted unit. 2 Press the v/V button to select the desired setting category icon, and then press the MENU...buttons to change or adjust a variety of inactivity, the setting menu will automatically close. Basic Menu Operations 1 Press the MENU button on the head mounted unit. A Setting category icons B Category C Setting menu D Current settings in the setting category icon menu. 17 Tips • To return to ...

Reference Guide
Page 25
...accessing "Lens span adjustment" in "3D Settings"), change the HDMI video output mode to 1080i video mode. p Make sure to disable video output with a soft dry cloth to the instruction manual of the head mounted unit are wearing the head mounted unit correctly. If this case, try... connecting the equipment directly to the processor unit instead. p If equipment is connected to the processor unit via an AV amplifier (receiver), try a new cable. Perform adjustment again by -Side" in "3D Display"...
...accessing "Lens span adjustment" in "3D Settings"), change the HDMI video output mode to 1080i video mode. p Make sure to disable video output with a soft dry cloth to the instruction manual of the head mounted unit are wearing the head mounted unit correctly. If this case, try... connecting the equipment directly to the processor unit instead. p If equipment is connected to the processor unit via an AV amplifier (receiver), try a new cable. Perform adjustment again by -Side" in "3D Display"...

Reference Guide
Page 26
...time Some pixels on the screens are not lit, or some operation on top and bottom, the 3D display format setting may be permanently black or lit in the head mounted unit detects that you clear the message and continue watching, the system will automatically go off. Try... changing the "3D Display" setting in "3D Settings" to "On" (page 19). p 3D perception varies by side or on the head mounted unit or the connected equipment directly. p Also check the settings of continuous viewing, the system will display a warning screen and go off after another ...
...time Some pixels on the screens are not lit, or some operation on top and bottom, the 3D display format setting may be permanently black or lit in the head mounted unit detects that you clear the message and continue watching, the system will automatically go off. Try... changing the "3D Display" setting in "3D Settings" to "On" (page 19). p 3D perception varies by side or on the head mounted unit or the connected equipment directly. p Also check the settings of continuous viewing, the system will display a warning screen and go off after another ...

Startup Guide
Page 8
... field of view. • Watch high-contrast, high-definition video produced by Sony HD OLED (Organic Light-Emitting Diode) panels in the head mounted unit and by Virtualphones Technology (VPT). Product Highlights Wearing the head mounted display, you can watch 3D movies and play 3D games from connected Blu-ray Disc™ player and game consoles. Product highlights...
... field of view. • Watch high-contrast, high-definition video produced by Sony HD OLED (Organic Light-Emitting Diode) panels in the head mounted unit and by Virtualphones Technology (VPT). Product Highlights Wearing the head mounted display, you can watch 3D movies and play 3D games from connected Blu-ray Disc™ player and game consoles. Product highlights...
Startup Guide
Page 17
To view the menus, press the MENU button on the head mounted unit. 2 Press the v/V button to select the desired setting category icon, and then press the MENU button. 3 Press the v/V button to select the desired menu, ... of system settings, such as needed, and then press the MENU button to enter your changes. Basic Menu Operations 1 Press the MENU button on the head mounted unit. System Settings Setting menus can be accessed at any time to change or adjust settings as video picture quality, audio output format, and...
To view the menus, press the MENU button on the head mounted unit. 2 Press the v/V button to select the desired setting category icon, and then press the MENU button. 3 Press the v/V button to select the desired menu, ... of system settings, such as needed, and then press the MENU button to enter your changes. Basic Menu Operations 1 Press the MENU button on the head mounted unit. System Settings Setting menus can be accessed at any time to change or adjust settings as video picture quality, audio output format, and...

Startup Guide
Page 25
...power cord, HDMI cable, and connecting cord of the head mounted unit are connected correctly, and that the AC power cord, HDMI cable, and connecting cord of this system or the cable and TV in . Perform adjustment again by -Side" in "3D Display" (in the setting menu (page 18). In ... new cable. p Make sure that the source signal is on supported signals, see "Supported HDMI input and output signals:" in the head mounted unit are wearing the head mounted unit correctly. p Confirm that equipment connected to the HDMI IN jack on the selector is fully plugged in use, there may be ...
...power cord, HDMI cable, and connecting cord of the head mounted unit are connected correctly, and that the AC power cord, HDMI cable, and connecting cord of this system or the cable and TV in . Perform adjustment again by -Side" in "3D Display" (in the setting menu (page 18). In ... new cable. p Make sure that the source signal is on supported signals, see "Supported HDMI input and output signals:" in the head mounted unit are wearing the head mounted unit correctly. p Confirm that equipment connected to the HDMI IN jack on the selector is fully plugged in use, there may be ...
Startup Guide
Page 26
..., perform some cases pixels may be incorrect. p 3D perception varies by -Side" (page 19). 26 Try changing the "3D Display" setting in 3D requires anaglyphic glasses (with red and blue lenses, for 3D playback. p Viewing anaglyphic images in "3D Settings" (page 19). For details, see "Power off . p Wear the head mounted unit correctly. 10 seconds after another 3 hours...
..., perform some cases pixels may be incorrect. p 3D perception varies by -Side" (page 19). 26 Try changing the "3D Display" setting in 3D requires anaglyphic glasses (with red and blue lenses, for 3D playback. p Viewing anaglyphic images in "3D Settings" (page 19). For details, see "Power off . p Wear the head mounted unit correctly. 10 seconds after another 3 hours...
Marketing Specifications
Page 1
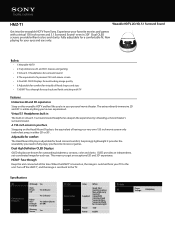
...experienced. HDMI® Pass-through for comfort The Head Mount Display is switched from Sony. Virtual 5.1 Headphones built in The built-in 3D!1 Dual OLED screens provide brilliant colors and clarity. When the HMZ-T1is turned on the Head Mount Display is the equivalent of a personal 150 inch movie...hours) Video Passthrough Function Yes (when Glasses are known for virtually all head shapes and sizes • 7.HDMI® Pass-through Keep the unit connected all the time. HMZ-T1 Wearable HDTV, 2D/3D, 5.1 Surround Sound Get into the wearable HDTV from your personal movie ...
...experienced. HDMI® Pass-through for comfort The Head Mount Display is switched from Sony. Virtual 5.1 Headphones built in The built-in 3D!1 Dual OLED screens provide brilliant colors and clarity. When the HMZ-T1is turned on the Head Mount Display is the equivalent of a personal 150 inch movie...hours) Video Passthrough Function Yes (when Glasses are known for virtually all head shapes and sizes • 7.HDMI® Pass-through Keep the unit connected all the time. HMZ-T1 Wearable HDTV, 2D/3D, 5.1 Surround Sound Get into the wearable HDTV from your personal movie ...


