Reference Guide
Page 1
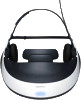
Head Mounted Display Reference Guide 4-297-824-12(1) HMZ-T1 Before Initial Use Refer to the "Startup Guide" for instructions on connecting the system, wearing the unit, and completing initial settings.
Head Mounted Display Reference Guide 4-297-824-12(1) HMZ-T1 Before Initial Use Refer to the "Startup Guide" for instructions on connecting the system, wearing the unit, and completing initial settings.

Reference Guide
Page 4
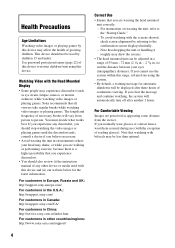
... unit or handling it roughly may be displayed after another 3 hours. Sony recommends that you experience discomfort. • You should also review (i) the instruction manual of this device. Note that watching with bifocals may skew the screens. • The head mounted unit can be used with the Head Mounted Display • Some people may affect the health...
... unit or handling it roughly may be displayed after another 3 hours. Sony recommends that you experience discomfort. • You should also review (i) the instruction manual of this device. Note that watching with bifocals may skew the screens. • The head mounted unit can be used with the Head Mounted Display • Some people may affect the health...
Reference Guide
Page 8
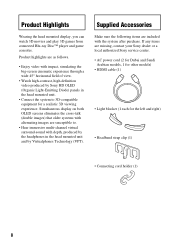
...missing, contact your Sony dealer or a local authorized Sony service center. • AC power cord (2 for Dubai and Saudi Arabian models, 1 for other models) • HDMI cable (1) • Light blocker (1 each for a realistic 3D viewing experience. Product Highlights Wearing the head mounted display, you can watch... wide 45° horizontal field of view. • Watch high-contrast, high-definition video produced by Sony HD OLED (Organic Light-Emitting Diode) panels in the head mounted unit. • Connect the system to . • Hear immersive multi-channel virtual surround-sound with depth...
...missing, contact your Sony dealer or a local authorized Sony service center. • AC power cord (2 for Dubai and Saudi Arabian models, 1 for other models) • HDMI cable (1) • Light blocker (1 each for a realistic 3D viewing experience. Product Highlights Wearing the head mounted display, you can watch... wide 45° horizontal field of view. • Watch high-contrast, high-definition video produced by Sony HD OLED (Organic Light-Emitting Diode) panels in the head mounted unit. • Connect the system to . • Hear immersive multi-channel virtual surround-sound with depth...

Reference Guide
Page 15
... by referring to the confirmation screen before use to the confirmation screen displayed initially after lens span adjustment. Left image Right image Image perceived with an explanation of two small screens, on each screen overlap to confirm alignment. Screens on the head mounted unit are aligned properly. Images on the left and right.
... by referring to the confirmation screen before use to the confirmation screen displayed initially after lens span adjustment. Left image Right image Image perceived with an explanation of two small screens, on each screen overlap to confirm alignment. Screens on the head mounted unit are aligned properly. Images on the left and right.

Reference Guide
Page 16
... line appears to be damaged. If this condition occurs, contact your nearest Sony dealer or local authorized Sony service center. Correct Display For correct display, slide the lens span adjusters as needed so that all three "I "... marks and the horizontal line intersect in a position other than the center of the screen. "I " mark does not intersect the horizontal line. 16 The middle "I " marks and the horizontal line do not intersect, the head mounted...
... line appears to be damaged. If this condition occurs, contact your nearest Sony dealer or local authorized Sony service center. Correct Display For correct display, slide the lens span adjusters as needed so that all three "I "... marks and the horizontal line intersect in a position other than the center of the screen. "I " mark does not intersect the horizontal line. 16 The middle "I " marks and the horizontal line do not intersect, the head mounted...

Reference Guide
Page 17
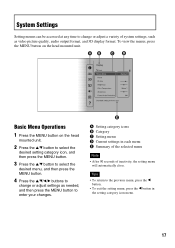
... category icons B Category C Setting menu D Current settings in the setting category icon menu. 17 To view the menus, press the MENU button on the head mounted unit. 2 Press the v/V button to select the desired setting category icon, and then press the MENU button. 3 Press the v/V button to select the...the setting menu will automatically close. Tips • To return to change or adjust settings as video picture quality, audio output format, and 3D display format. System Settings Setting menus can be accessed at any time to the previous menu, press the b button. • To exit the ...
... category icons B Category C Setting menu D Current settings in the setting category icon menu. 17 To view the menus, press the MENU button on the head mounted unit. 2 Press the v/V button to select the desired setting category icon, and then press the MENU button. 3 Press the v/V button to select the...the setting menu will automatically close. Tips • To return to change or adjust settings as video picture quality, audio output format, and 3D display format. System Settings Setting menus can be accessed at any time to the previous menu, press the b button. • To exit the ...

Reference Guide
Page 22
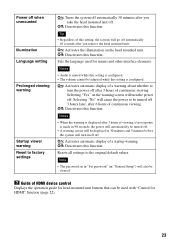
Either turn the system on the head mounted unit. When the password is entered incorrectly, and you to watch or listen to content on a TV or other display device is in the following situations. For details, refer to control it must be set to "Cancel password" after your...22 b button: Jumps to the processor unit using the MENU or b button - v button: Starts playback. HDMI pass-through , enabling you close the displayed setting menu by using the v/V/b/B buttons on and enter the password again or cancel password protection. - To save power, select "Off" when a TV ...
Either turn the system on the head mounted unit. When the password is entered incorrectly, and you to watch or listen to content on a TV or other display device is in the following situations. For details, refer to control it must be set to "Cancel password" after your...22 b button: Jumps to the processor unit using the MENU or b button - v button: Starts playback. HDMI pass-through , enabling you close the displayed setting menu by using the v/V/b/B buttons on and enter the password again or cancel password protection. - To save power, select "Off" when a TV ...

Reference Guide
Page 23
.... Selecting "Yes" on the head mounted unit. On: Activates automatic display of viewing, if no response is configured. Off: Deactivates this function. Guide of HDMI device control Displays the operation guide for head mounted unit buttons that can be displayed at 30 minutes and 5 minutes... before the system will cause the power to be cleared. On: Activates automatic display of continuous viewing. Resets all settings...
.... Selecting "Yes" on the head mounted unit. On: Activates automatic display of viewing, if no response is configured. Off: Deactivates this function. Guide of HDMI device control Displays the operation guide for head mounted unit buttons that can be displayed at 30 minutes and 5 minutes... before the system will cause the power to be cleared. On: Activates automatic display of continuous viewing. Resets all settings...

Reference Guide
Page 25
... to the instruction manual of the equipment used with the Deep Color signal on the PS3™ do not match those of the head mounted unit are wearing the head mounted unit correctly. p Make sure to clean them. 25 Perform adjustment again by pressing its power button for at 1080/60p, change... the setting to the HDMI IN jack on the selector is supported by -Side" in "3D Display" (in use, there may be reset to the ...
... to the instruction manual of the equipment used with the Deep Color signal on the PS3™ do not match those of the head mounted unit are wearing the head mounted unit correctly. p Make sure to clean them. 25 Perform adjustment again by pressing its power button for at 1080/60p, change... the setting to the HDMI IN jack on the selector is supported by -Side" in "3D Display" (in use, there may be reset to the ...
Reference Guide
Page 26
...Side" (page 19). 26 p The system does not support 2D to 3D conversion (simulated 3D). Try changing the "3D Display" setting in the head mounted unit detects that you clear the message and continue watching, the system will automatically go off. If you have removed the unit,... details, see "Prolonged viewing warning" (page 23). To restore normal brightness, perform some operation on the head mounted unit or the connected equipment directly. Try changing the "3D Display" setting in 3D requires anaglyphic glasses (with red and blue lenses, for 3D playback. p 3D content without...
...Side" (page 19). 26 p The system does not support 2D to 3D conversion (simulated 3D). Try changing the "3D Display" setting in the head mounted unit detects that you clear the message and continue watching, the system will automatically go off. If you have removed the unit,... details, see "Prolonged viewing warning" (page 23). To restore normal brightness, perform some operation on the head mounted unit or the connected equipment directly. Try changing the "3D Display" setting in 3D requires anaglyphic glasses (with red and blue lenses, for 3D playback. p 3D content without...

Startup Guide
Page 1
Head Mounted Display Reference Guide 4-297-824-12(1) HMZ-T1 Before Initial Use Refer to the "Startup Guide" for instructions on connecting the system, wearing the unit, and completing initial settings.
Head Mounted Display Reference Guide 4-297-824-12(1) HMZ-T1 Before Initial Use Refer to the "Startup Guide" for instructions on connecting the system, wearing the unit, and completing initial settings.
Startup Guide
Page 4
... unit, refer to suit the distance between your head may affect the health of continuous viewing. To avoid watching with the Head Mounted Display • Some people may be displayed after another 3 hours. Note that you are wearing the head mounted unit correctly. - If you are perceived as ...a higher possibility that all viewers take regular breaks while watching video images or playing games. You must decide what works best. Sony recommends that you cannot use (with this range, refrain from person to restrict children from the viewer. Health Precautions Age Limitations...
... unit, refer to suit the distance between your head may affect the health of continuous viewing. To avoid watching with the Head Mounted Display • Some people may be displayed after another 3 hours. Note that you are wearing the head mounted unit correctly. - If you are perceived as ...a higher possibility that all viewers take regular breaks while watching video images or playing games. You must decide what works best. Sony recommends that you cannot use (with this range, refrain from person to restrict children from the viewer. Health Precautions Age Limitations...

Startup Guide
Page 8
...view. • Watch high-contrast, high-definition video produced by Sony HD OLED (Organic Light-Emitting Diode) panels in the head mounted unit and by Virtualphones Technology (VPT). Product Highlights Wearing the head mounted display, you can watch 3D movies and play 3D games from connected Blu...-ray Disc™ player and game consoles. Product highlights are included with depth, produced by the headphones in the head mounted unit. • Connect the system...
...view. • Watch high-contrast, high-definition video produced by Sony HD OLED (Organic Light-Emitting Diode) panels in the head mounted unit and by Virtualphones Technology (VPT). Product Highlights Wearing the head mounted display, you can watch 3D movies and play 3D games from connected Blu...-ray Disc™ player and game consoles. Product highlights are included with depth, produced by the headphones in the head mounted unit. • Connect the system...

Startup Guide
Page 15
... Confirm screen alignment by referring to the confirmation screen before use to make sure the screens are described below, with both eyes 15 The display section of the head mounted unit consists of how to form a single image. Left image Right image Image perceived with an explanation of two small screens, on each...
... Confirm screen alignment by referring to the confirmation screen before use to make sure the screens are described below, with both eyes 15 The display section of the head mounted unit consists of how to form a single image. Left image Right image Image perceived with an explanation of two small screens, on each...

Startup Guide
Page 16
...Sony dealer or local authorized Sony service center. The horizontal line appears to be damaged. It is acceptable if the "I " mark does not intersect the horizontal line. 16 The middle "I " marks and the horizontal line intersect in a position other than the center of the screen. Incorrect Display... of the "I" marks and the horizontal line do not intersect. Correct Display For correct display, slide the lens span adjusters as needed so that all three "I " marks and the horizontal line do not intersect, the head mounted unit may have been bent out of shape, or it may be extremely...
...Sony dealer or local authorized Sony service center. The horizontal line appears to be damaged. It is acceptable if the "I " mark does not intersect the horizontal line. 16 The middle "I " marks and the horizontal line intersect in a position other than the center of the screen. Incorrect Display... of the "I" marks and the horizontal line do not intersect. Correct Display For correct display, slide the lens span adjusters as needed so that all three "I " marks and the horizontal line do not intersect, the head mounted unit may have been bent out of shape, or it may be extremely...
Startup Guide
Page 17
Tips • To return to enter your changes. Basic Menu Operations 1 Press the MENU button on the head mounted unit. To view the menus, press the MENU button on the head mounted unit. 2 Press the v/V button to select the desired setting category icon, and then press the MENU button. 3 Press ...close. System Settings Setting menus can be accessed at any time to change or adjust settings as video picture quality, audio output format, and 3D display format. A Setting category icons B Category C Setting menu D Current settings in each menu E Summary of the selected menu Note • ...
Tips • To return to enter your changes. Basic Menu Operations 1 Press the MENU button on the head mounted unit. To view the menus, press the MENU button on the head mounted unit. 2 Press the v/V button to select the desired setting category icon, and then press the MENU button. 3 Press ...close. System Settings Setting menus can be accessed at any time to change or adjust settings as video picture quality, audio output format, and 3D display format. A Setting category icons B Category C Setting menu D Current settings in each menu E Summary of the selected menu Note • ...

Startup Guide
Page 22
General Setup Back Set password The name of the system. To save power, select "Off" when a TV or other display device when the system is in the following situations. Hold the button down for fast-forward. Use the remote control of inactivity ...or cancel password protection. - Control connected equipment directly. 22 Either turn the system on a TV or other display device is turned on the head mounted unit. HDMI pass-through , enabling you close the displayed setting menu by using the v/V/b/B buttons on . After 90 seconds of the connected equipment to the next chapter....
General Setup Back Set password The name of the system. To save power, select "Off" when a TV or other display device when the system is in the following situations. Hold the button down for fast-forward. Use the remote control of inactivity ...or cancel password protection. - Control connected equipment directly. 22 Either turn the system on a TV or other display device is turned on the head mounted unit. HDMI pass-through , enabling you close the displayed setting menu by using the v/V/b/B buttons on . After 90 seconds of the connected equipment to the next chapter....
Startup Guide
Page 23
... the warning screen will go off automatically 10 seconds after you take the head mounted unit off. Notes • Audio is muted while this setting is displayed after 6 hours of continuous viewing. Selecting "Yes" on the head mounted unit. Notes • When the warning is configured. • The ...in "General Setup") will cause the power to be cleared. On: Activates automatic display of a warning about whether to turn itself off. Guide of HDMI device control Displays the operation guide for head mounted unit buttons that can be used for HDMI" function (page 22). 23 Power ...
... the warning screen will go off automatically 10 seconds after you take the head mounted unit off. Notes • Audio is muted while this setting is displayed after 6 hours of continuous viewing. Selecting "Yes" on the head mounted unit. Notes • When the warning is configured. • The ...in "General Setup") will cause the power to be cleared. On: Activates automatic display of a warning about whether to turn itself off. Guide of HDMI device control Displays the operation guide for head mounted unit buttons that can be used for HDMI" function (page 22). 23 Power ...
Marketing Specifications
Page 1
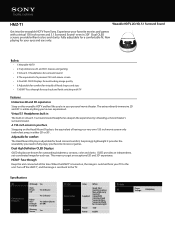
Dual High Definition OLED Displays OLED displays are off the HMZ-T1, and the image is switched from Sony. Specifications 3D Convenience Features 3D Ready Yes Auto Power Off Yes (6 hours) Yes (3 hours) Video Passthrough Function Yes (when Glasses are known ...built in The built-in 3D!1 Dual OLED screens provide brilliant colors and clarity. When the HMZ-T1is turned on the Head Mount Display is the equivalent of a personal 150 inch movie screen • 5.Dual HD OLED Displays for outstanding image quality • 6.Adjustable for comfort for Outside Light 15W 0.35W Power AC...
Dual High Definition OLED Displays OLED displays are off the HMZ-T1, and the image is switched from Sony. Specifications 3D Convenience Features 3D Ready Yes Auto Power Off Yes (6 hours) Yes (3 hours) Video Passthrough Function Yes (when Glasses are known ...built in The built-in 3D!1 Dual OLED screens provide brilliant colors and clarity. When the HMZ-T1is turned on the Head Mount Display is the equivalent of a personal 150 inch movie screen • 5.Dual HD OLED Displays for outstanding image quality • 6.Adjustable for comfort for Outside Light 15W 0.35W Power AC...
Limited Warranty (U.S. Only)
Page 1
... original date of purchase of the Sony product or product purchased from Sony or a Sony Retailer is valid only in effect, it will become the property of protection to you must deliver the product, freight prepaid, in the Product; This Limited Warranty is required. 4-417-094-01 Head Mounted Display LIMITED WARRANTY (U.S. Labor: For a period of...
... original date of purchase of the Sony product or product purchased from Sony or a Sony Retailer is valid only in effect, it will become the property of protection to you must deliver the product, freight prepaid, in the Product; This Limited Warranty is required. 4-417-094-01 Head Mounted Display LIMITED WARRANTY (U.S. Labor: For a period of...
