
Reference Guide
Page 2
... to the version of the FCC Rules. To prevent fire or shock hazard, do not expose this model manufactured for a Class B digital device, pursuant to Part 15 of this apparatus to provide reasonable protection against harmful interference in the U.S.A. NOTE: This equipment has been tested and found to comply with the...
... to the version of the FCC Rules. To prevent fire or shock hazard, do not expose this model manufactured for a Class B digital device, pursuant to Part 15 of this apparatus to provide reasonable protection against harmful interference in the U.S.A. NOTE: This equipment has been tested and found to comply with the...
Reference Guide
Page 5
... the system off . Extended Listening at High Volume Listening at excessive volume. Packaging Materials Keep the original box and protective cushioning for repair or other parts, forming droplets. Precautions Power Supply Position the system near the wall outlet used. Installation Environment Avoid installation in a cold room where the system is very...
... the system off . Extended Listening at High Volume Listening at excessive volume. Packaging Materials Keep the original box and protective cushioning for repair or other parts, forming droplets. Precautions Power Supply Position the system near the wall outlet used. Installation Environment Avoid installation in a cold room where the system is very...
Reference Guide
Page 7
Contents Health Precautions 4 Precautions 5 Product Highlights 8 Supplied Accessories 8 Parts and Controls 10 Fitting the Head Mounted Unit 12 Confirming Screen Alignment 15 System Settings 17 Troubleshooting 24 Specifications 30 License and Trademark Notice 31 7
Contents Health Precautions 4 Precautions 5 Product Highlights 8 Supplied Accessories 8 Parts and Controls 10 Fitting the Head Mounted Unit 12 Confirming Screen Alignment 15 System Settings 17 Troubleshooting 24 Specifications 30 License and Trademark Notice 31 7

Reference Guide
Page 10
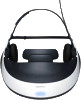
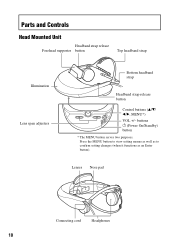
Press the MENU button to view setting menus as well as to confirm setting changes (when it functions as an Enter button). Lenses Nose pad Connecting cord Headphones 10 buttons 1 (Power On/Standby) button * The MENU button serves two purposes. Parts and Controls Head Mounted Unit Headband strap release Forehead supporter button Top headband strap Illumination Lens span adjusters Bottom headband strap Headband strap release button Control buttons (v/V/ b/B, MENU*) VOL +/-
Press the MENU button to view setting menus as well as to confirm setting changes (when it functions as an Enter button). Lenses Nose pad Connecting cord Headphones 10 buttons 1 (Power On/Standby) button * The MENU button serves two purposes. Parts and Controls Head Mounted Unit Headband strap release Forehead supporter button Top headband strap Illumination Lens span adjusters Bottom headband strap Headband strap release button Control buttons (v/V/ b/B, MENU*) VOL +/-
Reference Guide
Page 14
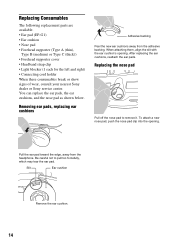
Replacing the nose pad Pull off the nose pad to pull too forcefully, which may tear the ear pad. Replacing Consumables The following replacement parts are available. • Ear pad (EP-G1) • Ear cushion • Nose pad • Forehead supporter (Type A (thin), Type B (medium) or Type...each for the left and right) • Connecting cord holder When these consumables break or show signs of wear, consult your nearest Sony dealer or Sony service center. After replacing the ear cushions, reattach the ear pads. Removing ear pads, replacing ear cushions Adhesive backing Peel the new...
Replacing the nose pad Pull off the nose pad to pull too forcefully, which may tear the ear pad. Replacing Consumables The following replacement parts are available. • Ear pad (EP-G1) • Ear cushion • Nose pad • Forehead supporter (Type A (thin), Type B (medium) or Type...each for the left and right) • Connecting cord holder When these consumables break or show signs of wear, consult your nearest Sony dealer or Sony service center. After replacing the ear cushions, reattach the ear pads. Removing ear pads, replacing ear cushions Adhesive backing Peel the new...
Startup Guide
Page 2
... as vases, on or pinched particularly at plugs, convenience receptacles, and the point where they exit from the apparatus. 11) Only use this apparatus to Part 15 of time. 14) Refer all instructions. 5) Do not use attachments/accessories specified by the manufacturer. 12) Use only with the cart, stand, tripod, bracket...
... as vases, on or pinched particularly at plugs, convenience receptacles, and the point where they exit from the apparatus. 11) Only use this apparatus to Part 15 of time. 14) Refer all instructions. 5) Do not use attachments/accessories specified by the manufacturer. 12) Use only with the cart, stand, tripod, bracket...

Startup Guide
Page 5
... volume. Precautions Power Supply Position the system near the wall outlet used. Packaging Materials Keep the original box and protective cushioning for repair or other parts, forming droplets.
... volume. Precautions Power Supply Position the system near the wall outlet used. Packaging Materials Keep the original box and protective cushioning for repair or other parts, forming droplets.

Startup Guide
Page 7
Contents Health Precautions 4 Precautions 5 Product Highlights 8 Supplied Accessories 8 Parts and Controls 10 Fitting the Head Mounted Unit 12 Confirming Screen Alignment 15 System Settings 17 Troubleshooting 24 Specifications 30 License and Trademark Notice 31 7
Contents Health Precautions 4 Precautions 5 Product Highlights 8 Supplied Accessories 8 Parts and Controls 10 Fitting the Head Mounted Unit 12 Confirming Screen Alignment 15 System Settings 17 Troubleshooting 24 Specifications 30 License and Trademark Notice 31 7
Startup Guide
Page 10
Press the MENU button to view setting menus as well as to confirm setting changes (when it functions as an Enter button). Lenses Nose pad Connecting cord Headphones 10 buttons 1 (Power On/Standby) button * The MENU button serves two purposes. Parts and Controls Head Mounted Unit Headband strap release Forehead supporter button Top headband strap Illumination Lens span adjusters Bottom headband strap Headband strap release button Control buttons (v/V/ b/B, MENU*) VOL +/-
Press the MENU button to view setting menus as well as to confirm setting changes (when it functions as an Enter button). Lenses Nose pad Connecting cord Headphones 10 buttons 1 (Power On/Standby) button * The MENU button serves two purposes. Parts and Controls Head Mounted Unit Headband strap release Forehead supporter button Top headband strap Illumination Lens span adjusters Bottom headband strap Headband strap release button Control buttons (v/V/ b/B, MENU*) VOL +/-

Startup Guide
Page 14
.... Pull the ear pad toward the edge, away from the adhesive backing. Slit Ear cushion Remove the ear cushion. 14 Replacing Consumables The following replacement parts are available. • Ear pad (EP-G1) • Ear cushion • Nose pad • Forehead supporter (Type A (thin), Type B (medium) or Type C (thick)) • ...• Light blocker (1 each for the left and right) • Connecting cord holder When these consumables break or show signs of wear, consult your nearest Sony dealer or Sony service center. After replacing the ear cushions, reattach the ear pads.
.... Pull the ear pad toward the edge, away from the adhesive backing. Slit Ear cushion Remove the ear cushion. 14 Replacing Consumables The following replacement parts are available. • Ear pad (EP-G1) • Ear cushion • Nose pad • Forehead supporter (Type A (thin), Type B (medium) or Type C (thick)) • ...• Light blocker (1 each for the left and right) • Connecting cord holder When these consumables break or show signs of wear, consult your nearest Sony dealer or Sony service center. After replacing the ear cushions, reattach the ear pads.
Marketing Specifications
Page 2
Reproduction in whole or in part without notice. / Updated: September 2, 2011 All rights reserved. Features and specifications are subject to change without written permission is prohibited. 1.Requires 3D content, 3D player, and HDMI® cable (at least 10.2 Gbps). © 2011 Sony Electronics Inc.
Reproduction in whole or in part without notice. / Updated: September 2, 2011 All rights reserved. Features and specifications are subject to change without written permission is prohibited. 1.Requires 3D content, 3D player, and HDMI® cable (at least 10.2 Gbps). © 2011 Sony Electronics Inc.
Limited Warranty (U.S. Only)
Page 1
...your responsibility to any repair, replacement part or replacement product for your product, Visit Sony's Web Site: www.sony.com/service Or call the Sony Customer Information Service Center 1-800-222-SONY (7669) For an accessory or part not available from Sony or a Sony Retailer is longer. A dated purchase...how to obtain warranty service for the remainder of this Limited Warranty, "refurbished" means a product or part that such data, software, or other than Sony or a Sony Retailer. This Limited Warranty gives you specific legal rights and you may have other materials you may have...
...your responsibility to any repair, replacement part or replacement product for your product, Visit Sony's Web Site: www.sony.com/service Or call the Sony Customer Information Service Center 1-800-222-SONY (7669) For an accessory or part not available from Sony or a Sony Retailer is longer. A dated purchase...how to obtain warranty service for the remainder of this Limited Warranty, "refurbished" means a product or part that such data, software, or other than Sony or a Sony Retailer. This Limited Warranty gives you specific legal rights and you may have other materials you may have...