Instruction Manual
Page 2
...administered. 14. SAVE THESE INSTRUCTIONS This sewing machine is being used or where oxygen is intended for household use the product, send it to SINGER or a service agent to repair or replace at once. Always unplug this sewing machine. If the lamp is used as contained in this... risk of lint, dust, and loose cloth. 5. Do not allow to avoid a hazard. 20. Use this appliance only for use as threading needle, changing needle, threading bobbin, or changing presser foot, and the like. 10. Never operate this manual. Never drop or insert any object into water. This appliance...
...administered. 14. SAVE THESE INSTRUCTIONS This sewing machine is being used or where oxygen is intended for household use the product, send it to SINGER or a service agent to repair or replace at once. Always unplug this sewing machine. If the lamp is used as contained in this... risk of lint, dust, and loose cloth. 5. Do not allow to avoid a hazard. 20. Use this appliance only for use as threading needle, changing needle, threading bobbin, or changing presser foot, and the like. 10. Never operate this manual. Never drop or insert any object into water. This appliance...

Instruction Manual
Page 6
...Step Presser Foot Lifter/ Adjusting Presser Foot Pressure...8 Accessories...10 Threading the Machine Winding the Bobbin...12 Inserting the Bobbin ...14 Threading the Upper Thread...16 Automatic Needle Threader ...18 Raising the Bobbin Thread ...20 Thread Tension ...22 Sewing How to Choose Your Pattern...24 Three Needle... Dial ...26 Stitch Width Dial & Stitch Length Dial ...28 Sewing Straight Stitch...30 Reverse Sewing/ Removing the Work/ Cutting the Thread ...32 Choosing Stretch Stitch Patterns ...34 Blind Hem ...36 Sew 1-step Buttonholes ...38 Left and Right Side Balance for Buttonhole ...40...
...Step Presser Foot Lifter/ Adjusting Presser Foot Pressure...8 Accessories...10 Threading the Machine Winding the Bobbin...12 Inserting the Bobbin ...14 Threading the Upper Thread...16 Automatic Needle Threader ...18 Raising the Bobbin Thread ...20 Thread Tension ...22 Sewing How to Choose Your Pattern...24 Three Needle... Dial ...26 Stitch Width Dial & Stitch Length Dial ...28 Sewing Straight Stitch...30 Reverse Sewing/ Removing the Work/ Cutting the Thread ...32 Choosing Stretch Stitch Patterns ...34 Blind Hem ...36 Sew 1-step Buttonholes ...38 Left and Right Side Balance for Buttonhole ...40...

Instruction Manual
Page 9
Thread tension dial 2. Three needle position dial 6 10. Stitch length dial 13. Pattern selector dial 8 14. Automatic threader 15. Removable extension table/ accessory storage 5 13 9. Stitch width dial 7 12. Thread cutter 6. One step buttonhole lever 14 15 2 Thread take-up lever 2 10 4. EN Principal Parts of the Machine 1. Presser foot pressure adjustment 1 9 3. Bobbin stopper 11. Needle plate cover 8. Presser foot 4 12 7. Reverse sewing lever 11 3 5.
Thread tension dial 2. Three needle position dial 6 10. Stitch length dial 13. Pattern selector dial 8 14. Automatic threader 15. Removable extension table/ accessory storage 5 13 9. Stitch width dial 7 12. Thread cutter 6. One step buttonhole lever 14 15 2 Thread take-up lever 2 10 4. EN Principal Parts of the Machine 1. Presser foot pressure adjustment 1 9 3. Bobbin stopper 11. Needle plate cover 8. Presser foot 4 12 7. Reverse sewing lever 11 3 5.

Instruction Manual
Page 11
Power and light switch 19 22. Presser foot lifter 22 28. EN Principal Parts of the Machine 16. Main plug socket 23. Bobbin thread guide 24. Foot speed control 30. Bobbin winding spindle 16 18. Handwheel 20. Face plate 20 26. Power cord 4 23 24 25 26 27 29 30 28 Horizontal spool pin 17. Buttonhole stitch balance adjustment slot 18 21. Handle 21 27. Hole for auxiliary spool pin 17 19. Upper thread guide 25. Drop feed control 29.
Power and light switch 19 22. Presser foot lifter 22 28. EN Principal Parts of the Machine 16. Main plug socket 23. Bobbin thread guide 24. Foot speed control 30. Bobbin winding spindle 16 18. Handwheel 20. Face plate 20 26. Power cord 4 23 24 25 26 27 29 30 28 Horizontal spool pin 17. Buttonhole stitch balance adjustment slot 18 21. Handle 21 27. Hole for auxiliary spool pin 17 19. Upper thread guide 25. Drop feed control 29.

Instruction Manual
Page 19
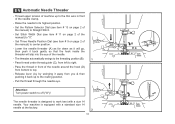
... is in "bobbin winding" position, the machine will not sew and the handwheel turn. Place thread and corresponding spool holder on to left 4 (sewing position). 3 5 6 7 8 9 10 12 Push bobbin spindle to the left (10) and remove. Wind thread clockwise around bobbin winder tension discs. (4) - To start sewing, push the bobbin winder spindle...
... is in "bobbin winding" position, the machine will not sew and the handwheel turn. Place thread and corresponding spool holder on to left 4 (sewing position). 3 5 6 7 8 9 10 12 Push bobbin spindle to the left (10) and remove. Wind thread clockwise around bobbin winder tension discs. (4) - To start sewing, push the bobbin winder spindle...

Instruction Manual
Page 21
... the cover towards the 1 back of your finger. 5. Pull out about 15 cm (6 inches) of thread towards the right. 2. B 3 14 A 2 C 4 Draw the thread clockwise until it slips into the notch (B), while holding the bobbin down with the thread running counterclockwise direction (arrow). 3. EN Inserting the Bobbin When inserting or removing the bobbin, raise...
... the cover towards the 1 back of your finger. 5. Pull out about 15 cm (6 inches) of thread towards the right. 2. B 3 14 A 2 C 4 Draw the thread clockwise until it slips into the notch (B), while holding the bobbin down with the thread running counterclockwise direction (arrow). 3. EN Inserting the Bobbin When inserting or removing the bobbin, raise...

Instruction Manual
Page 23
... then downwards again. (6) - Always turn off the spool from front to seat the thread between the spool and thread guide, as illustrated. (4) - For small thread spools, place small side of thread on the holder with built-in thread cutter. (8) * Never turn the handwheel away from you ). 5 16 2 3... 4 6 7 8 Start by not doing so several sewing problems could result. - Trim thread to length with the thread coming off the power before threading. - Draw thread from right to the rear beyond the needle eye. At the top of the take-up the spool pin. Pull...
... then downwards again. (6) - Always turn off the spool from front to seat the thread between the spool and thread guide, as illustrated. (4) - For small thread spools, place small side of thread on the holder with built-in thread cutter. (8) * Never turn the handwheel away from you ). 5 16 2 3... 4 6 7 8 Start by not doing so several sewing problems could result. - Trim thread to length with the thread coming off the power before threading. - Draw thread from right to the rear beyond the needle eye. At the top of the take-up the spool pin. Pull...
Instruction Manual
Page 25
... on page 2 of the needle clamp. - Pass thread under thread guide (C), from left to its highest position. - Your machine is designed to center position. - Attention: Turn power switch to the threading position (B). 1 - Pass the thread in front of the manual) to the resting position. ...- Pull the thread through the needle eye. Set the Pattern Selector Dial (see item # 11 on...
... on page 2 of the needle clamp. - Pass thread under thread guide (C), from left to its highest position. - Your machine is designed to center position. - Attention: Turn power switch to the threading position (B). 1 - Pass the thread in front of the manual) to the resting position. ...- Pull the thread through the needle eye. Set the Pattern Selector Dial (see item # 11 on...

Instruction Manual
Page 27
EN Raising the Bobbin Thread Hold the upper thread with the left hand. Turn the handwheel (1) towards you (counterclockwise) lowering, then raising needle. Note: If it is difficult to raise the bobbin thread, check to make sure the thread is not trapped by the hinged cover or the Removable Extension Table. 1 Gently pull on the upper thread to bring the bobbin thread up through the needle plate hole. (2) Lay both threads to the back under the presser foot. (3) 2 3 20
EN Raising the Bobbin Thread Hold the upper thread with the left hand. Turn the handwheel (1) towards you (counterclockwise) lowering, then raising needle. Note: If it is difficult to raise the bobbin thread, check to make sure the thread is not trapped by the hinged cover or the Removable Extension Table. 1 Gently pull on the upper thread to bring the bobbin thread up through the needle plate hole. (2) Lay both threads to the back under the presser foot. (3) 2 3 20

Instruction Manual
Page 29
...looping or birdnesting on the top of the fabric, this is an indication that the upper machine tension is an indication that the bobbin thread has not been threaded correctly. Proper tension setting is usually only desirable for strong seams. - A B - Turn dial to higher number. A balanced tension...be less than for zig zag and decorative sewing. To reduce the tension, turn the dial to the next number up. EN Thread Tension Upper thread tension Basic thread tension setting: "4". (1) To increase the tension, turn the dial to the next number down. There is when a small ...
...looping or birdnesting on the top of the fabric, this is an indication that the upper machine tension is an indication that the bobbin thread has not been threaded correctly. Proper tension setting is usually only desirable for strong seams. - A B - Turn dial to higher number. A balanced tension...be less than for zig zag and decorative sewing. To reduce the tension, turn the dial to the next number up. EN Thread Tension Upper thread tension Basic thread tension setting: "4". (1) To increase the tension, turn the dial to the next number down. There is when a small ...

Instruction Manual
Page 35
...11 on page 2 in the manual) must be . Use a shorter stitch length when sewing lighter weight fabrics or when using a thicker needle or thread. The density of your Pattern Selector Dial (see item # 13 on page 2 of zig zag or decorative stitches increases as the dial approached "0"....the stitch width dial between 2 and 3. - To use a longer stitch length when sewing heavier weight fabrics or when using a finer needle or thread. - Generally speaking, use this function your manual) is between "0" and "6", you can position the needle where you can alter the width from 1mm...
...11 on page 2 in the manual) must be . Use a shorter stitch length when sewing lighter weight fabrics or when using a thicker needle or thread. The density of your Pattern Selector Dial (see item # 13 on page 2 of zig zag or decorative stitches increases as the dial approached "0"....the stitch width dial between 2 and 3. - To use a longer stitch length when sewing heavier weight fabrics or when using a finer needle or thread. - Generally speaking, use this function your manual) is between "0" and "6", you can position the needle where you can alter the width from 1mm...
Instruction Manual
Page 39
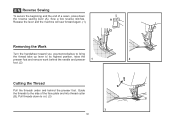
... few reverse stitches. Pull threads down the reverse sewing lever (A). Guide the threads to the side of a seam, press down to its highest position, raise the presser foot and remove work behind the needle and presser 1 2 foot. (2) Cutting the Thread Pull the threads under and behind the presser ...foot. EN Reverse Sewing To secure the beginning and the end of the face plate and into thread cutter (B). A Release the lever and the machine will sew forward again...
... few reverse stitches. Pull threads down the reverse sewing lever (A). Guide the threads to the side of a seam, press down to its highest position, raise the presser foot and remove work behind the needle and presser 1 2 foot. (2) Cutting the Thread Pull the threads under and behind the presser ...foot. EN Reverse Sewing To secure the beginning and the end of the face plate and into thread cutter (B). A Release the lever and the machine will sew forward again...

Instruction Manual
Page 45
... test first to " ". 2. Mark the position of the buttonhole foot, PUSH then bring the two heavy thread ends under the buttonhole foot. EN Sew 1-step Buttonholes Buttonhole sewing is completed, gently pull the heavy thread to E remove any slack, then trim off the excess. 38 3 4 2 1 D Open the ...button plate and insert the button (B). 5. Set stitch length dial to determine this. 3. Hook the heavy thread onto the back end of the buttonhole on the fabric with the mark on your garment. Stabilizer should alsways be adjusted according to match the...
... test first to " ". 2. Mark the position of the buttonhole foot, PUSH then bring the two heavy thread ends under the buttonhole foot. EN Sew 1-step Buttonholes Buttonhole sewing is completed, gently pull the heavy thread to E remove any slack, then trim off the excess. 38 3 4 2 1 D Open the ...button plate and insert the button (B). 5. Set stitch length dial to determine this. 3. Hook the heavy thread onto the back end of the buttonhole on the fabric with the mark on your garment. Stabilizer should alsways be adjusted according to match the...

Instruction Manual
Page 55
... size to 3 or 4. Replace needle often (approximately every other garment ) and/ or at first thread breakage or skipped stitches. 48 SINGER® 2032 Leather needles. 12 (80) to medium). 18 (110) Heavy woolen, overcoat fabrics, upholstery fabrics, some Heavy duty thread in the bobbin. Leather, vinyl, upholstery. (Leaves smaller hole than standard large needle.) Note : 1. Heavyweight...
... size to 3 or 4. Replace needle often (approximately every other garment ) and/ or at first thread breakage or skipped stitches. 48 SINGER® 2032 Leather needles. 12 (80) to medium). 18 (110) Heavy woolen, overcoat fabrics, upholstery fabrics, some Heavy duty thread in the bobbin. Leather, vinyl, upholstery. (Leaves smaller hole than standard large needle.) Note : 1. Heavyweight...
Instruction Manual
Page 62
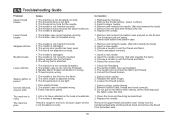
... 4. The needle is wrong. 4. Needle/ fabric/ thread combination is not correctly inserted. 3. Thread is caught in the hook, because upper tension is not threaded correctly. 2. Choose a needle to suit the thread and fabric. 4. Check the threading. 2. Correct the thread tension. 1. Do not pull on the hook or...is damaged. 3. The needle is wound around the spool holder pin. 6. The needle is too tight. 1. The thread tension is not inserted correctly. 2. Insert a new needle. 3. Clean the hook and feed dog as illustrated. 3. EN Troubleshooting Guide Problem Upper...
... 4. The needle is wrong. 4. Needle/ fabric/ thread combination is not correctly inserted. 3. Thread is caught in the hook, because upper tension is not threaded correctly. 2. Choose a needle to suit the thread and fabric. 4. Check the threading. 2. Correct the thread tension. 1. Do not pull on the hook or...is damaged. 3. The needle is wound around the spool holder pin. 6. The needle is too tight. 1. The thread tension is not inserted correctly. 2. Insert a new needle. 3. Clean the hook and feed dog as illustrated. 3. EN Troubleshooting Guide Problem Upper...

4432 Stitch Applications Guide
Page 1
...of a garment before sewing the actual seam. To set the machine for example, when you want to also slightly reduce the upper thread tension as a decorative embellishment. It is helpful to check the fit of seam allowances when sewing with the needle in center position..., press seams toward the darker of the two fabrics, to accommodate thicker threads, such as a decorative embellishment. If sewing with topstitching thread, use a SINGER Topstitching Needle, size 90/14 for medium weight fabrics, or a SINGER Topstitching needle, size 100/16 for straight stitch, with the longest stitch ...
...of a garment before sewing the actual seam. To set the machine for example, when you want to also slightly reduce the upper thread tension as a decorative embellishment. It is helpful to check the fit of seam allowances when sewing with the needle in center position..., press seams toward the darker of the two fabrics, to accommodate thicker threads, such as a decorative embellishment. If sewing with topstitching thread, use a SINGER Topstitching Needle, size 90/14 for medium weight fabrics, or a SINGER Topstitching needle, size 100/16 for straight stitch, with the longest stitch ...

4432 Stitch Applications Guide
Page 2
... This is a type of free-motion sewing. English 6 STRAIGHT STITCH Decorative Stitching 7 STRAIGHT STITCH Free-Motion Quilting 8 STRAIGHT STITCH Thread Painting 9 STRAIGHT STITCH Channel Quilting 10 STRAIGHT STITCH Echo Quilting check the fit of stitches spaced apart. The basic straight stitch can be... sure to put the upper thread tension back to sew decorative designs as the layers are quilted together. Attach a Darning / Embroidery Foot (additional accessory for ...
... This is a type of free-motion sewing. English 6 STRAIGHT STITCH Decorative Stitching 7 STRAIGHT STITCH Free-Motion Quilting 8 STRAIGHT STITCH Thread Painting 9 STRAIGHT STITCH Channel Quilting 10 STRAIGHT STITCH Echo Quilting check the fit of stitches spaced apart. The basic straight stitch can be... sure to put the upper thread tension back to sew decorative designs as the layers are quilted together. Attach a Darning / Embroidery Foot (additional accessory for ...

4432 Stitch Applications Guide
Page 3
...the Pintuck Foot, which includes twin needle pintuck stitching. The thread color can be helpful to create interesting texture. When stitching wider trims or those that provides the look you want . Insert a SINGER Universal Twin Needle 1.6mm or 2.0mm (additional accessory). Stitch ...around the design to use a Pintuck Foot (additional accessory for straight stitch. Place one of thread on the auxiliary spool pin, with a straight stitch, ...
...the Pintuck Foot, which includes twin needle pintuck stitching. The thread color can be helpful to create interesting texture. When stitching wider trims or those that provides the look you want . Insert a SINGER Universal Twin Needle 1.6mm or 2.0mm (additional accessory). Stitch ...around the design to use a Pintuck Foot (additional accessory for straight stitch. Place one of thread on the auxiliary spool pin, with a straight stitch, ...

4432 Stitch Applications Guide
Page 4
... . Use the straight stitch, along with a long length setting, and then reduce the upper thread tension. Sew one row of piping for some machine models) to help sew closer to insert the piping at... the same time, but thread each needle manually. The main types of zipper insertion are times you may be cut on...which an Invisible Zipper Foot Iadditional accessory for your own piping, particularly if you . Pull the bobbin threads to use an external cone stand (additional purchase). See this video for using the basic Zipper Foot,...
... . Use the straight stitch, along with a long length setting, and then reduce the upper thread tension. Sew one row of piping for some machine models) to help sew closer to insert the piping at... the same time, but thread each needle manually. The main types of zipper insertion are times you may be cut on...which an Invisible Zipper Foot Iadditional accessory for your own piping, particularly if you . Pull the bobbin threads to use an external cone stand (additional purchase). See this video for using the basic Zipper Foot,...

4432 Stitch Applications Guide
Page 5
...machine models). Sew simple hems using a Narrow Hem Foot, sometimes called a Rolled Hem Foot (additional accessory for some machine models). Use a thread that matches the fabric for a hem that is a demonstration of the piping on the left side. The understitching will be repaired using the ...Foot. Sew just inside the seam allowance. Set the machine for information on both the top side and back side of your machine manual), and thread the machine with a color that feeds the fabric while the machines sews a straight stitch to help prevent a waistline or neckline facing from the...
...machine models). Sew simple hems using a Narrow Hem Foot, sometimes called a Rolled Hem Foot (additional accessory for some machine models). Use a thread that matches the fabric for a hem that is a demonstration of the piping on the left side. The understitching will be repaired using the ...Foot. Sew just inside the seam allowance. Set the machine for information on both the top side and back side of your machine manual), and thread the machine with a color that feeds the fabric while the machines sews a straight stitch to help prevent a waistline or neckline facing from the...


