Instruction Manual 2
Page 5
... and fabric chart 22 Changing the needle 23 Adjusting top thread tension 24 - 25 Changing presser foot 24 - 25 Control panel functions 26 - 33 Start/Stop and speed control 34 - 35 Reverse operation and tacking stitch 36 - 37 Stretch and decorative stitches 50 - 55 Straight stretch stitch, Ric-rac stitch, Honeycomb...
... and fabric chart 22 Changing the needle 23 Adjusting top thread tension 24 - 25 Changing presser foot 24 - 25 Control panel functions 26 - 33 Start/Stop and speed control 34 - 35 Reverse operation and tacking stitch 36 - 37 Stretch and decorative stitches 50 - 55 Straight stretch stitch, Ric-rac stitch, Honeycomb...

Instruction Manual 2
Page 8
Thread tension control 3 4. Threading lever 5. Extension table (Accessory box) 8. Bobbin winder stop 6 10. Presser foot lifter 12 19. Feed dogs 32. Handle 13. Identification plate 17. Twin thread guide 22. Alternate thread cutter 28. Power line cord ...
Thread tension control 3 4. Threading lever 5. Extension table (Accessory box) 8. Bobbin winder stop 6 10. Presser foot lifter 12 19. Feed dogs 32. Handle 13. Identification plate 17. Twin thread guide 22. Alternate thread cutter 28. Power line cord ...

Instruction Manual 2
Page 16
Start machine. The bobbin will automatically stop to cut thread. 14 WINDING THE BOBBIN Be sure to the right until it through the hole in illustration. 1 2. Put end of thread through thread ... the bobbin has begun to fill the bobbin. Pull the thread out from top of thread on the foot control again to continue to fill, stop turning when completely filled. Note: Make sure the presser foot is not already there. Push shaft to remove bobbin and cut 4 the thread tail. Push...
Start machine. The bobbin will automatically stop to cut thread. 14 WINDING THE BOBBIN Be sure to the right until it through the hole in illustration. 1 2. Put end of thread through thread ... the bobbin has begun to fill the bobbin. Pull the thread out from top of thread on the foot control again to continue to fill, stop turning when completely filled. Note: Make sure the presser foot is not already there. Push shaft to remove bobbin and cut 4 the thread tail. Push...

Instruction Manual 2
Page 18
... the thread along the groove on the needle plate until it is snipped with cutter on top of the bobbin, pull the 5 thread until it stops in the slot (B). With a finger held gently on the top left . 4 5. THREADING THE BOBBIN THREAD 1.
... the thread along the groove on the needle plate until it is snipped with cutter on top of the bobbin, pull the 5 thread until it stops in the slot (B). With a finger held gently on the top left . 4 5. THREADING THE BOBBIN THREAD 1.

Instruction Manual 2
Page 32
...lit, indicating that are not suitable for twin needle. 6. When turning the Stitch Selection Dial, the machine now automatically skips all patterns. NEEDLE STOP POSITION SELECTOR BUTTON When the machine is turned on all stitches that Twin Needle Safety is pushed. Push it again and it will reduce the...and save broken needles and possible damage to selecting a pattern. Doing so will return to its up -stop position with upper LED light lit. 30 This will be at its up -stop position with lower LED light lit. To disengage Twin Needle Safety and return the machine to tie off ....
...lit, indicating that are not suitable for twin needle. 6. When turning the Stitch Selection Dial, the machine now automatically skips all patterns. NEEDLE STOP POSITION SELECTOR BUTTON When the machine is turned on all stitches that Twin Needle Safety is pushed. Push it again and it will reduce the...and save broken needles and possible damage to selecting a pattern. Doing so will return to its up -stop position with upper LED light lit. 30 This will be at its up -stop position with lower LED light lit. To disengage Twin Needle Safety and return the machine to tie off ....

Instruction Manual 2
Page 34
...sequence to two different sizes (x2 or x3). 9. To revert back to elongate (see illustration) can be elongated to repeat, instead of stopping after one cycle and stop at the end of the stitch, a x1 symbol will be shown on the LCD panel. 2. Available letters Alphabet disponible Alfabeto disponible ABCDE FGH...stitch, press the lit button again. 45 48 49 50 51 53 57 63 X1 X2 X3 10.ONE CYCLE STITCH BUTTON 1. Therefore, any stitch or stitch sequence that is programmed will stop . When you would like to the default size of the stitch sequence, the machine will automatically sew...
...sequence to two different sizes (x2 or x3). 9. To revert back to elongate (see illustration) can be elongated to repeat, instead of stopping after one cycle and stop at the end of the stitch, a x1 symbol will be shown on the LCD panel. 2. Available letters Alphabet disponible Alfabeto disponible ABCDE FGH...stitch, press the lit button again. 45 48 49 50 51 53 57 63 X1 X2 X3 10.ONE CYCLE STITCH BUTTON 1. Therefore, any stitch or stitch sequence that is programmed will stop . When you would like to the default size of the stitch sequence, the machine will automatically sew...
Instruction Manual 2
Page 36
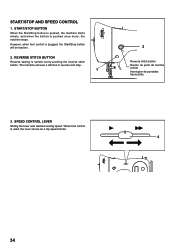
...reverse stitch button. REVERSE STITCH BUTTON Reverse sewing is used, the lever serves as a top speed limiter. 4 34 The machine will be inactive. 2. START/STOP AND SPEED CONTROL 1. START/STOP BUTTON When the Start/Stop button is pushed, the machine starts slowly, and when the button is plugged, the Start.../Stop button will sew 4 stitches in reverse and stop. 1 2 Reverse stitch button Bouton du point de marche arrière interruptor de puntadas hacia atrás 3. SPEED CONTROL LEVER Sliding the lever ...
...reverse stitch button. REVERSE STITCH BUTTON Reverse sewing is used, the lever serves as a top speed limiter. 4 34 The machine will be inactive. 2. START/STOP AND SPEED CONTROL 1. START/STOP BUTTON When the Start/Stop button is pushed, the machine starts slowly, and when the button is plugged, the Start.../Stop button will sew 4 stitches in reverse and stop. 1 2 Reverse stitch button Bouton du point de marche arrière interruptor de puntadas hacia atrás 3. SPEED CONTROL LEVER Sliding the lever ...

Instruction Manual 2
Page 44
...( 9 mm) 1/4" ( 6 mm) First turn the handwheel counter clockwise until the needle enters the fabric. 5. The guide line on the top of the fabric, stop button D. STRAIGHT STITCHING Straight stitch is most frequently used for detail. All-purpose foot Thread tension control - Pull both metric and inch markings as shown... line which is used for piecing quilt blocks and also for guiding your hands. KEEPING SEAMS STRAIGHT To keep the seam straight, use one of the tension may be desired. AUTO F NOTE: Based upon the weight of the fabric, slight "fine tuning" of the numbered...
...( 9 mm) 1/4" ( 6 mm) First turn the handwheel counter clockwise until the needle enters the fabric. 5. The guide line on the top of the fabric, stop button D. STRAIGHT STITCHING Straight stitch is most frequently used for detail. All-purpose foot Thread tension control - Pull both metric and inch markings as shown... line which is used for piecing quilt blocks and also for guiding your hands. KEEPING SEAMS STRAIGHT To keep the seam straight, use one of the tension may be desired. AUTO F NOTE: Based upon the weight of the fabric, slight "fine tuning" of the numbered...

Instruction Manual 2
Page 70
... pedal fue presionado para empezar a coser antes de bajar el pie prensatelas. Baje el pie prensatelas y comience a coser. 68 The foot controller or start/stop button was pushed down to remove top thread from machine and rethread. 1. The top thread has broken. Lift presser foot lifter. The stitch pattern...
... pedal fue presionado para empezar a coser antes de bajar el pie prensatelas. Baje el pie prensatelas y comience a coser. 68 The foot controller or start/stop button was pushed down to remove top thread from machine and rethread. 1. The top thread has broken. Lift presser foot lifter. The stitch pattern...

