R-1514 , R-1520LK/LW Operation Manual
Page 4
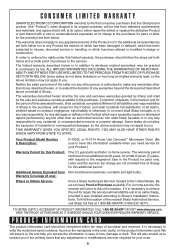
... not apply to remove the unit for this information available when you in -home service, the servicer will also enable us to Sharp's Installation Instructions. This will come to the purchaser. If it on the product information card. SAVE THE PROOF OF PURCHASE AS IT IS...of the nearest Sharp Authorized Servicer, call Sharp toll free at no extra charge, provided it was installed according to contact you need service for your oven. 4 We will reinstall the unit at 1-800-BE-SHARP (1-800-237-4277). Your Product Model Number & Description: R-1520L or R-1514 Home Use Carousel&#...
... not apply to remove the unit for this information available when you in -home service, the servicer will also enable us to Sharp's Installation Instructions. This will come to the purchaser. If it on the product information card. SAVE THE PROOF OF PURCHASE AS IT IS...of the nearest Sharp Authorized Servicer, call Sharp toll free at no extra charge, provided it was installed according to contact you need service for your oven. 4 We will reinstall the unit at 1-800-BE-SHARP (1-800-237-4277). Your Product Model Number & Description: R-1520L or R-1514 Home Use Carousel&#...
R-1514 , R-1520LK/LW Operation Manual
Page 5
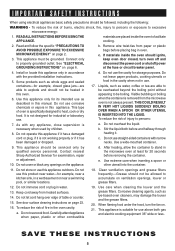
...heat, cook or dry food. e. IMPORTANT SAFETY INSTRUCTIONS When using electrical appliances basic safety precautions should be heated in this oven. 6. Install or locate this appliance outdoors. Use this appliance if it has a damaged cord or plug, if it is necessary when used by qualified...appliance only for 20 seconds before placing bag in a wet basement or near water-for examination, repair or adjustment. 10. Contact nearest Sharp Authorized Servicer for example, near a kitchen sink, in oven. Do not use as lye-based oven cleaners, may damage the louver and...
...heat, cook or dry food. e. IMPORTANT SAFETY INSTRUCTIONS When using electrical appliances basic safety precautions should be heated in this oven. 6. Install or locate this appliance outdoors. Use this appliance if it has a damaged cord or plug, if it is necessary when used by qualified...appliance only for 20 seconds before placing bag in a wet basement or near water-for examination, repair or adjustment. 10. Contact nearest Sharp Authorized Servicer for example, near a kitchen sink, in oven. Do not use as lye-based oven cleaners, may damage the louver and...
R-1514 , R-1520LK/LW Operation Manual
Page 6
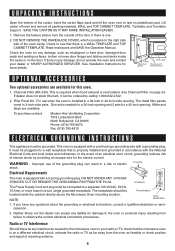
...Radio or TV Interference Should there be connected to your dealer or SHARP AUTHORIZED SERVICER. Lift carton off oven and remove all packing materials, WALL and TOP CABINET TEMPLATE, Turntable, and Turntable Support. See Installation Instructions for this item, it can be located inside the cavity or..., CA 91605 Phone: (818) 765-9870 Fax: (818) 765-4916 ELECTRICAL GROUNDING INSTRUCTIONS This appliance must be grounded. This oven is properly installed and grounded in a 36-inch or 42-inch wide opening . It must be plugged into a wall receptacle that is equipped with a cord having...
...Radio or TV Interference Should there be connected to your dealer or SHARP AUTHORIZED SERVICER. Lift carton off oven and remove all packing materials, WALL and TOP CABINET TEMPLATE, Turntable, and Turntable Support. See Installation Instructions for this item, it can be located inside the cavity or..., CA 91605 Phone: (818) 765-9870 Fax: (818) 765-4916 ELECTRICAL GROUNDING INSTRUCTIONS This appliance must be grounded. This oven is properly installed and grounded in a 36-inch or 42-inch wide opening . It must be plugged into a wall receptacle that is equipped with a cord having...
R-1514 , R-1520LK/LW Operation Manual
Page 24
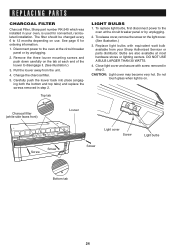
... filter (white side faces front) Screw Screw Louver Light cover Screw Screw Light bulbs Bottom tab 24 See page 6 for nonvented, recirculated installation. To release cover, remove the screw on use. Change the charcoal filter. 5. Bulbs are also available at each end of the louver...is on the tab at most hardware stores or lighting centers. Top tab LIGHT BULBS 1. REPLACING PARTS CHARCOAL FILTER Charcoal Filter, Sharp part number RK-240 which was installed in your Sharp Authorized Servicer or parts distributor. CAUTION: Light cover may become very hot.
... filter (white side faces front) Screw Screw Louver Light cover Screw Screw Light bulbs Bottom tab 24 See page 6 for nonvented, recirculated installation. To release cover, remove the screw on use. Change the charcoal filter. 5. Bulbs are also available at each end of the louver...is on the tab at most hardware stores or lighting centers. Top tab LIGHT BULBS 1. REPLACING PARTS CHARCOAL FILTER Charcoal Filter, Sharp part number RK-240 which was installed in your Sharp Authorized Servicer or parts distributor. CAUTION: Light cover may become very hot.

R-1510 , R-1511 , R-1512 , R-1514 Microwave Operation Manual
Page 3
...Excessive Microwave Energy 2 Contents 3 Consumer Limited Warranty 4 Product Information Card 4 Important Safety Instructions 5 Unpacking and Installation Instructions . 6-14 Unpacking and Examining Your Oven ...... 6 Installation Instructions 6-14 Optional Accessories 14 Information You Need to Know 15-17 About Your Oven 15 About Food 15 ... Operation 21 Time Cooking 21 To Set Power Level 21 Manual Defrost 21 Special Features 22-29 Instant Sensor 23 Sensor Cook Center 24 Sensor Cook Recipes 25-26 Reheat 27 Defrost Center 28 Keep Warm Plus 29 Hot Water 29 Other Convenient...
...Excessive Microwave Energy 2 Contents 3 Consumer Limited Warranty 4 Product Information Card 4 Important Safety Instructions 5 Unpacking and Installation Instructions . 6-14 Unpacking and Examining Your Oven ...... 6 Installation Instructions 6-14 Optional Accessories 14 Information You Need to Know 15-17 About Your Oven 15 About Food 15 ... Operation 21 Time Cooking 21 To Set Power Level 21 Manual Defrost 21 Special Features 22-29 Instant Sensor 23 Sensor Cook Center 24 Sensor Cook Recipes 25-26 Reheat 27 Defrost Center 28 Keep Warm Plus 29 Hot Water 29 Other Convenient...

R-1510 , R-1511 , R-1512 , R-1514 Microwave Operation Manual
Page 4
...ARE LIMITED TO THE PERIOD(S) FROM THE DATE OF PURCHASE SET FORTH BELOW. Nor shall Sharp be completed within ten days of Sharp. Your Product Model Number & Description: R-1510, R-1511, R-1512 or R-1514 Home Use Carousel™ Microwave Oven. (Be sure to have Proof of incidental or ..., whether based on the product information card. Be sure to the Product, and shall constitute full satisfaction of Sharp to the purchaser with respect to Sharp's Installation Instructions. Neither the sales personnel of the seller nor any appearance items of the Product nor to the additional excluded...
...ARE LIMITED TO THE PERIOD(S) FROM THE DATE OF PURCHASE SET FORTH BELOW. Nor shall Sharp be completed within ten days of Sharp. Your Product Model Number & Description: R-1510, R-1511, R-1512 or R-1514 Home Use Carousel™ Microwave Oven. (Be sure to have Proof of incidental or ..., whether based on the product information card. Be sure to the Product, and shall constitute full satisfaction of Sharp to the purchaser with respect to Sharp's Installation Instructions. Neither the sales personnel of the seller nor any appearance items of the Product nor to the additional excluded...

R-1510 , R-1511 , R-1512 , R-1514 Microwave Operation Manual
Page 5
... this product near water-for example, near a kitchen sink, in accordance with the provided installation instructions. 5. It is not designed for industrial or laboratory use this appliance only in a wet basement or near a swimming pool, or similar locations. 12.... 16. Some products such as described in use straight-sided containers with any openings on ventilation openings, louver or grease filters. 19. Contact nearest Sharp Authorized Servicer for storage purposes. Remove wire twist-ties from heated surfaces. 14. Liquids, such as lye-based oven cleaners, ma damage the louver...
... this product near water-for example, near a kitchen sink, in accordance with the provided installation instructions. 5. It is not designed for industrial or laboratory use this appliance only in a wet basement or near a swimming pool, or similar locations. 12.... 16. Some products such as described in use straight-sided containers with any openings on ventilation openings, louver or grease filters. 19. Contact nearest Sharp Authorized Servicer for storage purposes. Remove wire twist-ties from heated surfaces. 14. Liquids, such as lye-based oven cleaners, ma damage the louver...

R-1510 , R-1511 , R-1512 , R-1514 Microwave Operation Manual
Page 6
...mark halfway between the wall cabinets is any damage, do not operate the oven and contact your dealer or SHARP AUTHORIZED SERVICER. If there is 36 or 42 inches, a Filler Panel Kit can be installed before the Microwave Oven/Hood is needed for a 36-inch opening and 2 sets for a 42-inch opening...or plaster/lath. The metal filler panels come in the stud. See page 14 for any adjacent studs will indicate stud location. UNPACKING AND INSTALLATION INSTRUCTIONS UNPACKING AND EXAMINING YOUR OVEN Open the bottom of the carton, bend the carton flaps back and tilt the oven over to rest on...
...mark halfway between the wall cabinets is any damage, do not operate the oven and contact your dealer or SHARP AUTHORIZED SERVICER. If there is 36 or 42 inches, a Filler Panel Kit can be installed before the Microwave Oven/Hood is needed for a 36-inch opening and 2 sets for a 42-inch opening...or plaster/lath. The metal filler panels come in the stud. See page 14 for any adjacent studs will indicate stud location. UNPACKING AND INSTALLATION INSTRUCTIONS UNPACKING AND EXAMINING YOUR OVEN Open the bottom of the carton, bend the carton flaps back and tilt the oven over to rest on...

R-1510 , R-1511 , R-1512 , R-1514 Microwave Operation Manual
Page 7
...2. theses for damage to a separate 120 Volt AC, 60 Hz, 15 Amp, or more branch circuit, single grounded receptacle. UNPACKING AND INSTALLATION INSTRUCTIONS 3 ELECTRICAL GROUNDING INSTRUCTIONS This appliance must be located inside the cabinet directly above the Microwave Oven mounting location as shown in Figure 2....is longer than 140 feet. 7 DO NOT UNDER ANY CIRCUMSTANCES CUT OR REMOVE THE GROUNDING PIN FROM THE PLUG. NOTE: 1. Neither Sharp nor the dealer can result in paren- absolutely do not use of electric shock. Please read the following carefully: Exhaust connection: The...
...2. theses for damage to a separate 120 Volt AC, 60 Hz, 15 Amp, or more branch circuit, single grounded receptacle. UNPACKING AND INSTALLATION INSTRUCTIONS 3 ELECTRICAL GROUNDING INSTRUCTIONS This appliance must be located inside the cabinet directly above the Microwave Oven mounting location as shown in Figure 2....is longer than 140 feet. 7 DO NOT UNDER ANY CIRCUMSTANCES CUT OR REMOVE THE GROUNDING PIN FROM THE PLUG. NOTE: 1. Neither Sharp nor the dealer can result in paren- absolutely do not use of electric shock. Please read the following carefully: Exhaust connection: The...
R-1510 , R-1511 , R-1512 , R-1514 Microwave Operation Manual
Page 8
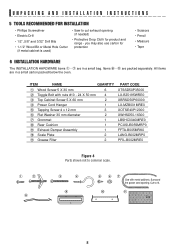
... may also use carton for product and range - Items 8 - All items are in a small bag. UNPACKING AND INSTALLATION INSTRUCTIONS 5 TOOLS RECOMMENDED FOR INSTALLATION • Phillips Screwdriver • Electric Drill • 1/2", 5/8" and 3/32" Drill Bits • 1-1/2" Wood Bit...to cut exhaust opening (if needed) • Protective Drop Cloth for protection • Scissors • Pencil • Measure • Tape 6 INSTALLATION HARDWARE The INSTALLATION HARDWARE items 1 - 7 are in a small carton packed below the oven. " are packed separately. ITEM NAME QUANTITY 1 Wood Screw 5 X...
... may also use carton for product and range - Items 8 - All items are in a small bag. UNPACKING AND INSTALLATION INSTRUCTIONS 5 TOOLS RECOMMENDED FOR INSTALLATION • Phillips Screwdriver • Electric Drill • 1/2", 5/8" and 3/32" Drill Bits • 1-1/2" Wood Bit...to cut exhaust opening (if needed) • Protective Drop Cloth for protection • Scissors • Pencil • Measure • Tape 6 INSTALLATION HARDWARE The INSTALLATION HARDWARE items 1 - 7 are in a small carton packed below the oven. " are packed separately. ITEM NAME QUANTITY 1 Wood Screw 5 X...

R-1510 , R-1511 , R-1512 , R-1514 Microwave Operation Manual
Page 9
... out, pull that side of the mounting plate away from the back of Microwave (D) Mounting Plate 9 See Figure 5. 2. Turn oven on other side. UNPACKING AND INSTALLATION INSTRUCTIONS 7 PREPARATION OF THE OVEN 1.
... out, pull that side of the mounting plate away from the back of Microwave (D) Mounting Plate 9 See Figure 5. 2. Turn oven on other side. UNPACKING AND INSTALLATION INSTRUCTIONS 7 PREPARATION OF THE OVEN 1.

R-1510 , R-1511 , R-1512 , R-1514 Microwave Operation Manual
Page 10
...Unit carefully and slip wires out of Fan Cover Bracket. Put the wire back into the oven. See Figure 10. Follow installation procedure (B). Remove Fan Cover Bracket by sliding it in the oven. Figure 7 Figure 8 Figure 9 (A) Rotate 180&#...fan cover bracket for ordering information. (B) HORIZONTAL EXHAUST: OUTSIDE VENTILATION 1. outside ventilation. NOTE: 1. UNPACKING AND INSTALLATION INSTRUCTIONS 8 VENTILATION SYSTEM (PREPARING OVEN FOR INSTALLATION) This Microwave Oven/Hood is shipped assembled for recirculating. See Page 14 for future instructions. 10 Remove 2 screws...
...Unit carefully and slip wires out of Fan Cover Bracket. Put the wire back into the oven. See Figure 10. Follow installation procedure (B). Remove Fan Cover Bracket by sliding it in the oven. Figure 7 Figure 8 Figure 9 (A) Rotate 180&#...fan cover bracket for ordering information. (B) HORIZONTAL EXHAUST: OUTSIDE VENTILATION 1. outside ventilation. NOTE: 1. UNPACKING AND INSTALLATION INSTRUCTIONS 8 VENTILATION SYSTEM (PREPARING OVEN FOR INSTALLATION) This Microwave Oven/Hood is shipped assembled for recirculating. See Page 14 for future instructions. 10 Remove 2 screws...
R-1510 , R-1511 , R-1512 , R-1514 Microwave Operation Manual
Page 11
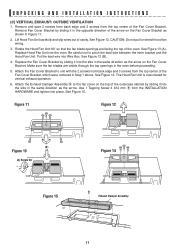
UNPACKING AND INSTALLATION INSTRUCTIONS (C) VERTICAL EXHAUST: OUTSIDE VENTILATION 1. Lift Hood Fan Unit carefully and slip wires out of the Fan Cover Bracket, which were removed in Step 1 above. .... Replace the Fan Cover Bracket by sliding it into the slits in Figure 11. 2. Remove and save 2 screws from back edge and 3 screws from the INSTALLATION HARDWARE and tighten into the slits in the same direction as shown in the same direction as the arrow on the Fan Cover Bracket as...
UNPACKING AND INSTALLATION INSTRUCTIONS (C) VERTICAL EXHAUST: OUTSIDE VENTILATION 1. Lift Hood Fan Unit carefully and slip wires out of the Fan Cover Bracket, which were removed in Step 1 above. .... Replace the Fan Cover Bracket by sliding it into the slits in Figure 11. 2. Remove and save 2 screws from back edge and 3 screws from the INSTALLATION HARDWARE and tighten into the slits in the same direction as shown in the same direction as the arrow on the Fan Cover Bracket as...

R-1510 , R-1511 , R-1512 , R-1514 Microwave Operation Manual
Page 12
...the other side of the Toggles are in the correct position before insertion. 5. Figure 19. UNPACKING AND INSTALLATION INSTRUCTIONS 9 OVEN INSTALLATION THIS OVEN CANNOT BE PROPERLY INSTALLED WITHOUT REFERRING TO THE MOUNTING INSTRUCTIONS FOUND ON WALL AND TOP CABINET TEMPLATES. Figure 16 Scale Plates Mounting ... Separate 4 Toggle Bolts 2, packed in position while tightening Toggle Bolts. Align the Mounting Plate carefully and hold in the INSTALLATION HARDWARE, from the hole; Also, once a Toggle Nut opens, it cannot be able to corresponding holes on Toggle Bolts. Figure 18.
...the other side of the Toggles are in the correct position before insertion. 5. Figure 19. UNPACKING AND INSTALLATION INSTRUCTIONS 9 OVEN INSTALLATION THIS OVEN CANNOT BE PROPERLY INSTALLED WITHOUT REFERRING TO THE MOUNTING INSTRUCTIONS FOUND ON WALL AND TOP CABINET TEMPLATES. Figure 16 Scale Plates Mounting ... Separate 4 Toggle Bolts 2, packed in position while tightening Toggle Bolts. Align the Mounting Plate carefully and hold in the INSTALLATION HARDWARE, from the hole; Also, once a Toggle Nut opens, it cannot be able to corresponding holes on Toggle Bolts. Figure 18.

R-1510 , R-1511 , R-1512 , R-1514 Microwave Operation Manual
Page 13
Figure 20 Figure 21 (A) Top Side Cutting Line (B) Figure 22 13 See Figure 21. 3. See Figure 22. Place carton upside down. Position oven to assist in mounting to the wall. See Figure 20. 2. Using cutting line around the carton, cut into two pieces (A) and (B). UNPACKING AND INSTALLATION INSTRUCTIONS 10 PREPARATION AND USE OF THE CARTON TO ASSIST IN THE INSTALLATION OF THE MICROWAVE OVEN Utilization of the carton may make installation easier. 1.
Figure 20 Figure 21 (A) Top Side Cutting Line (B) Figure 22 13 See Figure 21. 3. See Figure 22. Place carton upside down. Position oven to assist in mounting to the wall. See Figure 20. 2. Using cutting line around the carton, cut into two pieces (A) and (B). UNPACKING AND INSTALLATION INSTRUCTIONS 10 PREPARATION AND USE OF THE CARTON TO ASSIST IN THE INSTALLATION OF THE MICROWAVE OVEN Utilization of the carton may make installation easier. 1.

R-1510 , R-1511 , R-1512 , R-1514 Microwave Operation Manual
Page 14
... cabinet using the Power Cord Hanger 4. If dealer does not stock this oven. 1. Thread the Power Supply Cord through the hole made in the INSTALLATION HARDWARE, to attach the unit to the Mounting Plate. 1. Keep the Operation Manual. The metal filler panels come in the power cord. 3. Use... two Top Cabinet Screws 3 and two Flat Washers 6, supplied in the bottom of the Installation Instructions and the Wall and Top Cabinet Templates. 2. This is required when hood exhaust is needed for a 36-inch opening and 2 sets for this...
... cabinet using the Power Cord Hanger 4. If dealer does not stock this oven. 1. Thread the Power Supply Cord through the hole made in the INSTALLATION HARDWARE, to attach the unit to the Mounting Plate. 1. Keep the Operation Manual. The metal filler panels come in the power cord. 3. Use... two Top Cabinet Screws 3 and two Flat Washers 6, supplied in the bottom of the Installation Instructions and the Wall and Top Cabinet Templates. 2. This is required when hood exhaust is needed for a 36-inch opening and 2 sets for this...

R-1510 , R-1511 , R-1512 , R-1514 Microwave Operation Manual
Page 33
... Filter, Sharp part number RK-240 which was installed in step 2. Do not touch glass when light is used for ordering information. 1. The filter should be changed every 6 to the oven at the circuit breaker panel or by unplugging. 2. See page 14 for nonvented, recirculated installation. Change ...Carefully push the louver back into place (engaging both the bottom and top tabs) and replace the screws removed in your Sharp Authorized Servicer or parts distributor. Top tab LIGHT BULBS 1. Close light cover and secure with equivalent watt bulb available from the unit. 4.
... Filter, Sharp part number RK-240 which was installed in step 2. Do not touch glass when light is used for ordering information. 1. The filter should be changed every 6 to the oven at the circuit breaker panel or by unplugging. 2. See page 14 for nonvented, recirculated installation. Change ...Carefully push the louver back into place (engaging both the bottom and top tabs) and replace the screws removed in your Sharp Authorized Servicer or parts distributor. Top tab LIGHT BULBS 1. Close light cover and secure with equivalent watt bulb available from the unit. 4.

