Operation Manual
Page 5
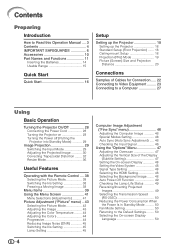
... Names and Functions 11 Inserting the Batteries 14 Usable Range 15 Quick Start Quick Start 16 Setup Setting up the Projector 18 Setting up the Projector 18 Standard Setup (Front Projection) ....... 18 Ceiling-mount Setup 18 Projection (PRJ) Mode 19 Picture (Screen) Size and Projection Distance 20 Connections Samples of Cables for Connection...
... Names and Functions 11 Inserting the Batteries 14 Usable Range 15 Quick Start Quick Start 16 Setup Setting up the Projector 18 Setting up the Projector 18 Standard Setup (Front Projection) ....... 18 Ceiling-mount Setup 18 Projection (PRJ) Mode 19 Picture (Screen) Size and Projection Distance 20 Connections Samples of Cables for Connection...

Operation Manual
Page 7
... from the type of time, unplug it is operated. 2. in this product from the wall outlet and disconnect the cable system. Any mounting of these instructions before you are provided for example, near a bath tub, wash bowl, kitchen sink, or laundry tub; Transportation A...in a built-in the operating instructions should be read all of the product should follow the manufacturer's instructions, and should use a mounting accessory recommended by the manufacturer. 9. For products intended to the product. Grounding or Polarization This product is provided or the manufacturer's ...
... from the type of time, unplug it is operated. 2. in this product from the wall outlet and disconnect the cable system. Any mounting of these instructions before you are provided for example, near a bath tub, wash bowl, kitchen sink, or laundry tub; Transportation A...in a built-in the operating instructions should be read all of the product should follow the manufacturer's instructions, and should use a mounting accessory recommended by the manufacturer. 9. For products intended to the product. Grounding or Polarization This product is provided or the manufacturer's ...

Operation Manual
Page 8
...) that the product is a registered trademark of International Business Machines Corporation in a fire or electric shock. d. e. b. Wall or Ceiling Mounting This product should be mounted to a wall or ceiling only as this can result in a risk of any kind on the product. 17. Object and Liquid Entry ...Never push objects of any service or repairs to this product, ask the service technician to perform safety checks to determine that produce heat. • The DLP...
...) that the product is a registered trademark of International Business Machines Corporation in a fire or electric shock. d. e. b. Wall or Ceiling Mounting This product should be mounted to a wall or ceiling only as this can result in a risk of any kind on the product. 17. Object and Liquid Entry ...Never push objects of any service or repairs to this product, ask the service technician to perform safety checks to determine that produce heat. • The DLP...
Operation Manual
Page 19
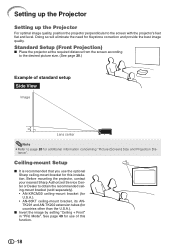
... size. (See page 20.) Example of this installation. See page 49 for use the optional Sharp ceiling-mount bracket for this function. 18 Ceiling-mount Setup I Place the projector at the required distance from the screen according to page 20 for additional information concerning "Picture ...(Screen) Size and Projection Dis- Before mounting the projector, contact your nearest Sharp Authorized Service Center or Dealer to the screen with the projector's feet flat and level. I Invert the image by setting "Ceiling + Front" in ...
... size. (See page 20.) Example of this installation. See page 49 for use the optional Sharp ceiling-mount bracket for this function. 18 Ceiling-mount Setup I Place the projector at the required distance from the screen according to page 20 for additional information concerning "Picture ...(Screen) Size and Projection Dis- Before mounting the projector, contact your nearest Sharp Authorized Service Center or Dealer to the screen with the projector's feet flat and level. I Invert the image by setting "Ceiling + Front" in ...

Operation Manual
Page 20
... projection (with a translucent screen) Menu item © "Ceiling + Front" I Ceiling mounted, rear projection (with a translucent screen) Menu item © "Rear" Menu item © "Ceiling + Rear" Indication of the 4 projection modes shown in the diagram below. Example: ... the Projection Image Size and Projection Distance Refer to page 20 for additional information concerning "Picture (Screen) Size and Projection Distance". Projection (PRJ) Mode The projector can set the PRJ Mode in "Options2" menu.
... projection (with a translucent screen) Menu item © "Ceiling + Front" I Ceiling mounted, rear projection (with a translucent screen) Menu item © "Rear" Menu item © "Ceiling + Rear" Indication of the 4 projection modes shown in the diagram below. Example: ... the Projection Image Size and Projection Distance Refer to page 20 for additional information concerning "Picture (Screen) Size and Projection Distance". Projection (PRJ) Mode The projector can set the PRJ Mode in "Options2" menu.

