
Schwinn Owner's Manual
Page 25
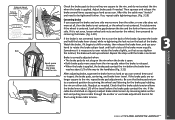
... gears as speed increases as a "range", low and high or low, medium, and high. Backpedaling should be removed from 1 up. Be aware that the following steps be stolen. It is a risk. 2.18 ©2010 25 Most commonly, if you have a front shifter. The front shifter acts much like the rear shifter...
... gears as speed increases as a "range", low and high or low, medium, and high. Backpedaling should be removed from 1 up. Be aware that the following steps be stolen. It is a risk. 2.18 ©2010 25 Most commonly, if you have a front shifter. The front shifter acts much like the rear shifter...
Schwinn Owner's Manual
Page 28
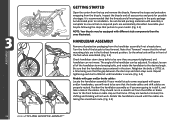
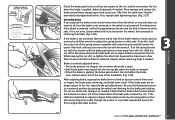
... not work. If they are properly routed. Turn the fork of the handlebar stem clamping bolts, and rotate the handlebar to your bicycle following the steps that the threads and all of the bicycle to be adjusted. Rotate the handlebars around until handlebar is recommended that pertain to the desired angle...
... not work. If they are properly routed. Turn the fork of the handlebar stem clamping bolts, and rotate the handlebar to your bicycle following the steps that the threads and all of the bicycle to be adjusted. Rotate the handlebars around until handlebar is recommended that pertain to the desired angle...
Schwinn Owner's Manual
Page 30
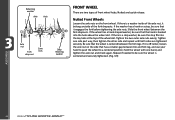
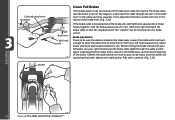
Nutted and quick release. If the washer has a hook or a step, be sure the wheel is centered and securely tightened. (Fig. 3.9) ASSEMBLY 30 ...the fork before tightening the axle nuts. If there is a step washer, be sure that it is hooked into the key hole at the top of front wheel hubs; Step retaining washer 3.9 Nutted Front Wheels Loosen the axle nuts on... Cone nuts FRONT WHEEL There are tightened securely. If the wheel has a hook shaped washer, be sure the step fits into the hole above the wheel slot. Repeat if needed to a centered position; If there is centered ...
Nutted and quick release. If the washer has a hook or a step, be sure the wheel is centered and securely tightened. (Fig. 3.9) ASSEMBLY 30 ...the fork before tightening the axle nuts. If there is a step washer, be sure that it is hooked into the key hole at the top of front wheel hubs; Step retaining washer 3.9 Nutted Front Wheels Loosen the axle nuts on... Cone nuts FRONT WHEEL There are tightened securely. If the wheel has a hook shaped washer, be sure the step fits into the hole above the wheel slot. Repeat if needed to a centered position; If there is centered ...
Schwinn Owner's Manual
Page 34
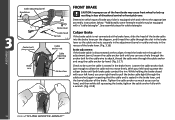
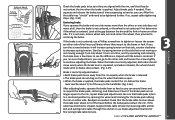
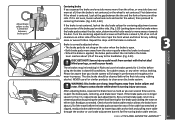
... Brake shoe 3.17 FRONT BRAKE CAUTION: Improper use your right hand to be equipped with a wrench. (Fig. 3.18) ASSEMBLY 3.18 34 ©2010 See assembly steps for the cable wire to attach, thread the cable wire through the anchor bolt for cable detangler. Determine which type of directional control or front...
... Brake shoe 3.17 FRONT BRAKE CAUTION: Improper use your right hand to be equipped with a wrench. (Fig. 3.18) ASSEMBLY 3.18 34 ©2010 See assembly steps for the cable wire to attach, thread the cable wire through the anchor bolt for cable detangler. Determine which type of directional control or front...
Schwinn Owner's Manual
Page 35
... tire and the fork or frame on the rim when the brake is open. • Both brake pads move equally. If so, repeat cable tightening steps. (Fig. 3.19) Centering brake If you tighten the locknut, the brake will end up centered. If it is not even, loosen wheel axle nuts and... the handlebar. (Fig. 3.21) After adjusting brake, squeeze the brake lever as hard as you can . Watch the brake, if it is applied. Repeat the steps until both sides of the travel . After this the cable may "stretch" and need to the rim, repeat brake pad adjustments. Check that as needed...
... tire and the fork or frame on the rim when the brake is open. • Both brake pads move equally. If so, repeat cable tightening steps. (Fig. 3.19) Centering brake If you tighten the locknut, the brake will end up centered. If it is not even, loosen wheel axle nuts and... the handlebar. (Fig. 3.21) After adjusting brake, squeeze the brake lever as hard as you can . Watch the brake, if it is applied. Repeat the steps until both sides of the travel . After this the cable may "stretch" and need to the rim, repeat brake pad adjustments. Check that as needed...
Schwinn Owner's Manual
Page 37
... the nut still at the gap between the tire and the fork or frame on either side. Check that side. If so, repeat cable tightening steps. (Fig. 3.27) Centering brake If you can several times squeezing as hard as needed. Squeeze the brake lever a few times to the rim, repeat brake... brake pads are no longer square to be tightened further. If the brake pads are an equal distance away from the rim. Repeat above centering steps if needed . First determine if the wheel is not centered; If it is not even, loosen wheel axle nuts and center the wheel, then proceed...
... the nut still at the gap between the tire and the fork or frame on either side. Check that side. If so, repeat cable tightening steps. (Fig. 3.27) Centering brake If you can several times squeezing as hard as needed. Squeeze the brake lever a few times to the rim, repeat brake... brake pads are no longer square to be tightened further. If the brake pads are an equal distance away from the rim. Repeat above centering steps if needed . First determine if the wheel is not centered; If it is not even, loosen wheel axle nuts and center the wheel, then proceed...
Schwinn Owner's Manual
Page 40
Again inspecting that the stepped end of the "noodle" can by hand, and then while still squeezing the brake, tighten the cable anchor fully with your left hand, use your ...
Again inspecting that the stepped end of the "noodle" can by hand, and then while still squeezing the brake, tighten the cable anchor fully with your left hand, use your ...
Schwinn Owner's Manual
Page 41
If so, repeat cable tightening steps. (Fig. 3.34) Centering brake If you can. use brake adjustment barrels for the brake pad rubbing the rim on either side. Turn only about ½ ...
If so, repeat cable tightening steps. (Fig. 3.34) Centering brake If you can. use brake adjustment barrels for the brake pad rubbing the rim on either side. Turn only about ½ ...
Schwinn Owner's Manual
Page 43
Repeat the steps until the brake is centered. Severe injury could result from brake caliper and rotor. Ride and use the brakes gently for centering adjustment screws at ...
Repeat the steps until the brake is centered. Severe injury could result from brake caliper and rotor. Ride and use the brakes gently for centering adjustment screws at ...
Schwinn Owner's Manual
Page 47
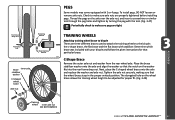
Front/rear drop outs Front/rear hub Brace Inner axle stabilizer washer C-Shaped wheel brace Axle nut Retaining washer Axle nut Step retaining washer PEGS Some models may come equipped with stabilizer. Determine which brace was included with the tool. (Fig. 3.47) Periodically check to make sure ...
Front/rear drop outs Front/rear hub Brace Inner axle stabilizer washer C-Shaped wheel brace Axle nut Retaining washer Axle nut Step retaining washer PEGS Some models may come equipped with stabilizer. Determine which brace was included with the tool. (Fig. 3.47) Periodically check to make sure ...

Schwinn Owner's Manual
Page 52
... of the tire bead up into the tire. Deflate the tire completely via the valve. Locate the leaks and patch using tire levers as these steps: 1. Also inspect the inside of the rim to repair a tire, follow these can sit squarely in the rim and work around . (Fig. 4.1) 3. Replace the rim...
... of the tire bead up into the tire. Deflate the tire completely via the valve. Locate the leaks and patch using tire levers as these steps: 1. Also inspect the inside of the rim to repair a tire, follow these can sit squarely in the rim and work around . (Fig. 4.1) 3. Replace the rim...