Owners Manual
Page 1
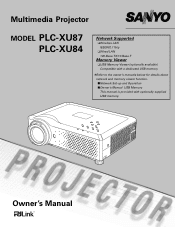
Owner's Manual Multimedia Projector MODEL PLC-XU87 PLC-XU84 Network Supported ❏Wireless LAN IEEE802.11b/g ❏Wired LAN 100-Base-TX/10-Base-T Memory Viewer ❏USB Memory Viewer (optionally available) Compatible with a dedicated USB memory ✽Refer to the owner's manuals below for details about network and memory viewer function. ■Network Set-up and Operation ■Owner's Manual USB Memory This manual is provided with optionally supplied USB memory.
Owner's Manual Multimedia Projector MODEL PLC-XU87 PLC-XU84 Network Supported ❏Wireless LAN IEEE802.11b/g ❏Wired LAN 100-Base-TX/10-Base-T Memory Viewer ❏USB Memory Viewer (optionally available) Compatible with a dedicated USB memory ✽Refer to the owner's manuals below for details about network and memory viewer function. ■Network Set-up and Operation ■Owner's Manual USB Memory This manual is provided with optionally supplied USB memory.
Owners Manual
Page 2
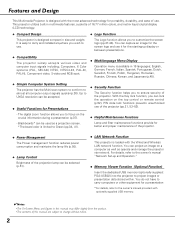
...You do not have to carry computers or other equipment for a presentation *For details, refer to the owner's manual provided with the Wired and Wireless LAN network function. This projector utilizes built-in this manual may differ slightly from the product. •The contents... zoom function allows you to ensure security of 16.77 million colors, and matrix liquid crystal display (LCD) technology. ◆ Compact Design This projector is designed compact in 16 languages; For details, refer to the owner's manual "Network Set-up display or between presentations. ◆ Compatibility The...
...You do not have to carry computers or other equipment for a presentation *For details, refer to the owner's manual provided with the Wired and Wireless LAN network function. This projector utilizes built-in this manual may differ slightly from the product. •The contents... zoom function allows you to ensure security of 16.77 million colors, and matrix liquid crystal display (LCD) technology. ◆ Compact Design This projector is designed compact in 16 languages; For details, refer to the owner's manual "Network Set-up display or between presentations. ◆ Compatibility The...
Owners Manual
Page 24
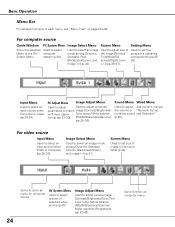
...image [Contrast/Brightness/Color/Tint/ Color temp./White balance (R/G/B)/Sharpness/Gamma/ Noise reduction/Progressive] (pp.42-43). Screen Menu Used to set the projector's operating configurations (pp.4555). AV System Menu Used to Normal or Wide (p.44). 24 Same function as computer menu. Image Select Menu Used ... +/-] (pp.36-37). For video source Input Menu Used to adjust size of selected video source (p.40). Basic Operation Menu Bar For detailed functions of the OnScreen Menu. Screen Menu Used to select an input source either Computer or Video. (pp.28-29). Input Menu Used ...
...image [Contrast/Brightness/Color/Tint/ Color temp./White balance (R/G/B)/Sharpness/Gamma/ Noise reduction/Progressive] (pp.42-43). Screen Menu Used to set the projector's operating configurations (pp.4555). AV System Menu Used to Normal or Wide (p.44). 24 Same function as computer menu. Image Select Menu Used ... +/-] (pp.36-37). For video source Input Menu Used to adjust size of selected video source (p.40). Basic Operation Menu Bar For detailed functions of the OnScreen Menu. Screen Menu Used to select an input source either Computer or Video. (pp.28-29). Input Menu Used ...
Owners Manual
Page 26
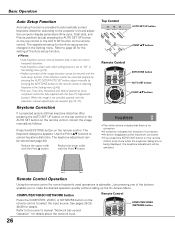
... COMPUTER/VIDEO/NETWORK button Press the COMPUTER, VIDEO, or NETWORK button on the remote control. Use the Point ed buttons to the projector's tilt and adjust the computer display parameters (Fine sync, Total dots, and Picture position) by pressing the KEYSTONE button on the remote...;Perfect correction of the image distortion cannot be ensured with the Auto setup function. The operational setup for details about the network input. Refer to page 45 for details. Keystone Correction If a projected picture still has keystone distortion after pressing the AUTO SET UP button on the...
... COMPUTER/VIDEO/NETWORK button Press the COMPUTER, VIDEO, or NETWORK button on the remote control. Use the Point ed buttons to the projector's tilt and adjust the computer display parameters (Fine sync, Total dots, and Picture position) by pressing the KEYSTONE button on the remote...;Perfect correction of the image distortion cannot be ensured with the Auto setup function. The operational setup for details about the network input. Refer to page 45 for details. Keystone Correction If a projected picture still has keystone distortion after pressing the AUTO SET UP button on the...
Owners Manual
Page 27
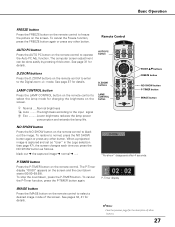
...show" disappears after 4 seconds. To cancel the Freeze function, press the FREEZE button again or press any other button. See page 31 for details. LAMP CONTROL button Press the LAMP CONTROL button on the remote control to select the lamp mode for the description of the screen. black out... ➜ the captured image ➜ normal P-TIMER button Press the P-TIMER button on the screen. See pages 34, 41 for details. ✔Note: • See the previous page for changing the brightness on the remote control to black out the image. To cancel the P-...
...show" disappears after 4 seconds. To cancel the Freeze function, press the FREEZE button again or press any other button. See page 31 for details. LAMP CONTROL button Press the LAMP CONTROL button on the remote control to select the lamp mode for the description of the screen. black out... ➜ the captured image ➜ normal P-TIMER button Press the P-TIMER button on the screen. See pages 34, 41 for details. ✔Note: • See the previous page for changing the brightness on the remote control to black out the image. To cancel the P-...
Owners Manual
Page 48
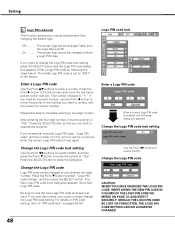
... code input dialog box appears. Off The screen logo can start to switch On/Off. If you can be changed to "4321" at hand. For details on PIN code setting, refer to "Quit." Change the Logo PIN code lock setting Use the Point 7 8 buttons to switch On/Off, and then press..., you could no longer change " and then press the SELECT button. Change the Logo PIN code lock setting Use the Point 7 8 buttons to operate the projector.
... code input dialog box appears. Off The screen logo can start to switch On/Off. If you can be changed to "4321" at hand. For details on PIN code setting, refer to "Quit." Change the Logo PIN code lock setting Use the Point 7 8 buttons to switch On/Off, and then press..., you could no longer change " and then press the SELECT button. Change the Logo PIN code lock setting Use the Point 7 8 buttons to operate the projector.
Owners Manual
Page 55
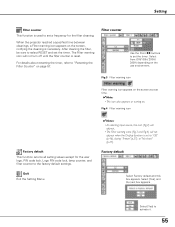
... warning icons (Fig.3 and Fig.4) will not turn off until the filter counter is reset. Factory default Select Factory default and this box appears. For details about resetting the timer, refer to "Resetting the Filter Counter" on the use environment. Select [Yes] to set the timer. Setting Filter counter This function... appears on the screen at a set to select RESET and set the timer. Filter counter Use the Point 7 8 buttons to activate it. 55 When the projector reached a specified time between cleanings, a Filter warning icon appears on ..
... warning icons (Fig.3 and Fig.4) will not turn off until the filter counter is reset. Factory default Select Factory default and this box appears. For details about resetting the timer, refer to "Resetting the Filter Counter" on the use environment. Select [Yes] to set the timer. Setting Filter counter This function... appears on the screen at a set to select RESET and set the timer. Filter counter Use the Point 7 8 buttons to activate it. 55 When the projector reached a specified time between cleanings, a Filter warning icon appears on ..