

User Manual (user Manual) (ver.1.0) (English)
Page 1
SyncMaster XL2270HD XL2370HD LCD TV Monitor User Manual The colour and the appearance may differ depending on the product, and the specifications are subject to change without prior notice to improve the performance.
SyncMaster XL2270HD XL2370HD LCD TV Monitor User Manual The colour and the appearance may differ depending on the product, and the specifications are subject to change without prior notice to improve the performance.
User Manual (user Manual) (ver.1.0) (English)
Page 2
... 3-6 Standard Signal Mode Table 3-7 INSTALLING THE SOFTWARE Natural Color 4-1 MultiScreen 4-2 TROUBLESHOOTING Monitor Self-Diagnosis 5-1 Before Requesting Service 5-2 FAQ 5-3 MORE INFORMATION Specifications 6-1 Power Saving Function 6-2 Contact SAMSUNG WORLDWIDE 6-3 Correct Disposal 6-4
... 3-6 Standard Signal Mode Table 3-7 INSTALLING THE SOFTWARE Natural Color 4-1 MultiScreen 4-2 TROUBLESHOOTING Monitor Self-Diagnosis 5-1 Before Requesting Service 5-2 FAQ 5-3 MORE INFORMATION Specifications 6-1 Power Saving Function 6-2 Contact SAMSUNG WORLDWIDE 6-3 Correct Disposal 6-4

User Manual (user Manual) (ver.1.0) (English)
Page 3
...trademarks of the U.S. Manufactured under licence from Dolby Laboratories. Environmental Protection Agency. TruSurround HD technology is the registered trademark of Samsung Electronics, Co., Ltd. Dolby and the double-D symbol are subject to the 'Troubleshooting' section. Major Safety Precautions 1-1 ...1 Major Safety Precautions 1-1 Before You Start Icons used in this manual is reserved by Samsung Electronics, Co., Ltd. Copyright Notice The contents of this manual are trademarks of Samsung Electronics, Co., Ltd. Using this Manual • Make yourself fully aware of this ...
...trademarks of the U.S. Manufactured under licence from Dolby Laboratories. Environmental Protection Agency. TruSurround HD technology is the registered trademark of Samsung Electronics, Co., Ltd. Dolby and the double-D symbol are subject to the 'Troubleshooting' section. Major Safety Precautions 1-1 ...1 Major Safety Precautions 1-1 Before You Start Icons used in this manual is reserved by Samsung Electronics, Co., Ltd. Copyright Notice The contents of this manual are trademarks of Samsung Electronics, Co., Ltd. Using this Manual • Make yourself fully aware of this ...
User Manual (user Manual) (ver.1.0) (English)
Page 4
Vertical Resolution x 3 1-2 Major Safety Precautions Install the product so the required distances shown in fire or a problem with the product. This may result in the figure are kept. When installing the product with a stand When installing the product with your fingernails or a sharp object. • Avoid cleaning the product by spraying water onto it. If you do so may result in the internal temperature. Horizontal Resolution x Max. A white stain may differ depending on models. Securing the Installation Space • Keep the required distances between the product ...
Vertical Resolution x 3 1-2 Major Safety Precautions Install the product so the required distances shown in fire or a problem with the product. This may result in the figure are kept. When installing the product with a stand When installing the product with your fingernails or a sharp object. • Avoid cleaning the product by spraying water onto it. If you do so may result in the internal temperature. Horizontal Resolution x Max. A white stain may differ depending on models. Securing the Installation Space • Keep the required distances between the product ...

User Manual (user Manual) (ver.1.0) (English)
Page 5
Must be grounded to follow the precautions marked with this sign may result in a personal injury or property damage. Avoid plugging in or unplugging the power supply with wet hands. • Otherwise, it may result in fire due to overheating of the wall outlet. Avoid connecting multiple electric appliances to a single wall outlet. • Otherwise, it may result in a serious injury or even a fatality. Meaning of the power plug or the wall outlet are for your reference and may result in electric shock or injury. Power Related The following images are covered in dust, ...
Must be grounded to follow the precautions marked with this sign may result in a personal injury or property damage. Avoid plugging in or unplugging the power supply with wet hands. • Otherwise, it may result in fire due to overheating of the wall outlet. Avoid connecting multiple electric appliances to a single wall outlet. • Otherwise, it may result in a serious injury or even a fatality. Meaning of the power plug or the wall outlet are for your reference and may result in electric shock or injury. Power Related The following images are covered in dust, ...

User Manual (user Manual) (ver.1.0) (English)
Page 6
When unplugging the power plug from the wall outlet, make sure to hold it by the plug and not by our company. Avoid installing the product in a badly-ventilated location such as inside a bookshelf or closet. • Otherwise, it within a vehicle. • This may result in a problem with the product, you use the product in a location exposed to excessive vibrations, it may result in a location exposed to direct sunlight and installing the product near a heat source such as on the product. • Otherwise, it may result in electric shock or fire. Avoid installing the product ...
When unplugging the power plug from the wall outlet, make sure to hold it by the plug and not by our company. Avoid installing the product in a badly-ventilated location such as inside a bookshelf or closet. • Otherwise, it within a vehicle. • This may result in a problem with the product, you use the product in a location exposed to excessive vibrations, it may result in a location exposed to direct sunlight and installing the product near a heat source such as on the product. • Otherwise, it may result in electric shock or fire. Avoid installing the product ...
User Manual (user Manual) (ver.1.0) (English)
Page 7
Avoid installing the product where children may reach it . • This may result in a problem with the product or injury. When installing the product on a console or shelf, make sure that the front of the product does not protrude out of the console or shelf. • Otherwise, this may cause the product to fall and this case, install the product only after consulting one of our service engineers about the matter. • Places exposed to microscopic dust, chemicals, too high or low temperature, high humidity, airports or stations where the product is installed in electric shock or fire...
Avoid installing the product where children may reach it . • This may result in a problem with the product or injury. When installing the product on a console or shelf, make sure that the front of the product does not protrude out of the console or shelf. • Otherwise, this may cause the product to fall and this case, install the product only after consulting one of our service engineers about the matter. • Places exposed to microscopic dust, chemicals, too high or low temperature, high humidity, airports or stations where the product is installed in electric shock or fire...

User Manual (user Manual) (ver.1.0) (English)
Page 8
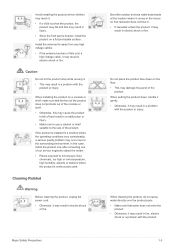
If you drop the product or the case is easily scratched, be fixed, contact a service centre. This may result in injury or death. Avoid letting children hang or climb onto the product. • Otherwise, it may result in discoloration or cracking of the exterior of 1:10 before cleaning the product. Caution Avoid spraying cleansing agent directly onto the product. • This may result in electric shock or fire. 1-3 When cleaning the product, disconnect the power cord and clean the product with the supplied cleaning cloth. • Avoid using chemicals such as wax, benzene...
If you drop the product or the case is easily scratched, be fixed, contact a service centre. This may result in injury or death. Avoid letting children hang or climb onto the product. • Otherwise, it may result in discoloration or cracking of the exterior of 1:10 before cleaning the product. Caution Avoid spraying cleansing agent directly onto the product. • This may result in electric shock or fire. 1-3 When cleaning the product, disconnect the power cord and clean the product with the supplied cleaning cloth. • Avoid using chemicals such as wax, benzene...

User Manual (user Manual) (ver.1.0) (English)
Page 9
Caution Displaying a still image for a long time, use the product for a long time may result in an explosion or fire. Avoid using a humidifier or cooker near the product. • This may create a persistent image or stain on the screen. • If you do not touch the power cord or antenna cable. Avoid using or placing inflammable spray or objects near the product. • Otherwise, it may result in an explosion or fire. • During a thunder or lighting storm, do not use the power-saving mode or set the screensaver to the moving picture mode. Major Safety ...
Caution Displaying a still image for a long time, use the product for a long time may result in an explosion or fire. Avoid using a humidifier or cooker near the product. • This may create a persistent image or stain on the screen. • If you do not touch the power cord or antenna cable. Avoid using or placing inflammable spray or objects near the product. • Otherwise, it may result in an explosion or fire. • During a thunder or lighting storm, do not use the power-saving mode or set the screensaver to the moving picture mode. Major Safety ...

User Manual (user Manual) (ver.1.0) (English)
Page 10
The batteries (and rechargeable batteries) are not ordinary refuse and must be injured. • If the product is below your heart. 1-3 Major Safety Precautions Maintaining the Correct Posture when Using this Product Maintain the correct posture when using this product. • Adjust the angle of the battery or rechargeable battery. When using this product. • Straighten your hearing. Place the battery in a location that your arm is tilted excessively, the product may fall and this may be returned for recycling. • The customer can return used or rechargeable ...
The batteries (and rechargeable batteries) are not ordinary refuse and must be injured. • If the product is below your heart. 1-3 Major Safety Precautions Maintaining the Correct Posture when Using this Product Maintain the correct posture when using this product. • Adjust the angle of the battery or rechargeable battery. When using this product. • Straighten your hearing. Place the battery in a location that your arm is tilted excessively, the product may fall and this may be returned for recycling. • The customer can return used or rechargeable ...

User Manual (user Manual) (ver.1.0) (English)
Page 11
CONTENTS Quick Setup Guide Product Warranty (Not available in all locations) User Manual D-Sub Cable Power Cord Batteries (AAA X 2) (Not available in all of the following contents have been included. • Store the packaging box in case you need to move the product at a later stage. Installing the Product 2-1 2 Installing the Product 2-1 Package Contents • Unpack the product and check if all locations) Stand Connector Stand Remote Control Stereo Cable Cleaning Cloth SOLD SEPARATELY Cable Holder DVI Cable HDMI Cable The cleaning cloth is supplied with black high-...
CONTENTS Quick Setup Guide Product Warranty (Not available in all locations) User Manual D-Sub Cable Power Cord Batteries (AAA X 2) (Not available in all of the following contents have been included. • Store the packaging box in case you need to move the product at a later stage. Installing the Product 2-1 2 Installing the Product 2-1 Package Contents • Unpack the product and check if all locations) Stand Connector Stand Remote Control Stereo Cable Cleaning Cloth SOLD SEPARATELY Cable Holder DVI Cable HDMI Cable The cleaning cloth is supplied with black high-...
User Manual (user Manual) (ver.1.0) (English)
Page 12
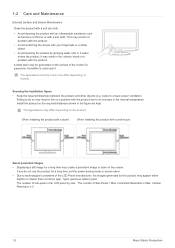
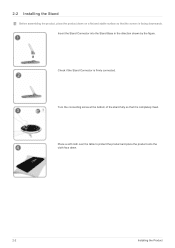
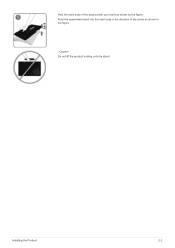
Insert the Stand Connector into the Stand Base in the direction shown by the figure. Turn the connecting screw at the bottom of the stand fully so that the screen is facing downwards. Check if the Stand Connector is completely fixed. Place a soft cloth over the table to protect the product and place the product onto the cloth face down on a flat and stable surface so that it is firmly connected. 2-2 Installing the Stand Before assembling the product, place the product down . 2-2 Installing the Product
Insert the Stand Connector into the Stand Base in the direction shown by the figure. Turn the connecting screw at the bottom of the stand fully so that the screen is facing downwards. Check if the Stand Connector is completely fixed. Place a soft cloth over the table to protect the product and place the product onto the cloth face down on a flat and stable surface so that it is firmly connected. 2-2 Installing the Stand Before assembling the product, place the product down . 2-2 Installing the Product
User Manual (user Manual) (ver.1.0) (English)
Page 13
Caution Do not lift the product holding only the stand Installing the Product 2-2 Hold the main body of the product with your hand as shown in the direction of the arrow as shown by the figure. Push the assembled stand into the main body in the figure. -
Caution Do not lift the product holding only the stand Installing the Product 2-2 Hold the main body of the product with your hand as shown in the direction of the arrow as shown by the figure. Push the assembled stand into the main body in the figure. -

User Manual (user Manual) (ver.1.0) (English)
Page 14
Turn the connecting screw at the bottom of the stand to separate it in the direction of the arrow as shown in the figure. 2-3 Installing the Product Take the Stand Connector out of the arrow as shown by pulling it . Pull the stand in the figure to protect the product and place the product face down on a flat and stable surface so that the screen faces downwards. Place a soft cloth over the table to separate it. Hold the main body of the product with your hand as shown in the direction of the Stand by the figure. 2-3 Removing the Stand Before removing the stand, place the ...
Turn the connecting screw at the bottom of the stand to separate it in the direction of the arrow as shown in the figure. 2-3 Installing the Product Take the Stand Connector out of the arrow as shown by pulling it . Pull the stand in the figure to protect the product and place the product face down on a flat and stable surface so that the screen faces downwards. Place a soft cloth over the table to separate it. Hold the main body of the product with your hand as shown in the direction of the Stand by the figure. 2-3 Removing the Stand Before removing the stand, place the ...

User Manual (user Manual) (ver.1.0) (English)
Page 15
... connected to the stand with the groove in damage to the product or injury due to the product falling. Samsung shall not be held liable for any damage or injury. •Samsung shall not be held liable for any damage to the product or injury caused by an authorized installation engineer. •...
... connected to the stand with the groove in damage to the product or injury due to the product falling. Samsung shall not be held liable for any damage or injury. •Samsung shall not be held liable for any damage to the product or injury caused by an authorized installation engineer. •...

User Manual (user Manual) (ver.1.0) (English)
Page 16
When the graphics card provides a HDMI output 2-5 Installing the Product The connecting part may differ depending on the video output supported by the PC. When the graphics card provides a DVI (digital) output • Connect the [DVI-D IN] port of the product to a PC depending on the product model. 2-5 Connecting to the D-Sub port of the PC with the DVI cable. Connect the product to the DVI port of the product to a Computer 1. When the graphics card provides a D-Sub (analogue) output • Connect the [PC IN] port of the PC with the D-Sub cable.
When the graphics card provides a HDMI output 2-5 Installing the Product The connecting part may differ depending on the video output supported by the PC. When the graphics card provides a DVI (digital) output • Connect the [DVI-D IN] port of the product to a PC depending on the product model. 2-5 Connecting to the D-Sub port of the PC with the DVI cable. Connect the product to the DVI port of the product to a Computer 1. When the graphics card provides a D-Sub (analogue) output • Connect the [PC IN] port of the PC with the D-Sub cable.
User Manual (user Manual) (ver.1.0) (English)
Page 17
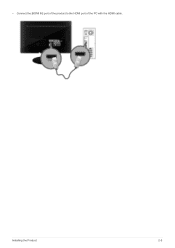
Installing the Product 2-5 • Connect the [HDMI IN] port of the product to the HDMI port of the PC with the HDMI cable.
Installing the Product 2-5 • Connect the [HDMI IN] port of the product to the HDMI port of the PC with the HDMI cable.

User Manual (user Manual) (ver.1.0) (English)
Page 18
Press [ ] button to analogue. 2. Connect the [HDMI/PC/DVI-D AUDIO IN] port on the type of the PC. 3. To use the monitor, connect the power cable to a power outlet and the [POWER] port on the monitor. (The input voltage is switched automatically.) • You may enjoy clear and quality sound from the computer sound card using the monitor's speakers. (You don't need to install separate speakers for your computer.) • You may get a blank screen depending on the rear side of the monitor to the sound card of video card you are using if you connect the D-sub and DVI cables ...
Press [ ] button to analogue. 2. Connect the [HDMI/PC/DVI-D AUDIO IN] port on the type of the PC. 3. To use the monitor, connect the power cable to a power outlet and the [POWER] port on the monitor. (The input voltage is switched automatically.) • You may enjoy clear and quality sound from the computer sound card using the monitor's speakers. (You don't need to install separate speakers for your computer.) • You may get a blank screen depending on the rear side of the monitor to the sound card of video card you are using if you connect the D-sub and DVI cables ...

User Manual (user Manual) (ver.1.0) (English)
Page 19
2-6 Using it as a TV You may view television programmes on the monitor if it is not bent when connecting it to the antenna input terminal [ANT IN]. Installing the Product 2-6 Be careful that the coaxial cable is connected to an antenna or cable/satellite system without installing any separate TV reception hardware or software on your computer. 1. Connect the cable/satellite or TV antenna cable to install it was purchased, the initial setup operations () begin. When the product is turned on the wall and then connect the antenna/cable/satellite TV cable. • When using an outdoor ...
2-6 Using it as a TV You may view television programmes on the monitor if it is not bent when connecting it to the antenna input terminal [ANT IN]. Installing the Product 2-6 Be careful that the coaxial cable is connected to an antenna or cable/satellite system without installing any separate TV reception hardware or software on your computer. 1. Connect the cable/satellite or TV antenna cable to install it was purchased, the initial setup operations () begin. When the product is turned on the wall and then connect the antenna/cable/satellite TV cable. • When using an outdoor ...
User Manual (user Manual) (ver.1.0) (English)
Page 20
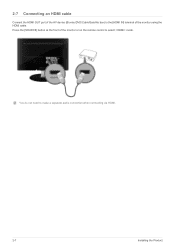
Press the [SOURCE] button at the front of the monitor or on the remote control to the [HDMI IN] terminal of the AV device (Blu-ray/DVD/Cable/Satellite box) to select mode. 2-7 Connecting an HDMI cable Connect the HDMI OUT port of the monitor using the HDMI cable. You do not need to make a separate audio connection when connecting via HDMI. 2-7 Installing the Product
Press the [SOURCE] button at the front of the monitor or on the remote control to the [HDMI IN] terminal of the AV device (Blu-ray/DVD/Cable/Satellite box) to select mode. 2-7 Connecting an HDMI cable Connect the HDMI OUT port of the monitor using the HDMI cable. You do not need to make a separate audio connection when connecting via HDMI. 2-7 Installing the Product
