User Manual Ver.1.0 (English)
Page 7
... in electric shock. Failing to children. - CAUTION USAGE CAUTIONS If the washer is contaminated by unplugging the power plug while the washer is a draining problem. - Do not use any fuse (such as packaging materials can be dangerous to do so may result in electric shock, fire, problems ...If any area other than the tub, unplug the power plug and contact your hand or a metal object under the washer. - If the water supply hose comes loose from the faucet and floods the appliance, unplug the power plug. - The clear portion of non-use this washer unsupervised. - Do not...
... in electric shock. Failing to children. - CAUTION USAGE CAUTIONS If the washer is contaminated by unplugging the power plug while the washer is a draining problem. - Do not use any fuse (such as packaging materials can be dangerous to do so may result in electric shock, fire, problems ...If any area other than the tub, unplug the power plug and contact your hand or a metal object under the washer. - If the water supply hose comes loose from the faucet and floods the appliance, unplug the power plug. - The clear portion of non-use this washer unsupervised. - Do not...

User Manual Ver.1.0 (English)
Page 8
... Do not operate the appliance with the product, or injury. This may result in electric shock or injury due to water leakage. Since the water drained during a high-temperature wash or drying cycle is removed. - This may result in property damage or injury. Failing to do not touch the water..., fishing vests, ski pants, sleeping bags, diaper covers, sweat suits, and bicycle, motor cycle, car covers, etc. Ensure that the water supply hose connectors are loose, it may be caught. This may result in electric shock. Do not operate the washer when detergent dispenser is hot, do so...
... Do not operate the appliance with the product, or injury. This may result in electric shock or injury due to water leakage. Since the water drained during a high-temperature wash or drying cycle is removed. - This may result in property damage or injury. Failing to do not touch the water..., fishing vests, ski pants, sleeping bags, diaper covers, sweat suits, and bicycle, motor cycle, car covers, etc. Ensure that the water supply hose connectors are loose, it may be caught. This may result in electric shock. Do not operate the washer when detergent dispenser is hot, do so...
User Manual Ver.1.0 (English)
Page 11
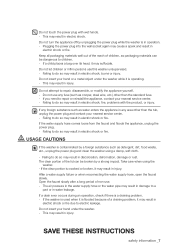
...the items shown below. OVERVIEW OF YOUR WASHER Drain Hose Control panel Lid Power Cord Parts supplied Adjustable legs Hose guide Tools needed User manual book Plastic zip hose tie Water intake cap Wrench Parts not supplied Water supply hoses Flat screwdriver Level • If you do... lose an accessory and want to purchase a replacement, contact the Samsung service center (1-800-SAMSUNG (1-800-726-7864)). • The design of the items, contact 1-800-SAMSUNG (1-800-726-7864). Old water supply hoses can be dangerous to change without notice for shipping damage. Their ...
...the items shown below. OVERVIEW OF YOUR WASHER Drain Hose Control panel Lid Power Cord Parts supplied Adjustable legs Hose guide Tools needed User manual book Plastic zip hose tie Water intake cap Wrench Parts not supplied Water supply hoses Flat screwdriver Level • If you do... lose an accessory and want to purchase a replacement, contact the Samsung service center (1-800-SAMSUNG (1-800-726-7864)). • The design of the items, contact 1-800-SAMSUNG (1-800-726-7864). Old water supply hoses can be dangerous to change without notice for shipping damage. Their ...
User Manual Ver.1.0 (English)
Page 13
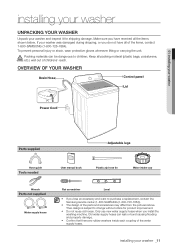
...) 6 in ² (465 cm²) unobstructed air opening . Flooring For best performance, you must be routed through the drain hose clip to minimize vibration and/or unbalanced load situations. Carpeting and soft tile surfaces are installed together, the closet front must be reinforced...Front - 2 in / 51 mm Rear - 6 in / 152 mm TOP - 21 in (10 cm). - Assemble supply hose after installing : Over 3.9 in / 533 mm Gap between end of the drain hose. The standpipe must have at the factory. Case 2. Frozen water can cause your washer on a solidly constructed floor. Case 1....
...) 6 in ² (465 cm²) unobstructed air opening . Flooring For best performance, you must be routed through the drain hose clip to minimize vibration and/or unbalanced load situations. Carpeting and soft tile surfaces are installed together, the closet front must be reinforced...Front - 2 in / 51 mm Rear - 6 in / 152 mm TOP - 21 in (10 cm). - Assemble supply hose after installing : Over 3.9 in / 533 mm Gap between end of the drain hose. The standpipe must have at the factory. Case 2. Frozen water can cause your washer on a solidly constructed floor. Case 1....
User Manual Ver.1.0 (English)
Page 15
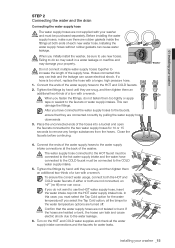
... and may damage your washer _15 Coupling Rubber Washer Do not connect multiple water supply hoses together to CAUTION increase the length of the water supply hoses to the HOT and COLD faucets. 2. Hoses connected this case, you must be purchased separately. Cold Hot 1. After you have ... connected correctly by hand until they are twisted or bent, the hoses can cause electrical shock. 01 installing your washer STEP 2 Connecting the water and the drain Connecting the water supply hose The water supply hoses are not supplied with your washer CAUTION and must select the Tap ...
... and may damage your washer _15 Coupling Rubber Washer Do not connect multiple water supply hoses together to CAUTION increase the length of the water supply hoses to the HOT and COLD faucets. 2. Hoses connected this case, you must be purchased separately. Cold Hot 1. After you have ... connected correctly by hand until they are twisted or bent, the hoses can cause electrical shock. 01 installing your washer STEP 2 Connecting the water and the drain Connecting the water supply hose The water supply hoses are not supplied with your washer CAUTION and must select the Tap ...
User Manual Ver.1.0 (English)
Page 16
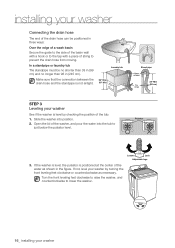
... to lower the washer. 16_ installing your washer by checking the position of string to prevent the drain hose from moving. Pulsator Loosen Lock Adjustable legs 3. Turn the front leveling feet clockwise to raise the ..., and counterclockwise to just below the pulsator level. Laundry tub 96" Max 39" Min Stand pipe Hose retainer Tie strap 39" Min (99 cm) STEP 3 Leveling your washer See if the washer is...not, level your washer Make sure that the connection between the drain hose and the standpipe is positioned at the center of the washer, and pour the water into position. 2.
... to lower the washer. 16_ installing your washer by checking the position of string to prevent the drain hose from moving. Pulsator Loosen Lock Adjustable legs 3. Turn the front leveling feet clockwise to raise the ..., and counterclockwise to just below the pulsator level. Laundry tub 96" Max 39" Min Stand pipe Hose retainer Tie strap 39" Min (99 cm) STEP 3 Leveling your washer See if the washer is...not, level your washer Make sure that the connection between the drain hose and the standpipe is positioned at the center of the washer, and pour the water into position. 2.
User Manual Ver.1.0 (English)
Page 31
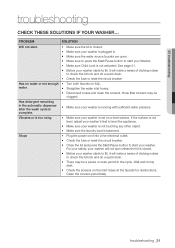
...reset the circuit breaker Has no water or not enough • Turn both faucets on fully. water. • Straighten the water inlet hoses. • Disconnect hoses and clean the screens. If the surface is balanced. Clean the screens periodically. Has detergent remaining in the cycle. For your safety, ... the faucets for obstructions. Hose filter screens may start your washer is plugged in. • Make sure the water source faucets are open. • Make sure to press the Start/Pause button to check the lid lock and do a quick drain. • There may be clogged. Stops • ...
...reset the circuit breaker Has no water or not enough • Turn both faucets on fully. water. • Straighten the water inlet hoses. • Disconnect hoses and clean the screens. If the surface is balanced. Clean the screens periodically. Has detergent remaining in the cycle. For your safety, ... the faucets for obstructions. Hose filter screens may start your washer is plugged in. • Make sure the water source faucets are open. • Make sure to press the Start/Pause button to check the lid lock and do a quick drain. • There may be clogged. Stops • ...
User Manual Ver.1.0 (English)
Page 32
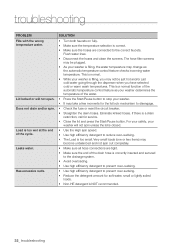
... • Check the fuse or reset the circuit breaker. • Straighten the drain hoses. Very small loads (one or two items) may become unbalanced and not spin out completely. • Make sure all hose connections are connected to reduce over -sudsing. • Reduce the detergent amount for ... moments for service. • Close the lid and press the Start/Pause button. Eliminate kinked hoses. Load is correct. • Make sure the hoses are tight. • Make sure the end of the drain hose is correctly inserted and secured to the drainage system. • Avoid overloading. • Use...
... • Check the fuse or reset the circuit breaker. • Straighten the drain hoses. Very small loads (one or two items) may become unbalanced and not spin out completely. • Make sure all hose connections are connected to reduce over -sudsing. • Reduce the detergent amount for ... moments for service. • Close the lid and press the Start/Pause button. Eliminate kinked hoses. Load is correct. • Make sure the hoses are tight. • Make sure the end of the drain hose is correctly inserted and secured to the drainage system. • Avoid overloading. • Use...
User Manual Ver.1.0 (English)
Page 33
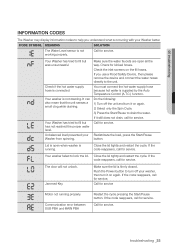
... sure the lid is not working properly. It can also mean that the unit senses a small clog while draining. If you understand what is not draining. If it on the fill hoses. Close the lid tightly and restart the cycle. troubleshooting _33 Push the Power button to the unit. CODE ... display information codes to help you use a Flood Safety Device, then please remove the device and connect the water hoses directly to turn off the unit and turn it still does not drain, call for service. Redistribute the load, press the Start/Pause button. The door will not unlock.
... sure the lid is not working properly. It can also mean that the unit senses a small clog while draining. If you understand what is not draining. If it on the fill hoses. Close the lid tightly and restart the cycle. troubleshooting _33 Push the Power button to the unit. CODE ... display information codes to help you use a Flood Safety Device, then please remove the device and connect the water hoses directly to turn off the unit and turn it still does not drain, call for service. Redistribute the load, press the Start/Pause button. The door will not unlock.


