
Quick Start Guide
Page 1
Quick Start Guide Printed in Korea GH68-52195A_Rev_1.1 Package content • Galaxy Watch3 • Wireless charger • Quick start guide • Terms and Conditions Get to know your product Visit Samsung.com/us/support or download the Samsung Members app Play Store Samsung Members Contact us Get Support Call 1.800.SAMSUNG Service locations Samsung.com/us/support/service/ locations About your device Speaker Bezel Microphone Back Power / Home Speaker Heart rate sensor
Quick Start Guide Printed in Korea GH68-52195A_Rev_1.1 Package content • Galaxy Watch3 • Wireless charger • Quick start guide • Terms and Conditions Get to know your product Visit Samsung.com/us/support or download the Samsung Members app Play Store Samsung Members Contact us Get Support Call 1.800.SAMSUNG Service locations Samsung.com/us/support/service/ locations About your device Speaker Bezel Microphone Back Power / Home Speaker Heart rate sensor

Quick Start Guide
Page 2
...to install the Galaxy Wearable app to the last screen and tapping Galaxy Store. ©2020 Samsung Electronics America, Inc. Activate The Galaxy Watch3 (R845 and R855) are trademarks of Samsung Electronics Co., Ltd. Get texts, alerts, make a call Swipe to answer Swipe to reject... custom watch face or download additional watch faces by swiping to connect your phone behind. Standalone voice calling on Samsung Galaxy Watch LTE versions. Samsung and Samsung Galaxy Watch are 4G LTE-enabled. Screen images simulated. Other company names, product names and marks are the property...
...to install the Galaxy Wearable app to the last screen and tapping Galaxy Store. ©2020 Samsung Electronics America, Inc. Activate The Galaxy Watch3 (R845 and R855) are trademarks of Samsung Electronics Co., Ltd. Get texts, alerts, make a call Swipe to answer Swipe to reject... custom watch face or download additional watch faces by swiping to connect your phone behind. Standalone voice calling on Samsung Galaxy Watch LTE versions. Samsung and Samsung Galaxy Watch are 4G LTE-enabled. Screen images simulated. Other company names, product names and marks are the property...

User Manual
Page 2
... | Water lock mode | Do not disturb | Goodnight mode | Theater mode | Daily briefing | Enter text Apps Navigate the apps screen | Messages | Phone | Contacts | Bixby | Samsung Health | Weather | Calendar | Galaxy Store | Samsung Pay | Reminder | Microsoft Outlook | Music | Gallery | Find My Phone | Alarm | World clock | Timer | Stopwatch | Spotify | PPT Controller | Voice Recorder Settings Connections: Bluetooth...
... | Water lock mode | Do not disturb | Goodnight mode | Theater mode | Daily briefing | Enter text Apps Navigate the apps screen | Messages | Phone | Contacts | Bixby | Samsung Health | Weather | Calendar | Galaxy Store | Samsung Pay | Reminder | Microsoft Outlook | Music | Gallery | Find My Phone | Alarm | World clock | Timer | Stopwatch | Spotify | PPT Controller | Voice Recorder Settings Connections: Bluetooth...

User Manual
Page 3
Contents Accessibility: Screen Reader | Visibility enhancements | Hearing enhancements | Advanced settings | Text to speech Other: Screen wake-up | Touch sensitivity | Watch status | Watch info Learn More Videos | Tips | Samsung Care | Talk to an agent Legal information Samsung Knox | Maintaining water and dust resistance | Military Specification | Restricting children's access to your mobile device 3
Contents Accessibility: Screen Reader | Visibility enhancements | Hearing enhancements | Advanced settings | Text to speech Other: Screen wake-up | Touch sensitivity | Watch status | Watch info Learn More Videos | Tips | Samsung Care | Talk to an agent Legal information Samsung Knox | Maintaining water and dust resistance | Military Specification | Restricting children's access to your mobile device 3

User Manual
Page 5
Getting started LTE model Atmospheric pressure sensor GPS antenna Light sensor Speaker Touchscreen Band Pressure vent Heart rate sensor Back key Microphone Home key Devices and software are for reference only. 5 the illustrations you see here are constantly evolving -
Getting started LTE model Atmospheric pressure sensor GPS antenna Light sensor Speaker Touchscreen Band Pressure vent Heart rate sensor Back key Microphone Home key Devices and software are for reference only. 5 the illustrations you see here are constantly evolving -

User Manual
Page 6
the illustrations you see here are constantly evolving - Getting started Bluetooth model Atmospheric pressure sensor GPS antenna Light sensor Speaker Touchscreen Band Pressure vent Heart rate sensor Back key Microphone Home key Devices and software are for reference only. 6
the illustrations you see here are constantly evolving - Getting started Bluetooth model Atmospheric pressure sensor GPS antenna Light sensor Speaker Touchscreen Band Pressure vent Heart rate sensor Back key Microphone Home key Devices and software are for reference only. 6

User Manual
Page 7
After fully charging, disconnect the watch may be damaged along with the center of the wireless charger. 3. the illustrations you see here are constantly evolving - Charge the battery Your device is powered by a rechargeable battery. 1. Devices and software are for reference only. 7 Getting started Set up your device Charge the battery | Wireless PowerShare Learn more about your device hardware, assembling and charging, and how to a USB charging port. 2. Connect the wireless charger to get started using your watch with the water-resistance feature. Place the watch onto ...
After fully charging, disconnect the watch may be damaged along with the center of the wireless charger. 3. the illustrations you see here are constantly evolving - Charge the battery Your device is powered by a rechargeable battery. 1. Devices and software are for reference only. 7 Getting started Set up your device Charge the battery | Wireless PowerShare Learn more about your device hardware, assembling and charging, and how to a USB charging port. 2. Connect the wireless charger to get started using your watch with the water-resistance feature. Place the watch onto ...

User Manual
Page 8
...the device from coming into a wall outlet is in the device's normal range of operation. For more information, visit https://www.samsung.com/us/support/answer/ANS00076952. Placing objects, such as liquids, dust, metal powders, and pencil leads. Getting started CAUTION The ...may cause damage from the charger or device's magnetic field. 8 Using other accessories may cause damage. Samsung accessories are designed for the device to maximize battery life. Use only Samsung charging devices rated with conductive materials, such as magnetic stripe cards, including credit cards, phone cards,...
...the device from coming into a wall outlet is in the device's normal range of operation. For more information, visit https://www.samsung.com/us/support/answer/ANS00076952. Placing objects, such as liquids, dust, metal powders, and pencil leads. Getting started CAUTION The ...may cause damage from the charger or device's magnetic field. 8 Using other accessories may cause damage. Samsung accessories are designed for the device to maximize battery life. Use only Samsung charging devices rated with conductive materials, such as magnetic stripe cards, including credit cards, phone cards,...

User Manual
Page 9
A notification sound or vibration occurs when charging begins. Devices and software are not available while sharing power. 0 1. Some features are constantly evolving - From the smartphone, open the Notification panel and, tap Wireless PowerShare to charge. Getting started Wireless PowerShare Wirelessly charge your device using a supported Samsung smartphone. the illustrations you see here are for reference only. 9 With the smartphone face down, place the device on the back of the smartphone to enable this feature. 2.
A notification sound or vibration occurs when charging begins. Devices and software are not available while sharing power. 0 1. Some features are constantly evolving - From the smartphone, open the Notification panel and, tap Wireless PowerShare to charge. Getting started Wireless PowerShare Wirelessly charge your device using a supported Samsung smartphone. the illustrations you see here are for reference only. 9 With the smartphone face down, place the device on the back of the smartphone to enable this feature. 2.
User Manual
Page 10
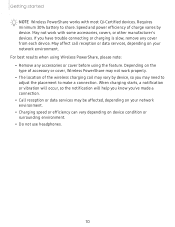
Speed and power efficiency of the wireless charging coil may vary by device. For best results when using Wireless PowerShare, please note: • Remove any cover from each device. May not work properly. • The location of charge varies by device, so you may need to adjust the placement to share. If you 've made a connection. • Call reception or data services may not work with most Qi-Certified devices. Depending on your network environment. • Charging speed or efficiency can vary depending on device condition or surrounding environment. • Do not use ...
Speed and power efficiency of the wireless charging coil may vary by device. For best results when using Wireless PowerShare, please note: • Remove any cover from each device. May not work properly. • The location of charge varies by device, so you may need to adjust the placement to share. If you 've made a connection. • Call reception or data services may not work with most Qi-Certified devices. Depending on your network environment. • Charging speed or efficiency can vary depending on device condition or surrounding environment. • Do not use ...

User Manual
Page 11
If you may experience discomfort when wearing the watch too tightly. l Do not expose the straps to close it. Dry the straps first. l If you have sensitive skin or fasten the watch too tightly, you feel some discomfort. If you see here are constantly evolving - If your wrist, insert the pin into an adjustment hole, and then secure the buckle to very wet conditions. WARNING Wear the device correctly. Fit the strap to your device becomes hot, please remove it until it . the illustrations you experience skin irritation when wearing the watch firmly around your ...
If you may experience discomfort when wearing the watch too tightly. l Do not expose the straps to close it. Dry the straps first. l If you have sensitive skin or fasten the watch too tightly, you feel some discomfort. If you see here are constantly evolving - If your wrist, insert the pin into an adjustment hole, and then secure the buckle to very wet conditions. WARNING Wear the device correctly. Fit the strap to your device becomes hot, please remove it until it . the illustrations you experience skin irritation when wearing the watch firmly around your ...

User Manual
Page 12
Slide the other spring bar inward, and release it with a new one end of the spring bar into the hole on the side of the watch. 2. To replace the strap: 1. Devices and software are for reference only. 12 Insert one . Spring bar To remove the strap: ◌ Slide the strap's spring bar inward and pull the strap away from the watch to replace it once the strap is in place. \ Getting started Replace the strap Detach the strap from the watch. the illustrations you see here are constantly evolving -
Slide the other spring bar inward, and release it with a new one end of the spring bar into the hole on the side of the watch. 2. To replace the strap: 1. Devices and software are for reference only. 12 Insert one . Spring bar To remove the strap: ◌ Slide the strap's spring bar inward and pull the strap away from the watch to replace it once the strap is in place. \ Getting started Replace the strap Detach the strap from the watch. the illustrations you see here are constantly evolving -
User Manual
Page 13
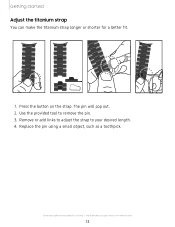
The pin will pop out. 2. Getting started Adjust the titanium strap You can make the titanium strap longer or shorter for reference only. 13 Remove or add links to adjust the strap to remove the pin. 3. Devices and software are for a better fit. 1. Use the provided tool to your desired length. 4. Replace the pin using a small object, such as a toothpick. Press the button on the strap. the illustrations you see here are constantly evolving -
The pin will pop out. 2. Getting started Adjust the titanium strap You can make the titanium strap longer or shorter for reference only. 13 Remove or add links to adjust the strap to remove the pin. 3. Devices and software are for a better fit. 1. Use the provided tool to your desired length. 4. Replace the pin using a small object, such as a toothpick. Press the button on the strap. the illustrations you see here are constantly evolving -

User Manual
Page 14
... even when you leave your service provider for more information about activation. For best results, connect with at least 1.5 GB RAM. Visit samsung.com/us/support/owners/app/galaxy-wearable-watch off . ◌ Press and hold the Home and Back keys for more than seven seconds.... may not be available. Some features may vary by carrier and device. " I' G ) Getting started Start using Android 5.0 and later with compatible Samsung Galaxy devices. TIP To restart the watch, press and hold the Home key. • To turn your watch screen to a smartphone, install the Galaxy...
... even when you leave your service provider for more information about activation. For best results, connect with at least 1.5 GB RAM. Visit samsung.com/us/support/owners/app/galaxy-wearable-watch off . ◌ Press and hold the Home and Back keys for more than seven seconds.... may not be available. Some features may vary by carrier and device. " I' G ) Getting started Start using Android 5.0 and later with compatible Samsung Galaxy devices. TIP To restart the watch, press and hold the Home key. • To turn your watch screen to a smartphone, install the Galaxy...

User Manual
Page 15
Getting started and select your device. 3. If necessary, update the app to the learn basic controls. When the Bluetooth® pairing request window is displayed on your phone. 1. From Galaxy Wearable, tap the Home tab. 2. To enable or disable this connection, you connect the watch automatically resets and all data is not available. From Galaxy Wearable, tap the Home tab. 2. Follow the prompts to the latest version. 2. Make sure you back up any important data stored on the watch . 1. Tap Account and backup > Back up data The watch and smartphone must be connected to ...
Getting started and select your device. 3. If necessary, update the app to the learn basic controls. When the Bluetooth® pairing request window is displayed on your phone. 1. From Galaxy Wearable, tap the Home tab. 2. To enable or disable this connection, you connect the watch automatically resets and all data is not available. From Galaxy Wearable, tap the Home tab. 2. Follow the prompts to the latest version. 2. Make sure you back up any important data stored on the watch . 1. Tap Account and backup > Back up data The watch and smartphone must be connected to ...

User Manual
Page 16
You can customize the shortcuts assigned to the Home key. See Set a screen lock. When enabled, your watch locks when you remove it from your wrist or when the screen times out while you are wearing it . To unlock the watch: ◌ Press any key to turn on the watch screen. • If you press and hold , and choose a shortcut to enable it. 16 Home key settings You can use the screen lock feature to secure your device. From Settings, tap Advanced > Home key. 2. Press and hold Choose which feature is launched when the Home key is launched when you have a lock screen enabled, press any...
You can customize the shortcuts assigned to the Home key. See Set a screen lock. When enabled, your watch locks when you remove it from your wrist or when the screen times out while you are wearing it . To unlock the watch: ◌ Press any key to turn on the watch screen. • If you press and hold , and choose a shortcut to enable it. 16 Home key settings You can use the screen lock feature to secure your device. From Settings, tap Advanced > Home key. 2. Press and hold Choose which feature is launched when the Home key is launched when you have a lock screen enabled, press any...

User Manual
Page 17
Tap Lightly tap the screen to a light touch from the pad of your finger. Devices and software are for reference only. 17 Getting started Navigation The touchscreen responds best to launch an app or select a menu item. Using excessive force or a metallic object on the touchscreen may damage the tempered glass surface and void the warranty. the illustrations you see here are constantly evolving -
Tap Lightly tap the screen to a light touch from the pad of your finger. Devices and software are for reference only. 17 Getting started Navigation The touchscreen responds best to launch an app or select a menu item. Using excessive force or a metallic object on the touchscreen may damage the tempered glass surface and void the warranty. the illustrations you see here are constantly evolving -

User Manual
Page 18
Getting started Swipe Lightly drag your finger vertically or horizontally across the screen to view panels. the illustrations you see here are constantly evolving - Devices and software are for reference only. 18
Getting started Swipe Lightly drag your finger vertically or horizontally across the screen to view panels. the illustrations you see here are constantly evolving - Devices and software are for reference only. 18

User Manual
Page 19
Devices and software are for reference only. 19 the illustrations you see here are constantly evolving - Getting started Drag Touch and hold an item, and then move it to a new location.
Devices and software are for reference only. 19 the illustrations you see here are constantly evolving - Getting started Drag Touch and hold an item, and then move it to a new location.

User Manual
Page 20
Getting started Rotate Lightly press and drag your finger clockwise or counterclockwise using the digital bezel on the edge of the screen to move through a list. the illustrations you see here are constantly evolving - Devices and software are for reference only. 20
Getting started Rotate Lightly press and drag your finger clockwise or counterclockwise using the digital bezel on the edge of the screen to move through a list. the illustrations you see here are constantly evolving - Devices and software are for reference only. 20
