
User Manual
Page 3
...Source (Antenna or Cable) for PIP .....52 Sound Control Customizing the Sound 56 Using Automatic Sound Settings 57 Choosing a Multi-Channel Sound (MTS)Soundtrack ......58 Using the Auto Volume 59 Setting the TruSurround XT 60 Listening to the Sound of the Sub(PIP) Picture (PC or DVI...PC 68 Adjusting the PC Screen 72 Changing the Position of the Image 73 Picture Quality Adjustment 74 Information 77 Time Setting Setting the Clock 80 Setting the Sleep Timer 81 Setting the Timers 82 Function Description Selecting a Menu Language 86 Digital Noise Reduction 87 Selecting the Film Mode 88...
...Source (Antenna or Cable) for PIP .....52 Sound Control Customizing the Sound 56 Using Automatic Sound Settings 57 Choosing a Multi-Channel Sound (MTS)Soundtrack ......58 Using the Auto Volume 59 Setting the TruSurround XT 60 Listening to the Sound of the Sub(PIP) Picture (PC or DVI...PC 68 Adjusting the PC Screen 72 Changing the Position of the Image 73 Picture Quality Adjustment 74 Information 77 Time Setting Setting the Clock 80 Setting the Sleep Timer 81 Setting the Timers 82 Function Description Selecting a Menu Language 86 Digital Noise Reduction 87 Selecting the Film Mode 88...

User Manual
Page 7
...198; PRE-CH button Tunes to the previous channel. ı TV/VIDEO button Press to display all of the preset factory settings (or select your personal, customized picture settings.) Ú MODE button Selects a target device to be controlled by selecting one of the available video sources (TV, AV1, ... along with selected mode (TV, VCR, CATV, DVD or STB) and remaining batteries on LCD. Ò P.MODE button Adjust the PDP picture by the Samsung remote control (ie., VCR, Cable, DVD players or STB). " MENU button Displays the main on-screen menu. ' ENTER button Confirms a selection. ˝...
...198; PRE-CH button Tunes to the previous channel. ı TV/VIDEO button Press to display all of the preset factory settings (or select your personal, customized picture settings.) Ú MODE button Selects a target device to be controlled by selecting one of the available video sources (TV, AV1, ... along with selected mode (TV, VCR, CATV, DVD or STB) and remaining batteries on LCD. Ò P.MODE button Adjust the PDP picture by the Samsung remote control (ie., VCR, Cable, DVD players or STB). " MENU button Displays the main on-screen menu. ' ENTER button Confirms a selection. ˝...

User Manual
Page 8
...on the main screen with the diagram inside the compartment. 3 Slide the cover back into place. button The TV automatically cycles through all of this Samsung remote control, so that it will work compatibly with other devices (VCR, cable box, DVD) ÷ PIP control buttons SWAP : Exchanges the ...press the reset button for about 2~3 seconds. Re-insert the batteries and try using the remote control again. Remote Control Operation Range. SET button Used during set up of the available channels and stores them in memory. ± ADD/DEL button Press to add or delete channels in the ...
...on the main screen with the diagram inside the compartment. 3 Slide the cover back into place. button The TV automatically cycles through all of this Samsung remote control, so that it will work compatibly with other devices (VCR, cable box, DVD) ÷ PIP control buttons SWAP : Exchanges the ...press the reset button for about 2~3 seconds. Re-insert the batteries and try using the remote control again. Remote Control Operation Range. SET button Used during set up of the available channels and stores them in memory. ± ADD/DEL button Press to add or delete channels in the ...

User Manual
Page 12
How to 15° by pulling the upper end of the PDP attached to bracket in the direction of the arrow. 3 The angle can be adjusted from 0° to Adjust Mounting Angle Factory default The wall mount bracket is delivered separately. Changing the angle 1 Secure the PDP to the wall mount bracket. (Please refer to the following instructions.) 2 Set the angle by ±2°. 13 Please tighten the captive screw in the direction of the arrow after assembling the bracket.
How to 15° by pulling the upper end of the PDP attached to bracket in the direction of the arrow. 3 The angle can be adjusted from 0° to Adjust Mounting Angle Factory default The wall mount bracket is delivered separately. Changing the angle 1 Secure the PDP to the wall mount bracket. (Please refer to the following instructions.) 2 Set the angle by ±2°. 13 Please tighten the captive screw in the direction of the arrow after assembling the bracket.

User Manual
Page 17
.... 5 Connect the last coaxial cable between the OUT terminal of your cable box. Set the A/B switch to the "B" position to view scrambled channels. (When you set the A/B switch to the cable box's output channel, which you can buy from your Samsung dealer or any electronics store). 1 Find and disconnect the cable that is... is connected to the ANTENNA IN terminal of the RF (A/B) switch and the VHF/UHF terminal on the PDP. After you've made this connection, set the A/B switch to "B", you will need to tune your Set-Top Box to the "A" position for normal viewing.
.... 5 Connect the last coaxial cable between the OUT terminal of your cable box. Set the A/B switch to the "B" position to view scrambled channels. (When you set the A/B switch to the cable box's output channel, which you can buy from your Samsung dealer or any electronics store). 1 Find and disconnect the cable that is... is connected to the ANTENNA IN terminal of the RF (A/B) switch and the VHF/UHF terminal on the PDP. After you've made this connection, set the A/B switch to "B", you will need to tune your Set-Top Box to the "A" position for normal viewing.

User Manual
Page 19
Connecting a Camcorder Viewing camcorder tapes PDP Camcorder Power Plug Video Cable Audio Cable How to your camcorder Owner's instructions.) 4. Turn on your camcorder and set it to Video Mode. (For details, refer to Connect Connect a Video/Audio cable between the AUDIO(L/R)/VIDEO jacks on the PDP and the VIDEO/AUDIO OUTPUT jacks on the camcorder. Viewing Tapes 1. Insert the tape into the camcorder and press the Play button. 20 Press the TV/VIDEO button to OUT. 5. Set the IN/OUT switch on your camcorder to select "Video". 3. Turn on your PDP. 2.
Connecting a Camcorder Viewing camcorder tapes PDP Camcorder Power Plug Video Cable Audio Cable How to your camcorder Owner's instructions.) 4. Turn on your camcorder and set it to Video Mode. (For details, refer to Connect Connect a Video/Audio cable between the AUDIO(L/R)/VIDEO jacks on the PDP and the VIDEO/AUDIO OUTPUT jacks on the camcorder. Viewing Tapes 1. Insert the tape into the camcorder and press the Play button. 20 Press the TV/VIDEO button to OUT. 5. Set the IN/OUT switch on your camcorder to select "Video". 3. Turn on your PDP. 2.

User Manual
Page 22
PLASMA DISPLAY PANEL Operation Turning the PDP On and Off 24 Plug & Play Feature 26 Memorizing the Channels 29 Setting Up Your Remote Control 34 Viewing an External Signal Source 36
PLASMA DISPLAY PANEL Operation Turning the PDP On and Off 24 Plug & Play Feature 26 Memorizing the Channels 29 Setting Up Your Remote Control 34 Viewing an External Signal Source 36

User Manual
Page 25
... is in Standby mode, press the POWER button on the remote control. ➤ The message Start Plug & Play is initially powered ON, several basic customer settings proceed automatically and subsequently. Enter Skip 26 Plug & Play Start Plug & Play Start Enter Exit Language English Français Español Move Enter...
... is in Standby mode, press the POWER button on the remote control. ➤ The message Start Plug & Play is initially powered ON, several basic customer settings proceed automatically and subsequently. Enter Skip 26 Plug & Play Start Plug & Play Start Enter Exit Language English Français Español Move Enter...

User Manual
Page 26
Enjoy your watching is displayed. ➤ To stop the search before it has finished, the Clock Set menu is displayed, and the channels which reflects their position in the frequency range (with lowest first and highest last). Press the œ or √ ...), then press the ENTER button. When it has finished or return to the Hour, Minute, or am /pm by pressing the ▲ or ▼ button. Set the Hour, Minute, or am /pm. Channels are sorted and stored in an order which have been stored can be viewed. Air/CATV Air STD...
Enjoy your watching is displayed. ➤ To stop the search before it has finished, the Clock Set menu is displayed, and the channels which reflects their position in the frequency range (with lowest first and highest last). Press the œ or √ ...), then press the ENTER button. When it has finished or return to the Hour, Minute, or am /pm by pressing the ▲ or ▼ button. Set the Hour, Minute, or am /pm. Channels are sorted and stored in an order which have been stored can be viewed. Air/CATV Air STD...

User Manual
Page 27
... the previous page. Move Enter Plug & Play Start Plug & Play Start Enter Return Return 28 Press the ENTER button. 4 For further details on how to set, refer to select "Plug & Play". Press the ▲ or ▼ button to select "Setup", then press the ENTER button. 2 Press the ▲ or ▼ button...
... the previous page. Move Enter Plug & Play Start Plug & Play Start Enter Return Return 28 Press the ENTER button. 4 For further details on how to set, refer to select "Plug & Play". Press the ▲ or ▼ button to select "Setup", then press the ENTER button. 2 Press the ▲ or ▼ button...

User Manual
Page 29
... to select "Auto Program", then press the ENTER button. ➤ Quick way to two minutes. 30 This takes about one to access the Automatic Channel Setting: Just press the "AUTO PROG." After all of the available channels. TV Channel Air/CATV : Air √ Auto Program √ Add/Delete √ Fine Tune...
... to select "Auto Program", then press the ENTER button. ➤ Quick way to two minutes. 30 This takes about one to access the Automatic Channel Setting: Just press the "AUTO PROG." After all of the available channels. TV Channel Air/CATV : Air √ Auto Program √ Add/Delete √ Fine Tune...

User Manual
Page 33
... with all DVD Players, VCRs, Cable boxes. ● The remote control can operate almost any VCR, cable box or DVD. After it has been set up properly, your VCR. • You do not need to switch between these modes, and control whichever piece of equipment you enter three digits of...or CATV, DVD). Pressing the corresponding button on page 35 of VCR (or CATV, DVD). Setting Up Your Remote Control This PDP's remote control can only operate STB made by Samsung. If no other codes listed for Samsung STBs as the codes are listed, try one .) 5 Press the POWER button on after setup...
... with all DVD Players, VCRs, Cable boxes. ● The remote control can operate almost any VCR, cable box or DVD. After it has been set up properly, your VCR. • You do not need to switch between these modes, and control whichever piece of equipment you enter three digits of...or CATV, DVD). Pressing the corresponding button on page 35 of VCR (or CATV, DVD). Setting Up Your Remote Control This PDP's remote control can only operate STB made by Samsung. If no other codes listed for Samsung STBs as the codes are listed, try one .) 5 Press the POWER button on after setup...

User Manual
Page 35
...you connect equipment to the PDP, you can choose between viewing signals from connected equipment, such as VCRs, DVD, Set-Top box and the TV source (broadcast or cable). Setting the Signal Source 1 Press the MENU button. Viewing an External Signal Source Use the remote control to switch between... the following sets of jacks: AV1, AV2, AV3, S-Video1, S-Video2, Component1, Component2, Monitor Out, PC or DVI on the PDP's ...
...you connect equipment to the PDP, you can choose between viewing signals from connected equipment, such as VCRs, DVD, Set-Top box and the TV source (broadcast or cable). Setting the Signal Source 1 Press the MENU button. Viewing an External Signal Source Use the remote control to switch between... the following sets of jacks: AV1, AV2, AV3, S-Video1, S-Video2, Component1, Component2, Monitor Out, PC or DVI on the PDP's ...

User Manual
Page 36
...; or ▼ button to select "Edit Name", then press the ENTER button. 3 Press the ENTER button. • Press the ▲ or ▼ button to exit. Set other signal sources (AV2, AV3, S-Video1, S-Video2, Component1, Component2, PC or DVI) using the same method as listed above. 4 Press the MENU button to select...
...; or ▼ button to select "Edit Name", then press the ENTER button. 3 Press the ENTER button. • Press the ▲ or ▼ button to exit. Set other signal sources (AV2, AV3, S-Video1, S-Video2, Component1, Component2, PC or DVI) using the same method as listed above. 4 Press the MENU button to select...
User Manual
Page 38
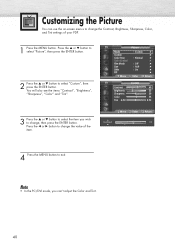
... the ▲ or ▼ button to select the item you can use the on-screen menus to change the Contrast, Brightness, Sharpness, Color, and Tint settings of the item. Press the œ or √ button to change the value of your PDP. 1 Press the MENU button. Customizing the Picture You can...
... the ▲ or ▼ button to select the item you can use the on-screen menus to change the Contrast, Brightness, Sharpness, Color, and Tint settings of the item. Press the œ or √ button to change the value of your PDP. 1 Press the MENU button. Customizing the Picture You can...

User Manual
Page 39
...you to exit. Press the ▲ or ▼ button to select "Picture", then press the ENTER button. ➤ Quick way to access the picture setting: Just press the "P.MODE" button on the remote control. 2 Press the ENTER button to select "Mode". 3 Press the ▲ or ▼ button... to select "Dynamic", "Standard", "Movie", "Custom" picture setting. • You can select "Custom", "Entertain", "Internet", or "Text" in PC/DVI mode. 4 Press the MENU button to adjust the video display easily. 1 ...
...you to exit. Press the ▲ or ▼ button to select "Picture", then press the ENTER button. ➤ Quick way to access the picture setting: Just press the "P.MODE" button on the remote control. 2 Press the ENTER button to select "Mode". 3 Press the ▲ or ▼ button... to select "Dynamic", "Standard", "Movie", "Custom" picture setting. • You can select "Custom", "Entertain", "Internet", or "Text" in PC/DVI mode. 4 Press the MENU button to adjust the video display easily. 1 ...

User Manual
Page 45
... Return 4 Press the MENU button to select "On". Note • Check if the V-Chip Lock (refer to page 93) is set to On. TV Picture Mode Custom Color Tone Color Control Film Mode Size DNIe PIP Move : Custom √ √ : Normal ... not function when the V-Chip Lock is ON if the PIP On/Off will alternate between "On" and "Off". Change the setting to select "PIP", then press the ENTER button. PIP Settings Main screen PIP screen TV TV O AV 1 O AV 2 O AV 3 O S-Video 1 O S-Video 2 O Component 1 O Component 2 O PC O DVI O AV 1 AV 2 O O X O O ...
... Return 4 Press the MENU button to select "On". Note • Check if the V-Chip Lock (refer to page 93) is set to On. TV Picture Mode Custom Color Tone Color Control Film Mode Size DNIe PIP Move : Custom √ √ : Normal ... not function when the V-Chip Lock is ON if the PIP On/Off will alternate between "On" and "Off". Change the setting to select "PIP", then press the ENTER button. PIP Settings Main screen PIP screen TV TV O AV 1 O AV 2 O AV 3 O S-Video 1 O S-Video 2 O Component 1 O Component 2 O PC O DVI O AV 1 AV 2 O O X O O ...

User Manual
Page 50
... is selected ("STD", "HRC" or "IRC"). 5 Press the MENU button to select "Air/CATV", then press the ENTER button. 4 If an antenna is connected, the setting is ON, you can select the broadcasting source of PIP picture separately from the main picture. 1 Press the MENU button.
... is selected ("STD", "HRC" or "IRC"). 5 Press the MENU button to select "Air/CATV", then press the ENTER button. 4 If an antenna is connected, the setting is ON, you can select the broadcasting source of PIP picture separately from the main picture. 1 Press the MENU button.

User Manual
Page 52
PLASMA DISPLAY PANEL Sound Control Customizing the Sound 56 Using Automatic Sound Settings 57 Choosing a Multi-Channel Sound (MTS)Soundtrack 58 Using the Auto Volume 59 Setting the TruSurround XT 60 Listening to the Sound of the Sub(PIP) Picture (PC or DVI Mode)..........61 Selecting the Internal Mute 62
PLASMA DISPLAY PANEL Sound Control Customizing the Sound 56 Using Automatic Sound Settings 57 Choosing a Multi-Channel Sound (MTS)Soundtrack 58 Using the Auto Volume 59 Setting the TruSurround XT 60 Listening to the Sound of the Sub(PIP) Picture (PC or DVI Mode)..........61 Selecting the Internal Mute 62

User Manual
Page 53
... button. 2 Press the ▲ or ▼ button to select "Custom", then press the ENTER button. 3 Select the option (volume, balance, equalizer) to reach the required setting. TV Sound Mode : Custom √ Custom √ MTS : Stereo √ Auto Volume : Off √ SRS TSXT : Stereo √ Internal Mute : Off √ Move Enter Return... TV Custom 0 R L 100 300 1K 3K 10K Adjust Move Return 4 Press the MENU button to exit. ➤ If you make any changes to the equalizer settings, the sound Mode is automatically switched to the custom mode. 56
... button. 2 Press the ▲ or ▼ button to select "Custom", then press the ENTER button. 3 Select the option (volume, balance, equalizer) to reach the required setting. TV Sound Mode : Custom √ Custom √ MTS : Stereo √ Auto Volume : Off √ SRS TSXT : Stereo √ Internal Mute : Off √ Move Enter Return... TV Custom 0 R L 100 300 1K 3K 10K Adjust Move Return 4 Press the MENU button to exit. ➤ If you make any changes to the equalizer settings, the sound Mode is automatically switched to the custom mode. 56


