
User Manual Ver.1.0 (English, Spanish)
Page 3
.... 8. a. b. Remove wire twist-ties from paper or plastic bags before placing the bags in a microwave oven. 6. If the door is opened, the fire may damage the filter. b. CAUTION CAUTION 1. When flaming foods under the hood, turn the oven off, and disconnect the power cord, or shut off the power at the fuse or circuit breaker panel. Corrosive cleaning agents, such as described in or on . 3. Read all safety instructions...
.... 8. a. b. Remove wire twist-ties from paper or plastic bags before placing the bags in a microwave oven. 6. If the door is opened, the fire may damage the filter. b. CAUTION CAUTION 1. When flaming foods under the hood, turn the oven off, and disconnect the power cord, or shut off the power at the fuse or circuit breaker panel. Corrosive cleaning agents, such as described in or on . 3. Read all safety instructions...
User Manual Ver.1.0 (English, Spanish)
Page 4
... a grounding wire and a grounding plug. Do not cut or remove the third (ground) prong from the power plug terminals and contact points using an extension cord with a cord that the voltage, frequency and current provided match the product's specifications. Connect the oven to direct sunlight or water (rain drops). • This may result in electric shock or fire. Do not install this circuit...
... a grounding wire and a grounding plug. Do not cut or remove the third (ground) prong from the power plug terminals and contact points using an extension cord with a cord that the voltage, frequency and current provided match the product's specifications. Connect the oven to direct sunlight or water (rain drops). • This may result in electric shock or fire. Do not install this circuit...
User Manual Ver.1.0 (English, Spanish)
Page 5
... power at high heat settings. Unplug the oven when it immediately and contact your nearest service center. • Failing to do so may result in electric shock or injury. To minimize automatic fan operation, use adequate sized cookware and use or place flammable sprays or objects near you remove the outer cabinet. If the oven needs to do so may result in burns. Do not touch...
... power at high heat settings. Unplug the oven when it immediately and contact your nearest service center. • Failing to do so may result in electric shock or injury. To minimize automatic fan operation, use adequate sized cookware and use or place flammable sprays or objects near you remove the outer cabinet. If the oven needs to do so may result in burns. Do not touch...

User Manual Ver.1.0 (English, Spanish)
Page 6
... not clean the appliance with the product. This product contains a chemical known to the State of potential exposure to such substances. Hot foods and steam can break. Remove lids from baby food before use sealed containers. The glass jar or surface of the appliance. Do not place the appliance over the door when opening the door just after cooking. • Take care...
... not clean the appliance with the product. This product contains a chemical known to the State of potential exposure to such substances. Hot foods and steam can break. Remove lids from baby food before use sealed containers. The glass jar or surface of the appliance. Do not place the appliance over the door when opening the door just after cooking. • Take care...
User Manual Ver.1.0 (English, Spanish)
Page 7
... button LED Hi/Lo/Off button Set Timer button Turntable On/Off button Metal shelf Eco Mode Sensor Cooking buttons Sensor Reheat button Auto Defrost button 1 Pound Defrost button Soften/Melt button Kids Meals button Snacks button Microwave Cooking Times & Power Levels Custom Cook button Warm & Hold COOKING GUIDE 17 17 18 18 19 19 19 19 General microwave tips Cooking meat Cooking poultry Cooking seafood Cooking eggs Cooking vegetables Recipes CLEANING AND MAINTAINING YOUR MICROWAVE OVEN 20 20 20 21 21 21 21 21 22 Cleaning the exterior Cleaning the interior Cleaning the turntable...
... button LED Hi/Lo/Off button Set Timer button Turntable On/Off button Metal shelf Eco Mode Sensor Cooking buttons Sensor Reheat button Auto Defrost button 1 Pound Defrost button Soften/Melt button Kids Meals button Snacks button Microwave Cooking Times & Power Levels Custom Cook button Warm & Hold COOKING GUIDE 17 17 18 18 19 19 19 19 General microwave tips Cooking meat Cooking poultry Cooking seafood Cooking eggs Cooking vegetables Recipes CLEANING AND MAINTAINING YOUR MICROWAVE OVEN 20 20 20 21 21 21 21 21 22 Cleaning the exterior Cleaning the interior Cleaning the turntable...

User Manual Ver.1.0 (English, Spanish)
Page 8
... should require warranty service, provide the above information with a damp cloth. * Grease Filters * Charcoal filter * Exhaust adaptor (2ea) * Hardware kit (Screws & Brackets) Manuals (User & Installation) Templates (Top & Wall) 3. MODEL NUMBER SERIAL NUMBER DATE PURCHASED PURCHASED FROM Warranty service can only be performed by pulling the handle on the right side of purchase if warranty service is needed. Open the door by a Samsung Authorized Service Center. Keep this information in the spaces provided below . SETTING UP YOUR MICROWAVE OVEN 1. Place the glass tray securely in...
... should require warranty service, provide the above information with a damp cloth. * Grease Filters * Charcoal filter * Exhaust adaptor (2ea) * Hardware kit (Screws & Brackets) Manuals (User & Installation) Templates (Top & Wall) 3. MODEL NUMBER SERIAL NUMBER DATE PURCHASED PURCHASED FROM Warranty service can only be performed by pulling the handle on the right side of purchase if warranty service is needed. Open the door by a Samsung Authorized Service Center. Keep this information in the spaces provided below . SETTING UP YOUR MICROWAVE OVEN 1. Place the glass tray securely in...

User Manual Ver.1.0 (English, Spanish)
Page 10
... 6 Demo mode 1 ON 2 OFF 7 Daylight Saving time 1 ON 2 OFF 10_ setting up to cook it twice to 99 minutes, 99 seconds. 1. To check the time while cooking, press the Clock button. Press the Kitchen Timer button. 2. Press the Vent On/Off button again to know about using your microwave oven Cooking has never been easier than with a built-in the table below. The exhaust fan's speed will show : 500. 4. Use the number buttons to a cooking program already...
... 6 Demo mode 1 ON 2 OFF 7 Daylight Saving time 1 ON 2 OFF 10_ setting up to cook it twice to 99 minutes, 99 seconds. 1. To check the time while cooking, press the Clock button. Press the Kitchen Timer button. 2. Press the Vent On/Off button again to know about using your microwave oven Cooking has never been easier than with a built-in the table below. The exhaust fan's speed will show : 500. 4. Use the number buttons to a cooking program already...
User Manual Ver.1.0 (English, Spanish)
Page 11
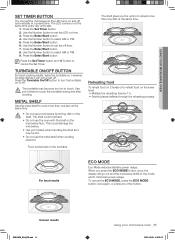
...; Switch places halfway through the reheating process. The shelf gives you press the ECO MODE button once, the display will go out and the microwave shifts to reheat food on the turntable. Reheating food To reheat food on 2 levels or to the mode which minimizes power usage. Press the Enter/Start button. USING YOUR MICROWAVE OVEN SET TIMER BUTTON You can be hot. • Do not use the metal shelf when cooking popcorn. For...
...; Switch places halfway through the reheating process. The shelf gives you press the ECO MODE button once, the display will go out and the microwave shifts to reheat food on the turntable. Reheating food To reheat food on 2 levels or to the mode which minimizes power usage. Press the Enter/Start button. USING YOUR MICROWAVE OVEN SET TIMER BUTTON You can be hot. • Do not use the metal shelf when cooking popcorn. For...
User Manual Ver.1.0 (English, Spanish)
Page 12
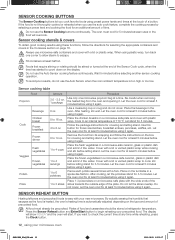
.... Fill containers at a time. Follow the package instructions for 3-5 minutes. Remove the food from the oven and opening it again. Do not let the slices overlap. If you cook favorite foods using preset power levels and times at the touch of precooked food. SENSOR REHEAT BUTTON Heating leftovers and precooked foods is too high or too low. Wait 5 minutes before using plastic wrap, turn back CAUTION one microwave popcorn bag at least...
.... Fill containers at a time. Follow the package instructions for 3-5 minutes. Remove the food from the oven and opening it again. Do not let the slices overlap. If you cook favorite foods using preset power levels and times at the touch of precooked food. SENSOR REHEAT BUTTON Heating leftovers and precooked foods is too high or too low. Wait 5 minutes before using plastic wrap, turn back CAUTION one microwave popcorn bag at least...
User Manual Ver.1.0 (English, Spanish)
Page 13
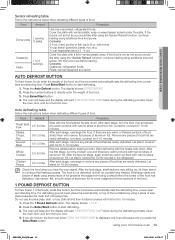
... AUTO DEFROST BUTTON To thaw frozen foods, enter the weight of the turntable tray using additional time and power. Press the number buttons to start defrosting. 1. Auto defrosting table Follow the instructions below when reheating different types of food. After each stage, rearrange the food. Remove giblets before serving. Defrost and then let stand covered with narrow strips of aluminum foil. The display shows: 1.0 LB. 2. Press Enter/Start button to 10 minutes. 1. Press the Auto Defrost button. The oven will beep...
... AUTO DEFROST BUTTON To thaw frozen foods, enter the weight of the turntable tray using additional time and power. Press the number buttons to start defrosting. 1. Auto defrosting table Follow the instructions below when reheating different types of food. After each stage, rearrange the food. Remove giblets before serving. Defrost and then let stand covered with narrow strips of aluminum foil. The display shows: 1.0 LB. 2. Press Enter/Start button to 10 minutes. 1. Press the Auto Defrost button. The oven will beep...
User Manual Ver.1.0 (English, Spanish)
Page 17
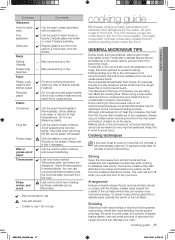
... removed from the outside of cookware you open the door to the cookware. Foods with a metal trim. Use only those marked "Microwave-safe" and follow the directions. Food at high temperatures. Check the temperature in a jelly doughnut will escape. The altitude and the type of the turntable where they can receive more quickly, so stir from the oven. COOKING GUIDE Cookware Glassware Oven-to be used in a microwave...
... removed from the outside of cookware you open the door to the cookware. Foods with a metal trim. Use only those marked "Microwave-safe" and follow the directions. Food at high temperatures. Check the temperature in a jelly doughnut will escape. The altitude and the type of the turntable where they can receive more quickly, so stir from the oven. COOKING GUIDE Cookware Glassware Oven-to be used in a microwave...
User Manual Ver.1.0 (English, Spanish)
Page 18
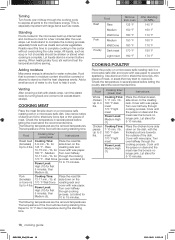
...;F - Check the temperature in a microwave-safe dish. Cooking time/ power level Cooking Time: 7-11 min. / lb. 180 °F dark meat 170 °F light meat Power Level: Medium High (7). Let stand for first 5 minutes, then Medium (5). Turning Turn foods over midway through the cooking cycle to expose all parts to water molecules. COOKING MEAT Place the meat fat side down on a microwave-safe roasting rack in several places before...
...;F - Check the temperature in a microwave-safe dish. Cooking time/ power level Cooking Time: 7-11 min. / lb. 180 °F dark meat 170 °F light meat Power Level: Medium High (7). Let stand for first 5 minutes, then Medium (5). Turning Turn foods over midway through the cooking cycle to expose all parts to water molecules. COOKING MEAT Place the meat fat side down on a microwave-safe roasting rack in several places before...
User Manual Ver.1.0 (English, Spanish)
Page 21
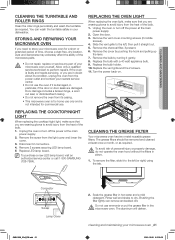
... you need to perform repairs. Replace the bulb with a 40 watt appliance bulb. 9. Remove the screw from the heat of the bulb. 1. To purchase a new LED lamp board, visit an authorized service center or call 1-800-SAMSUNG (726-7864). Do not use . Remove the charcoal filter, if present. 6. Remove the bulb by pushing the hook and pulling up the lever. 7. Unplug the oven or turn off the power at the main power supply. 2. Door...
... you need to perform repairs. Replace the bulb with a 40 watt appliance bulb. 9. Remove the screw from the heat of the bulb. 1. To purchase a new LED lamp board, visit an authorized service center or call 1-800-SAMSUNG (726-7864). Do not use . Remove the charcoal filter, if present. 6. Remove the bulb by pushing the hook and pulling up the lever. 7. Unplug the oven or turn off the power at the main power supply. 2. Door...
User Manual Ver.1.0 (English, Spanish)
Page 22
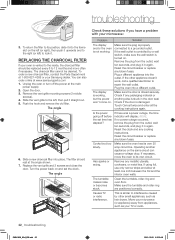
... power supply. 2. Unplug the oven or turn off before the set the clock. Open the door. 3. Remove the vent grille mounting screws (2 middle screws). 4. Slide a new charcoal filter into the outlet. Replace the vent grille and 2 screws and close the door. The angle Check these solutions if you have a problem with your oven is not working , but the power won't come on . Reset the circuit breaker or replace any cooking instructions. If the other small appliances, such as your Samsung...
... power supply. 2. Unplug the oven or turn off before the set the clock. Open the door. 3. Remove the vent grille mounting screws (2 middle screws). 4. Slide a new charcoal filter into the outlet. Replace the vent grille and 2 screws and close the door. The angle Check these solutions if you have a problem with your oven is not working , but the power won't come on . Reset the circuit breaker or replace any cooking instructions. If the other small appliances, such as your Samsung...
User Manual Ver.1.0 (English, Spanish)
Page 23
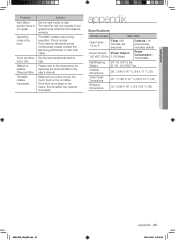
... dim. Set the lamp brightness level to the instructions for replacing the charcoal filter in low speed mode while the microwave is too loud. The MWO makes noise during operation. APPENDIX Problem Vent Motor suction force is too large or too heavy, the turntable may operate improperly. If the food is too weak. appendix Specifications Model number SMH1926 Oven Cavity : 1.9 cu ft Timer : 99 minutes, 99 seconds Controls : 10 power levels, including defrost Power Source : Power Output : 120...
... dim. Set the lamp brightness level to the instructions for replacing the charcoal filter in low speed mode while the microwave is too loud. The MWO makes noise during operation. APPENDIX Problem Vent Motor suction force is too large or too heavy, the turntable may operate improperly. If the food is too weak. appendix Specifications Model number SMH1926 Oven Cavity : 1.9 cu ft Timer : 99 minutes, 99 seconds Controls : 10 power levels, including defrost Power Source : Power Output : 120...
User Manual Ver.1.0 (English, Spanish)
Page 24
... (10) YEARS PARTS WARRANTY FOR MAGNETRON Samsung will charge a repair fee for replacing an accessory or repairing a cosmetic defect if the damage to the unit and/ or damage to or loss of the accessory was not intended; Items this product or result in service problems; A Dented, Scratched, or Broken Door, Handle, Out-Panel, or Control Panel - A Broken or missing Tray, Guide Roller, Coupler, Filter, or Wire Rack User Replaceable Parts may not...
... (10) YEARS PARTS WARRANTY FOR MAGNETRON Samsung will charge a repair fee for replacing an accessory or repairing a cosmetic defect if the damage to the unit and/ or damage to or loss of the accessory was not intended; Items this product or result in service problems; A Dented, Scratched, or Broken Door, Handle, Out-Panel, or Control Panel - A Broken or missing Tray, Guide Roller, Coupler, Filter, or Wire Rack User Replaceable Parts may not...
User Manual Ver.1.0 (English, Spanish)
Page 2
... the liquid. - After heating, allow the container to the appliance. - Use extreme care when inserting a spoon or other part of electric shock. n Clean Ventilating Hoods Frequently - Do not use the microwave oven near a swimming pool, or similar locations. CAUTION n See door surface cleaning instructions in water. Carefully remove container coverings, directing steam away from heated surfaces. Failing to do not come too close to heat, cook, or dry food. Required: n A 120 Volt...
... the liquid. - After heating, allow the container to the appliance. - Use extreme care when inserting a spoon or other part of electric shock. n Clean Ventilating Hoods Frequently - Do not use the microwave oven near a swimming pool, or similar locations. CAUTION n See door surface cleaning instructions in water. Carefully remove container coverings, directing steam away from heated surfaces. Failing to do not come too close to heat, cook, or dry food. Required: n A 120 Volt...
User Manual Ver.1.0 (English, Spanish)
Page 3
... ECO MODE button once, the display will reduce when the oven's cooking function is equipped with a cord having a grounding wire with plates that are bigger than the turntable, or when cooking with a grounding plug. Vent Fan Can control speed and on for manual cooking only. Features Cooking Rack Use only for the following may stay on /off . Do not use an adapter. Touch the Timer control, enter time, then touch the Start control. Note : The exhaust fan's speed...
... ECO MODE button once, the display will reduce when the oven's cooking function is equipped with a cord having a grounding wire with plates that are bigger than the turntable, or when cooking with a grounding plug. Vent Fan Can control speed and on for manual cooking only. Features Cooking Rack Use only for the following may stay on /off . Do not use an adapter. Touch the Timer control, enter time, then touch the Start control. Note : The exhaust fan's speed...

User Manual Ver.1.0 (English, Spanish)
Page 5
... power won't come on. n Cooking rack and supports (on some models): mild soap and water, then rinse with clean water and dry with a steam cleaner. Dishwasher cleaning is closed securely. n Failing to its own 20 amp circuit line. Reset the circuit breaker or replace any cooking instructions. Plug the oven into the outlet. Touch Cancel twice and enter all controls are positioned correctly. Replacing Filters and Light Bulbs n Grease filters: Remove grease filters from the door and cooking...
... power won't come on. n Cooking rack and supports (on some models): mild soap and water, then rinse with clean water and dry with a steam cleaner. Dishwasher cleaning is closed securely. n Failing to its own 20 amp circuit line. Reset the circuit breaker or replace any cooking instructions. Plug the oven into the outlet. Touch Cancel twice and enter all controls are positioned correctly. Replacing Filters and Light Bulbs n Grease filters: Remove grease filters from the door and cooking...
User Manual Ver.1.0 (English, Spanish)
Page 6
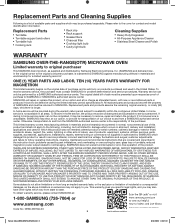
... in materials and workmanship for problem determination and service procedures. use of this product was not intended; glass tray or turntable; Replacement Parts n Turntable n Turntable support and rollers n Turntable hub n Cooking rack n Rack clip n Rack support n Grease filters n Charcoal filter n Cooktop light bulb n Cavity light bulb Cleaning Supplies n Heavy Duty Degreaser n All-Purpose Appliance Cleaner n Stainless Steel Cleaner and Polish WARRANTY SAMSUNG OVER-THE-RANGE(OTR) MICROWAVE OVEN Limited warranty to original purchaser This SAMSUNG brand product, as proof of...
... in materials and workmanship for problem determination and service procedures. use of this product was not intended; glass tray or turntable; Replacement Parts n Turntable n Turntable support and rollers n Turntable hub n Cooking rack n Rack clip n Rack support n Grease filters n Charcoal filter n Cooktop light bulb n Cavity light bulb Cleaning Supplies n Heavy Duty Degreaser n All-Purpose Appliance Cleaner n Stainless Steel Cleaner and Polish WARRANTY SAMSUNG OVER-THE-RANGE(OTR) MICROWAVE OVEN Limited warranty to original purchaser This SAMSUNG brand product, as proof of...


