

User Manual Ver.1.0 (English)
Page 1
BN46-00309B-01 User Manual S24C750P The color and the appearance may differ depending on the product, and the specifications are subject to change without prior notice to improve the performance.
BN46-00309B-01 User Manual S24C750P The color and the appearance may differ depending on the product, and the specifications are subject to change without prior notice to improve the performance.

User Manual Ver.1.0 (English)
Page 5
... 69 70 71 INSTALLING THE 72 SOFTWARE 72 72 73 74 74 75 TROUBLESHOOTING 76 GUIDE 76 76 76 79 SPECIFICATIONS 81 83 84 Source Detection Configuring Source Detection Customized Key Configuring Customized Key INFORMATION Displaying INFORMATION Configuring Brightness and Contrast ...MagicTune What is "MagicTune"? Installing the Software Removing the Software MultiScreen Installing the Software Removing the Software Requirements Before Contacting Samsung Customer Service Center Testing the Product Checking the Resolution and Frequency Check the following. Q & A General PowerSaver Standard Signal Mode...
... 69 70 71 INSTALLING THE 72 SOFTWARE 72 72 73 74 74 75 TROUBLESHOOTING 76 GUIDE 76 76 76 79 SPECIFICATIONS 81 83 84 Source Detection Configuring Source Detection Customized Key Configuring Customized Key INFORMATION Displaying INFORMATION Configuring Brightness and Contrast ...MagicTune What is "MagicTune"? Installing the Software Removing the Software MultiScreen Installing the Software Removing the Software Requirements Before Contacting Samsung Customer Service Center Testing the Product Checking the Resolution and Frequency Check the following. Q & A General PowerSaver Standard Signal Mode...

User Manual Ver.1.0 (English)
Page 21
... VOL AUTO Key Guide SAMSUNG MAGIC BRIGHT VOL SAMSUNG MAGIC BRIGHT AUTO AUTO Icons MENU Description Open or close the onscreen display (OSD) menu, or return to the parent menu. OSD control ... Key, go to settings. 1 Preparations 1.2 Parts 1.2.1 Frontal Buttons The color and shape of parts may differ from what is locked) Configure Customized Key and press [ ]. Specifications are subject to change without notice to improve quality.
... VOL AUTO Key Guide SAMSUNG MAGIC BRIGHT VOL SAMSUNG MAGIC BRIGHT AUTO AUTO Icons MENU Description Open or close the onscreen display (OSD) menu, or return to the parent menu. OSD control ... Key, go to settings. 1 Preparations 1.2 Parts 1.2.1 Frontal Buttons The color and shape of parts may differ from what is locked) Configure Customized Key and press [ ]. Specifications are subject to change without notice to improve quality.

User Manual Ver.1.0 (English)
Page 23
Specifications are subject to change without notice to the DC power adapter. 23 1 Preparations Connect to a PC using an HDMI cable. Connects to improve quality. Connect to an audio output device such as headphones. 1 Preparations 1.2.2 Reverse Side The color and shape of parts may differ from what is shown. Port 1 HDMI IN 2 RGB IN DC14V 1 HDMI IN 2 RGB IN DC14V About ports Connect to a source device using the D-SUB cable.
Specifications are subject to change without notice to the DC power adapter. 23 1 Preparations Connect to a PC using an HDMI cable. Connects to improve quality. Connect to an audio output device such as headphones. 1 Preparations 1.2.2 Reverse Side The color and shape of parts may differ from what is shown. Port 1 HDMI IN 2 RGB IN DC14V 1 HDMI IN 2 RGB IN DC14V About ports Connect to a source device using the D-SUB cable.

User Manual Ver.1.0 (English)
Page 24
... not hold the product upside stand body. Caution After installing the stand, place the product upright. Tightly fasten the screw to improve quality. 24 1 Preparations Specifications are subject to change without notice to the bottom of the arrow. rotate the stand body about 90° Remove the packing sheet Insert the...
... not hold the product upside stand body. Caution After installing the stand, place the product upright. Tightly fasten the screw to improve quality. 24 1 Preparations Specifications are subject to change without notice to the bottom of the arrow. rotate the stand body about 90° Remove the packing sheet Insert the...

User Manual Ver.1.0 (English)
Page 25
... the desktop. The monitor may get damaged if you rotate the screen without notice to change without tilt, or counter clockwise direction. 25 1 Preparations Specifications are subject to improve quality. -1° (±2.0°) ~ 26° (±2.0°) You can rotate your monitor. Hold the lower part of parts...
... the desktop. The monitor may get damaged if you rotate the screen without notice to change without tilt, or counter clockwise direction. 25 1 Preparations Specifications are subject to improve quality. -1° (±2.0°) ~ 26° (±2.0°) You can rotate your monitor. Hold the lower part of parts...

User Manual Ver.1.0 (English)
Page 26
... the other end. 3 Insert the locking device into the anti-theft lock slot at the back of parts may differ from what is sold separately. Specifications are subject to change without notice to use the product securely even in public places. Refer to a heavy object such as a desk. 2 Put one end...
... the other end. 3 Insert the locking device into the anti-theft lock slot at the back of parts may differ from what is sold separately. Specifications are subject to change without notice to use the product securely even in public places. Refer to a heavy object such as a desk. 2 Put one end...

User Manual Ver.1.0 (English)
Page 72
... mouse and the keyboard without using the operating buttons of monitor functions and easy-to the instructions displayed on the computer system and the product specifications. If the shortcut icon does not appear, press the F5 key. 8 Installing the Software 8.1 MagicTune 8.1.1 What is a software program that helps with monitor adjustments...
... mouse and the keyboard without using the operating buttons of monitor functions and easy-to the instructions displayed on the computer system and the product specifications. If the shortcut icon does not appear, press the F5 key. 8 Installing the Software 8.1 MagicTune 8.1.1 What is a software program that helps with monitor adjustments...

User Manual Ver.1.0 (English)
Page 74
Restrictions and Problems with the Installation ("MultiScreen") The "MultiScreen" installation may not appear depending on the computer system and the product specifications. If the shortcut icon does not appear, press the F5 key. If the pop-up screen for the software installation does not appear on ...
Restrictions and Problems with the Installation ("MultiScreen") The "MultiScreen" installation may not appear depending on the computer system and the product specifications. If the shortcut icon does not appear, press the F5 key. If the pop-up screen for the software installation does not appear on ...

User Manual Ver.1.0 (English)
Page 81
...Specifications 10.1 General Panel Model Name Size Display area Pixel Pitch Synchronization Horizontal Frequency Vertical Frequency Display Color Resolution Optimum Resolution Maximum Resolution Maximum Pixel Clock Power Supply Signal connectors Dimensions (WxHxD) Without Stand / Weight With Stand Environmental considerations Operating Storage S24C750P...: -4°F ~ 113°F (-20°C ~ 45°C) Humidity : 5 % - 95 %, non-condensing 81 10 Specifications Refer to the label at the back of the product as the standard voltage can vary in different countries. 15 pin-to-15 pin...
...Specifications 10.1 General Panel Model Name Size Display area Pixel Pitch Synchronization Horizontal Frequency Vertical Frequency Display Color Resolution Optimum Resolution Maximum Resolution Maximum Pixel Clock Power Supply Signal connectors Dimensions (WxHxD) Without Stand / Weight With Stand Environmental considerations Operating Storage S24C750P...: -4°F ~ 113°F (-20°C ~ 45°C) Humidity : 5 % - 95 %, non-condensing 81 10 Specifications Refer to the label at the back of the product as the standard voltage can vary in different countries. 15 pin-to-15 pin...

User Manual Ver.1.0 (English)
Page 82
...Pixels) S24C750P This monitor can customize the installation settings if desired. This does not affect product performance. To find the nearest recycling location, go to improve quality. The above specifications are subject to change without notice to our website: www.samsung.com/recyclingdirect... or call, (877) 278 - 0799 82 10 Specifications Monitor installation takes place automatically. However, you can be ...
...Pixels) S24C750P This monitor can customize the installation settings if desired. This does not affect product performance. To find the nearest recycling location, go to improve quality. The above specifications are subject to change without notice to our website: www.samsung.com/recyclingdirect... or call, (877) 278 - 0799 82 10 Specifications Monitor installation takes place automatically. However, you can be ...

User Manual Ver.1.0 (English)
Page 83
...consumption to 0 watts when the power switch is not used for an extended period of the product or disconnect the power cable. 10 Specifications 10.2 PowerSaver The power-saving function of this product reduces power consumption by switching off the screen and changing the color of the ...power LED if the product is not available, disconnect the power cable. 83 10 Specifications PowerSaver Power Indicator Power Consumption Energy Star Power Consumption On 23 watts Power saving mode Blinking Typical 0.3 watts Max 0.45 watts Power off ...
...consumption to 0 watts when the power switch is not used for an extended period of the product or disconnect the power cable. 10 Specifications 10.2 PowerSaver The power-saving function of this product reduces power consumption by switching off the screen and changing the color of the ...power LED if the product is not available, disconnect the power cable. 83 10 Specifications PowerSaver Power Indicator Power Consumption Energy Star Power Consumption On 23 watts Power saving mode Blinking Typical 0.3 watts Max 0.45 watts Power off ...

User Manual Ver.1.0 (English)
Page 84
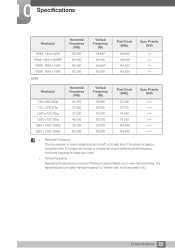
...000 50.000 49.500 65.000 75.000 78.750 108.000 74.250 83.500 108.000 135.000 Sync Polarity (H/V) 84 10 Specifications In such a case, change the vertical frequency to 60Hz using the CDT monitor before you exchange it is transmitted from the PC does not belong... the signal transmitted from your product. Check the frequency when you select the optimum resolution specified for the screen size of the panel. 10 Specifications 10.3 Standard Signal Mode Table This product can be set to only one resolution for an LCD monitor. Therefore, a resolution other than the ...
...000 50.000 49.500 65.000 75.000 78.750 108.000 74.250 83.500 108.000 135.000 Sync Polarity (H/V) 84 10 Specifications In such a case, change the vertical frequency to 60Hz using the CDT monitor before you exchange it is transmitted from the PC does not belong... the signal transmitted from your product. Check the frequency when you select the optimum resolution specified for the screen size of the panel. 10 Specifications 10.3 Standard Signal Mode Table This product can be set to only one resolution for an LCD monitor. Therefore, a resolution other than the ...
User Manual Ver.1.0 (English)
Page 85
...; Vertical Frequency Repeating the same picture dozens of times per second allows you to the right side of the screen is called horizontal frequency. 10 Specifications Resolution VESA, 1440 x 900 VESA, 1600 x 900RB VESA, 1680 x 1050 VESA, 1920 x 1080 HDMI Horizontal Frequency (kHz) 55.935 60.000 65.290 67.500...
...; Vertical Frequency Repeating the same picture dozens of times per second allows you to the right side of the screen is called horizontal frequency. 10 Specifications Resolution VESA, 1440 x 900 VESA, 1600 x 900RB VESA, 1680 x 1050 VESA, 1920 x 1080 HDMI Horizontal Frequency (kHz) 55.935 60.000 65.290 67.500...

User Manual Ver.1.0 (English)
Page 1
BN46-00309B-01 User Manual S24C750P The color and the appearance may differ depending on the product, and the specifications are subject to change without prior notice to improve the performance.
BN46-00309B-01 User Manual S24C750P The color and the appearance may differ depending on the product, and the specifications are subject to change without prior notice to improve the performance.

User Manual Ver.1.0 (English)
Page 5
...Center Testing the Product Checking the Resolution and Frequency Check the following. Q & A General PowerSaver Standard Signal Mode Table APPENDIX 86 Contact SAMSUNG WORLD WIDE 5 Table Of Contents Table Of Contents 67 67 68 68 INFORMATION MENU AND 69 OTHERS 69 70 71 INSTALLING THE 72 ...SOFTWARE 72 72 73 74 74 75 TROUBLESHOOTING 76 GUIDE 76 76 76 79 SPECIFICATIONS 81 83 84 Source Detection Configuring Source Detection Customized Key Configuring Customized Key INFORMATION Displaying INFORMATION Configuring Brightness and Contrast in the Initial ...
...Center Testing the Product Checking the Resolution and Frequency Check the following. Q & A General PowerSaver Standard Signal Mode Table APPENDIX 86 Contact SAMSUNG WORLD WIDE 5 Table Of Contents Table Of Contents 67 67 68 68 INFORMATION MENU AND 69 OTHERS 69 70 71 INSTALLING THE 72 ...SOFTWARE 72 72 73 74 74 75 TROUBLESHOOTING 76 GUIDE 76 76 76 79 SPECIFICATIONS 81 83 84 Source Detection Configuring Source Detection Customized Key Configuring Customized Key INFORMATION Displaying INFORMATION Configuring Brightness and Contrast in the Initial ...

User Manual Ver.1.0 (English)
Page 21
... VOL AUTO Key Guide SAMSUNG MAGIC BRIGHT VOL SAMSUNG MAGIC BRIGHT AUTO AUTO Icons MENU Description Open or close the onscreen display (OSD) menu, or return to the parent menu. OSD control ... can be adjusted, and INFORMATION can be viewed. The Customized Key function can be enabled. Image Size To configure Customized Key, go to settings. Specifications are subject to change without notice to improve quality. Disable: To unlock the OSD control, press and hold the [MENU ] button for more than 10...
... VOL AUTO Key Guide SAMSUNG MAGIC BRIGHT VOL SAMSUNG MAGIC BRIGHT AUTO AUTO Icons MENU Description Open or close the onscreen display (OSD) menu, or return to the parent menu. OSD control ... can be adjusted, and INFORMATION can be viewed. The Customized Key function can be enabled. Image Size To configure Customized Key, go to settings. Specifications are subject to change without notice to improve quality. Disable: To unlock the OSD control, press and hold the [MENU ] button for more than 10...

User Manual Ver.1.0 (English)
Page 23
Connect to an audio output device such as headphones. 1 Preparations 1.2.2 Reverse Side The color and shape of parts may differ from what is shown. Port 1 HDMI IN 2 RGB IN DC14V 1 HDMI IN 2 RGB IN DC14V About ports Connect to a PC using an HDMI cable. Connects to a source device using the D-SUB cable. Connect to the DC power adapter. 23 1 Preparations Specifications are subject to change without notice to improve quality.
Connect to an audio output device such as headphones. 1 Preparations 1.2.2 Reverse Side The color and shape of parts may differ from what is shown. Port 1 HDMI IN 2 RGB IN DC14V 1 HDMI IN 2 RGB IN DC14V About ports Connect to a PC using an HDMI cable. Connects to a source device using the D-SUB cable. Connect to the DC power adapter. 23 1 Preparations Specifications are subject to change without notice to improve quality.

User Manual Ver.1.0 (English)
Page 24
... the screw to improve quality. 24 1 Preparations 1 Preparations 1.3 Installation 1.3.1 Attaching the cradle Place a protective cloth orcushion on top of the arrow. down on a flat surface. Specifications are subject to change without notice to the bottom of parts may differ from what is the reverse order of assembly. The color and...
... the screw to improve quality. 24 1 Preparations 1 Preparations 1.3 Installation 1.3.1 Attaching the cradle Place a protective cloth orcushion on top of the arrow. down on a flat surface. Specifications are subject to change without notice to the bottom of parts may differ from what is the reverse order of assembly. The color and...

User Manual Ver.1.0 (English)
Page 25
Specifications are subject to the desktop. The monitor may differ from what is shown. 1 Preparations 1.3.2 Adjusting the Product Tilt and Height The color and shape ...
Specifications are subject to the desktop. The monitor may differ from what is shown. 1 Preparations 1.3.2 Adjusting the Product Tilt and Height The color and shape ...