
User Manual Ver.1.0 (English)
Page 13
... storage Safety Precautions Electricity and Safety Installation and Safety Operation and Safety Correct posture to use the product PREPARATIONS 18 18 19 20 20 22 23 23 24 25 26 Checking the Contents Removing the Packaging Checking the Components Parts Frontal Buttons Reverse Side Installation Attaching the Stand Adjusting the Product Tilt...
... storage Safety Precautions Electricity and Safety Installation and Safety Operation and Safety Correct posture to use the product PREPARATIONS 18 18 19 20 20 22 23 23 24 25 26 Checking the Contents Removing the Packaging Checking the Components Parts Frontal Buttons Reverse Side Installation Attaching the Stand Adjusting the Product Tilt...
User Manual Ver.1.0 (English)
Page 23
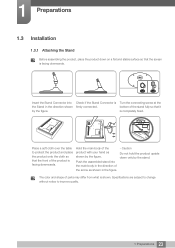
... cloth so that the front of the stand fully so that the screen is firmly connected. Place a soft cloth over the table to improve quality. 23 1 Preparations Hold the main body of the product with your hand as shown in the figure. - 1 Preparations 1.3 Installation 1.3.1 Attaching the Stand Before assembling the product...
... cloth so that the front of the stand fully so that the screen is firmly connected. Place a soft cloth over the table to improve quality. 23 1 Preparations Hold the main body of the product with your hand as shown in the figure. - 1 Preparations 1.3 Installation 1.3.1 Attaching the Stand Before assembling the product...

User Manual Ver.1.0 (English)
Page 62
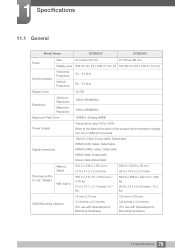
... front of 1 to display the Key Guide. This menu is available only when Off Timer On/Off is set within a range of the product to 23 hours. 7 Setup and Reset 7.5 Off Timer Setting The off after the specified number of hours. Next, press [MENU] to display the corresponding menu screen. 2 Press...
... front of 1 to display the Key Guide. This menu is available only when Off Timer On/Off is set within a range of the product to 23 hours. 7 Setup and Reset 7.5 Off Timer Setting The off after the specified number of hours. Next, press [MENU] to display the corresponding menu screen. 2 Press...
User Manual Ver.1.0 (English)
Page 79
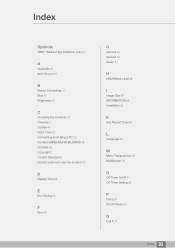
... vary in different countries. 15pin-to-15pin D-sub cable, Detachable HDMI to DVI Cable, Detachable HDMI to 240V. 11 Specifications 11.1 General Model Name S23B550V S27B550V Panel Size 23 Inches (58 cm) 27 Inches (68 cm) Display area 509.76 mm (H) x 286.74 mm (V) 597.89 mm (H) x 336.31 mm (V) Synchronization Horizontal...
... vary in different countries. 15pin-to-15pin D-sub cable, Detachable HDMI to DVI Cable, Detachable HDMI to 240V. 11 Specifications 11.1 General Model Name S23B550V S27B550V Panel Size 23 Inches (58 cm) 27 Inches (68 cm) Display area 509.76 mm (H) x 286.74 mm (V) 597.89 mm (H) x 336.31 mm (V) Synchronization Horizontal...
User Manual Ver.1.0 (English)
Page 93
... Source 65 B Before Connecting 31 Blue 52 Brightness 39 C Checking the Contents 18 Cleaning 3 Coarse 45 Color Tone 53 Connecting and Using a PC 32 Contact SAMSUNG WORLDWIDE 85 Contrast 40 Copyright 2 Correct Disposal 90 Correct posture to use the product 12 D Display Time 66 E Eco Saving 60 F Fine 46 G Gamma 54... General 79 Green 51 H HDMI Black Level 48 I Image Size 56 INFORMATION 68 Installation 23 K Key Repeat Time 64 L Language 59 M Menu Transparency 67 MultiScreen 72 O Off Timer OnOff 61 Off Timer Setting 62 P Parts 20 PC/AV Mode 63...
... Source 65 B Before Connecting 31 Blue 52 Brightness 39 C Checking the Contents 18 Cleaning 3 Coarse 45 Color Tone 53 Connecting and Using a PC 32 Contact SAMSUNG WORLDWIDE 85 Contrast 40 Copyright 2 Correct Disposal 90 Correct posture to use the product 12 D Display Time 66 E Eco Saving 60 F Fine 46 G Gamma 54... General 79 Green 51 H HDMI Black Level 48 I Image Size 56 INFORMATION 68 Installation 23 K Key Repeat Time 64 L Language 59 M Menu Transparency 67 MultiScreen 72 O Off Timer OnOff 61 Off Timer Setting 62 P Parts 20 PC/AV Mode 63...
