

User Manual
Page 2
... 15 Operations 29 Feature panel 29 Special features 34 Maintenance 36 Door reversal (applicable models only) 36 Handle and care 49 Cleaning 51 Replacement 51 Troubleshooting 52 General 52 Do you hear abnormal sounds from the refrigerator? 55 LIMITED WARRANTY (U.S.A.) 57 SAMSUNG REFRIGERATOR 57 Warranty Information (CANADA) 60 If your refrigerator needs service...
... 15 Operations 29 Feature panel 29 Special features 34 Maintenance 36 Door reversal (applicable models only) 36 Handle and care 49 Cleaning 51 Replacement 51 Troubleshooting 52 General 52 Do you hear abnormal sounds from the refrigerator? 55 LIMITED WARRANTY (U.S.A.) 57 SAMSUNG REFRIGERATOR 57 Warranty Information (CANADA) 60 If your refrigerator needs service...

User Manual
Page 18
... of the unit. Leave the legs at least (A) mm from tipping, make sure the leveling leg (A) on the unit. CAUTION • In all cases including door reversal, to raise. The other leveling leg (B) on the unit is on the unit can cause the refrigerator to tip over. Turn the leveling legs clockwise.... • (A) 39 mm for RT18* • (A) 43 mm for stability purposes. Installation STEP 3 Adjust the leveling legs A C B A The refrigerator comes with 3 leveling legs, 1 on the door and 2 on the door is for RT21* Installation 18 English Untitled-4 18 2020-03-17 7:03:18
... of the unit. Leave the legs at least (A) mm from tipping, make sure the leveling leg (A) on the unit. CAUTION • In all cases including door reversal, to raise. The other leveling leg (B) on the unit is on the unit can cause the refrigerator to tip over. Turn the leveling legs clockwise.... • (A) 39 mm for RT18* • (A) 43 mm for stability purposes. Installation STEP 3 Adjust the leveling legs A C B A The refrigerator comes with 3 leveling legs, 1 on the door and 2 on the door is for RT21* Installation 18 English Untitled-4 18 2020-03-17 7:03:18

User Manual
Page 36
... all the small parts (screws, caps, etc.) of 2 people. • Disconnect power source and water line before plugging it in. Maintenance Door reversal (applicable models only) WARNING • Tilting/laying the refrigerator requires minimum of the refrigerator away from children or infants for 15 minutes after it ...is returned to the upright position before reversing the doors. • If the unit is allowed to lay on its back or side for more than an hour, let it stand for ...
... all the small parts (screws, caps, etc.) of 2 people. • Disconnect power source and water line before plugging it in. Maintenance Door reversal (applicable models only) WARNING • Tilting/laying the refrigerator requires minimum of the refrigerator away from children or infants for 15 minutes after it ...is returned to the upright position before reversing the doors. • If the unit is allowed to lay on its back or side for more than an hour, let it stand for ...
User Manual
Page 40
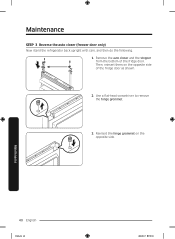
Reinsert the hinge grommet on the opposite side of the fridge door. Maintenance 40 English Untitled-4 40 2020-03-17 7:03:25 Use a flat-head screwdriver to remove the hinge grommet. 3. Remove the auto closer and the stopper from the bottom of the fridge door as shown. 2. Then, reinsert them on the opposite side. Maintenance STEP 3 Reverse the auto closer (freezer door only) Now stand the refrigerator back upright with care, and then do the following. 1.
Reinsert the hinge grommet on the opposite side of the fridge door. Maintenance 40 English Untitled-4 40 2020-03-17 7:03:25 Use a flat-head screwdriver to remove the hinge grommet. 3. Remove the auto closer and the stopper from the bottom of the fridge door as shown. 2. Then, reinsert them on the opposite side. Maintenance STEP 3 Reverse the auto closer (freezer door only) Now stand the refrigerator back upright with care, and then do the following. 1.

User Manual
Page 41
Separate the top hinge from the hinge cover. 4. Pull up to remove the bar cover on the top of the freezer door. 2. STEP 4 Reverse the bar cover and the top hinge 1. Maintenance Untitled-4 41 English 41 2020-03-17 7:03:25 Arrange the door wire in the hinge cover. Remove the top hinge with its cover. 3.
Separate the top hinge from the hinge cover. 4. Pull up to remove the bar cover on the top of the freezer door. 2. STEP 4 Reverse the bar cover and the top hinge 1. Maintenance Untitled-4 41 English 41 2020-03-17 7:03:25 Arrange the door wire in the hinge cover. Remove the top hinge with its cover. 3.

User Manual
Page 44
Reinsert them on the opposite side. Reverse the middle hinge and insert it on their respective opposite side. 6. Use the flat-head screwdriver to remove both the hinge grommet on one side and the hinge-hole cap on the other side. Gently slide the fridge door into the correction position so that it fits. Gently slide the freezer door into the correction position so that it fits. 7. Maintenance 44 English Untitled-4 44 2020-03-17 7:03:27 Then, tighten the hinge with the screws. 5. Maintenance 4.
Reinsert them on the opposite side. Reverse the middle hinge and insert it on their respective opposite side. 6. Use the flat-head screwdriver to remove both the hinge grommet on one side and the hinge-hole cap on the other side. Gently slide the fridge door into the correction position so that it fits. Gently slide the freezer door into the correction position so that it fits. 7. Maintenance 44 English Untitled-4 44 2020-03-17 7:03:27 Then, tighten the hinge with the screws. 5. Maintenance 4.

User Manual
Page 45
STEP 6 Reverse the bottom hinge 1. Insert the hinge bolt into the bottom hinge plate from the top as shown, and then tighten it until it is securely in place. 3. Maintenance Untitled-4 45 English 45 2020-03-17 7:03:28 Position the bottom hinge plate on the opposite side, and then use two screws to secure and attach the hinge plate as shown, and then tighten it until it is securely in place. 2. Insert the door shaft into the bottom hinge plate from the top as shown.
STEP 6 Reverse the bottom hinge 1. Insert the hinge bolt into the bottom hinge plate from the top as shown, and then tighten it until it is securely in place. 3. Maintenance Untitled-4 45 English 45 2020-03-17 7:03:28 Position the bottom hinge plate on the opposite side, and then use two screws to secure and attach the hinge plate as shown, and then tighten it until it is securely in place. 2. Insert the door shaft into the bottom hinge plate from the top as shown.

User Manual
Page 48
Turn them clockwise by 180 degrees, and then reattach them. Maintenance 48 English Untitled-4 48 2020-03-17 7:03:29 Insert the bar cover. 8. Maintenance 7. Remove the fridge door and freezer door gaskets. In that case, refer to the instructions on the previous pages, but switch the doors, hinges, and covers back to their initial positions. NOTE In the future, you might want to return the doors to their initial position (before the doors were reversed).
Turn them clockwise by 180 degrees, and then reattach them. Maintenance 48 English Untitled-4 48 2020-03-17 7:03:29 Insert the bar cover. 8. Maintenance 7. Remove the fridge door and freezer door gaskets. In that case, refer to the instructions on the previous pages, but switch the doors, hinges, and covers back to their initial positions. NOTE In the future, you might want to return the doors to their initial position (before the doors were reversed).


